Programs Tutorial
Audience: This guide is written for Administrators and Registrars who manage academic configuration, enrollment, reporting, and transcript setup in ampEducator. It’s especially helpful for anyone responsible for building and maintaining Programs, or for schools transitioning from short-term session setups to structured programs for better transcript and reporting accuracy.
Purpose: To explain how to correctly create and manage Programs in ampEducator — including how to configure program details, structure courses and fees, and generate accurate transcripts by program.
Series Overview:This tutorial is Part 2 of the “Academic Sessions & Programs” series.
- Part 1: Academic Sessions Tutorial: How to Structure Terms, Years, and Intakes
- Part 2: Programs Tutorial: Configuring programs, building them, and managing enrollment, audits, and program transcripts.
You can read each part independently, but together they form a complete foundation for setting up your academic structure in ampEducator.
🎥 Tutorial Videos — Program Setup in ampEducator
This tutorial includes two short videos that walk through the core parts of setting up your programs. They’re a helpful visual reference for understanding program configuration and creating new programs, but you can also follow the full written guide below, which walks you through each step and includes additional information and examples.
Introduction
In ampEducator, Programs define the structure and requirements of what a student is studying — whether it’s General English Level 3, IELTS Preparation, or a Diploma in Hospitality Management.
Each program contains the course components a student must complete in order to earn a credential or finish that program. It brings together courses, grading scales, and fees under one organized framework, allowing you to manage progress and reporting at the program level.
For many institutions, especially language schools and training programs, programs can also represent levels or stages of study — for example, English Level 1, Intermediate Business Skills, or Advanced IT Fundamentals. Each level or program contains the courses a student must complete before progressing or earning a credential.
Programs act as the foundation for your academic structure. They connect your courses and sessions, determine how transcripts are generated, and ensure students’ academic records remain consistent over time.
How Programs Work with Sessions and Intakes
Programs work alongside Academic Sessions and Program Intakes to form your school’s complete academic calendar.
- Sessions define when learning takes place — for example, a 2026 academic year.
- Programs define what students are studying — the structured package of courses, components, and requirements a student must complete to finish their studies or earn a credential.
- Intakes define when students begin that program within a session — for example, 2026 Intake 1 (January) or Intake 2 (March).
By linking programs with sessions and intakes, you can easily manage multiple start dates, ongoing enrollments, and organized academic reporting — without having to create new sessions for every small group or course rotation.
Why Programs Are Important for Accurate Reporting and Transcripts
Programs make it possible to track student progress and produce transcripts that reflect complete academic paths, not just individual courses. When programs are structured correctly, ampEducator can automatically calculate GPA, attendance, and completion status — even across multiple sessions.
This structure ensures consistency in academic records, simplifies transcript generation, and allows schools to report on student achievement clearly and accurately — regardless of the type of program or study format.
Programs Overview
Programs are managed from the Programs tab in the main navigation. This page lists all existing programs in your system and provides a quick snapshot of their key details — including status, credential type, duration, and student progress.
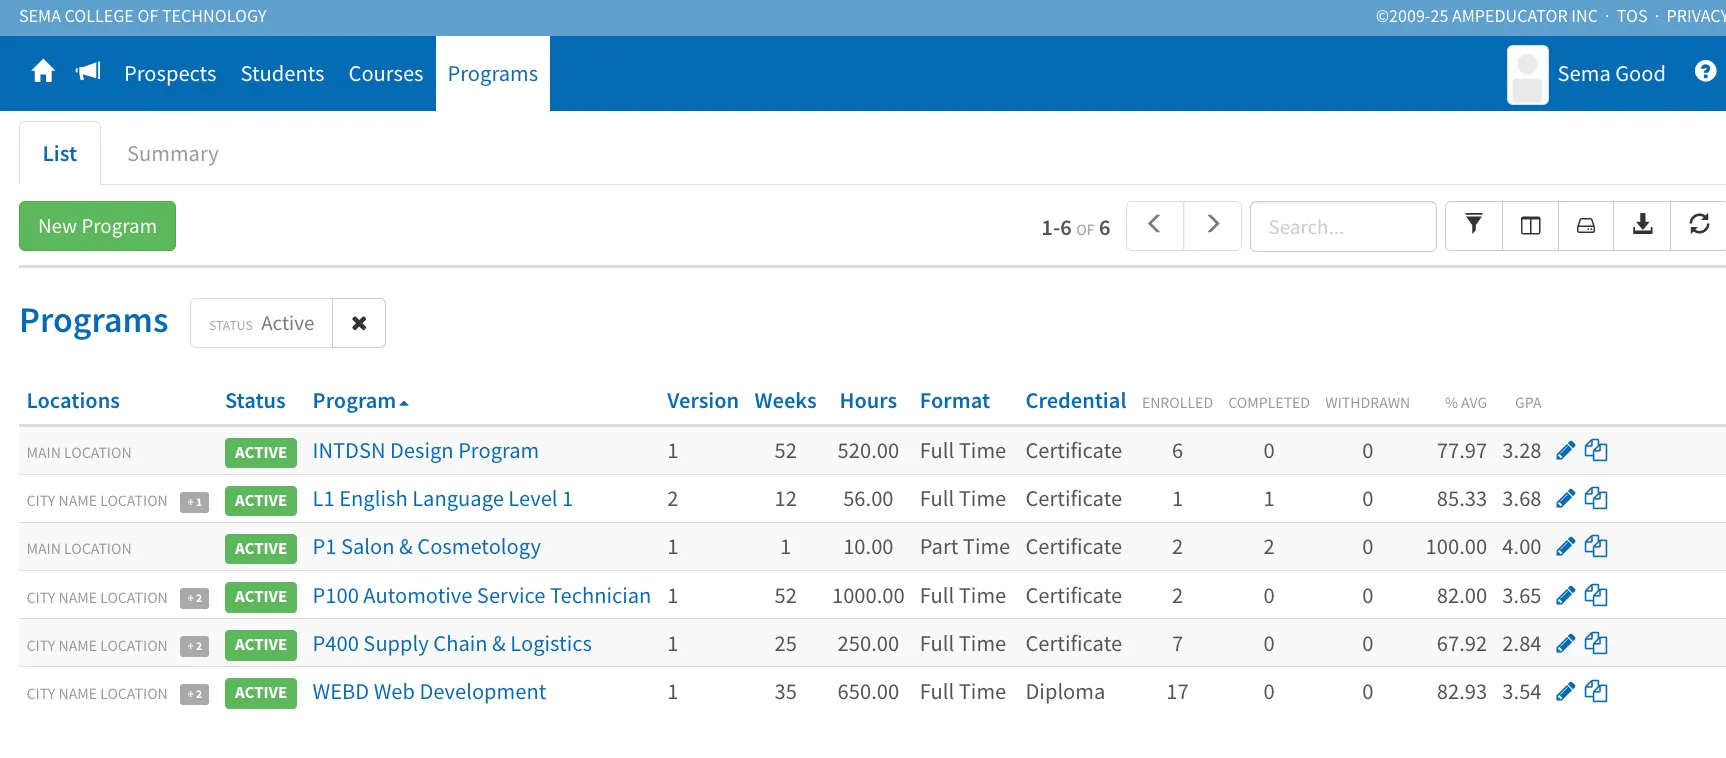
Each program represents a structured set of courses and requirements that a student must complete to finish a level or earn a credential. Depending on your institution, a program might represent a diploma, certificate, or even a single level in a multi-level curriculum.
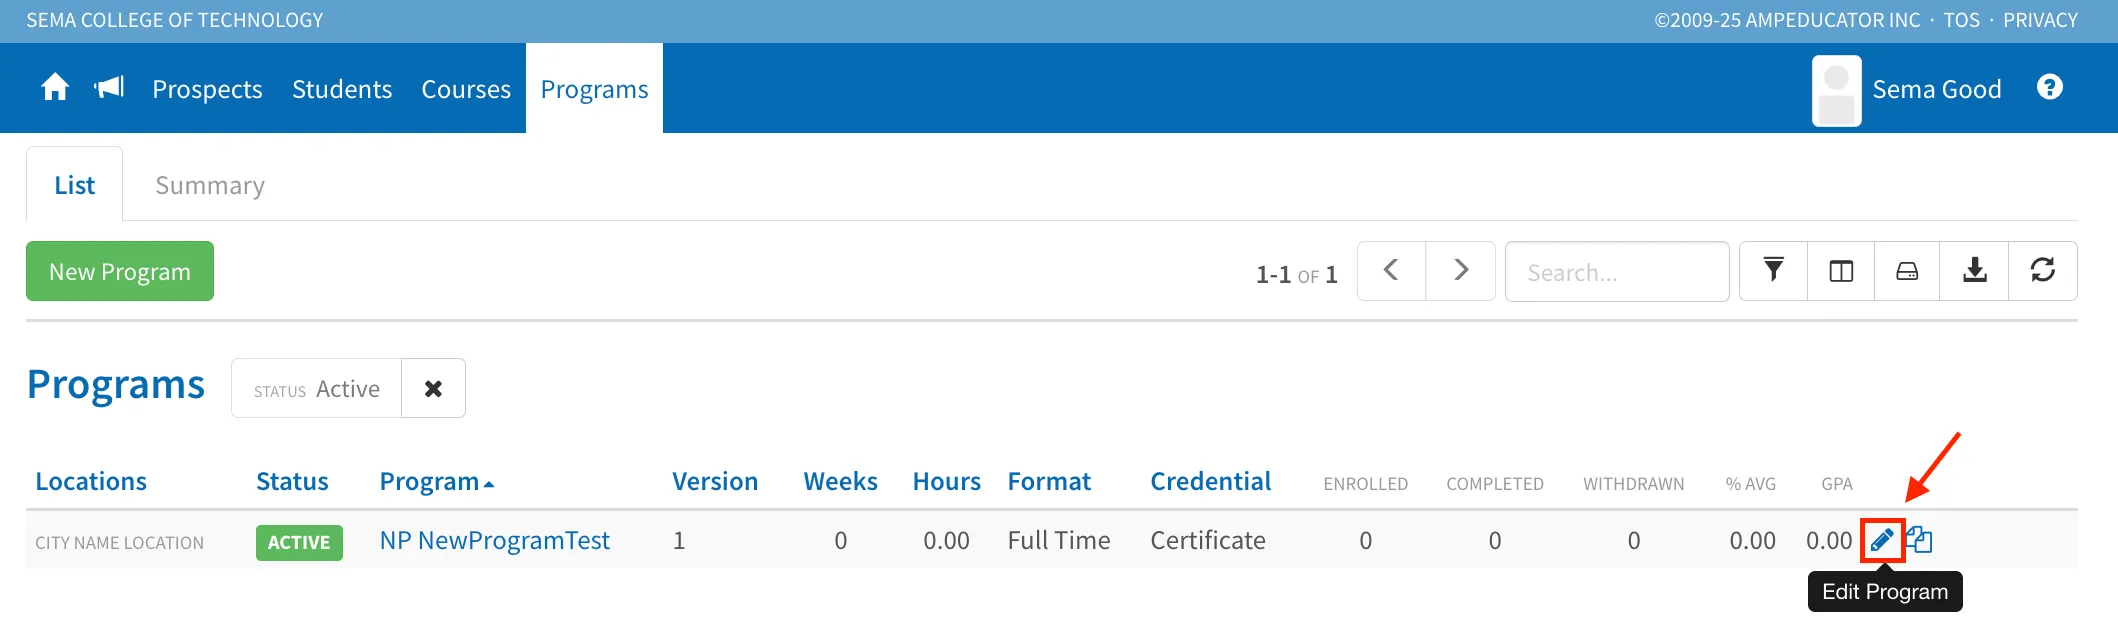
The program list view includes several columns to help you manage and track progress across all programs:
- Location: Indicates which campus or site the program is offered at.
- Status: Shows whether the program is currently active or inactive.
- Program Name: The title of the program, which can be clicked to open its details.
- Version: Useful if your institution revises or updates program requirements.
- Weeks / Hours: Defines the expected length and total instructional hours for the program.
- Format: Identifies whether the program runs full-time or part-time.
- Credential: Displays the type of award the student receives upon completion.
- Enrolled / Completed / Withdrawn: Tracks the number of students currently in progress, finished, or withdrawn from the program.
- % Avg and GPA: Provide performance summaries for all students within the program.
From here, you can quickly view, edit, or create programs using the action icons on the right.
Before creating a new program, it’s important to first review your Program Configuration. This ensures that the way your programs calculate grades, credits, and audits aligns with your institution’s academic policies.
Program Configuration
Before creating new programs, it’s important to review your Program Configuration settings. These settings apply globally to all programs in your system and define how calculations, fields, and sub-statuses behave.
Program configuration is found under Institution Config → Programs, and it includes three tabs: Defaults, Custom, and Sub Stati.
🎥 Video Walkthrough: Program Configuration
Below, you’ll find a video walkthrough that takes you through each part of the Program Configuration page step by step. If you prefer a more detailed explanation or want to follow along at your own pace, the full written walkthrough continues right below the video.
Defaults Tab
The Defaults tab controls how the system calculates grades, handles repeated and transfer courses, and determines which courses count toward a program audit. These defaults apply across all programs to ensure consistent reporting and transcript data.
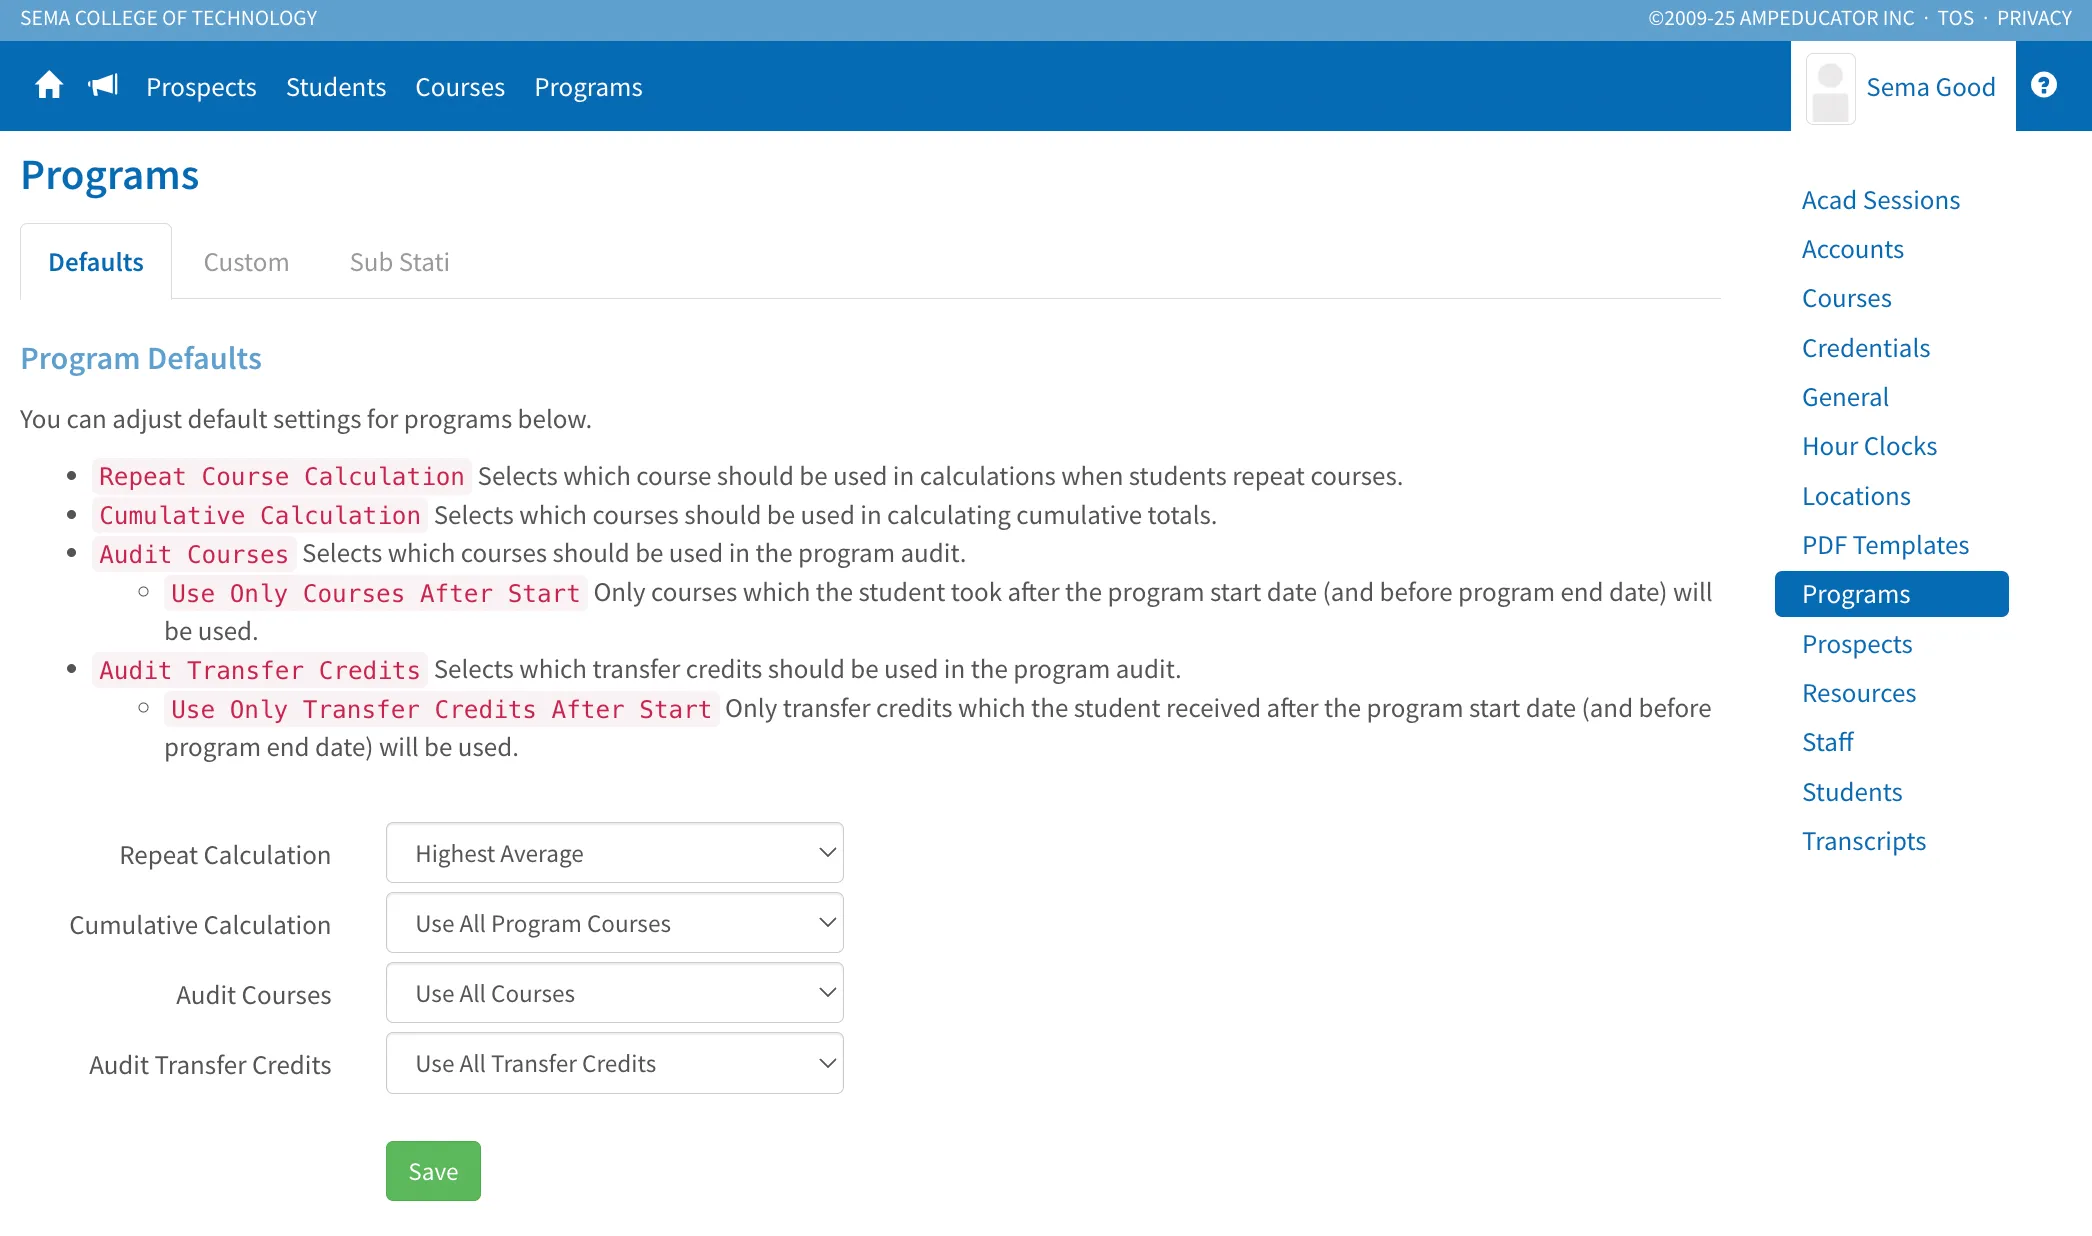
Repeat Course Calculation
Determines which grade should be used when a student repeats a course.
- First – Uses the grade from the first attempt.
- Most Recent – Uses the latest attempt.
- Highest Average – Uses the best result (this is the most common setting).
Cumulative Calculation
Controls which courses are included in cumulative totals like GPA and total credits.
- Use All Program Courses – Includes every course that belongs to the program, even if the student repeated one.
- Use Only Courses Applied – Includes only the course attempts actually applied to the program. For example, if a student repeats HIS100 twice, this setting uses only the attempt the system selected (based on your Repeat Calculation setting, such as Highest Average or Most Recent).
This ensures that duplicate or replaced course attempts don’t inflate totals.
If you’re using “Use Only Courses Applied,” the courses used in the calculation depend on how the Repeat Course Calculation is set. For example, if “Highest Average” is selected, only that best result is included in the cumulative totals.
Audit Courses
Specifies which courses are considered during program audits.
- Use All Courses – Includes all courses the student has taken.
- Use Only Courses After Start – Excludes older courses, counting only those taken after the program start date (useful for transfer students).
If you’re creating Programs after students have already completed courses and you want those courses included in their program audits, make sure to select Use All Courses. Choosing Use Only Courses After Start will exclude any past courses taken before the program’s start date.
Audit Transfer Credits
Determines which transfer credits count in program audits.
- Use All Transfer Credits – Includes all transfer credits on the student’s record.
- Use Only Transfer Credits After Start – Only counts credits earned after the program start date.
After adjusting these options, click Save to apply your settings globally. These defaults can still be overridden for individual programs later if needed.
Custom Tab
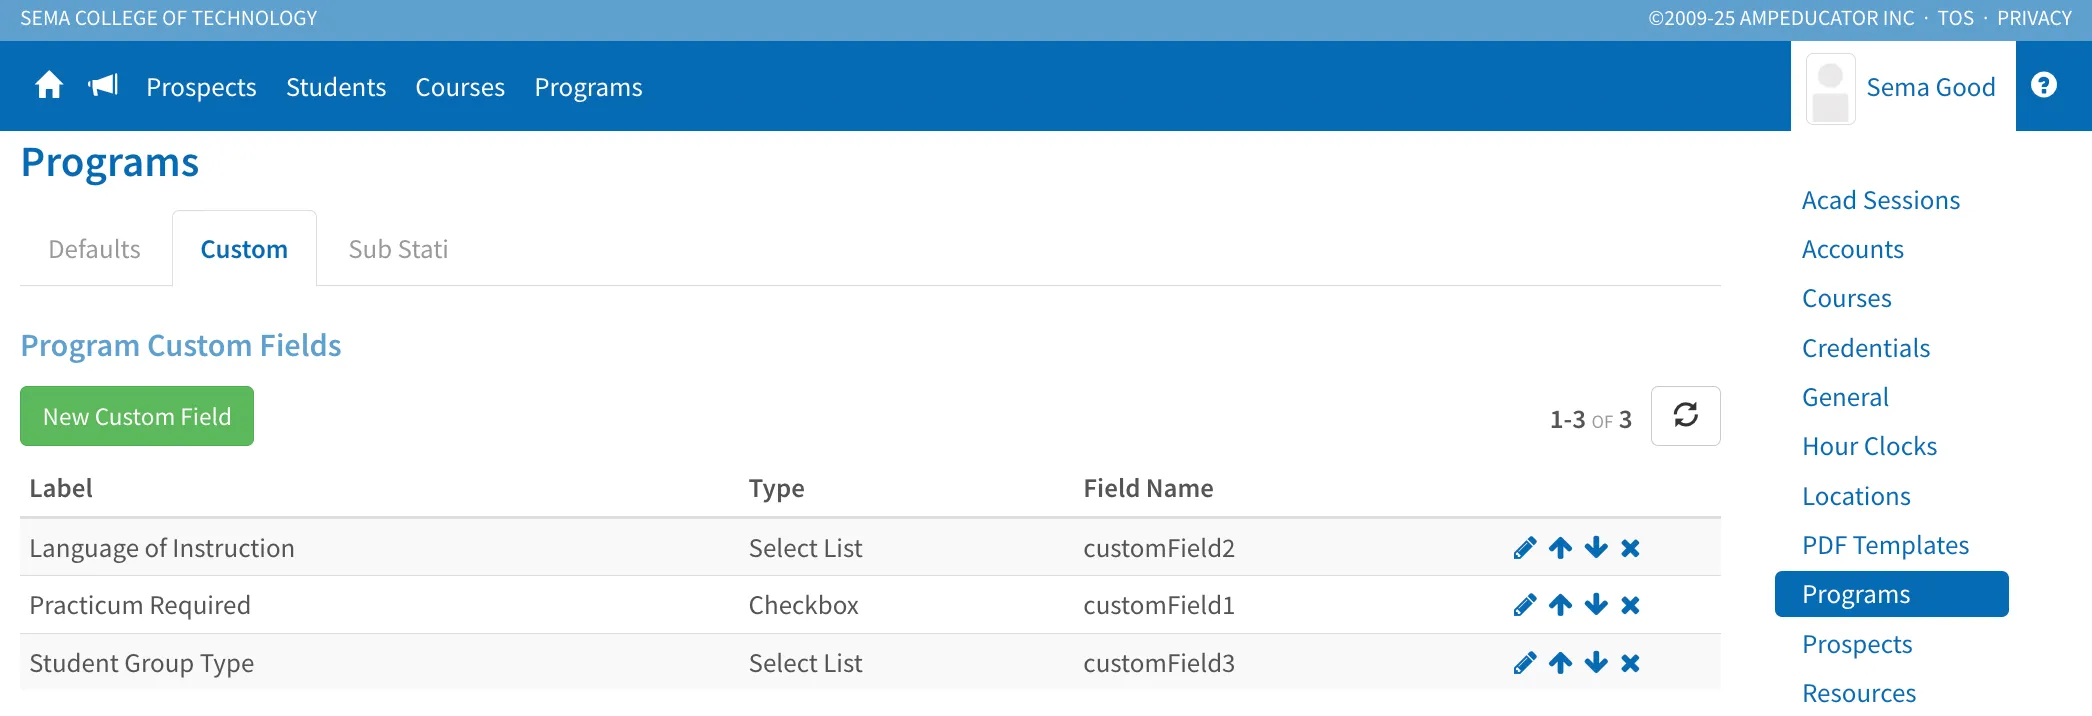
The Custom tab allows you to add up to 20 additional data fields to programs that aren’t part of the default setup. These fields appear at the bottom of the Details section, just above the Program Description, on each Program Profile page. They’re best used for school-specific details that aren’t included in the standard program fields, helping you customize ampEducator for your institution’s needs.
Adding Custom Fields to Programs
Click New Custom Field, and a window will appear where you can create your field.
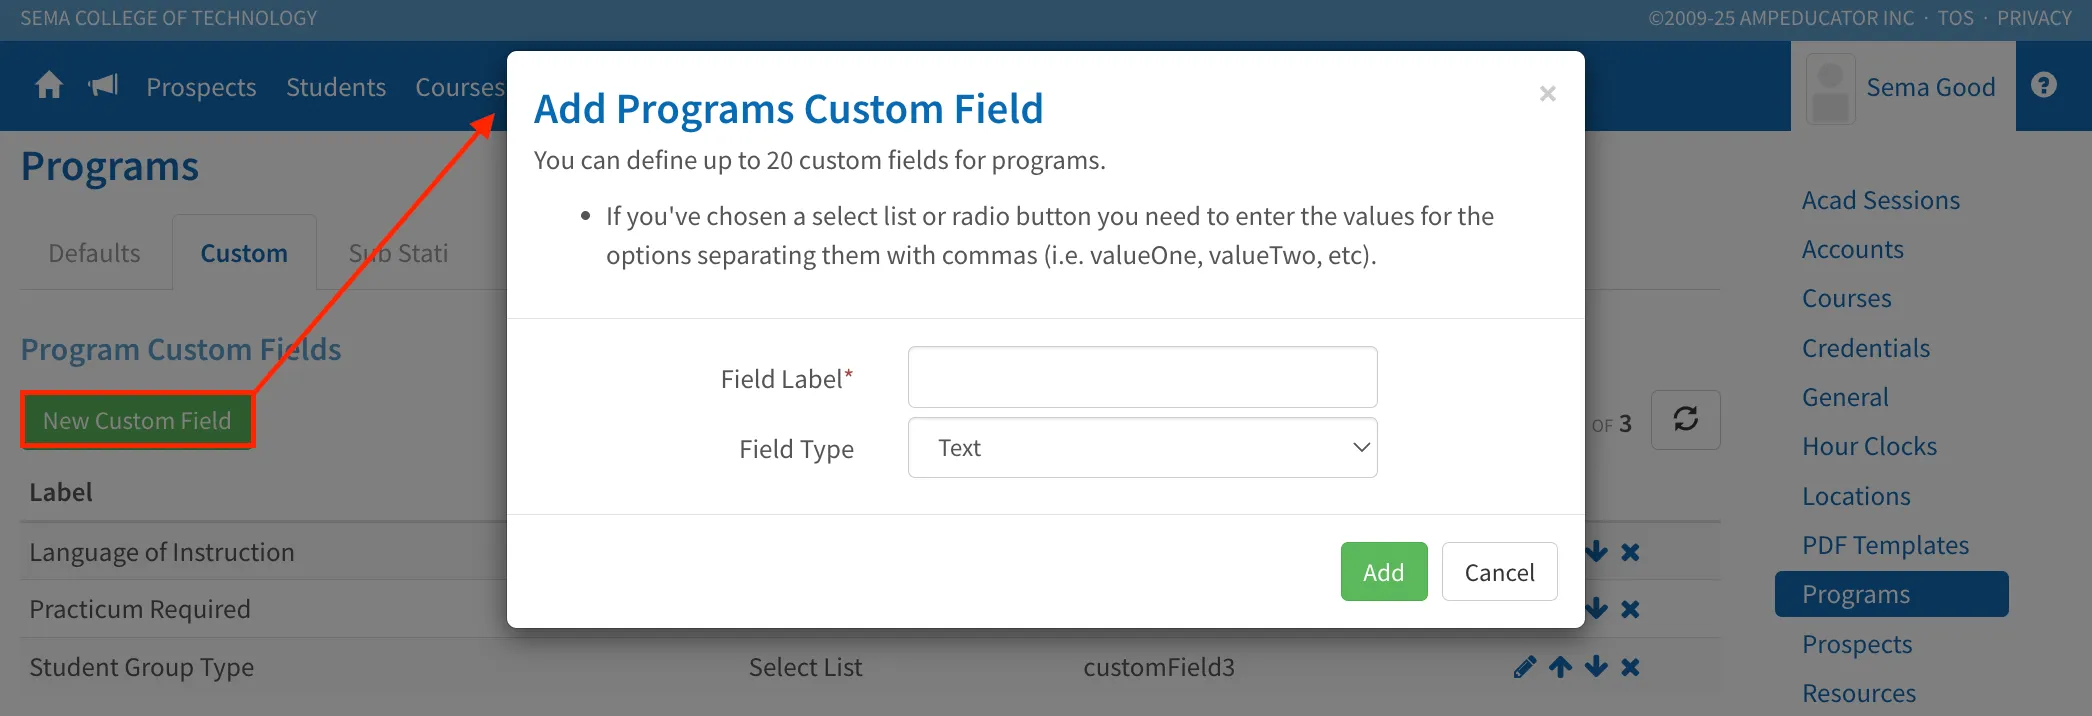
Enter a Field Label — this is the name that will appear on the program profile.
Next, select a Field Type from the dropdown menu:
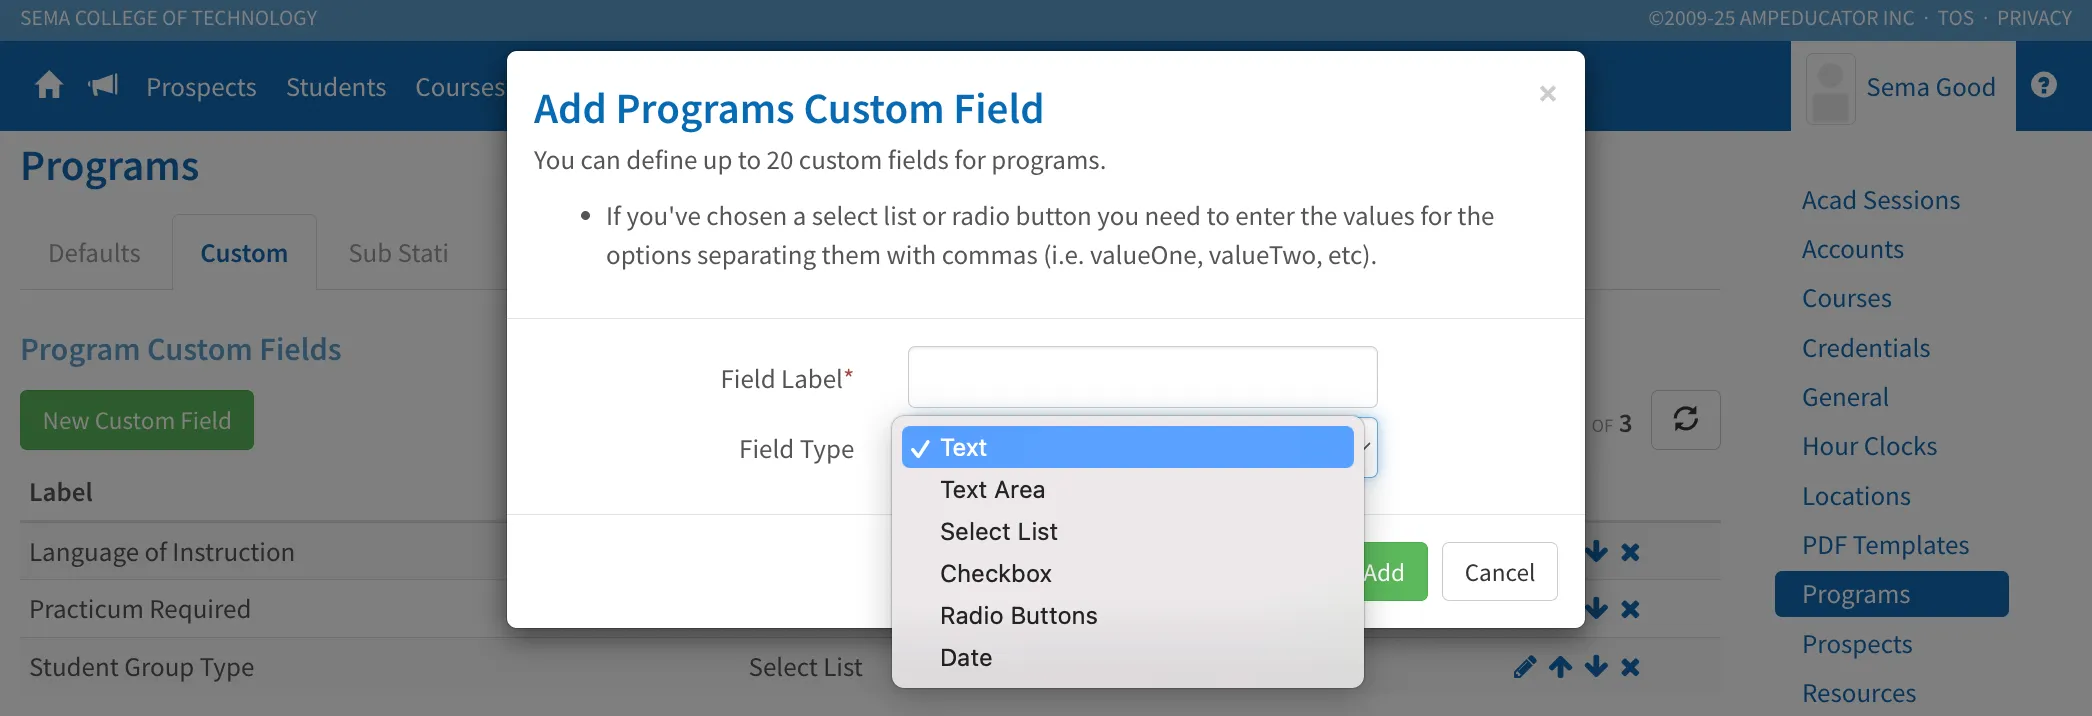
- Text: For short, single-line entries.
- Text Area: For longer notes or descriptions.
- Select List: Creates a dropdown menu with predefined options.
- Checkbox: For yes/no or true/false options.
- Radio Buttons: Allows multiple choices, but only one can be selected.
- Date: Adds a calendar date picker.
If you choose Select List or Radio Buttons, enter your list of options separated by commas (for example: Beginner, Intermediate, Advanced).
Once saved, the field will appear in the Program Custom Fields list, and it will also display at the bottom of the Details section on all program profiles.
Sub Stati Tab
The Sub Stati tab lets you add additional classifications under each main program status. This helps track more specific enrollment types or outcomes without creating entirely new statuses.
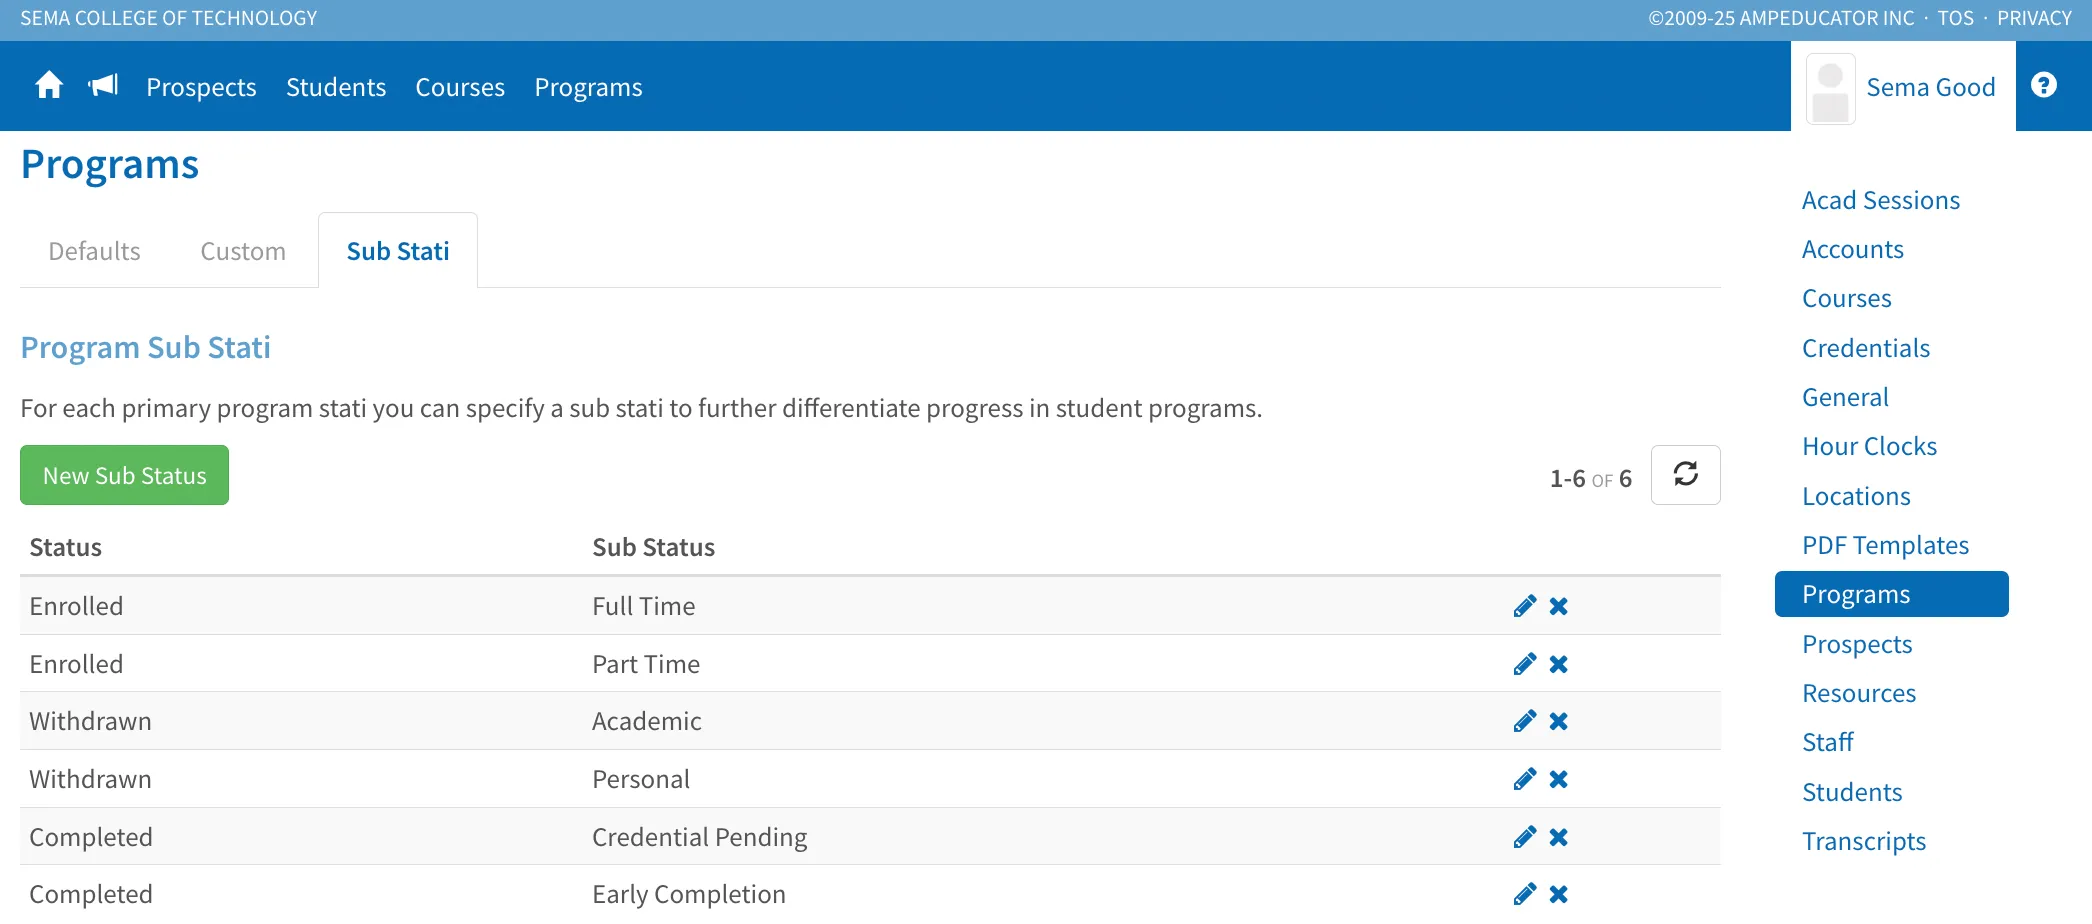
Once set up, sub-statuses can be assigned when enrolling, updating, completing, or withdrawing a student from a program. They appear in the Student List, on Transcripts, and in View Student Program — helping you report and track student progress more precisely.
Creating a New Sub Status
Click New Sub Status to open the setup window.
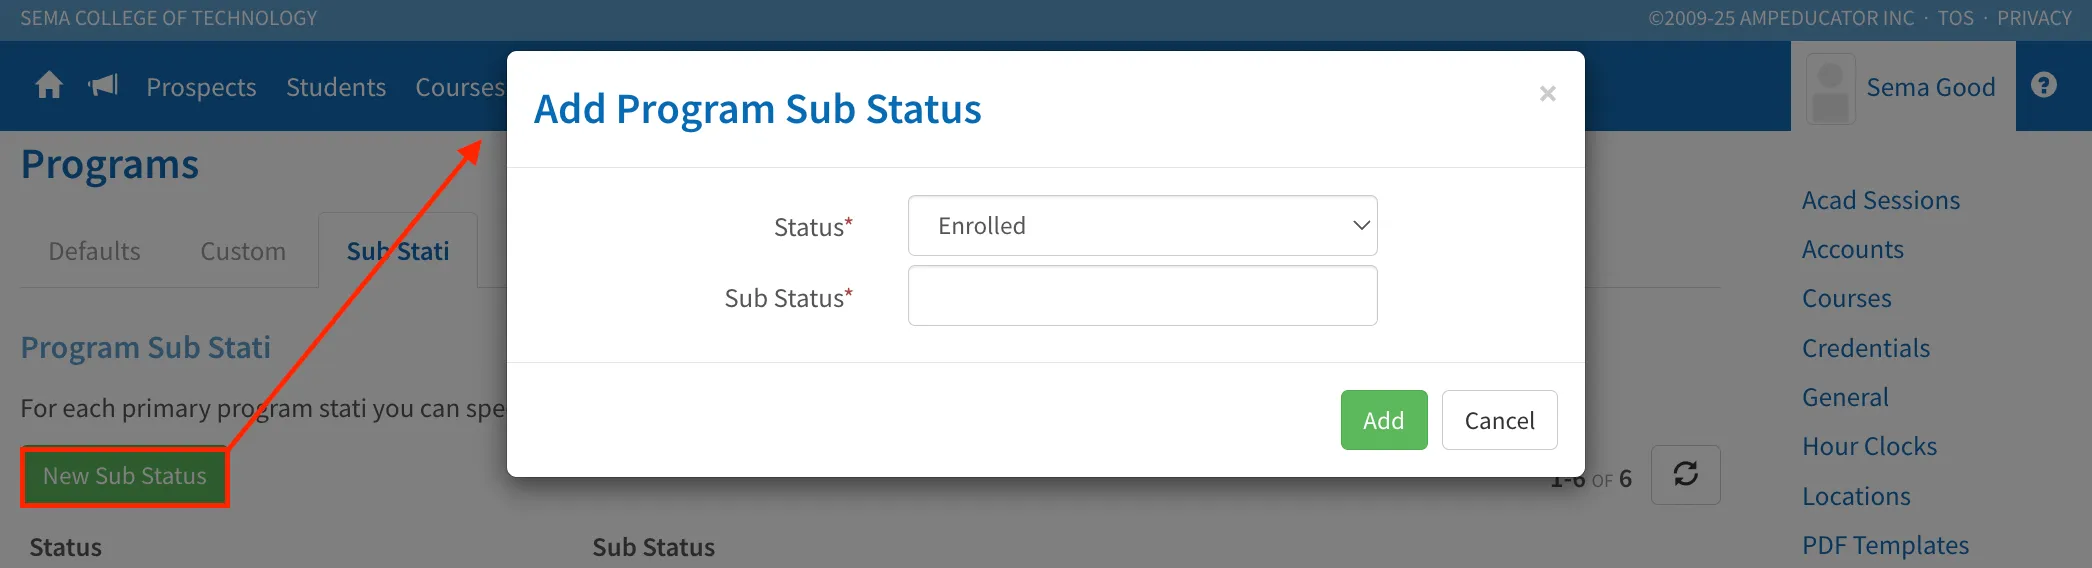
Choose the Status from the list — Enrolled, Completed, or Withdrawn. These are the three main program statuses that sub-statuses can be added under.
Then, enter the Sub Status name that provides more specific detail about the student’s situation or progress within that main status.
Press Add to save your new sub-status. It will appear in the Program Sub Stati list and can be selected when enrolling, updating, completing, or withdrawing a student from a program. Sub-statuses also display in the Student List, on Transcripts, and in View Student Program.
Once your Program Configuration is set up the way you want, you can move on to creating your individual programs. You can always make changes to your configuration later if needed — just remember to recalculate your program totals afterward for any updates to take effect.
Creating and Customizing a New Program
This section walks you through the full process of creating and customizing a new program in ampEducator. The video below provides a detailed, step-by-step demonstration of every field and setting you’ll use during setup. If you’d like even more explanation or prefer to follow along at your own pace, the written guide beneath the video breaks down each part in additional detail.
🎥 Video Walkthrough: Creating and Customizing a New Program
Creating a New Program
Click New Program to open the setup window. In the New Program modal, enter the following details:
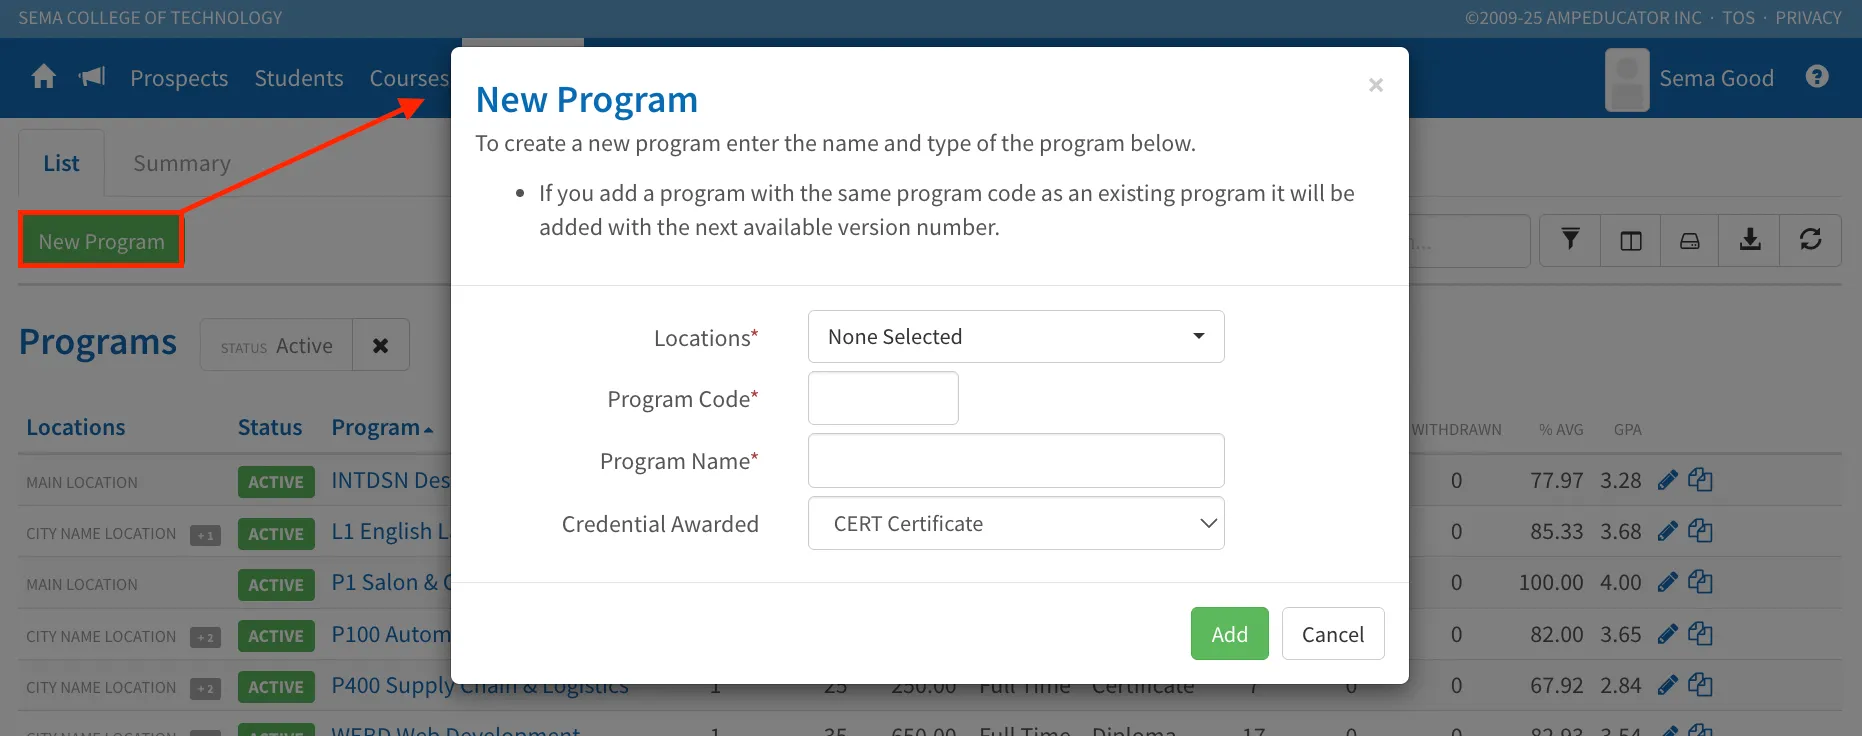
- Location: Select the campus or site where this program is offered.
- Program Code: A unique identifier for the program (for example, BUS100 or ENG-LVL1).
- Program Name: The full name of the program as it will appear on reports and transcripts.
- Credential Awarded: Choose the credential type that students receive upon completion — such as Certificate, Diploma, or Degree. These options are pulled from the Institution Config → Credentials settings.
Once complete, click Add to create the program. If you enter a Program Code that already exists, ampEducator will automatically create a new version of that program using the next available version number.
Customizing the Program Profile
Once you’ve created a new program, you can edit its settings through the Program Profile. This is where you’ll define how the program functions — including key academic details, grading and attendance rules, and custom fields unique to your institution.
To open a program profile, go to Programs, then click the Edit (✏️) icon next to the program you want to update.
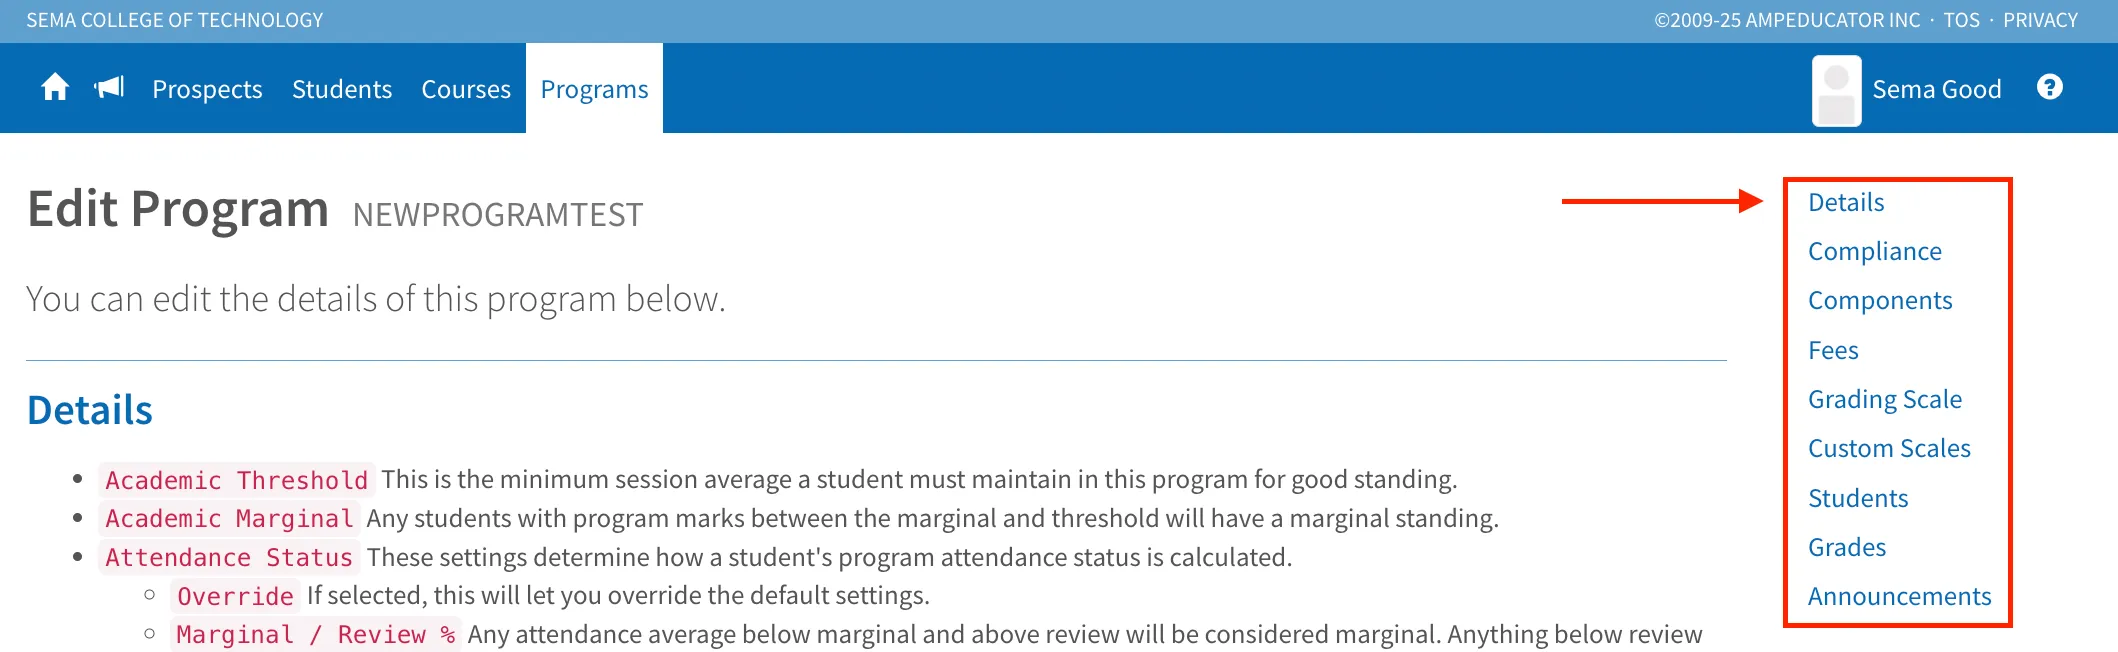
At the top of the page, you’ll see several tabs that organize different areas of program configuration. We’ll go through these sections one by one below.
Program Details
The Details tab defines your program’s structure, academic requirements, and how it displays throughout ampEducator.
General Information
The fields in this section define the basic setup information that identifies each program within your institution.
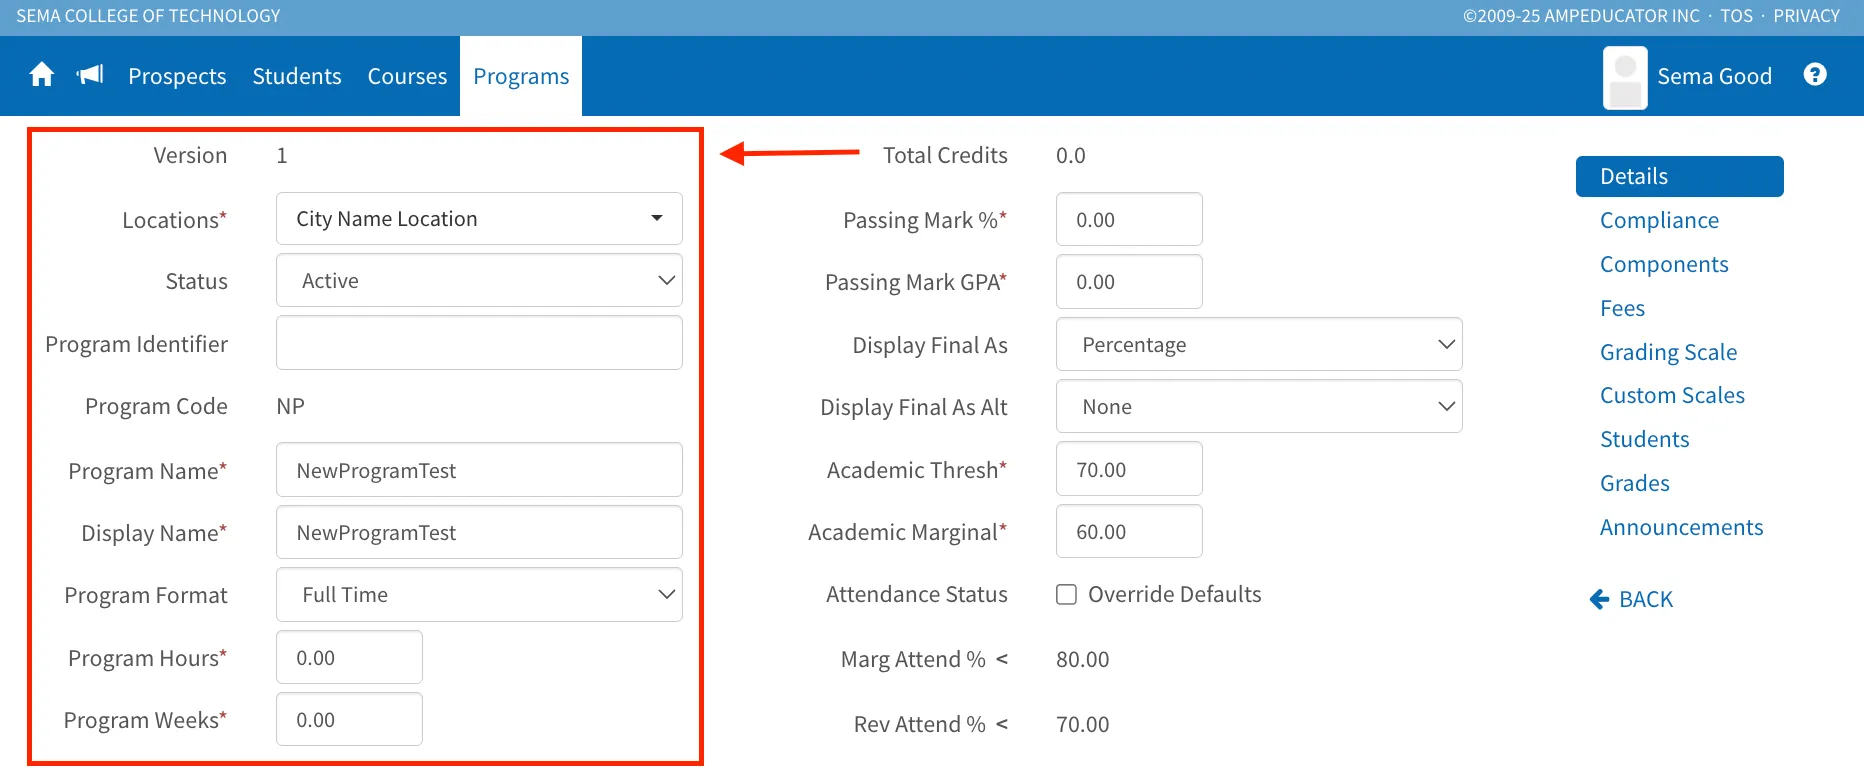
Version: This number is automatically assigned when a program is created. Each time you copy a program using the quick action on the Programs list, a new version is created and the version number increases by one.
Location: Select the campus or site where the program is offered. Students must be assigned to the same location in order to be enrolled in this program. This setting is especially important for institutions with multiple campuses or delivery sites.
Status: Set to Active or Inactive.
Program Identifier: Optional field for internal use. For example, to distinguish between different delivery types or scheduling variations of the same program.
Program Code: The short unique code used across the system.
Program Name / Display Name: The official program name and how it appears on documents.
Program Format: Choose Full Time or Part Time.
Program Hours / Weeks: Enter the total instructional hours and duration of the program in weeks. It’s important to record these accurately, as they’re used for transcript calculations and attendance reporting.
Academic Settings
These fields define how student performance and academic standing are evaluated within the program.
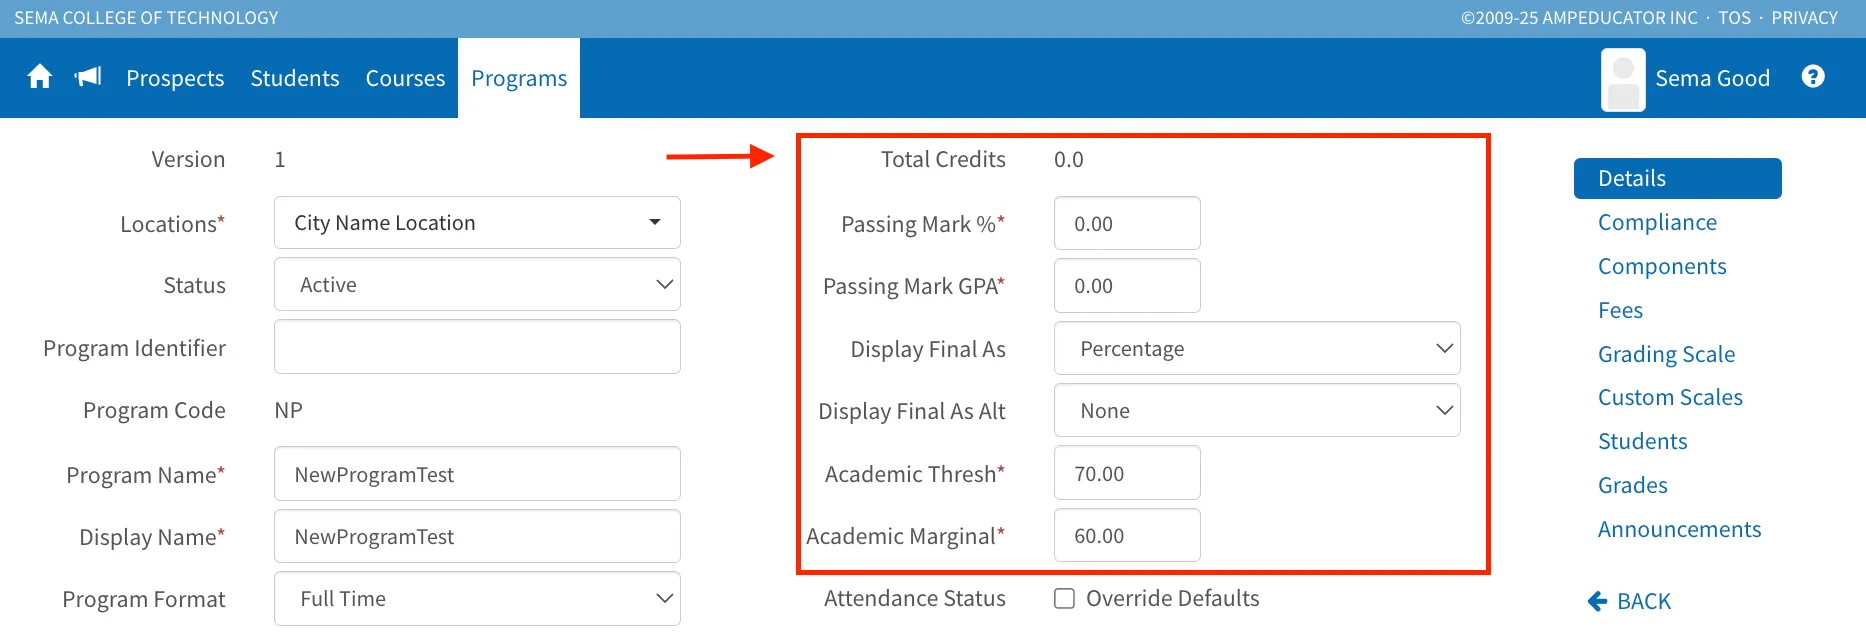
Total Credits: Displays the combined credit value of all courses linked to the program. This updates automatically as you add or edit program components.
Passing Mark % / Passing Mark GPA: Enter both a percentage and GPA value to define the minimum grade required to pass the program. These values are linked to your grading scale setup, which determines how percentages and GPA correspond to letter grades on reports and transcripts.
Display Final As: Choose how the final grade for the program will appear — for example, Percentage, Grade Point, Letter Grade, Pass/Fail, or Custom.
Display Final As Alt: Optional. Allows you to show an alternate grade format in addition to the main display type (for example, Percentage and Letter Grade).
Academic Threshold: Defines the minimum average a student must maintain to remain in good academic standing. This value automatically fills in based on your default settings but can be adjusted for individual programs.
Academic Marginal: Sets the lower boundary for marginal performance. Students with averages between this value and the academic threshold are marked as Marginal, while anything below this value is considered Review status. Like the threshold, this value is pre-filled from your defaults but can be customized as needed for the program.
Attendance Settings
Attendance rules determine how a student’s attendance status is evaluated within the program.
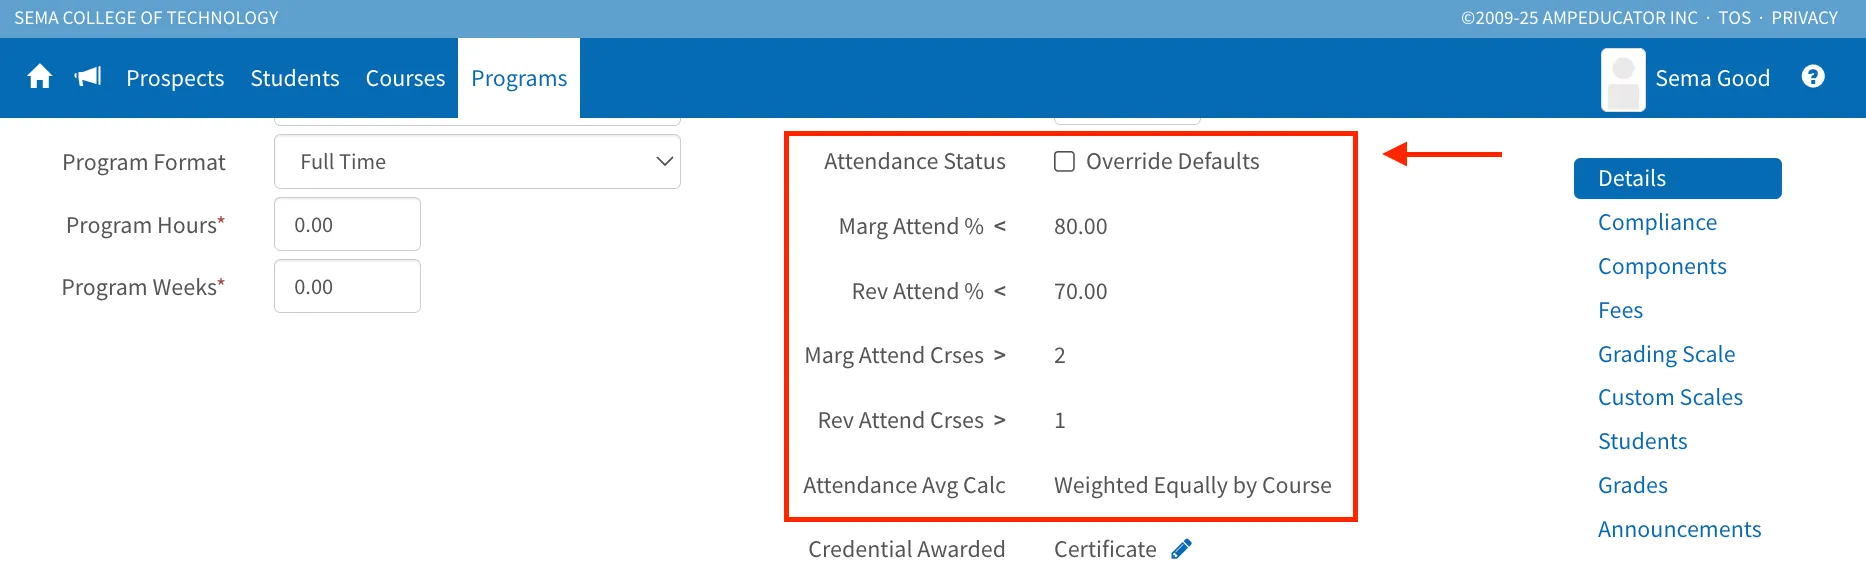
Override Defaults: Select this option to enable custom attendance settings for the program. When unchecked, the program uses the institution’s default attendance rules pulled from Institution Config / Students / Attendance.
Marg Attend % <: Defines the attendance percentage below which a student’s status becomes Marginal.
Rev Attend % <: Defines the attendance percentage threshold below which a student’s status becomes Review.
Marg Attend Crses >: Determines the number of courses a student can fall below the Marginal Attendance threshold before their overall program attendance status changes to Review.
Rev Attend Crses >: The number of courses a student can fall below the Review Attendance threshold before being placed in Review status.
Attendance Avg Calc: Defines how attendance is weighted when calculating the program average:
- Weighted Equally by Course: Each course contributes equally to the attendance average, regardless of credits or hours.
- Weighted by Course Credits: Attendance is weighted according to each course’s assigned credit value.
- Weighted by Course Hours: Attendance is weighted based on the total instructional hours of each course.
- Weighted by Course Hours Delivered: Attendance is weighted by the hours actually delivered, useful for variable-hour or modular courses.
Credentials and Distinction
This section defines how the program is recognized upon completion and how academic honors are applied. These settings control the credential students earn and any distinctions that appear on their transcripts.
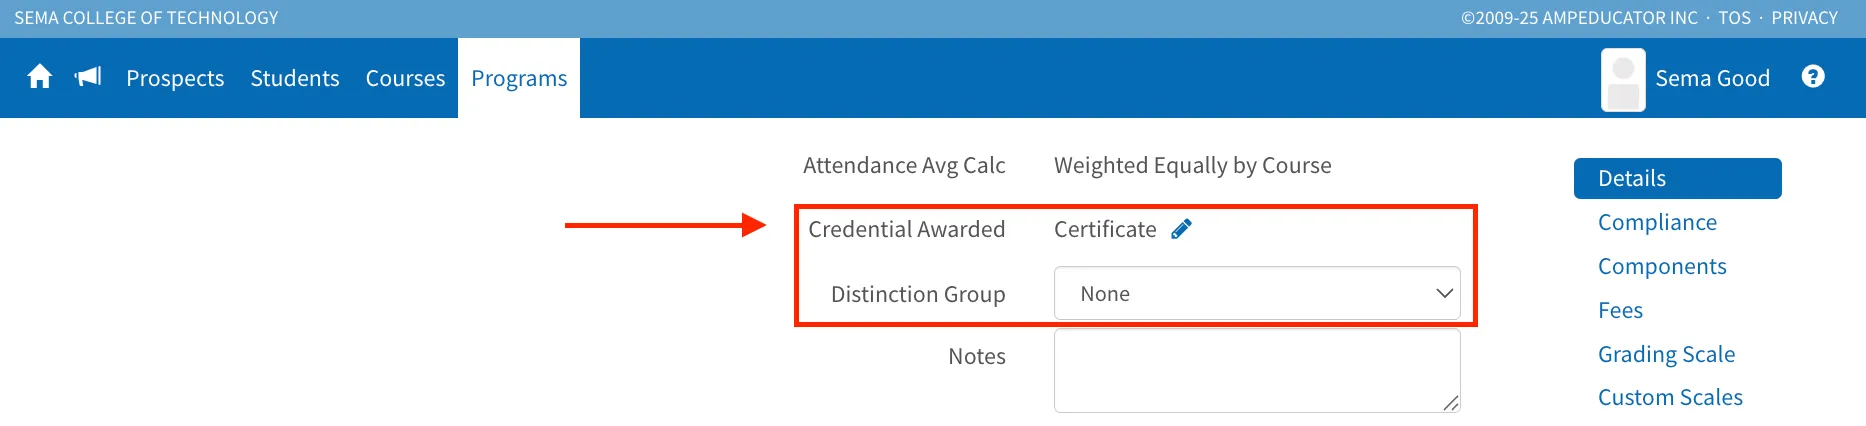
Credential Awarded: Select the credential students will receive upon completing the program — for example, Certificate, Diploma, or Degree. The available options are configured under Institution Config / Credentials.
Distinction Group: Choose the distinction that can be applied to students who meet specific academic achievement criteria (for example, With Distinction or Honors). Distinction groups are configured under Institution Config / Students / Academic and appear on transcripts when applicable.
Notes, Custom Fields, and Program Description
This final section lets you record internal details or additional information about the program. You can add notes for staff reference, include any custom fields you’ve configured, and provide a full program description.
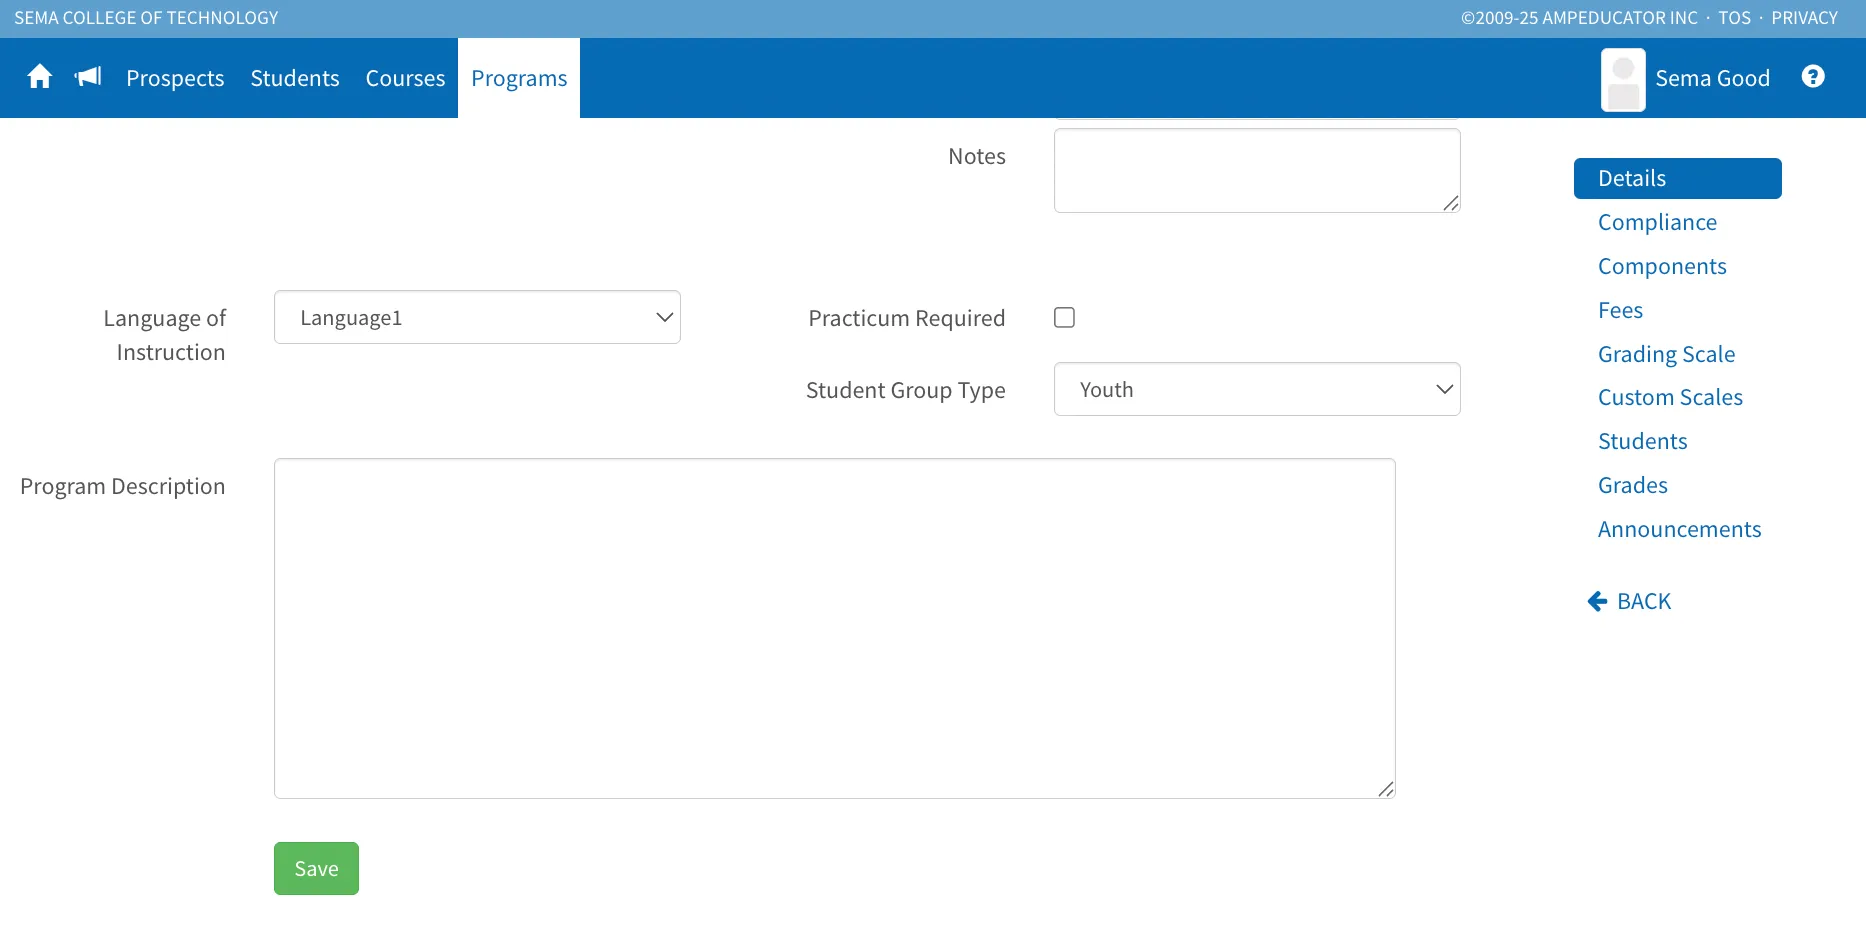
Notes: Add any internal comments or administrative notes related to the program. Notes are visible only to staff and do not appear on transcripts or student-facing documents.
Custom Fields: Any custom fields you’ve added inInstitution Config / Programs / Custom will appear here. These allow your institution to collect additional program-specific information beyond the default options (for example, language of instruction, practicum requirement, or student group type).
Program Description: Add a summary or overview of the program. This field is primarily for internal use but can also be used as a merge field in templates and custom documents.
Compliance
The Compliance section is used by institutions in Ontario and British Columbia that have requested ampEducator to enable compliance tracking. It allows you to record the required information for registered programs to meet provincial regulatory reporting standards.
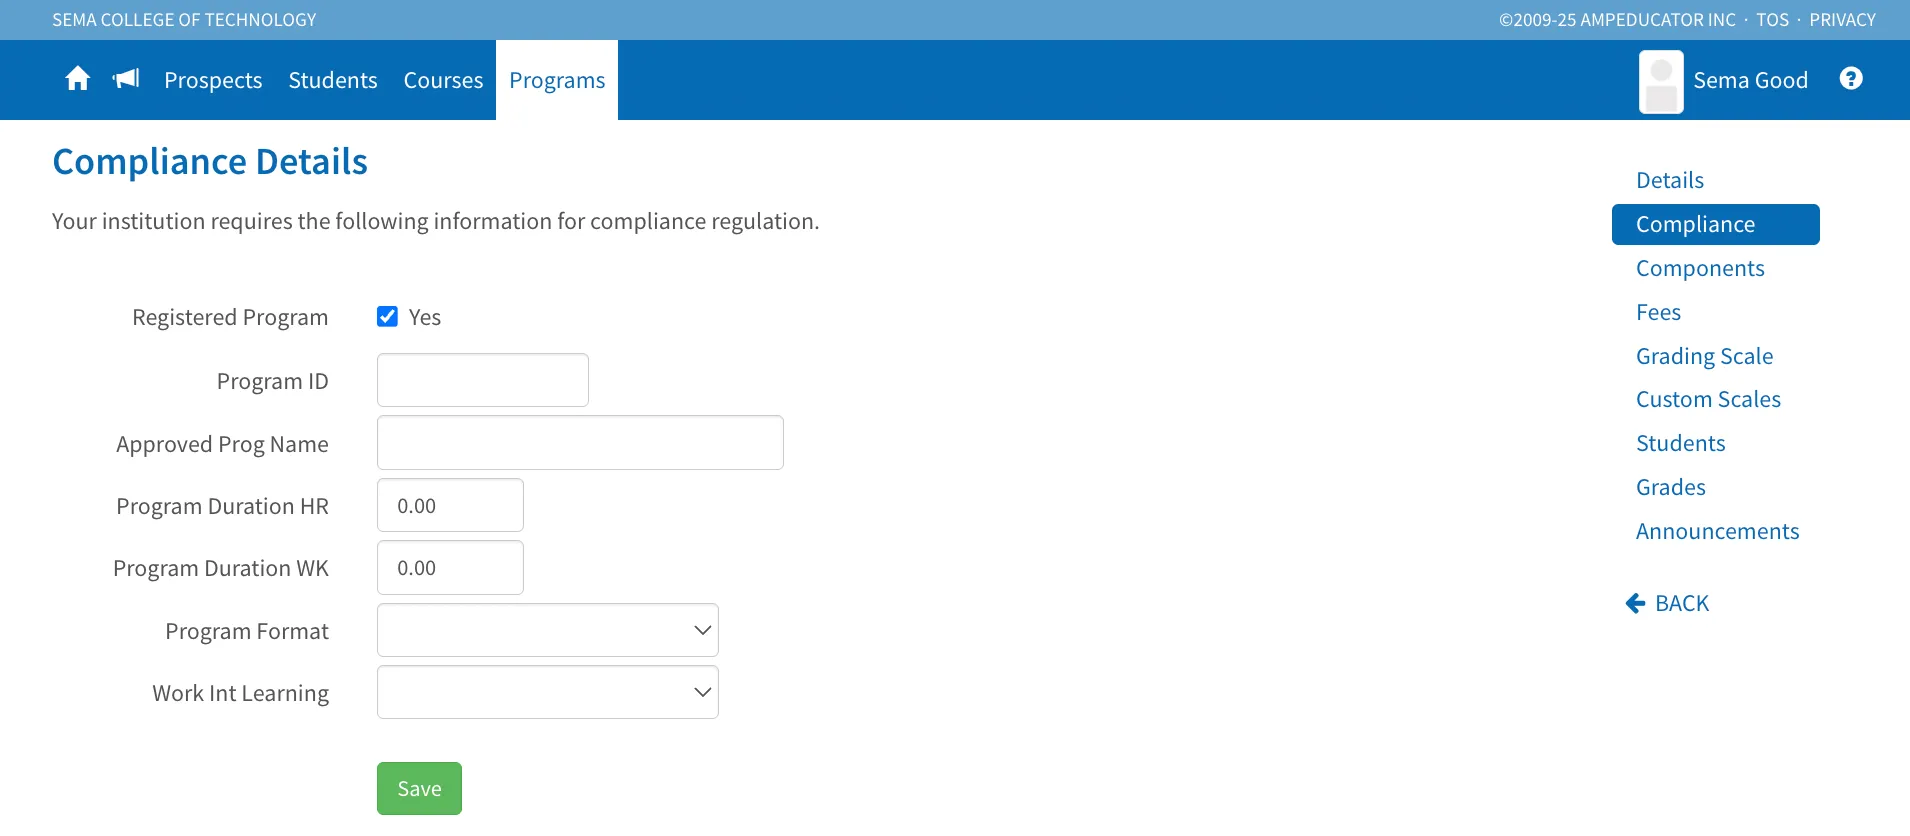
If your institution does not operate in these regions or has not requested compliance tracking to be enabled, this tab will not appear in your Program Profile.
Components
The Components section defines all the courses that make up a program — in other words, everything a student needs to complete to earn their credential.
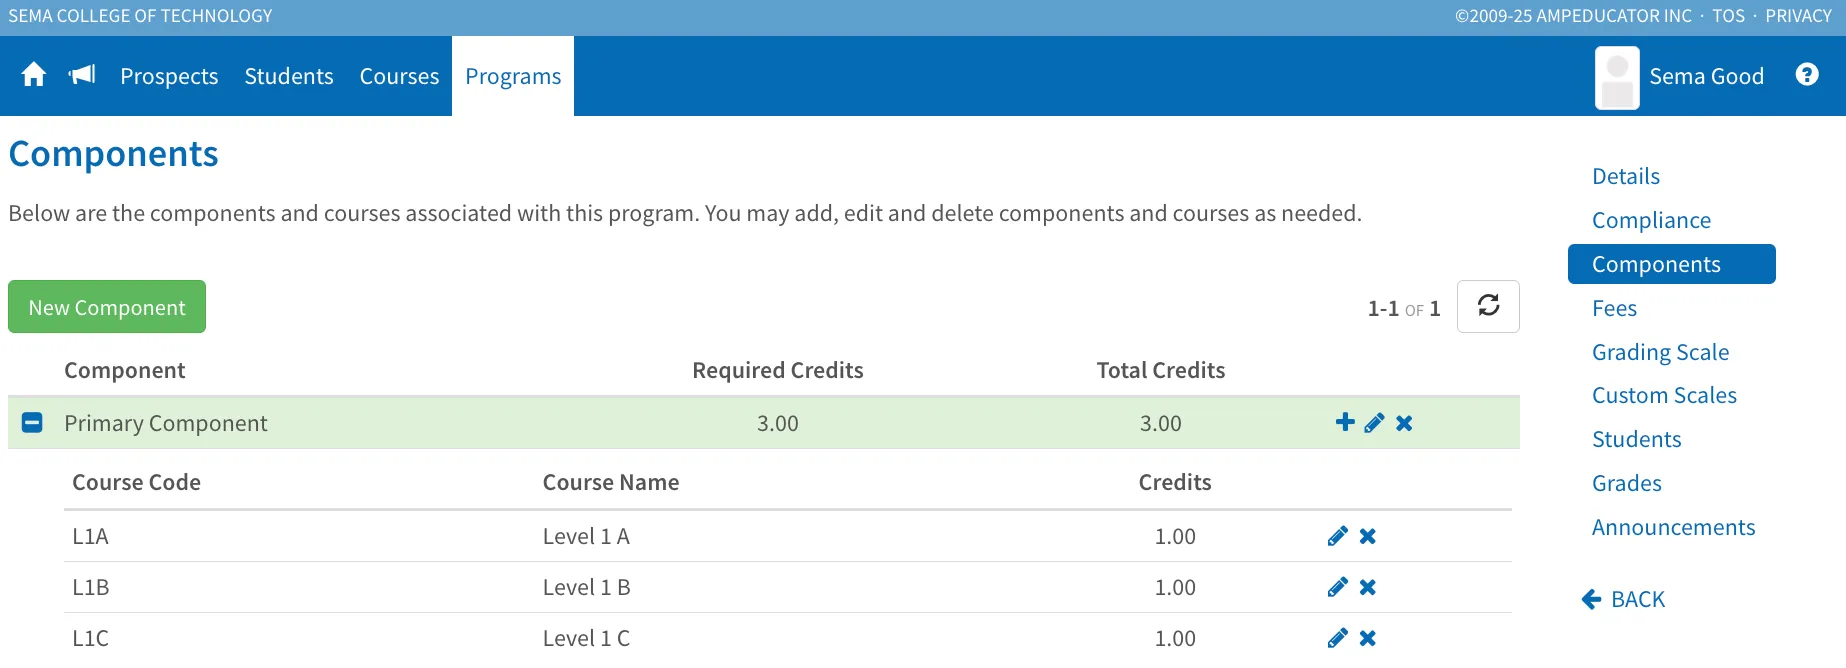
Each program includes at least one Primary Component category, which is created automatically. You can add additional components to separate courses into logical groupings that match how your program is structured — for example, by year, semester, or type (such as Mandatory and Elective).
Within each component, you can set both Required Credits and Total Credits:
- Required Credits specify how many credits students must complete from that component.
- Total Credits represent the total number of courses or credits available within it.
This gives flexibility — for example, if a program offers five electives totaling 5.0 credits, but students are only required to complete 3.0.
Adding Courses to a Component
Every program includes at least one Primary Component, which is automatically created when the program is added. You can start by adding all your program’s courses to this component, then create additional components for better organization if necessary — for example, separating courses by year, semester, or type (Mandatory vs. Elective).
To add courses to a component:
Click the Add Course (+) icon beside the component name.
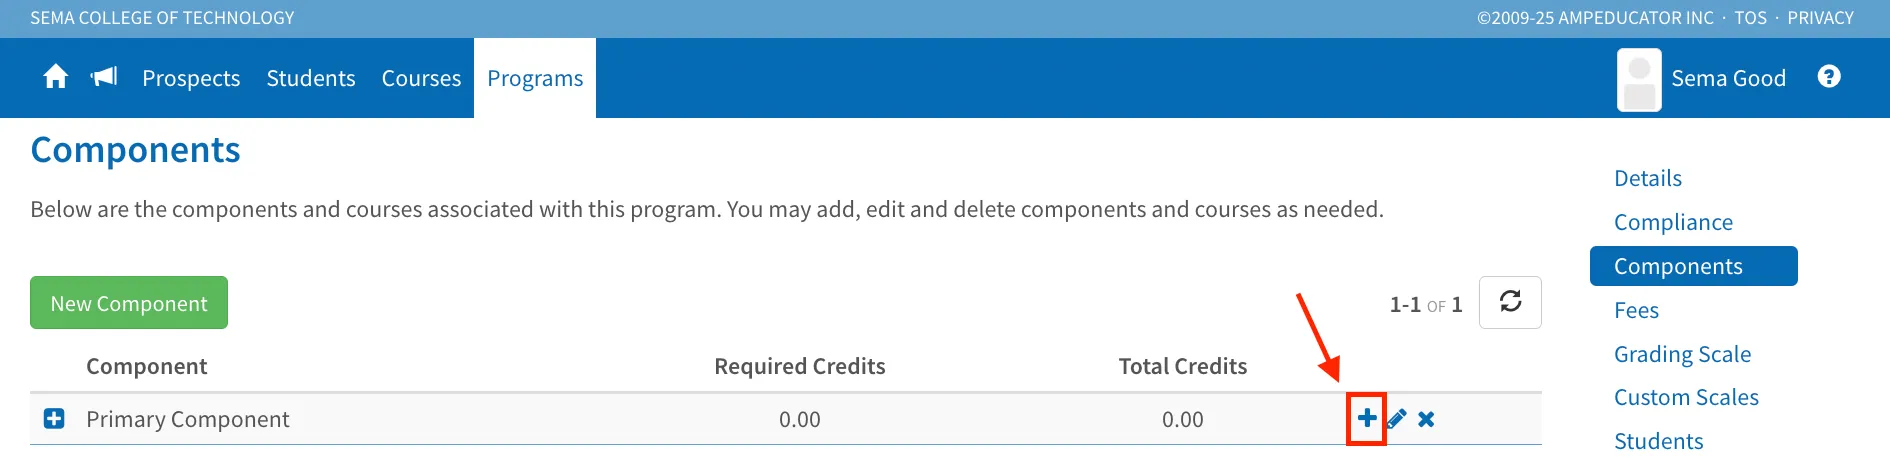
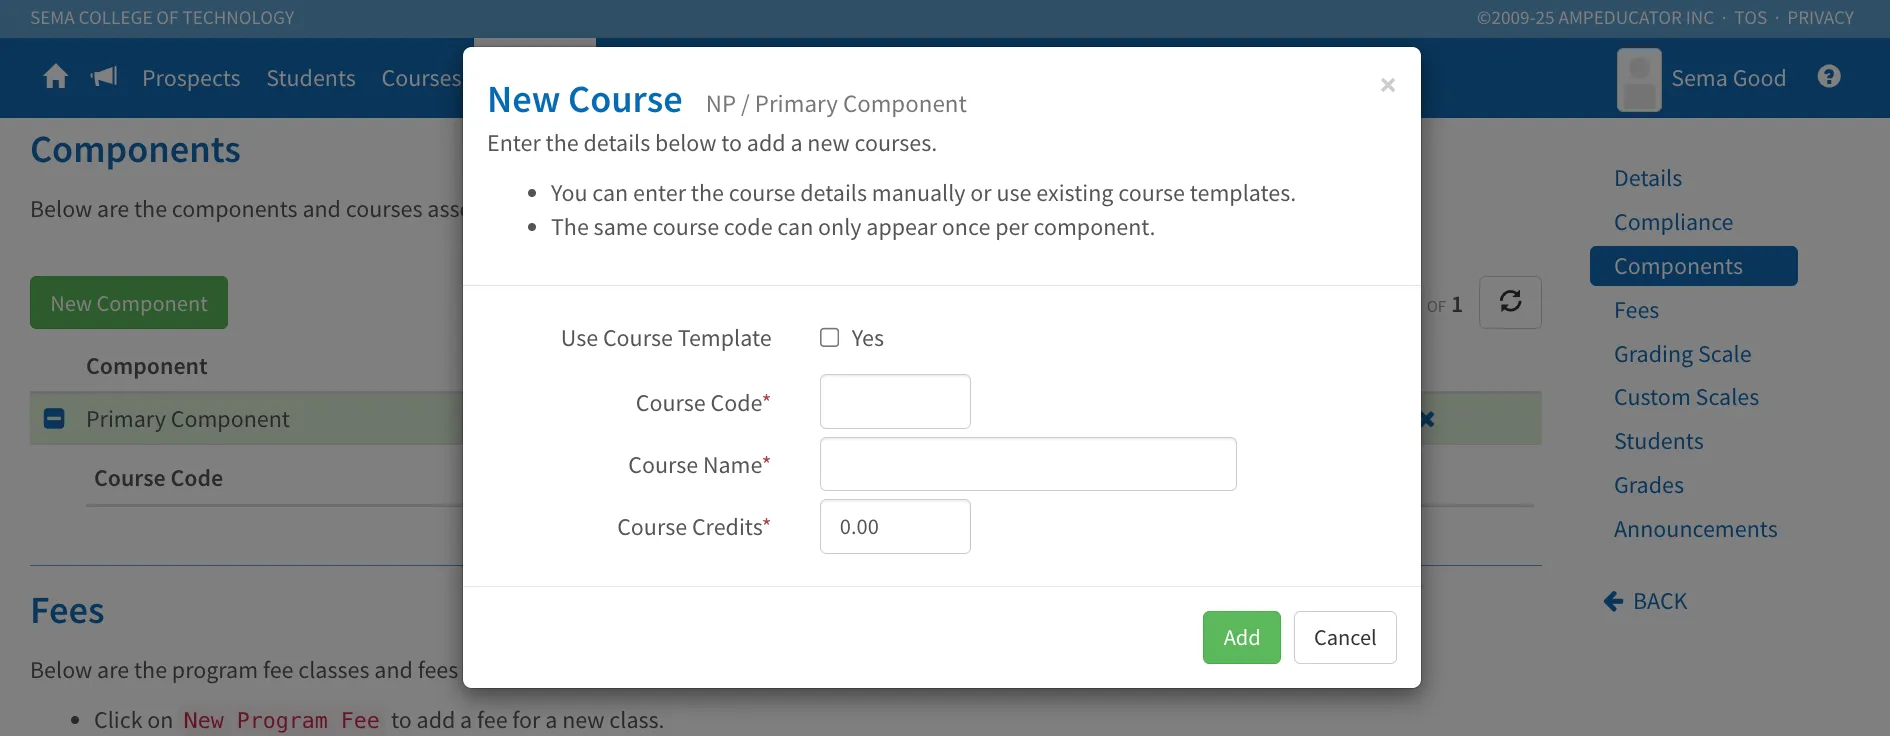
In the New Course window, you can:
- Enter the course details manually (Course Code, Course Name, Course Credits, etc.)
- Select Use Course Template to choose from existing course templates. You can select multiple courses at once, and the details will automatically populate based on your selections.
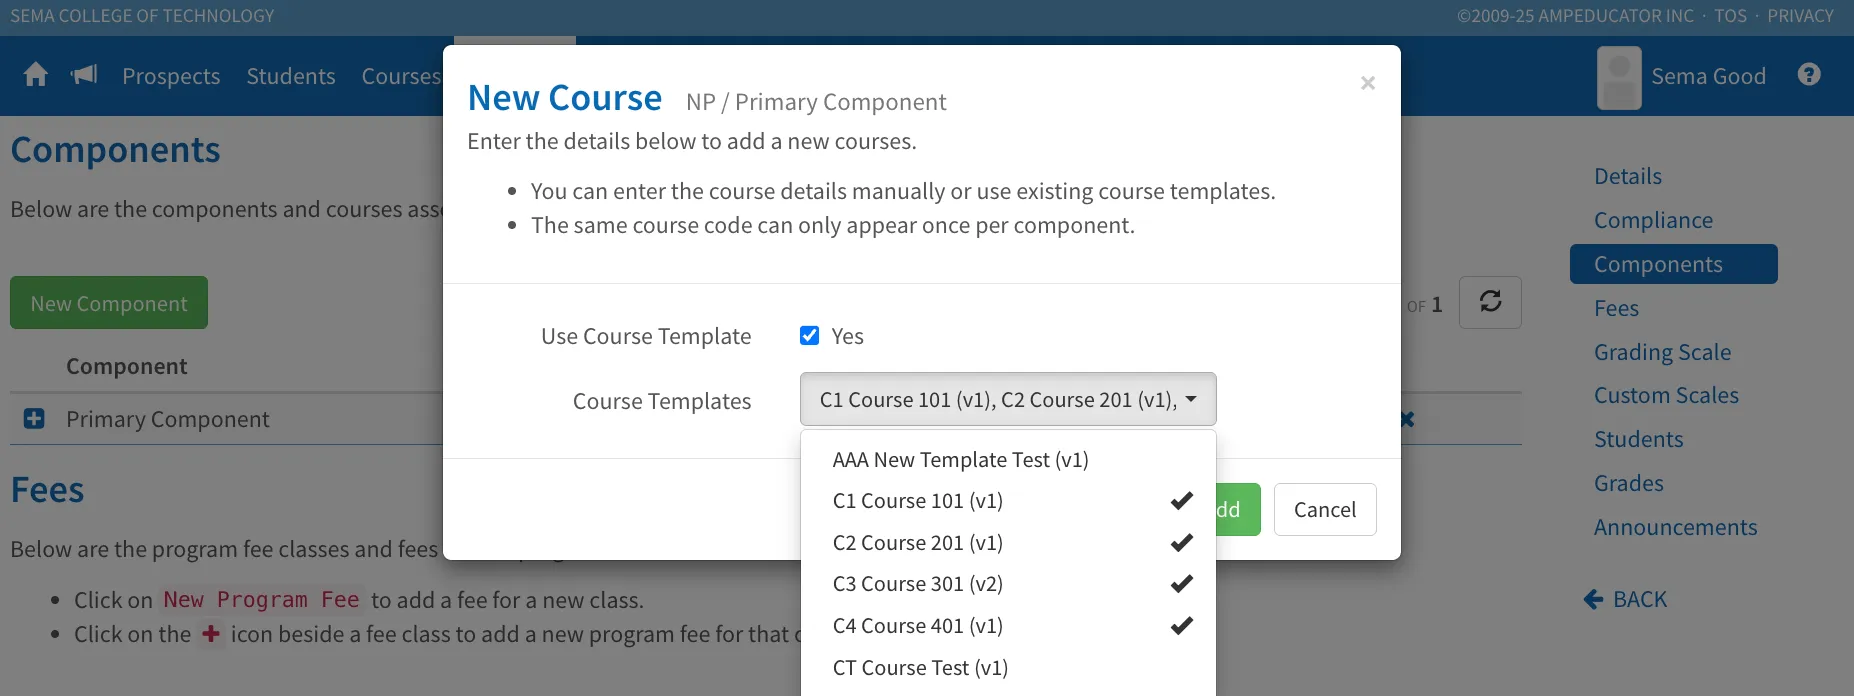
- Click Add to save the course. The Total Credits field will update automatically as you add more.
Continue adding courses to the same component until all required courses for that category have been added.
Expanding a Component
You can view or manage the courses within any component by expanding it.
Click the expand (➕) icon next to the component name to display all courses assigned to that component.
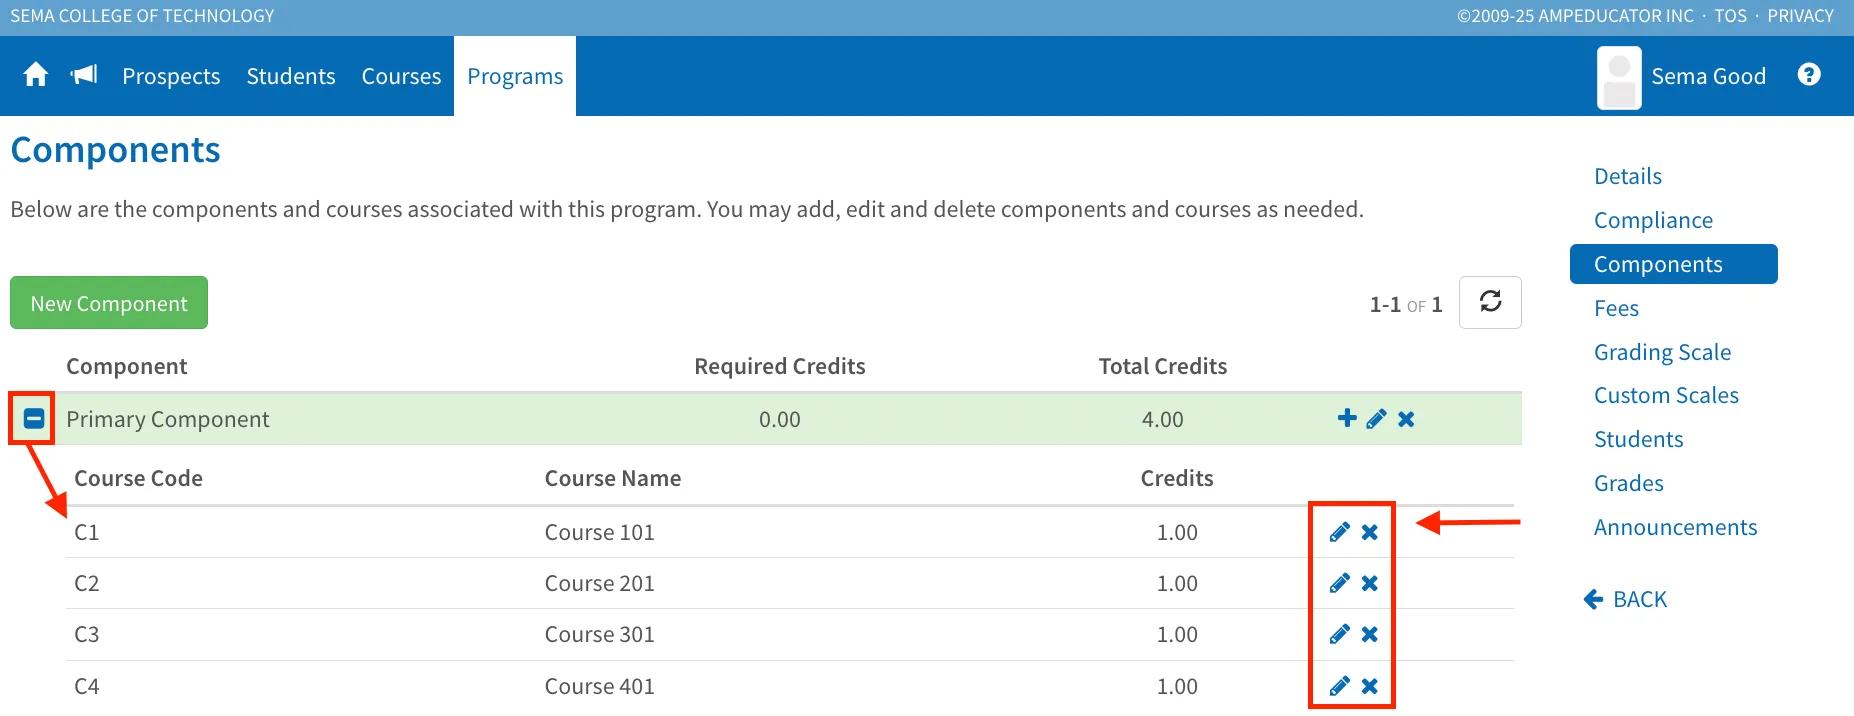
From here, you can:
- Review the list of courses and their credits.
- Edit course details if needed (such as name, code, or credits).
- Remove courses that no longer apply to the program.
As you make changes, the Total Credits for the component will update automatically.
After adding your courses, you’ll still need to determine how many of them students are required to complete. This is defined in the Required Credits field, which you can adjust when editing the component.
Editing a Component
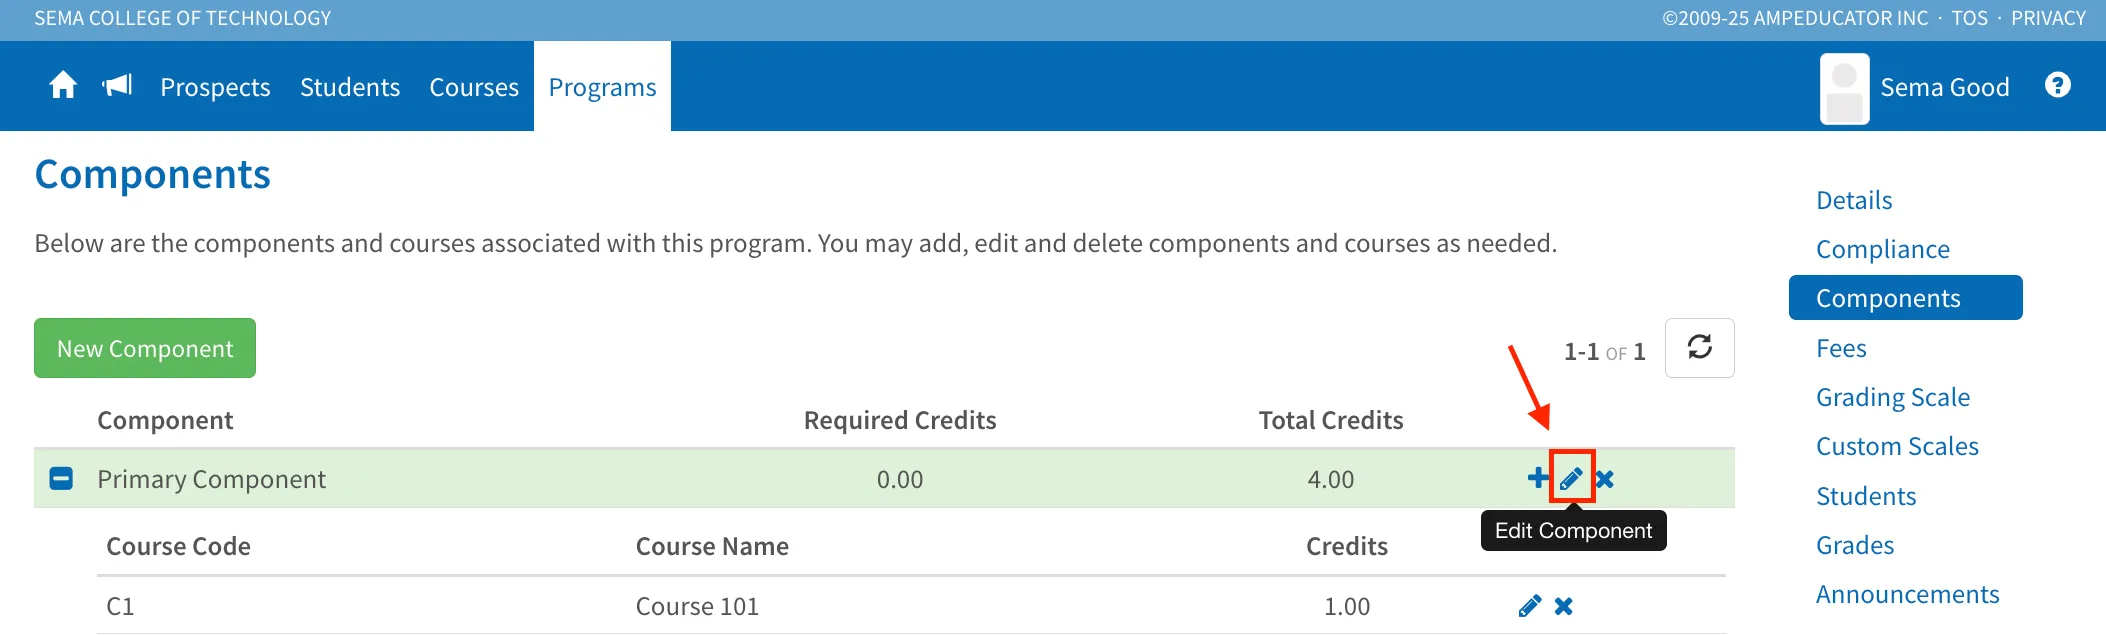
You can edit a component to rename it or change its required credits. Start by clicking the Edit icon beside the component name.
Update the Component Name or adjust the Required Credits field to set how many credits students must complete from that component (the total may be higher if there are electives).
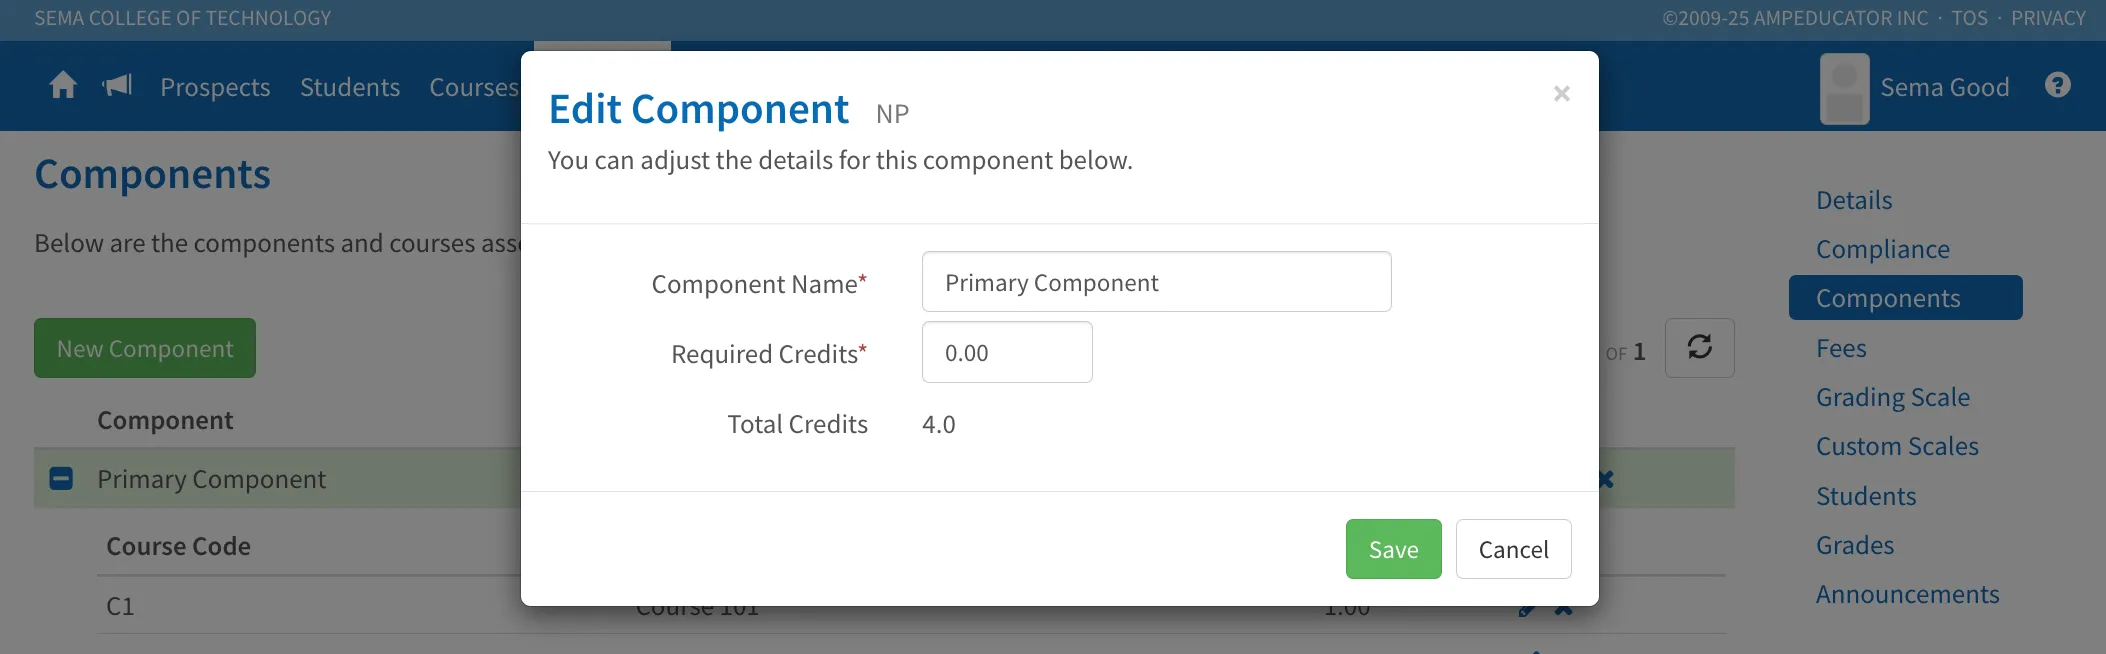
Click Save to save your changes.
Creating a New Component
If your program includes multiple groups of courses — for example, Mandatory and Elective — you can add more components.
Click New Component to open the setup window. Enter a Component Name and set Required Credits.
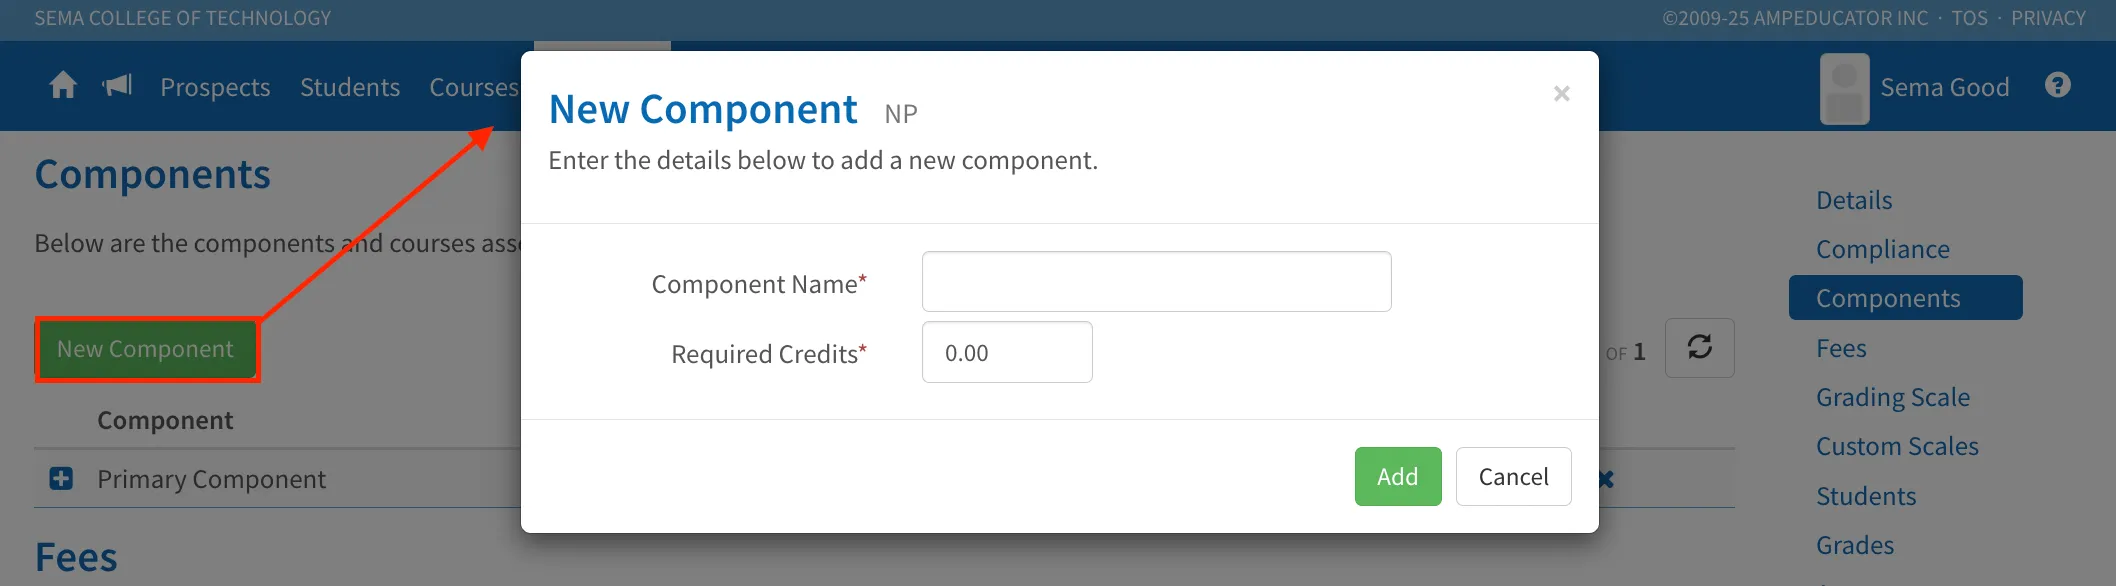
Click Add to save.
Once added, the new component will appear in the list below the Primary Component. You can add courses to it or edit it in the same way.
Fees
In the Fees section, you can add fees specific to each program.
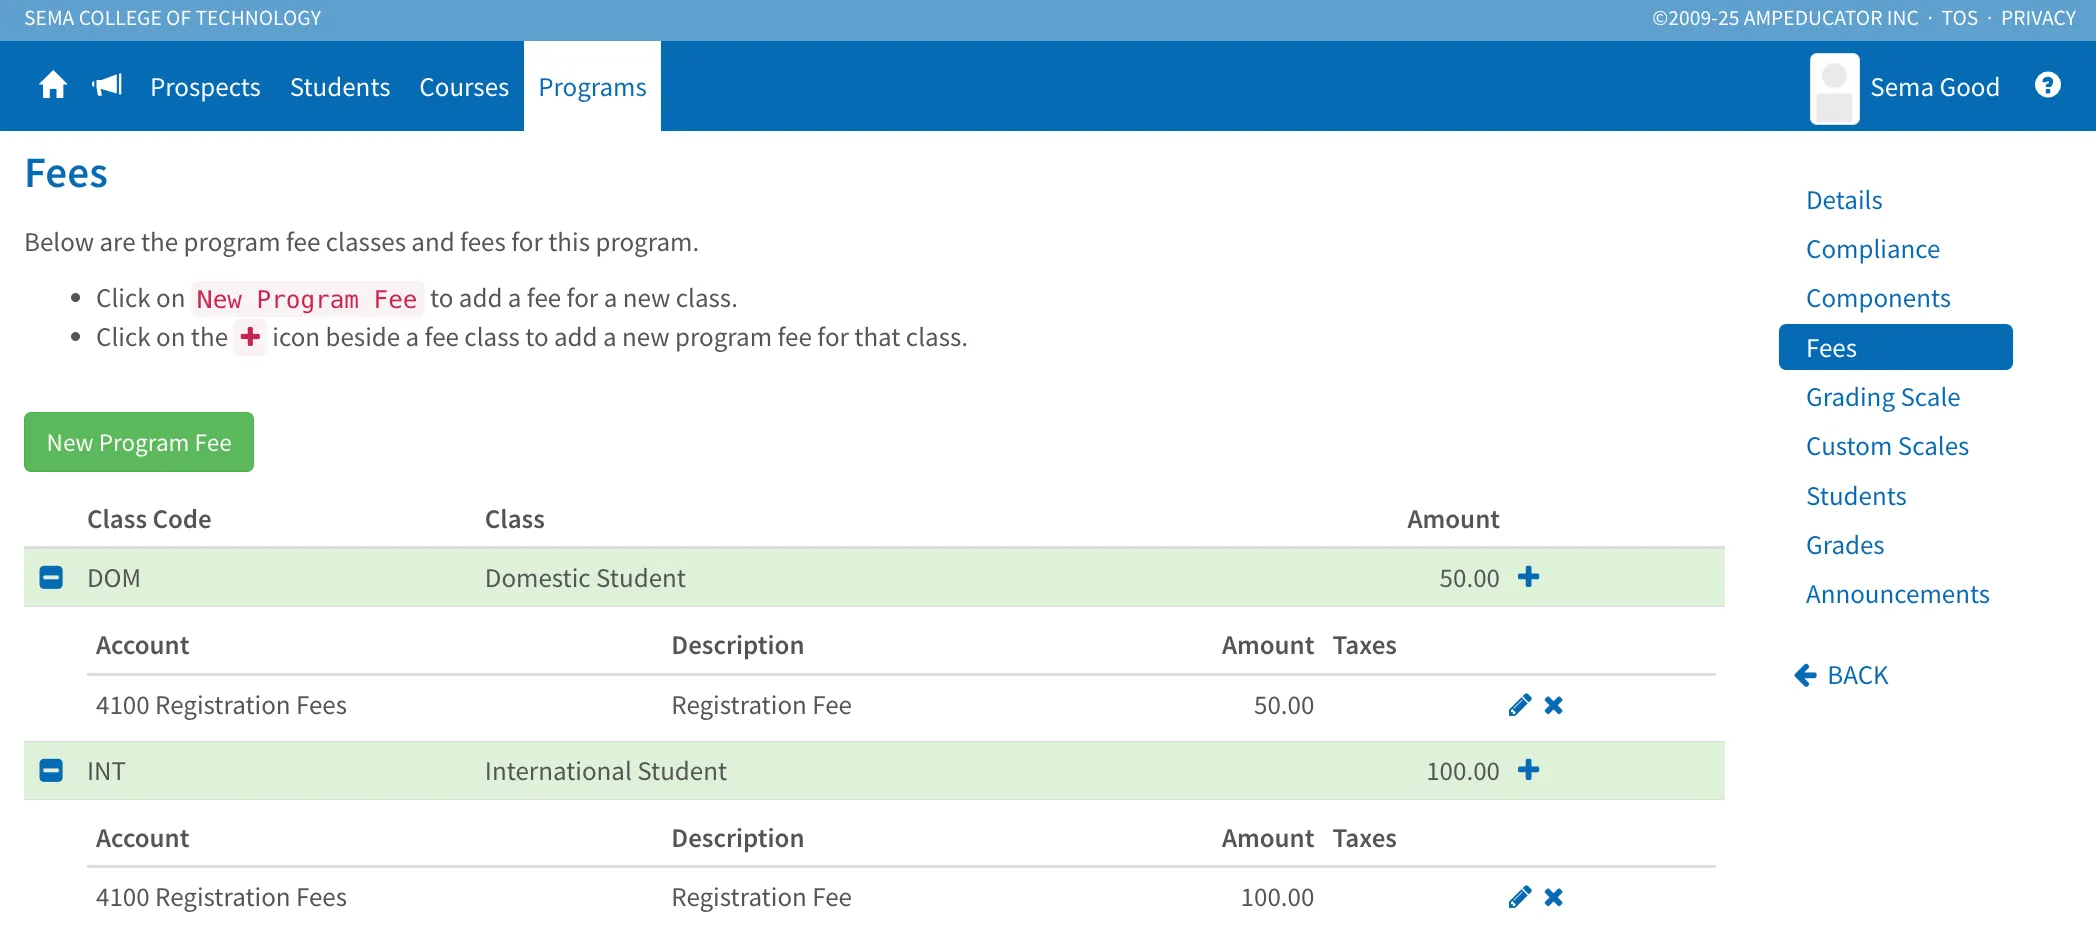
If your institution uses different Fee Classes, for example, Domestic and International, you can assign each fee to a class when you add it. This automatically organizes fees into separate categories, making it easier to manage and track different fee structures for each type of student or program.
Fee Classes are configured under Institution Config / Students / Fee Classes.
Adding a New Program Fee
Click New Program Fee to add a new fee. In the New Fee window, fill in the following details:
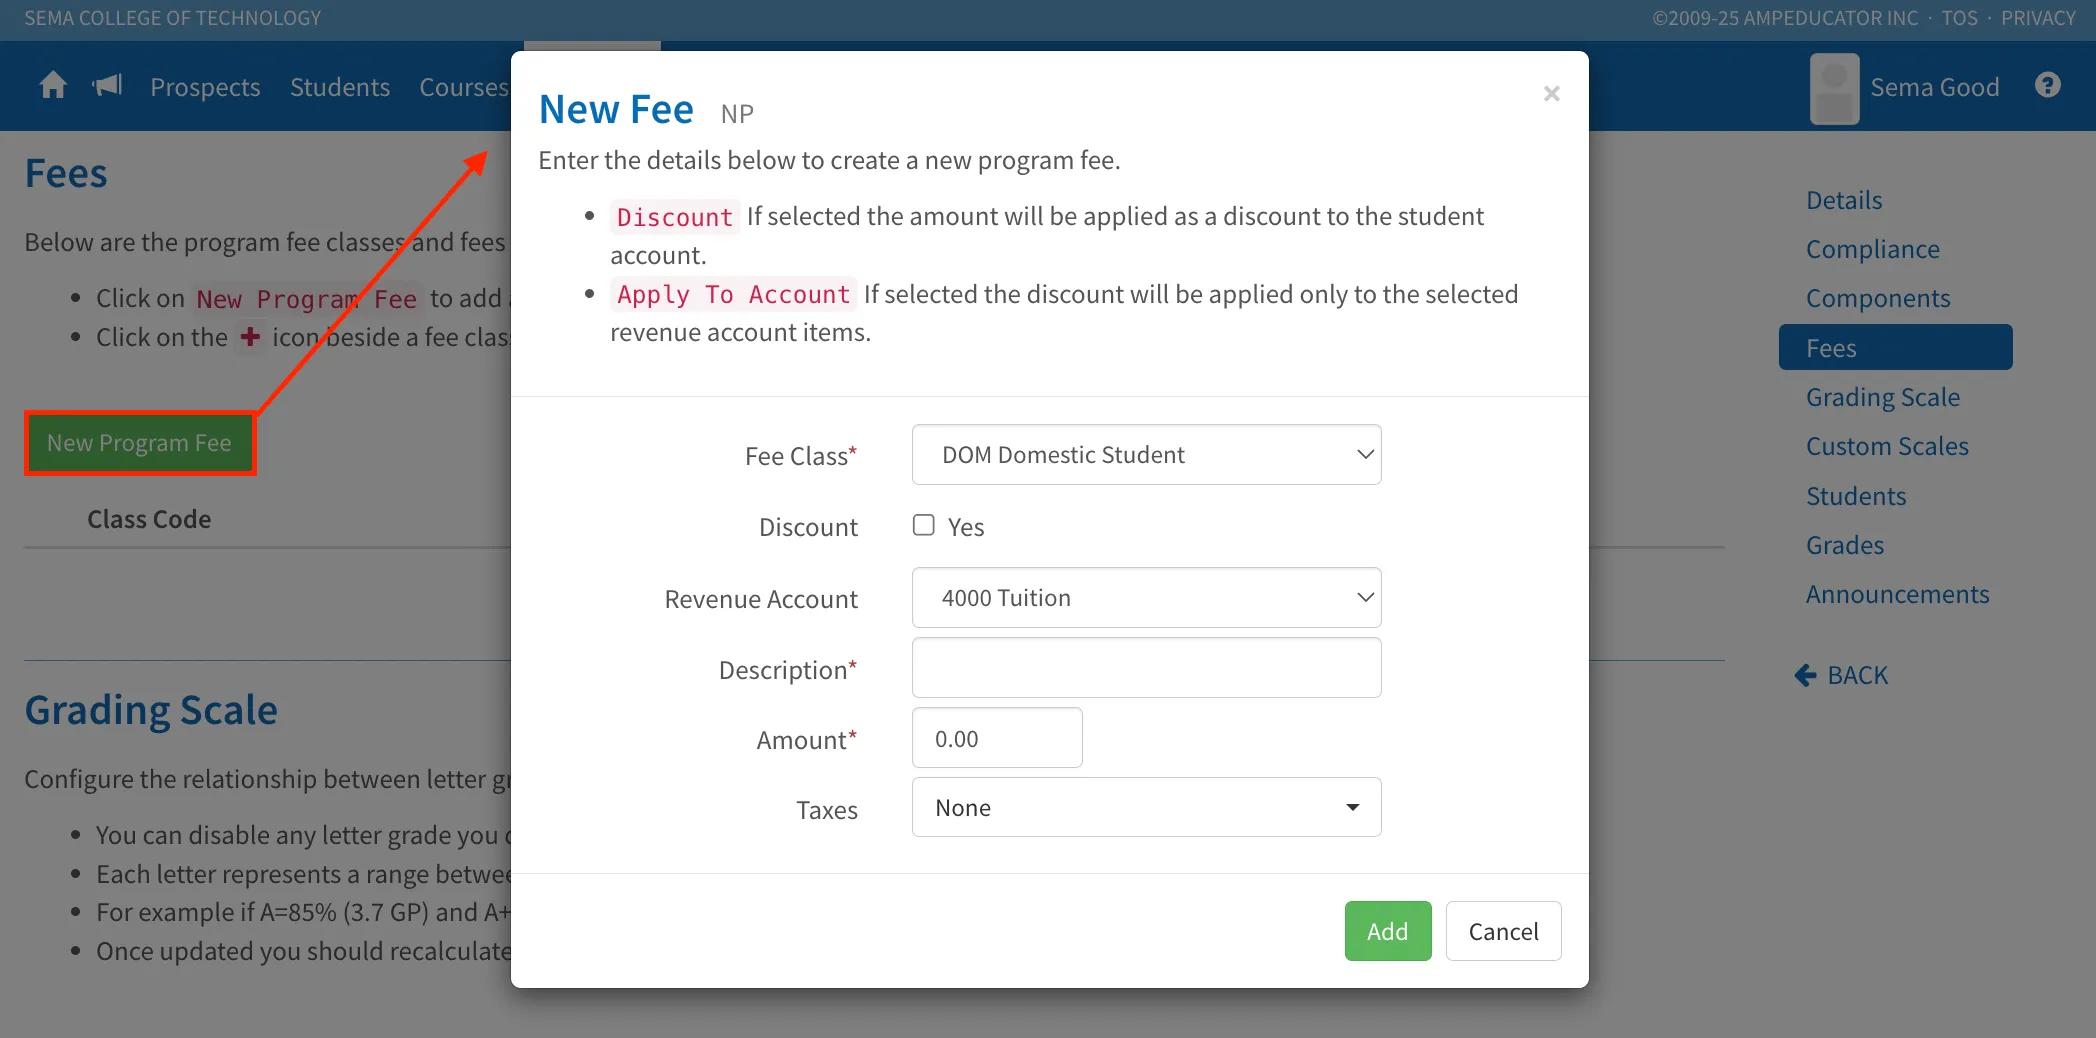
- Fee Class: Select the fee class the charge applies to.
- Discount: Check this if the amount should be applied as a discount on the student’s account. When selected, additional options will appear:
- Discount Account: Choose the account the discount should post to. These are configured under Institution Config / Accounts / Accounts Tab.
- Apply to Account: Check this if the discount should apply only to the selected revenue account items.
- Account: Select which account the discount applies to.
- Revenue Account: Select the account the fee should post to (for example, Tuition or Registration Fee).
- Description: Add a short label or note to identify the fee.
- Amount: Enter the total fee amount.
- Taxes: Select a tax option if applicable.
Click Add to save your fee.
Once added, the fee will appear under its assigned Fee Class in the list. You can continue adding as many fees as needed for each class.
Viewing and Managing Program Fees
After you’ve added fees, they’ll appear in a list under the Fees section. If your institution uses Fee Classes, your fees will be grouped by class (for example, Domestic or International).
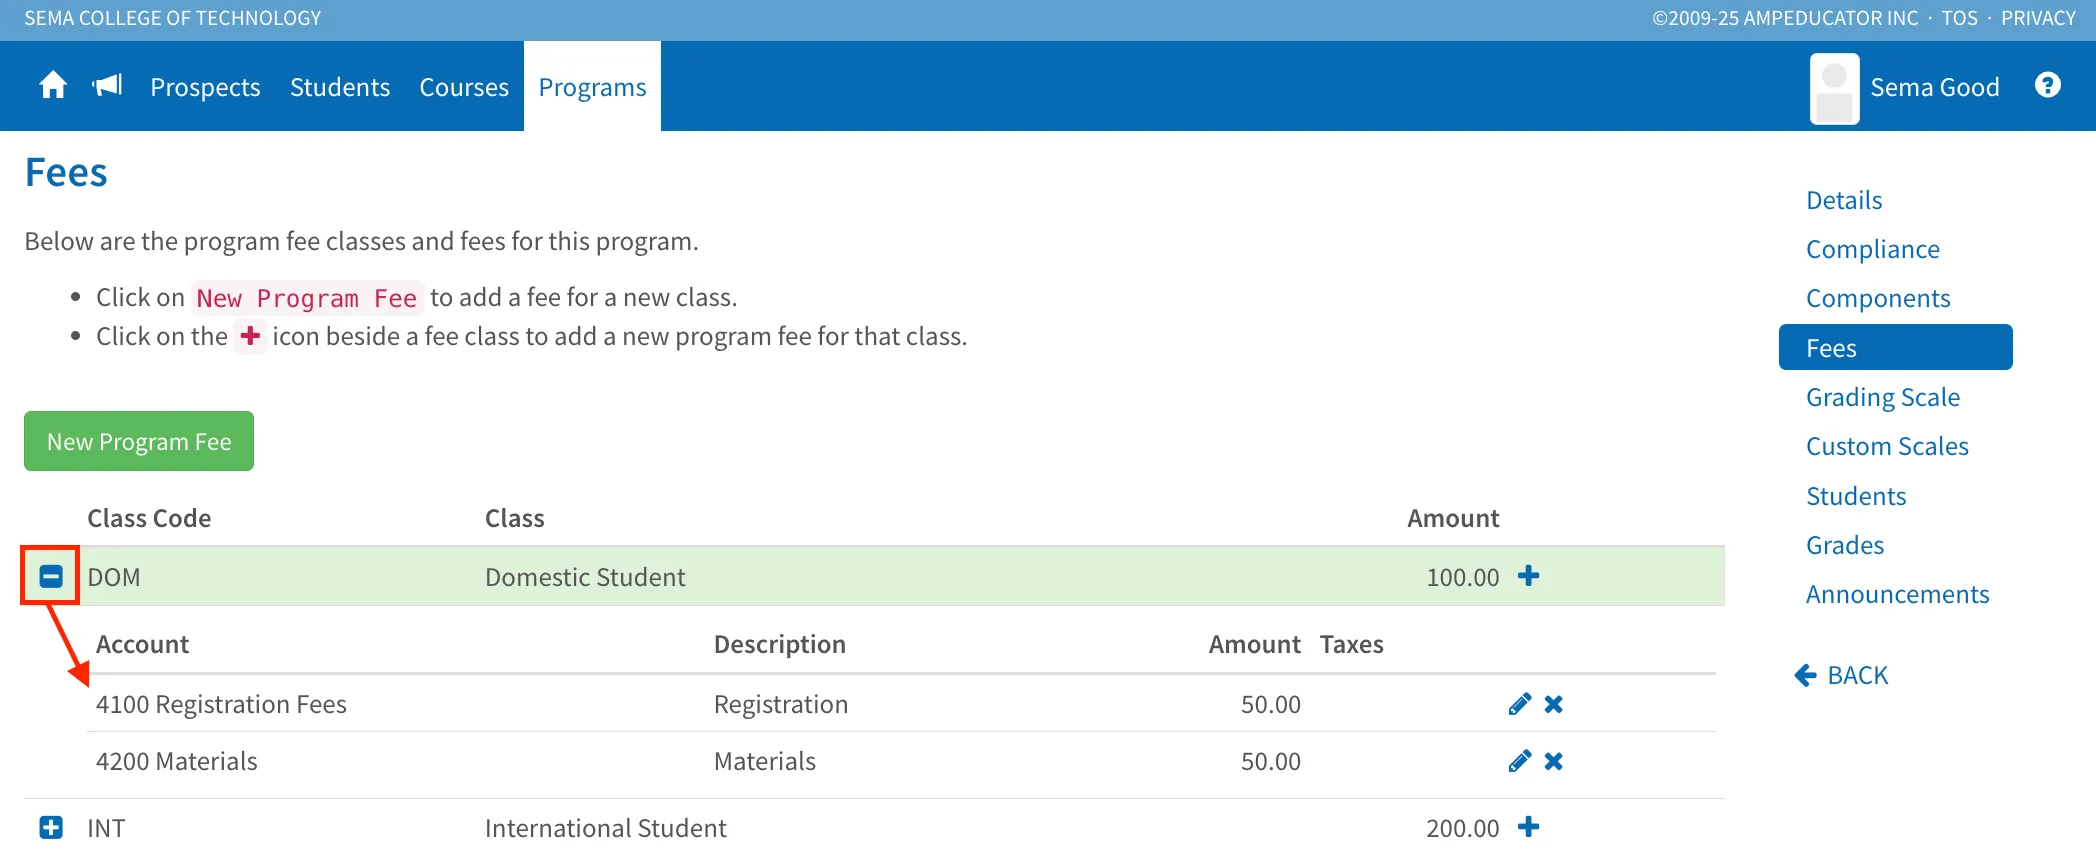
Click the + icon on the left of a Fee Class to expand it and view all individual fees in that category. You can also edit or delete individual fees from within a Fee Class this way.
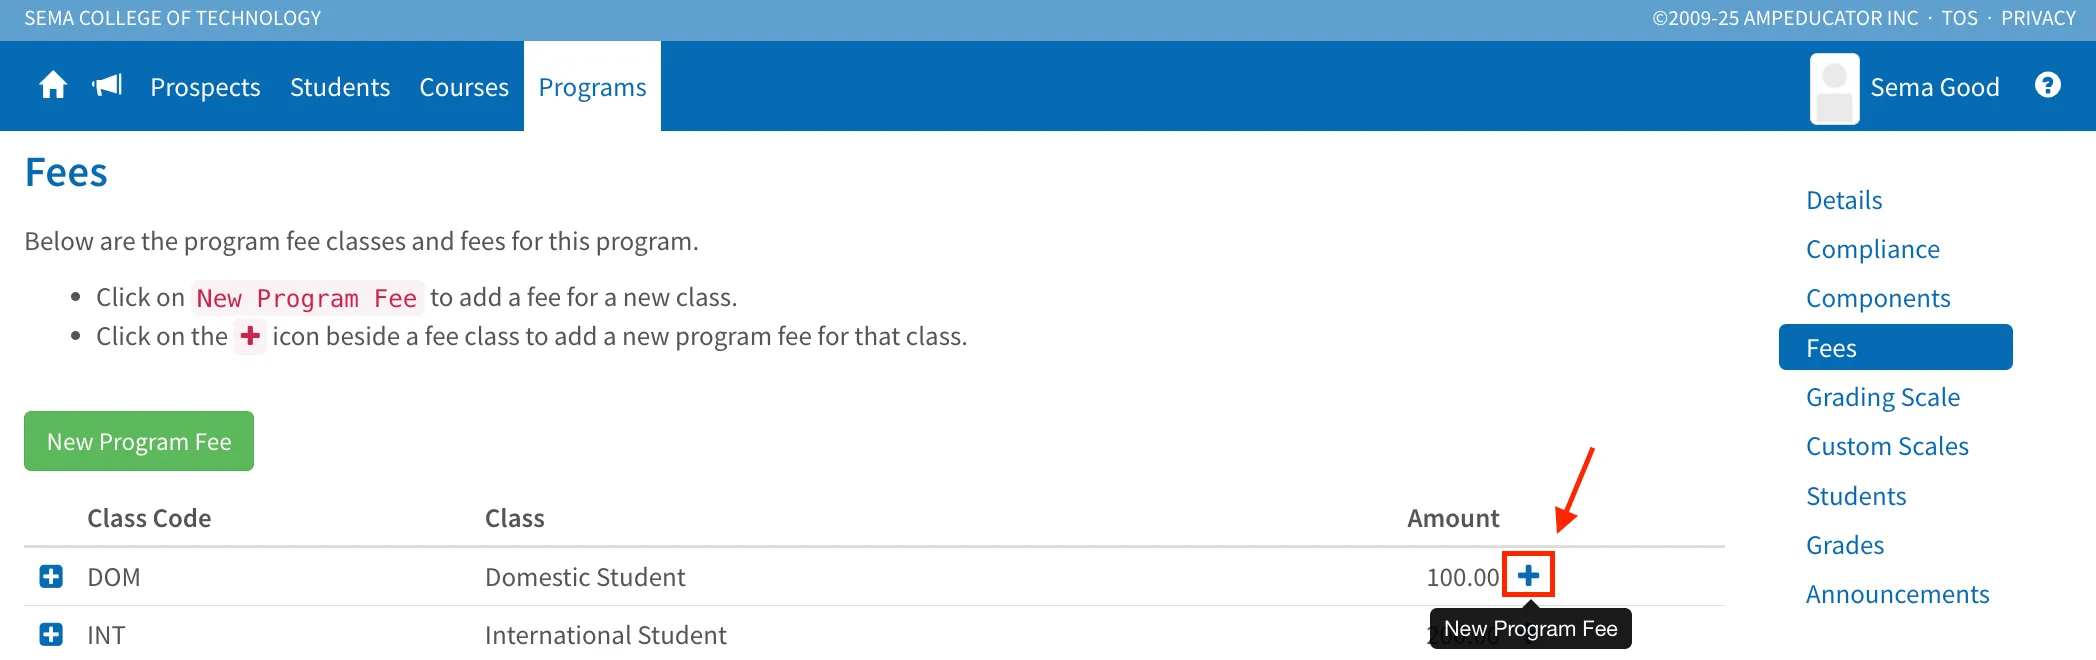
Click the + icon on the right of a Fee Class to add a new fee directly within that class.
If your institution doesn’t use Fee Classes, all fees will simply appear together in one list instead of being grouped by category.
Grading Scale
The Grading Scale section lets you define how letter grades, percentages, and grade points (GP) relate to each other for the program. Each grade represents a range between the percentage entered and the percentage assigned to the next higher grade.
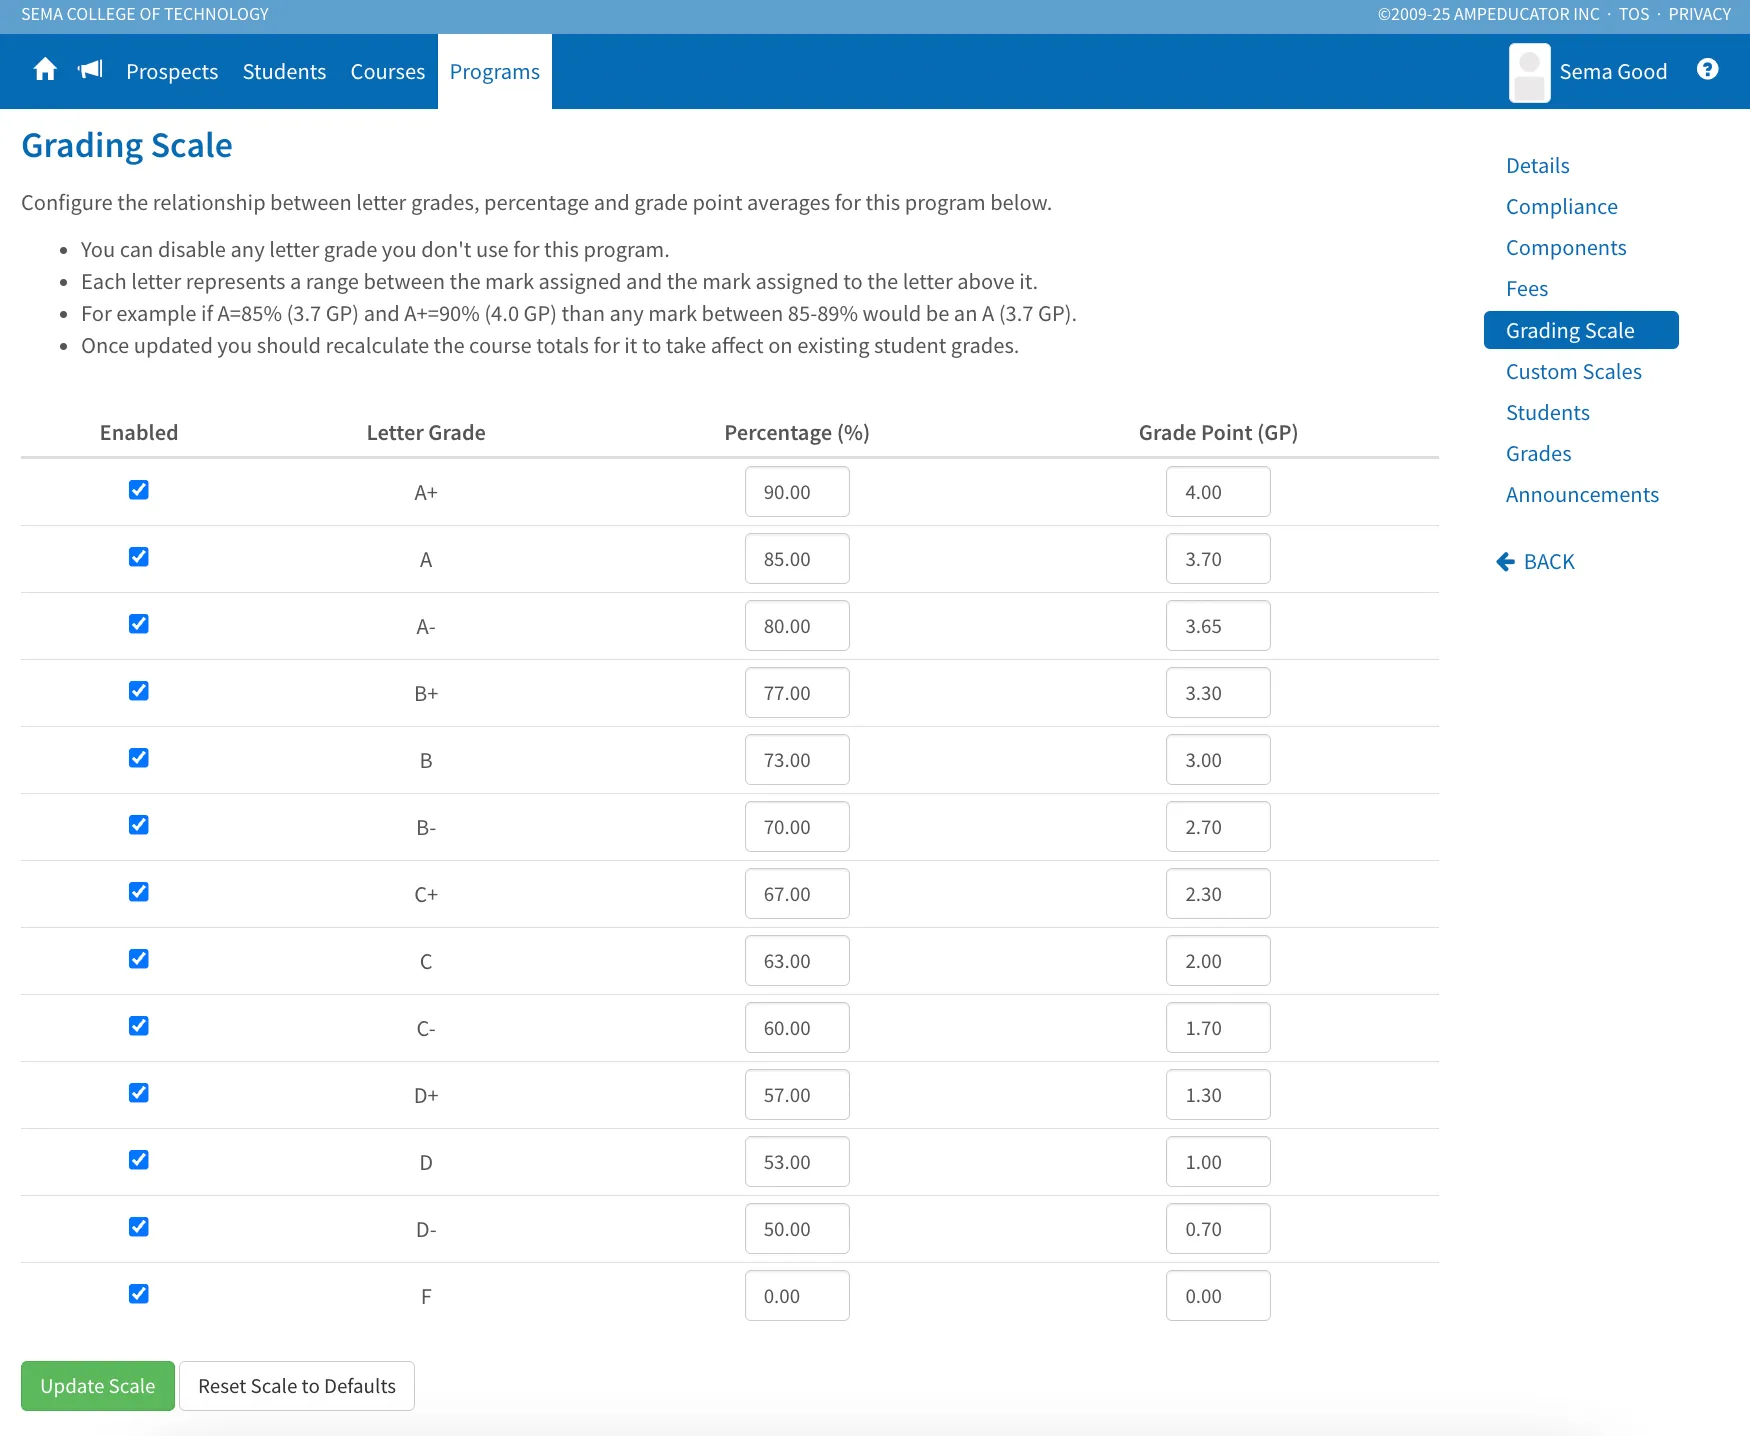
For example, if A = 85% (3.7 GP) and A+ = 90% (4.0 GP), then any mark between 85–89% would be recorded as an A (3.7 GP).
In the Details section of the program setup, you can choose how the final grade is displayed on transcripts and online — as a Percentage, Grade Point, Letter Grade, or even both by using the Display Final As Alt option.
Editing the Grading Scale
You can enable or disable any grade by checking or unchecking the box beside it. Only the grades that are enabled will be available for use in the program.
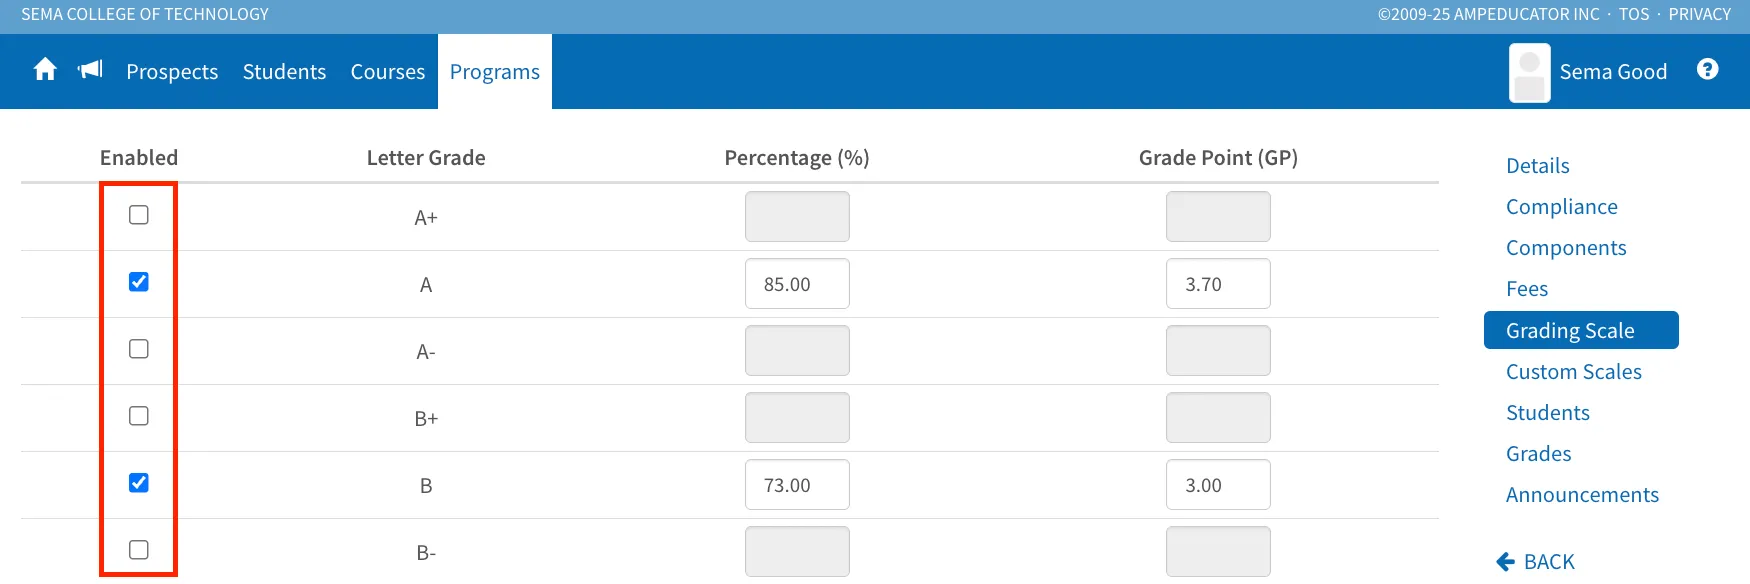
You can also edit the Percentage (%) and Grade Point (GP) values for each letter grade as needed. Once you’ve made your changes, click Update Scale.
Resetting the Grading Scale
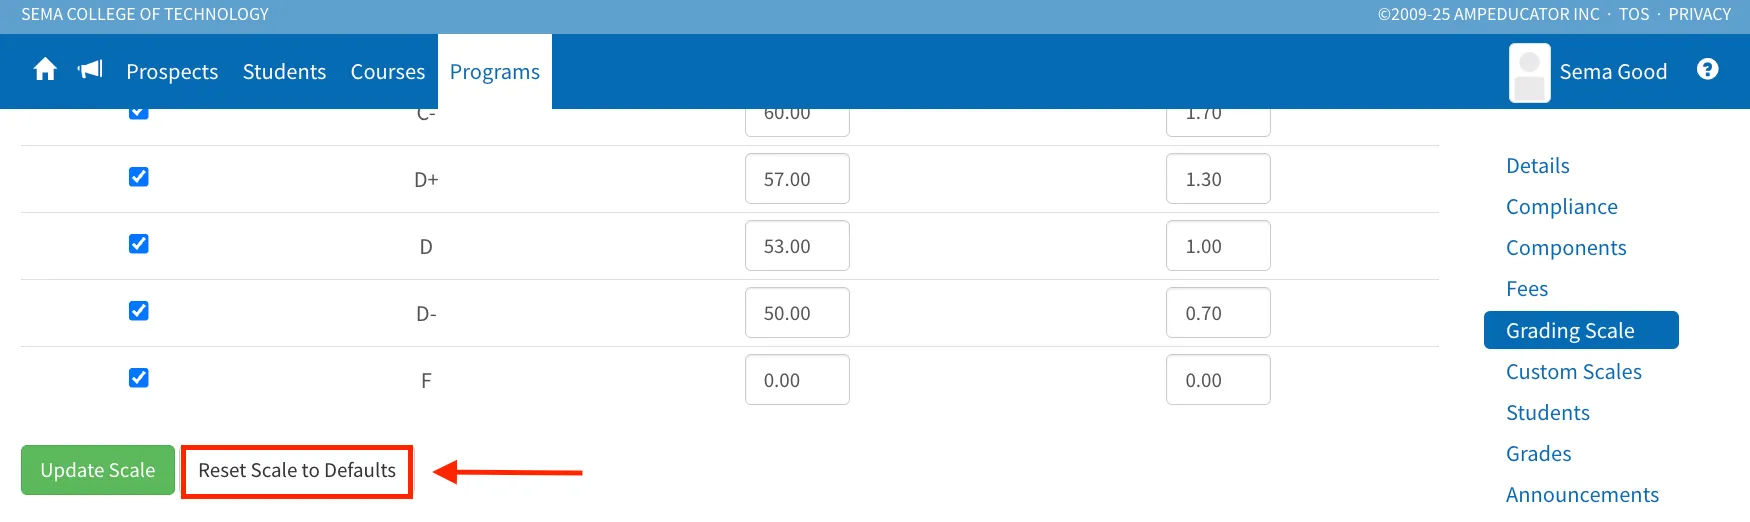
If you ever need to return to the original settings, click Reset Scale to Defaults, located under the grading scale, to restore the system’s default grading scale values.
Custom Grading Scales
The Custom Grading Scales section lets you define your own grading system for a program. Unlike the standard grading scale, this feature allows you to set up custom grade names, percentages, and grade points — giving you full flexibility to match your institution’s grading rules or special requirements.
Adding a New Custom Grading Scale
To create a new custom grading scale, click New Custom Grading Scale. A window will open where you can:
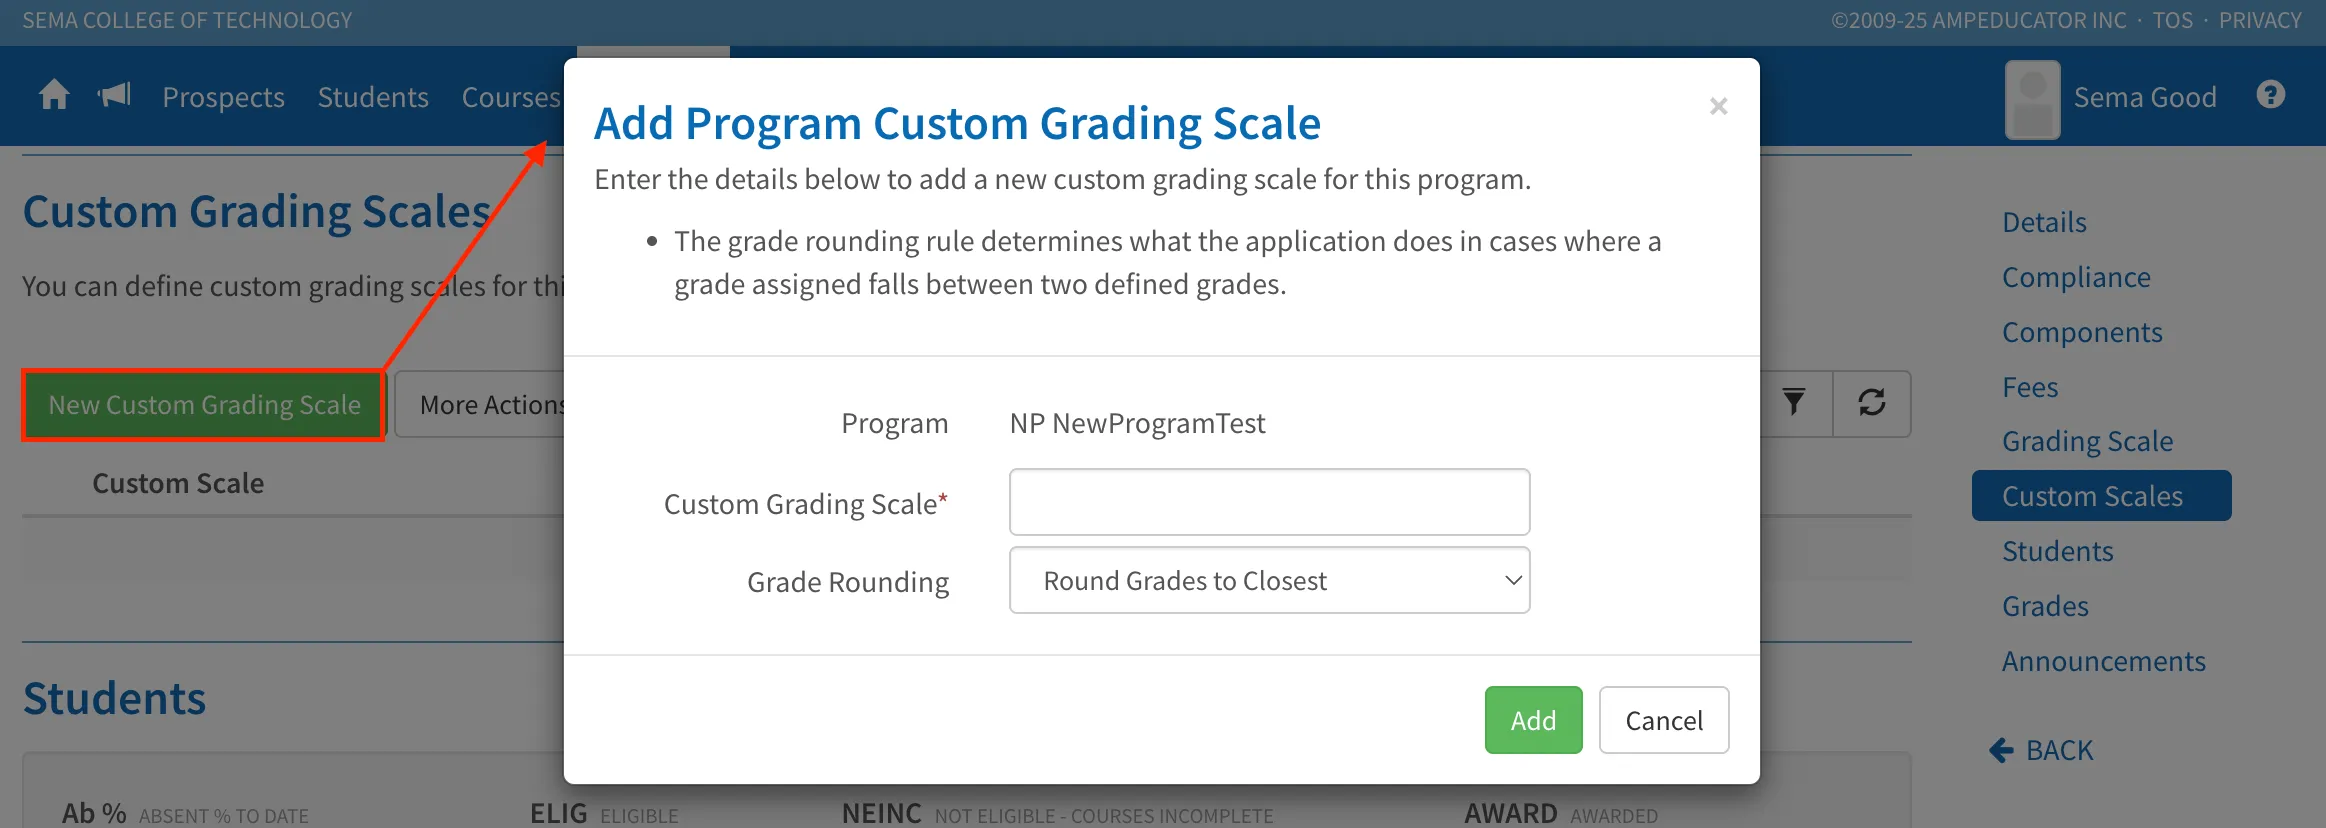
- Enter the Custom Grading Scale Name.
- Choose a Grade Rounding option that determines how the system handles grades that fall between defined grade boundaries:
- Round Grades to Closest – The grade is rounded to whichever boundary it’s nearest to. Example: If a B is 80% and a B+ is 85%, then 83% would round to B+, since it’s closer to 85%.
- Round Grades Down – The grade will always round down to the lower boundary. Example: 83% would be recorded as a B, even though it’s closer to a B+.
- Round Grades Up – The grade will always round up to the higher boundary. Example: 81% would be recorded as a B+, instead of a B.
Click Add to save. Your new scale will now appear in the list with the name and rounding rule you selected.
Adding Custom Grading Scale Items
Once your custom grading scale has been created, you can begin adding the individual grades that make it up.
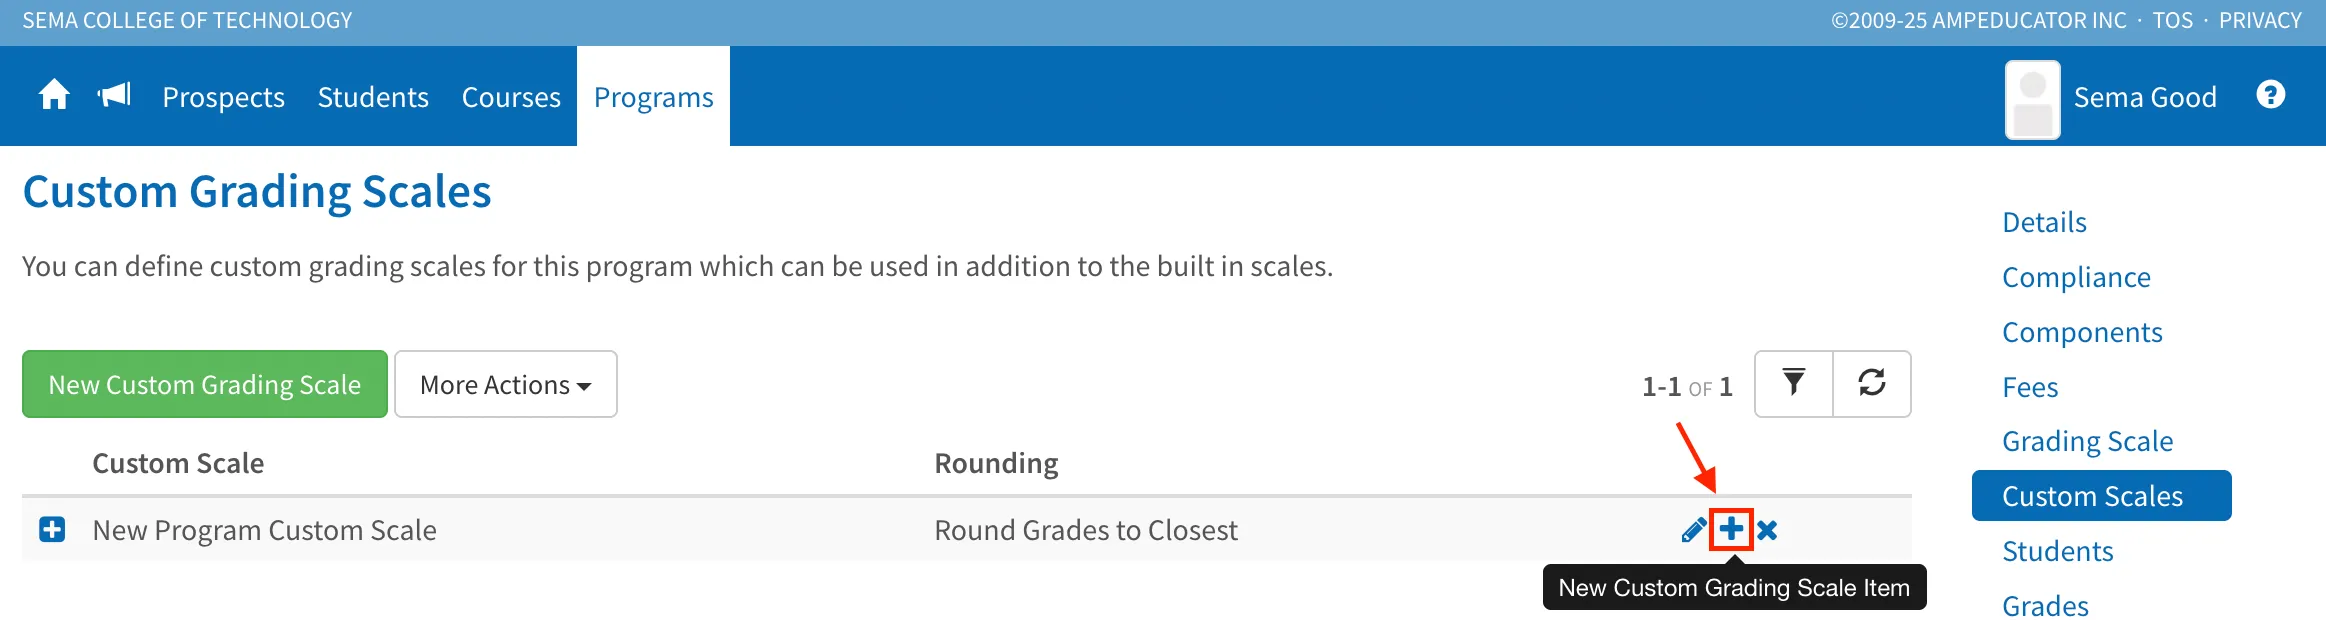
Click the + icon on the right side of your custom grading scale to add a new item.
In the Add Custom Grading Scale Item window, enter the following details:
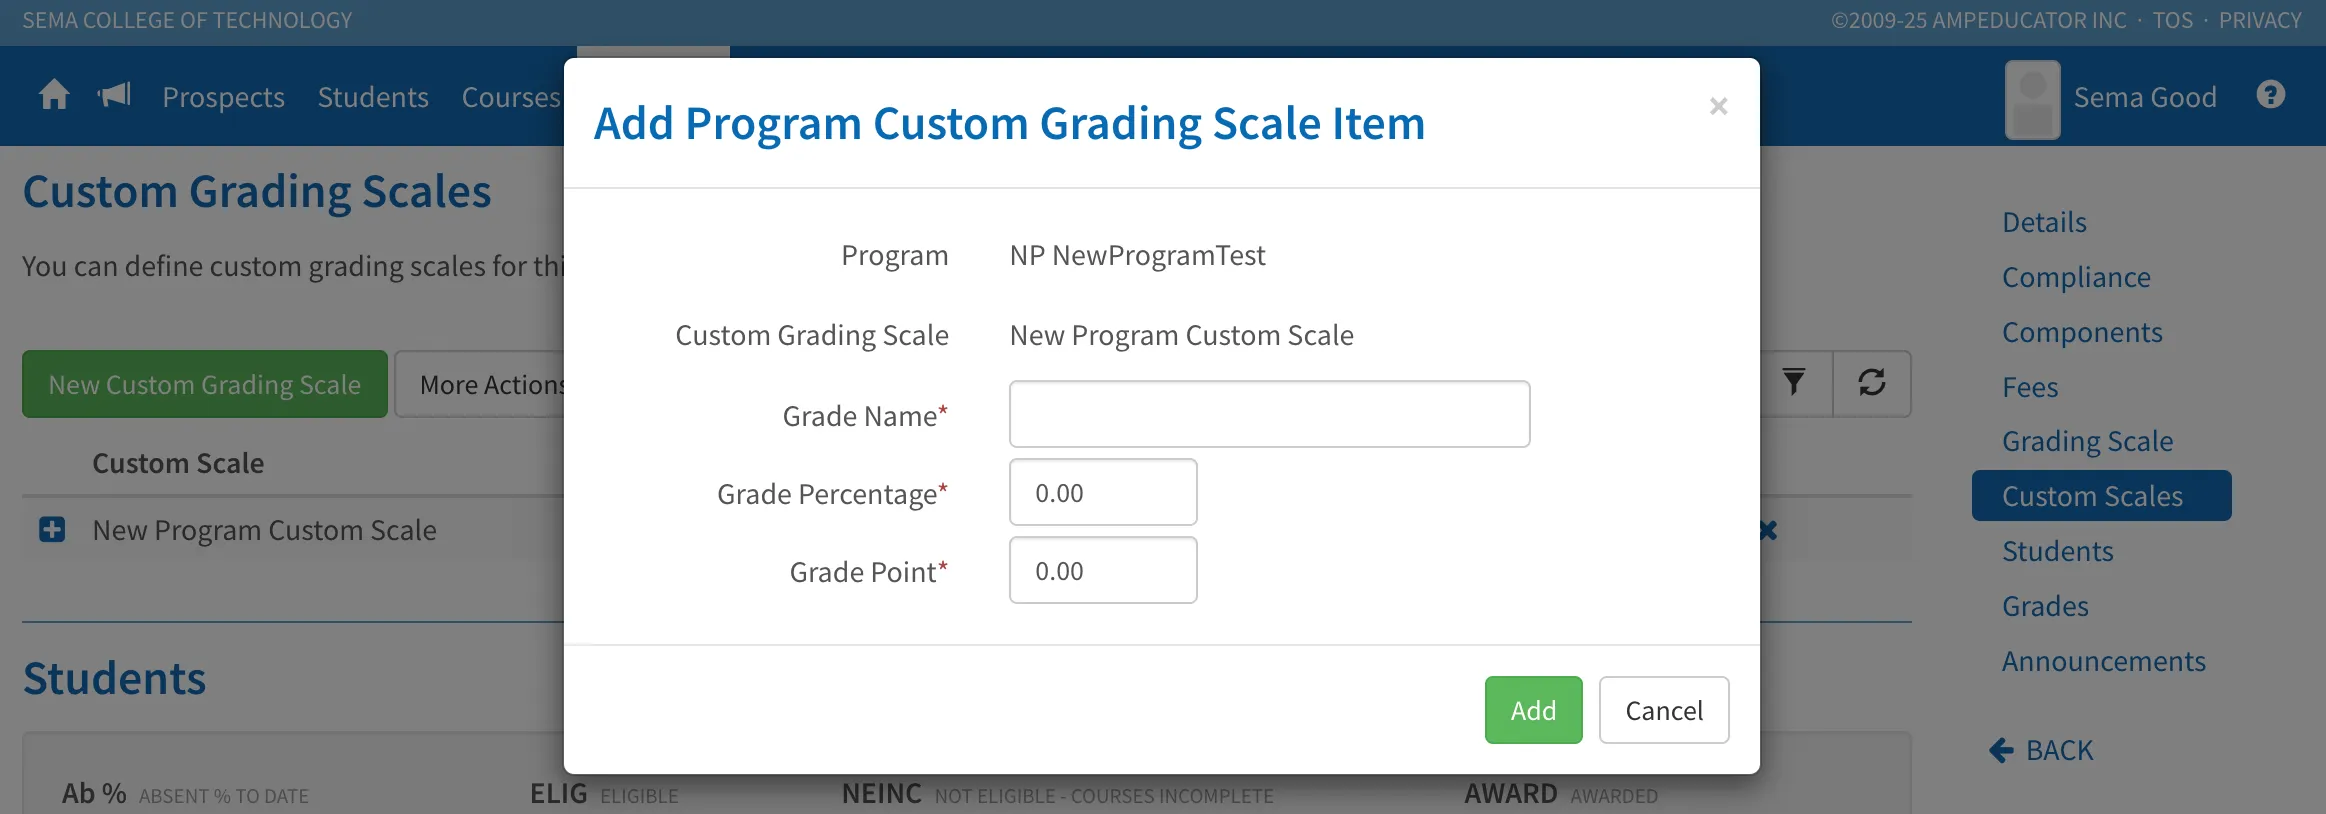
- Grade Name – The label for the grade.
- Grade Percentage – The minimum percentage required to achieve this grade.
- Grade Point – The grade point value associated with this grade (for example, 4.0 for Distinction or 0.0 for Fail).
Click Add to save. You can continue adding as many grades as your custom scale requires.
Managing Grading Scale Items
Once you’ve added items, you can view and manage them using the expand (➕) icon on the left side of the custom grading scale.
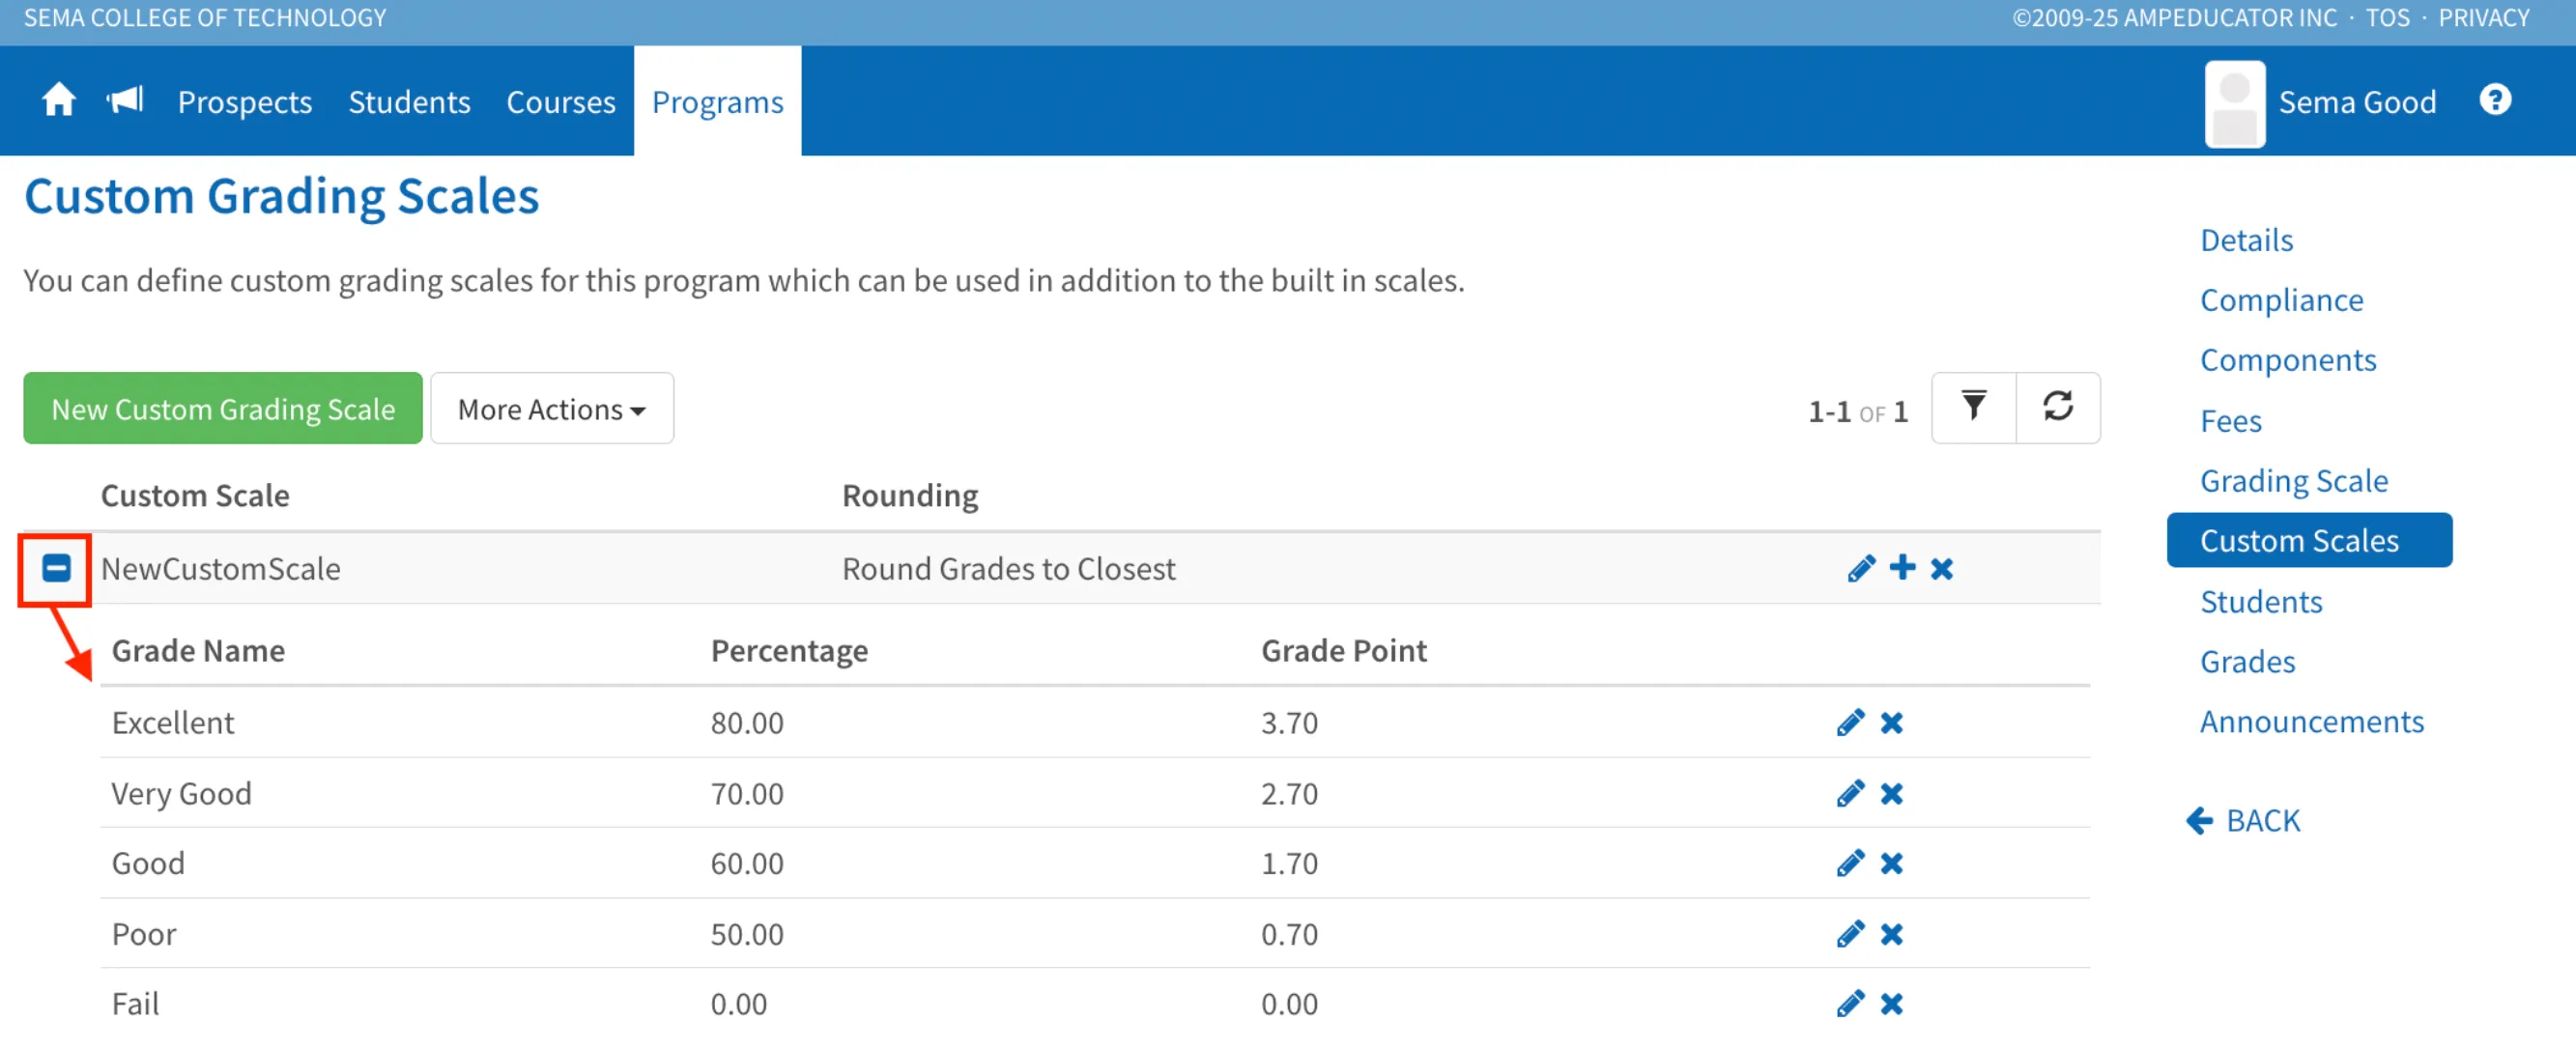
Expanding the scale shows a list of all the grades within it. From here, you can:
- Review grade names, percentages, and grade points.
- Edit existing items to adjust percentages or point values.
- Delete grades that are no longer part of the custom scale.
Adding a Default Custom Grading Scale
If your institution uses the same grading system across multiple programs, you can create default custom grading scales in advance. These are set up under Institution Config / Courses / Grading and can be quickly added to any program when needed.
To add one, click More Actions, then select Add Default Custom Grading Scale.
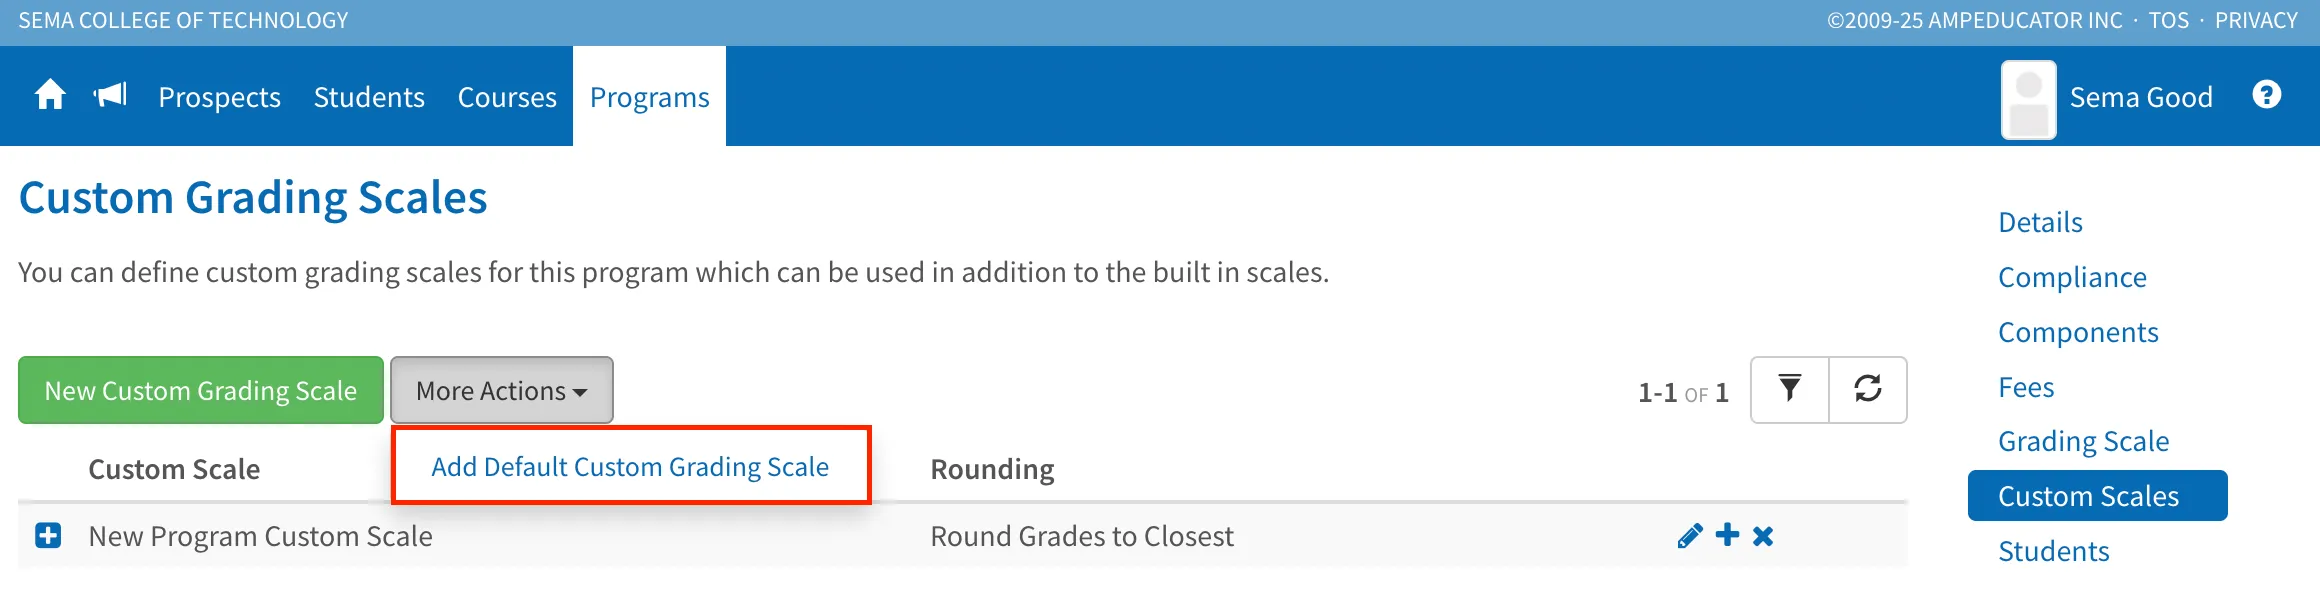
Select the grading scale you want to use from your list of preconfigured options.
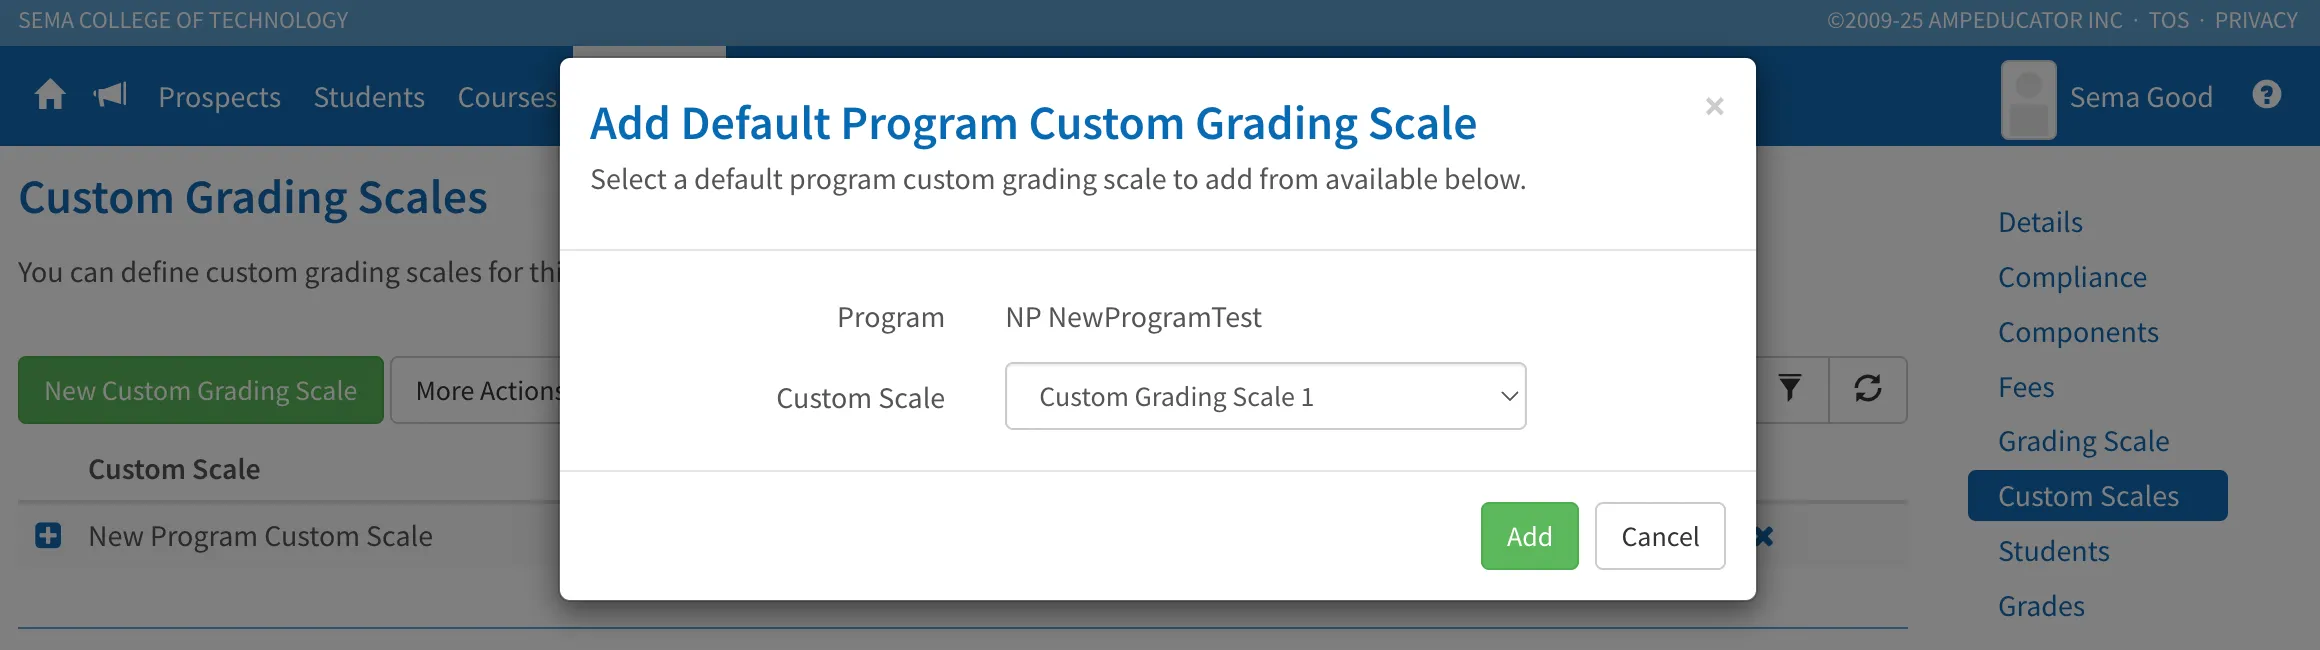
Once added, the default scale appears in the Custom Scales section, where you can still expand, review, or make edits as needed.
Students
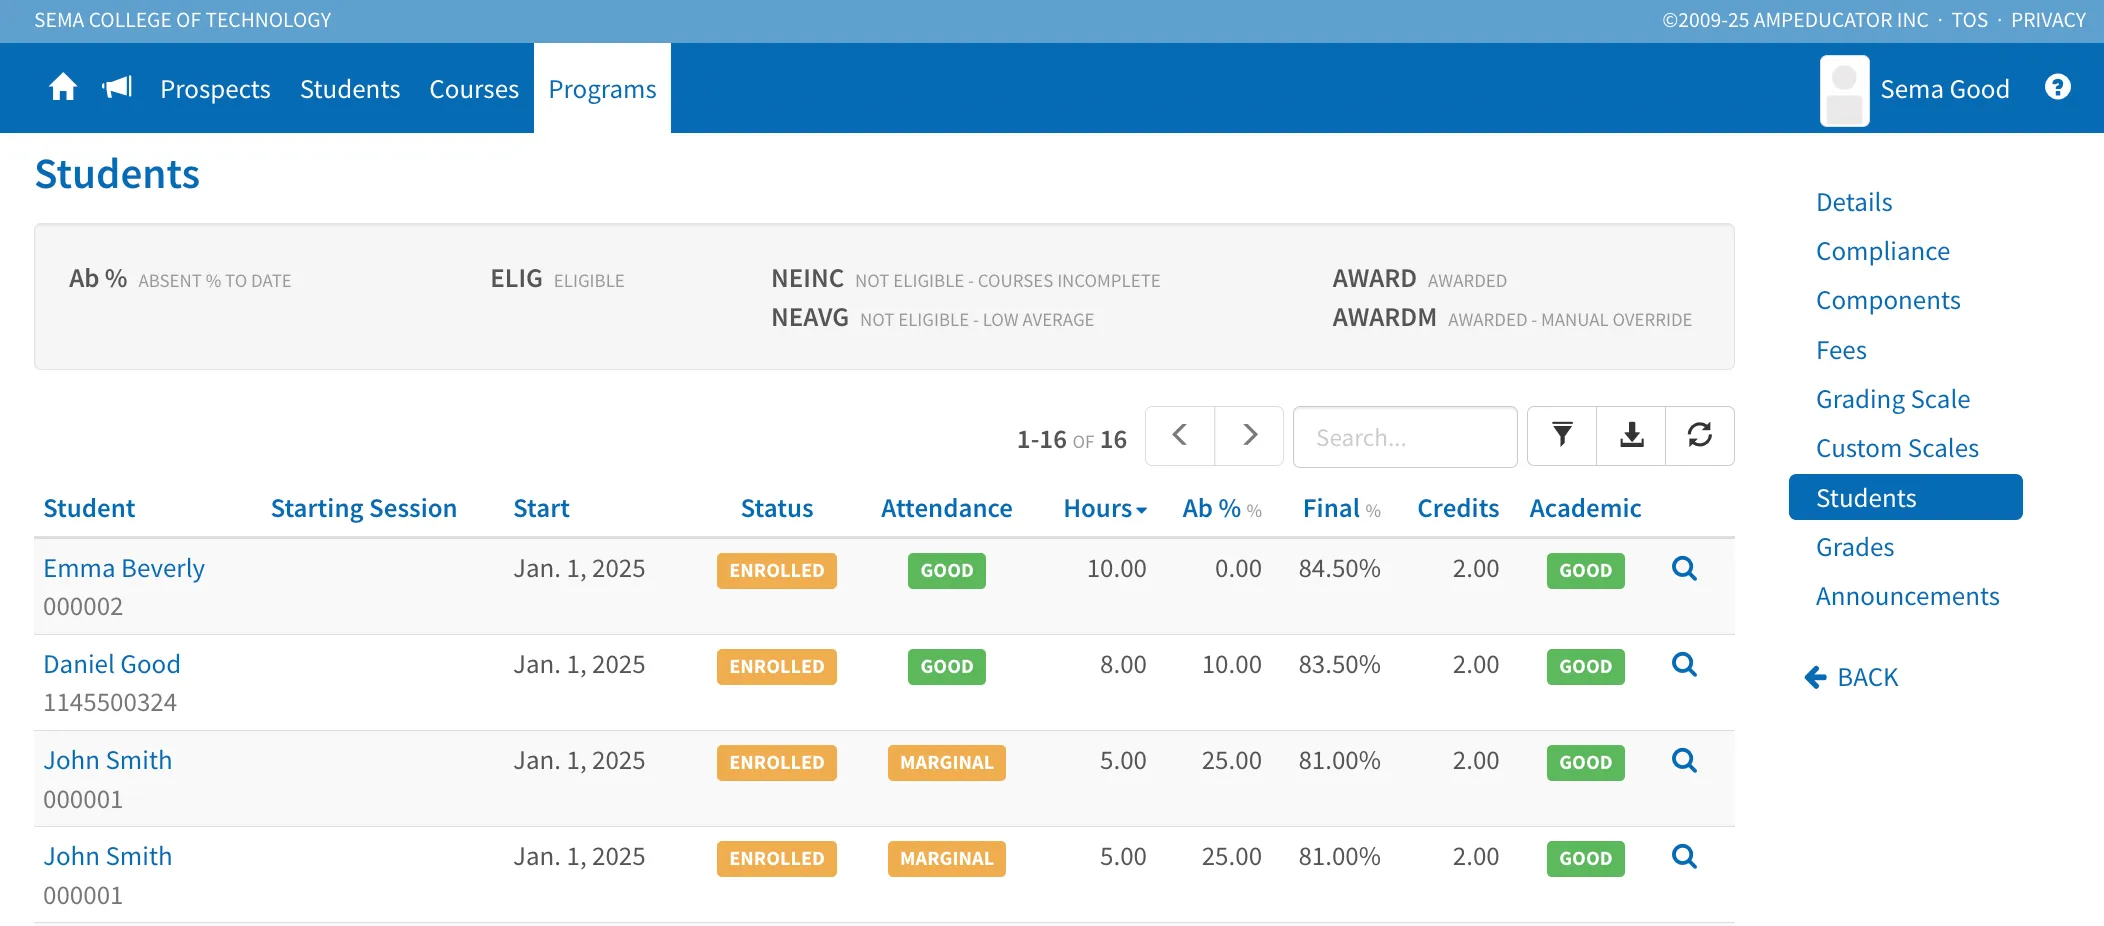
The Students section displays all students currently enrolled in the Program along with key details such as their starting session, enrollment status, attendance, hours, absence percentage, final percentage, total credits, and academic status. This gives you a clear, at-a-glance overview of each student’s progress within the Program.
Searching, Filtering, and Exporting Student Data
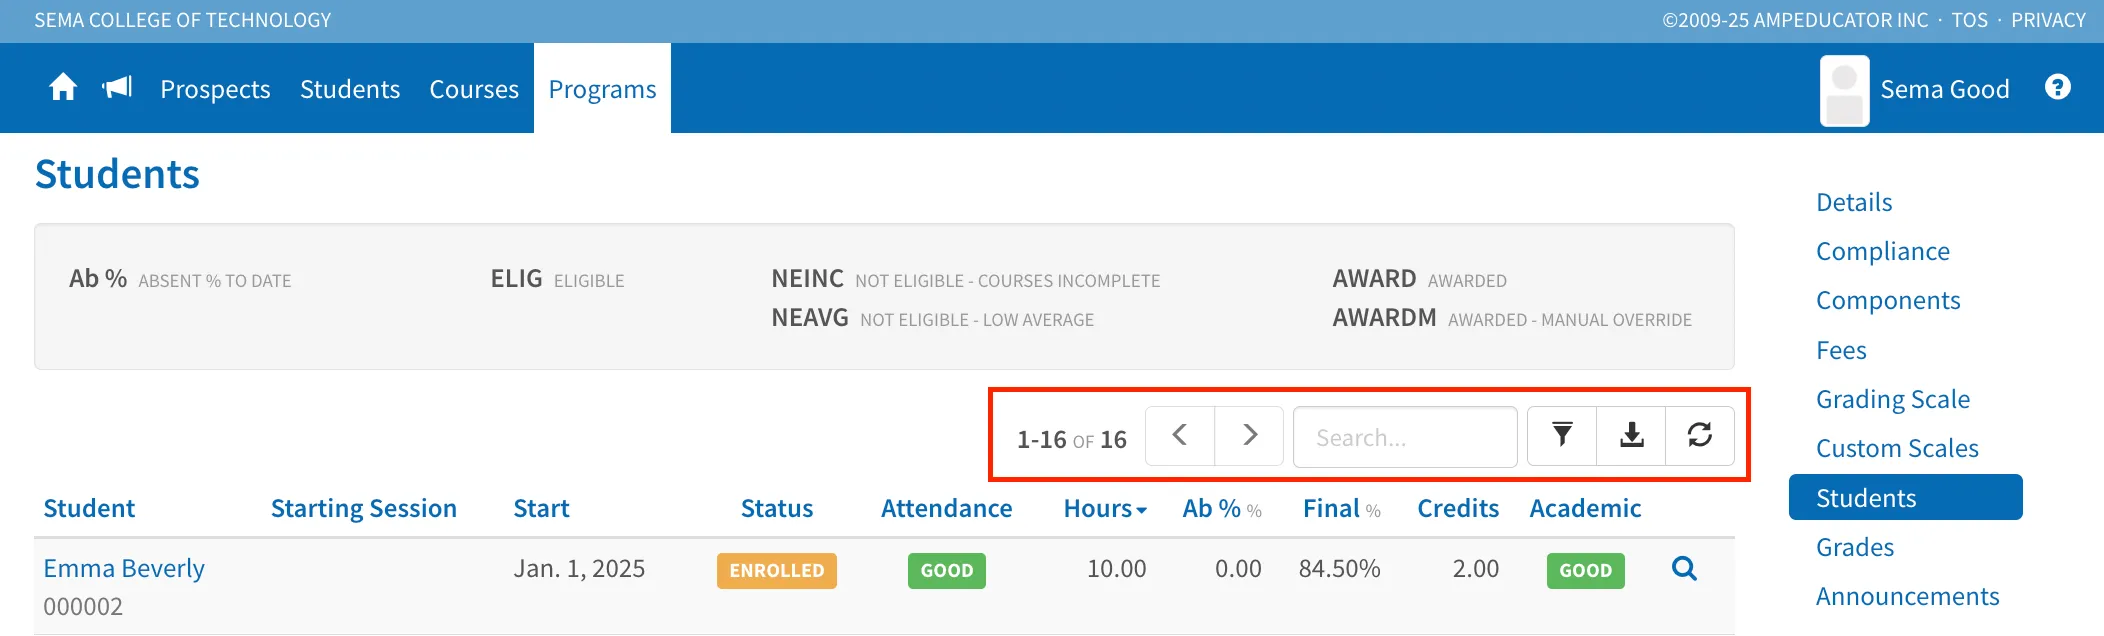
At the top of the section, you can use the search bar to quickly find a specific student by name or ID.
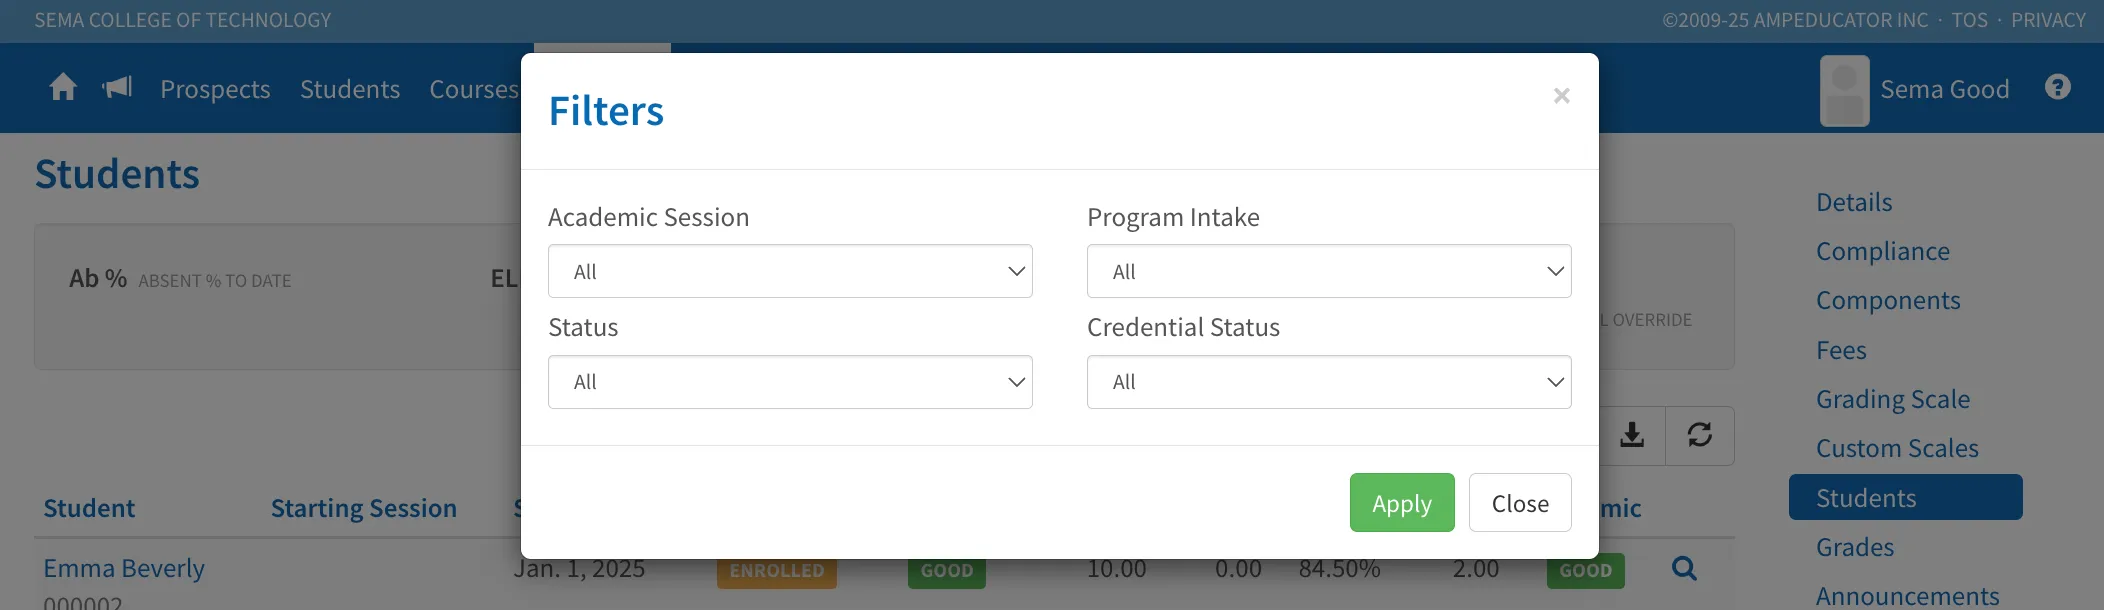
If you want a more refined view, click the Filter icon to open filtering options, where you can sort students by Academic Session, Program Intake, Status, and Credential Status.
You can also export student data by clicking the Export icon. In the Export Data window, you can choose which columns to include before downloading the file — making it easy to share or store the information as needed.
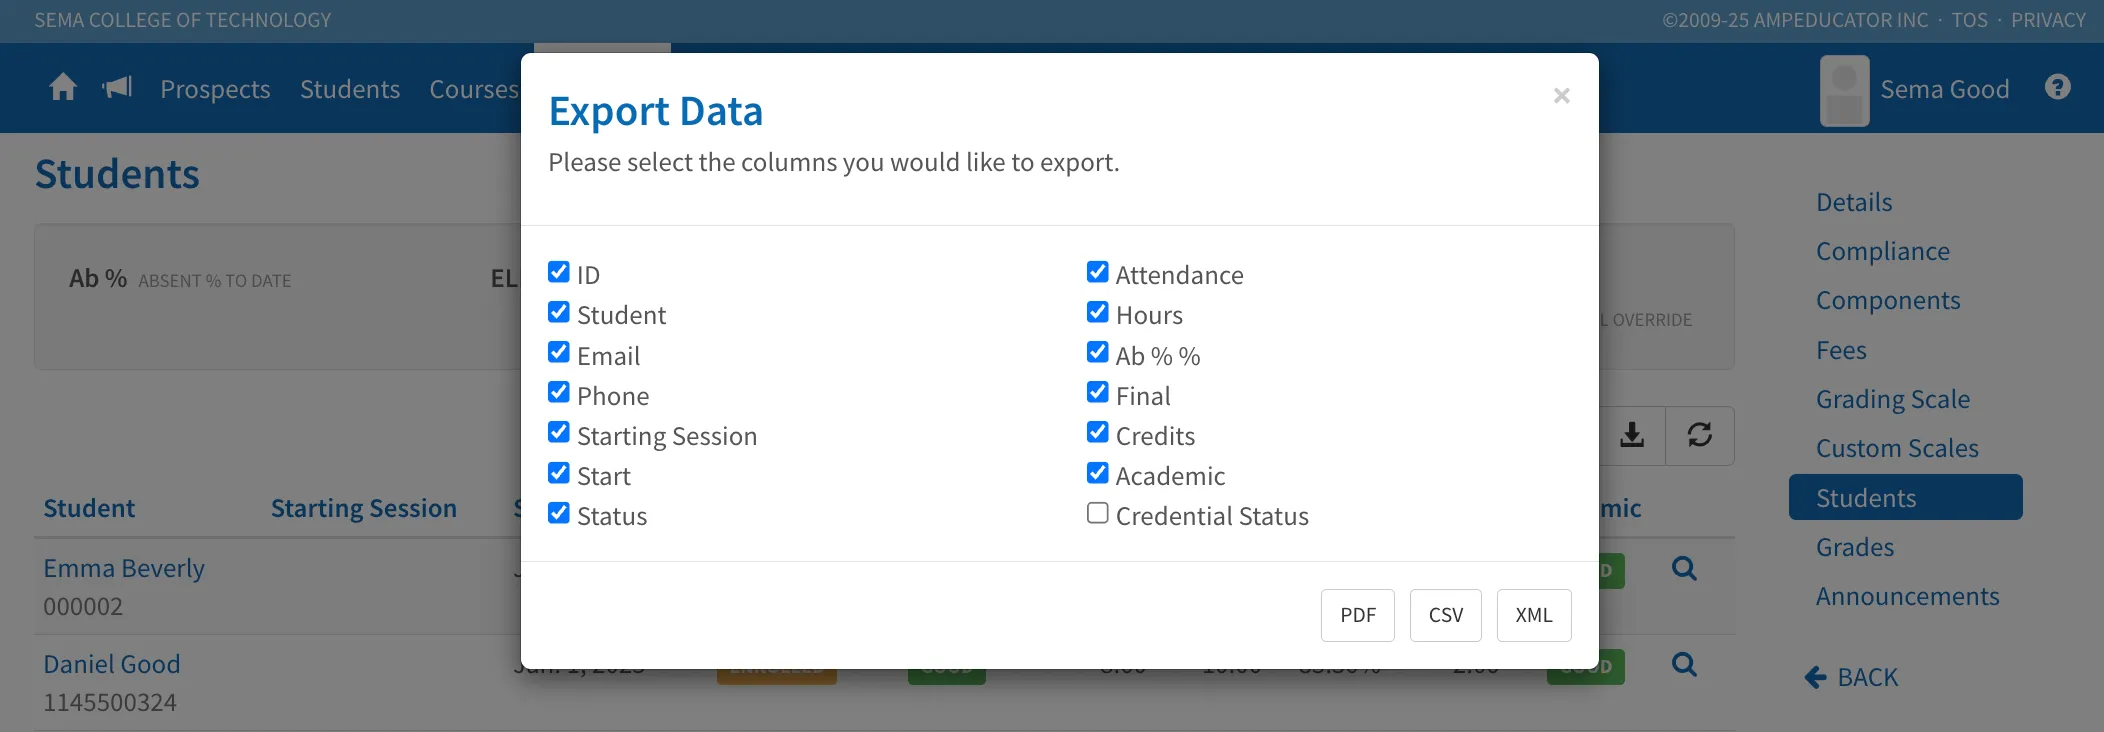
This creates a downloadable file of the current view — perfect for reporting, sharing, or maintaining offline records.
Viewing a Student’s Program Audit
Click the Audit Program icon next to a student’s name to open their Program Audit.
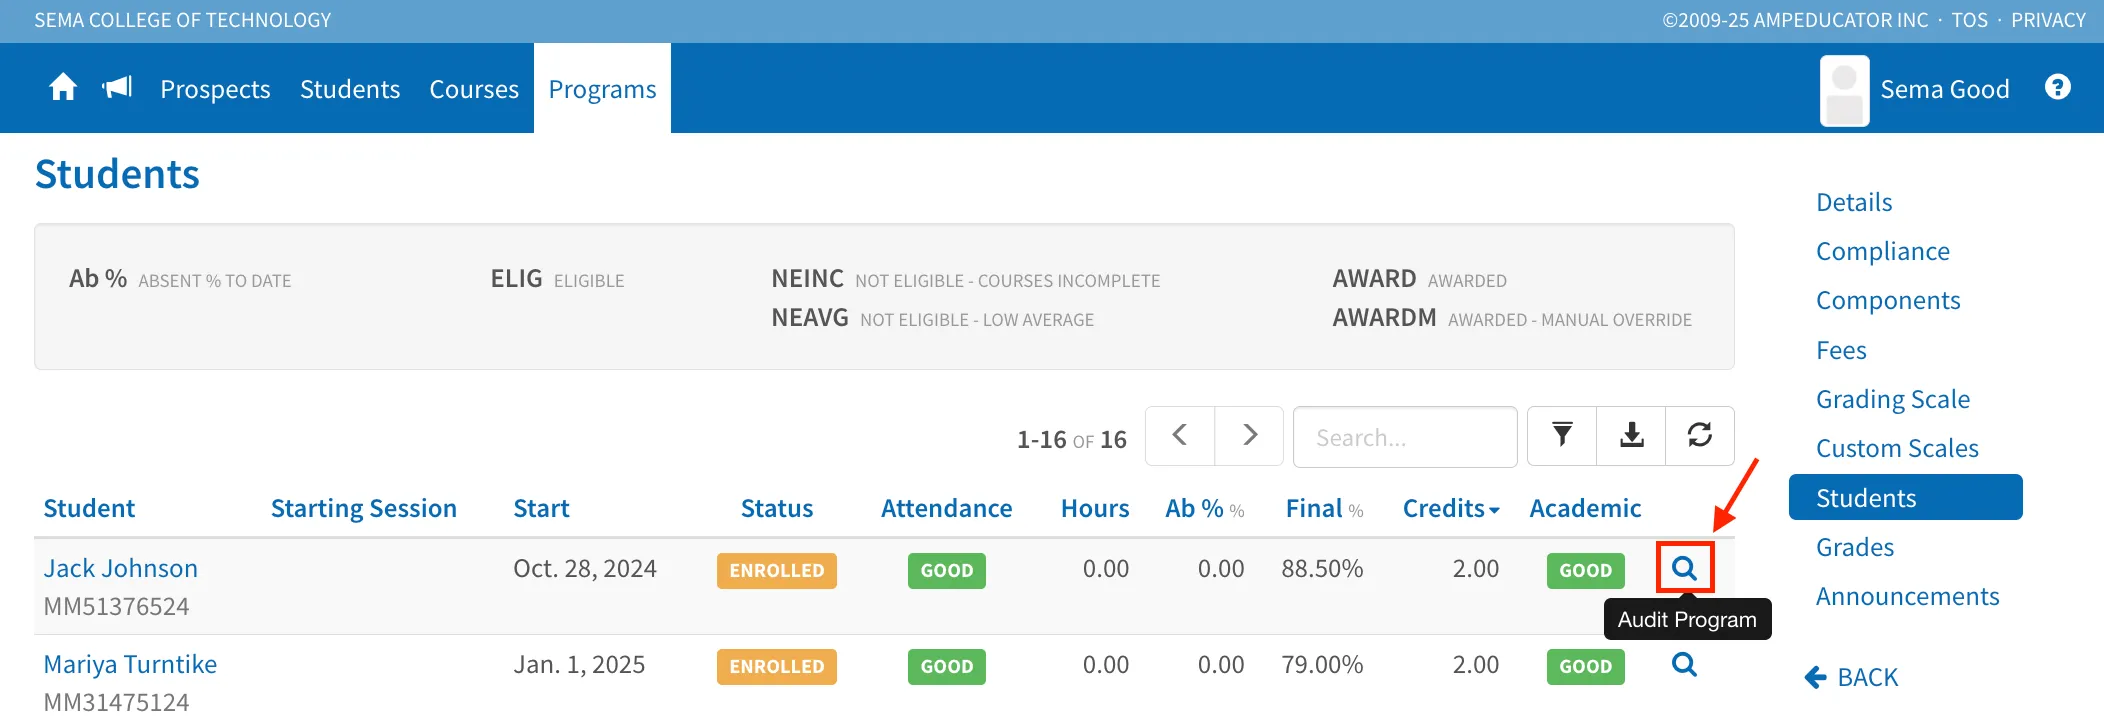
This view provides a detailed summary of the student’s progress in the program, including their completed and missed hours, earned credits, final grades, attendance status, and a breakdown of all courses with their completion details.
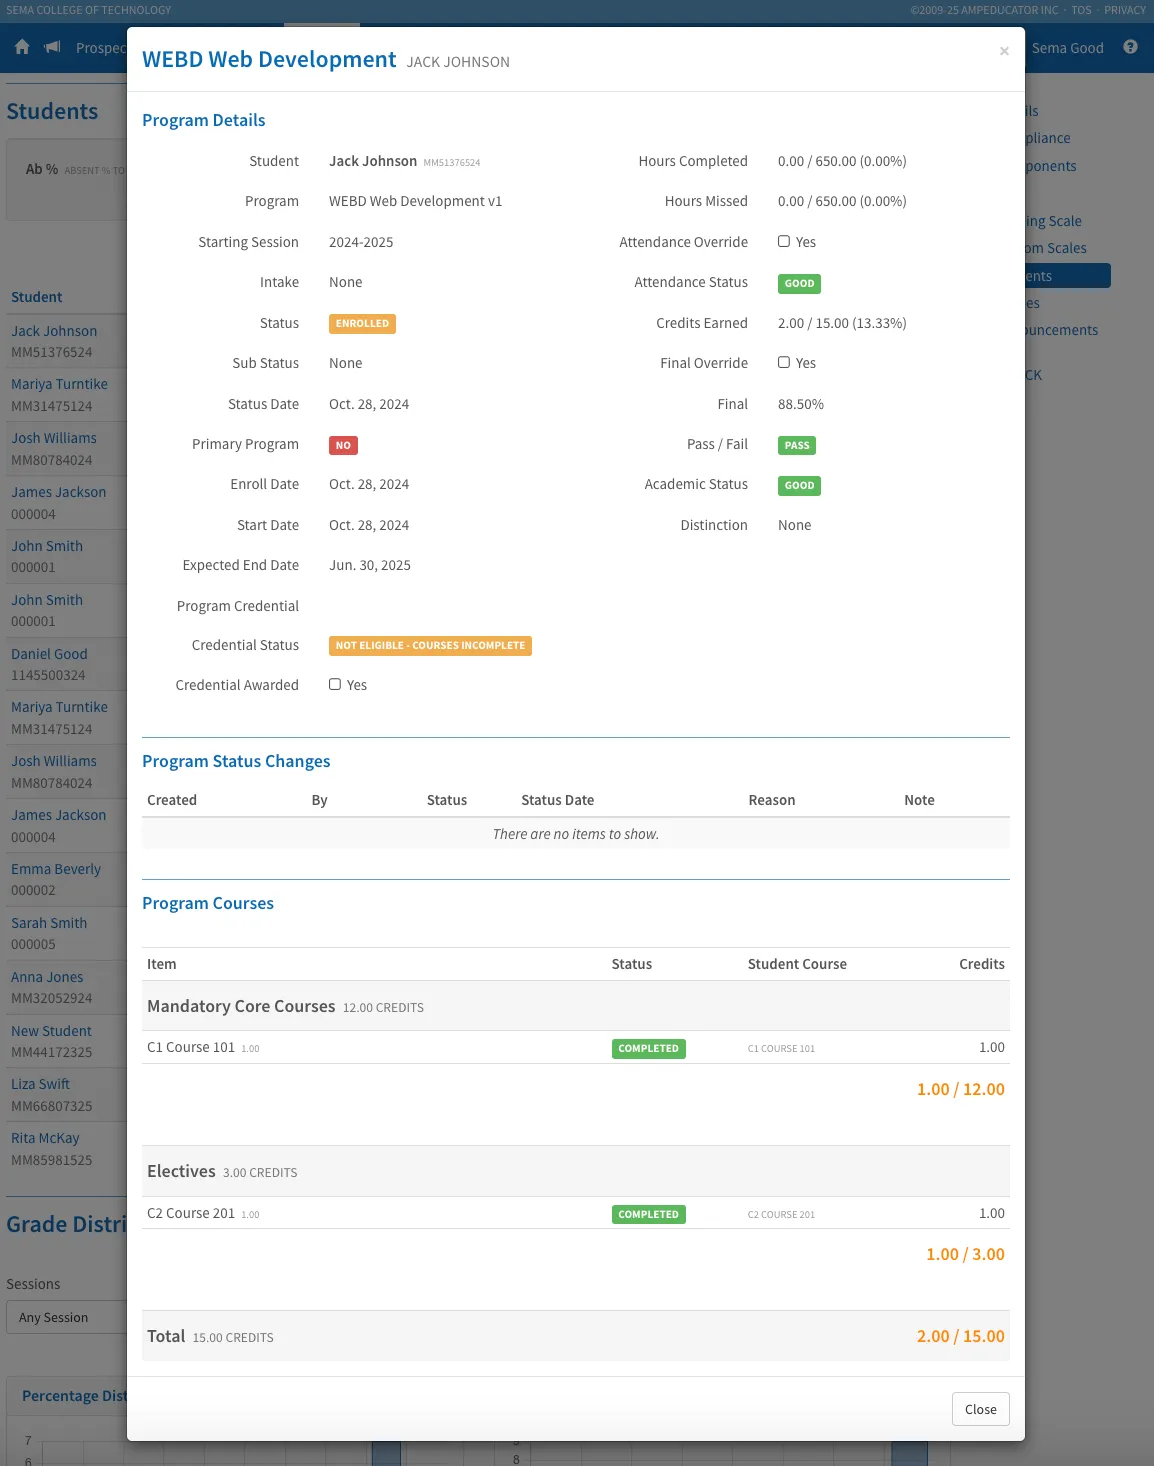
To view the student’s full record across all programs, simply click on their name to open their Student Profile.
Grade Distribution
The Grade Distribution section provides a visual overview of student performance within a program. It displays both percentage and GPA distributions through charts, along with detailed statistics including the average, median, standard deviation, and the number of students within each range.
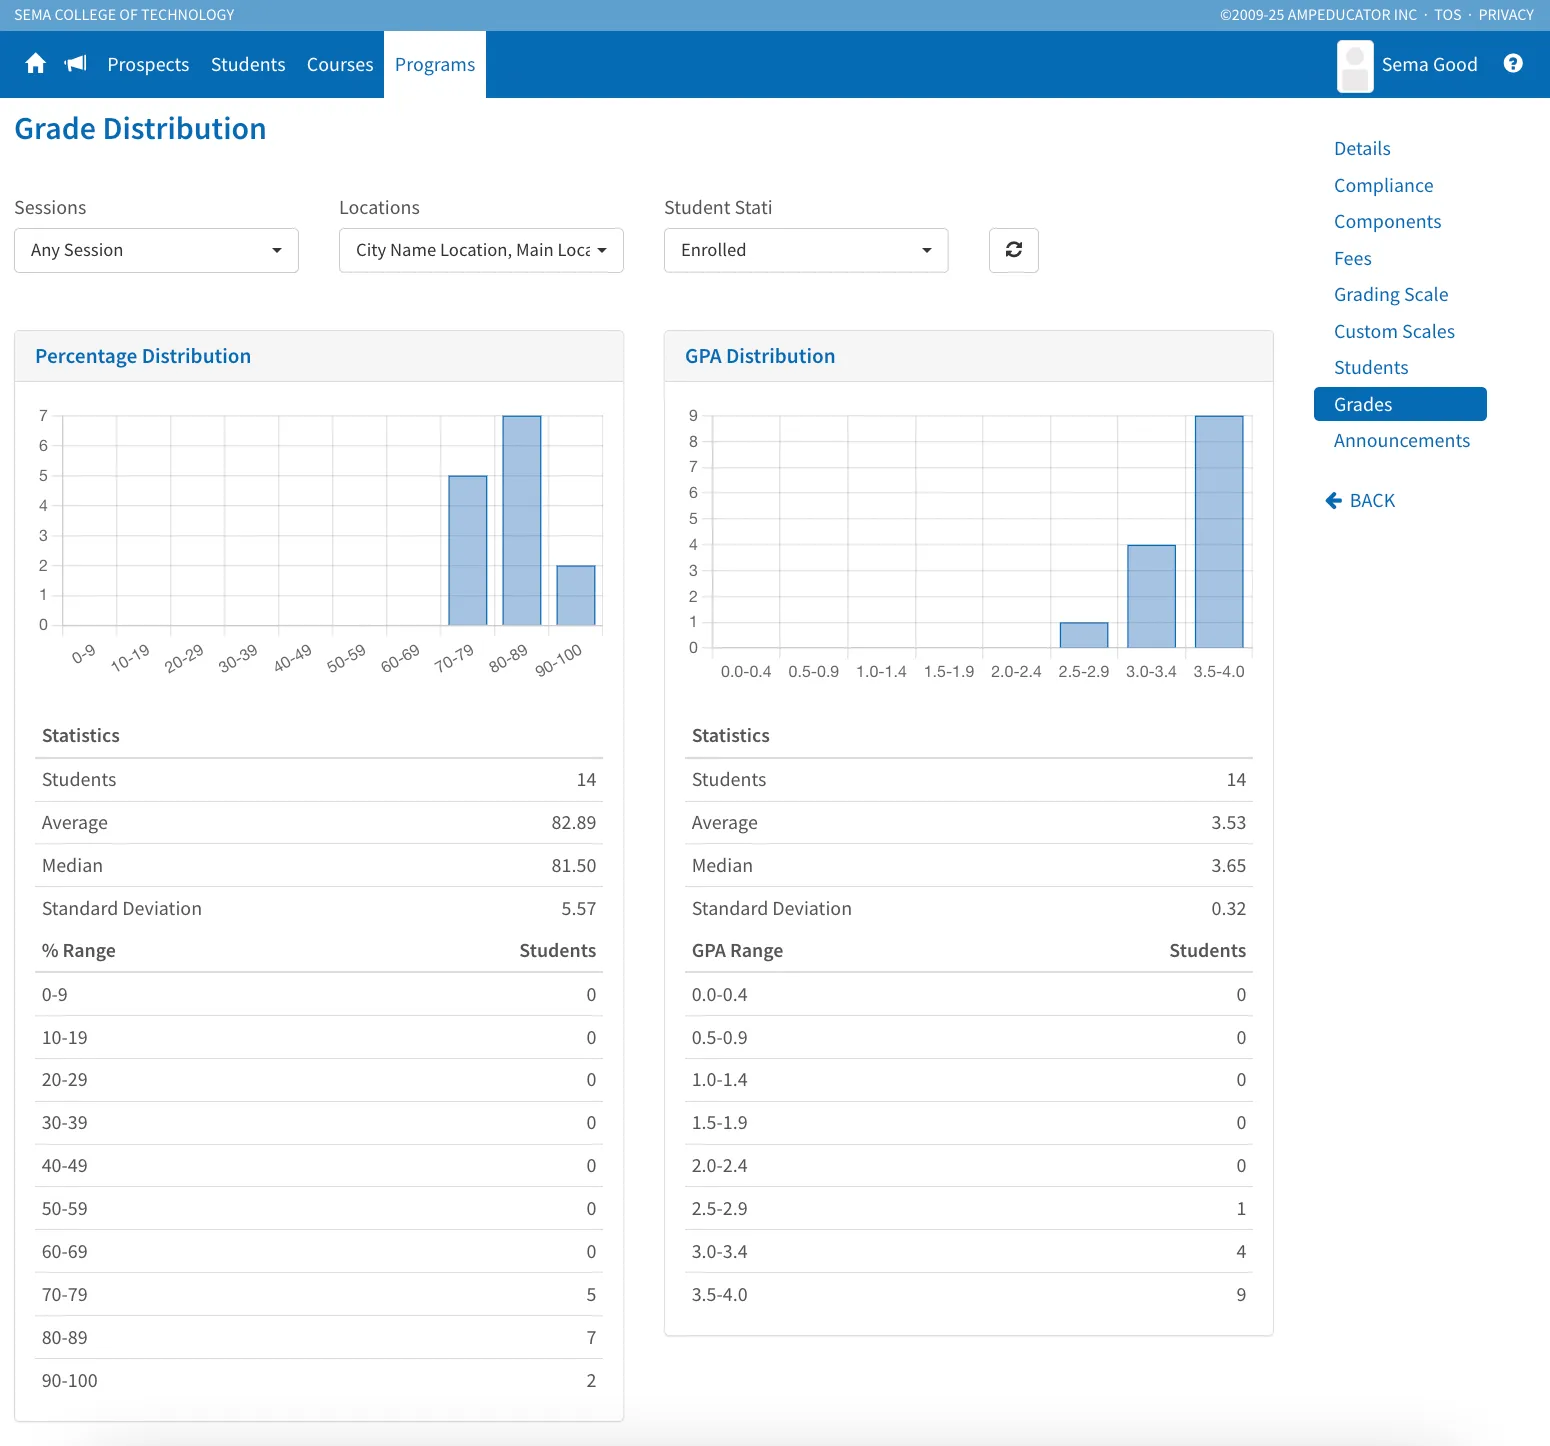
You can filter the data to focus on specific groups:
- Sessions – choose to view grades from all sessions or limit the view to one or multiple sessions.
- Locations – select a single location or multiple locations to compare performance across campuses.
- Student Stati – refine results to show Enrolled, Completed, and/or Withdrawn students.
Once your filters are set, the charts automatically update to reflect your selections, giving you clear insight into how students are performing across different segments.
Annoucements
The Announcements section lets you share important updates and messages with students enrolled in the program. Announcements appear directly on each student’s dashboard in the Student Portal, keeping them informed about key dates, events, and reminders.
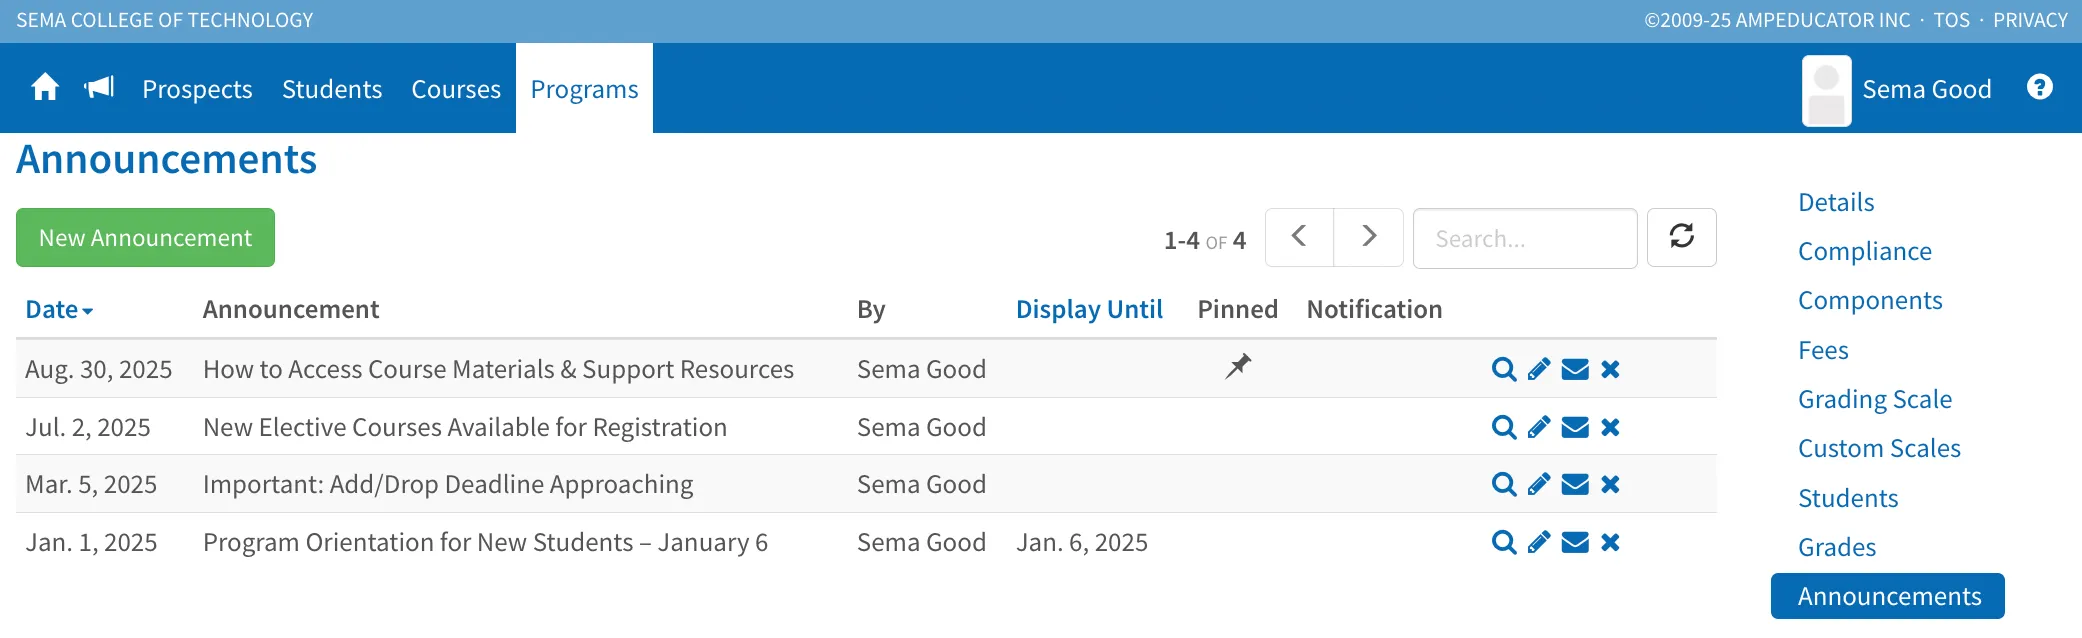
You can also choose to send announcements by email when creating them, ensuring students don’t miss important information. If you schedule an announcement for a future date, it will automatically post at midnight on the scheduled day, and any associated email notifications will be sent the following morning.
To create a new announcement, click New Announcement. This opens a setup window where you can:
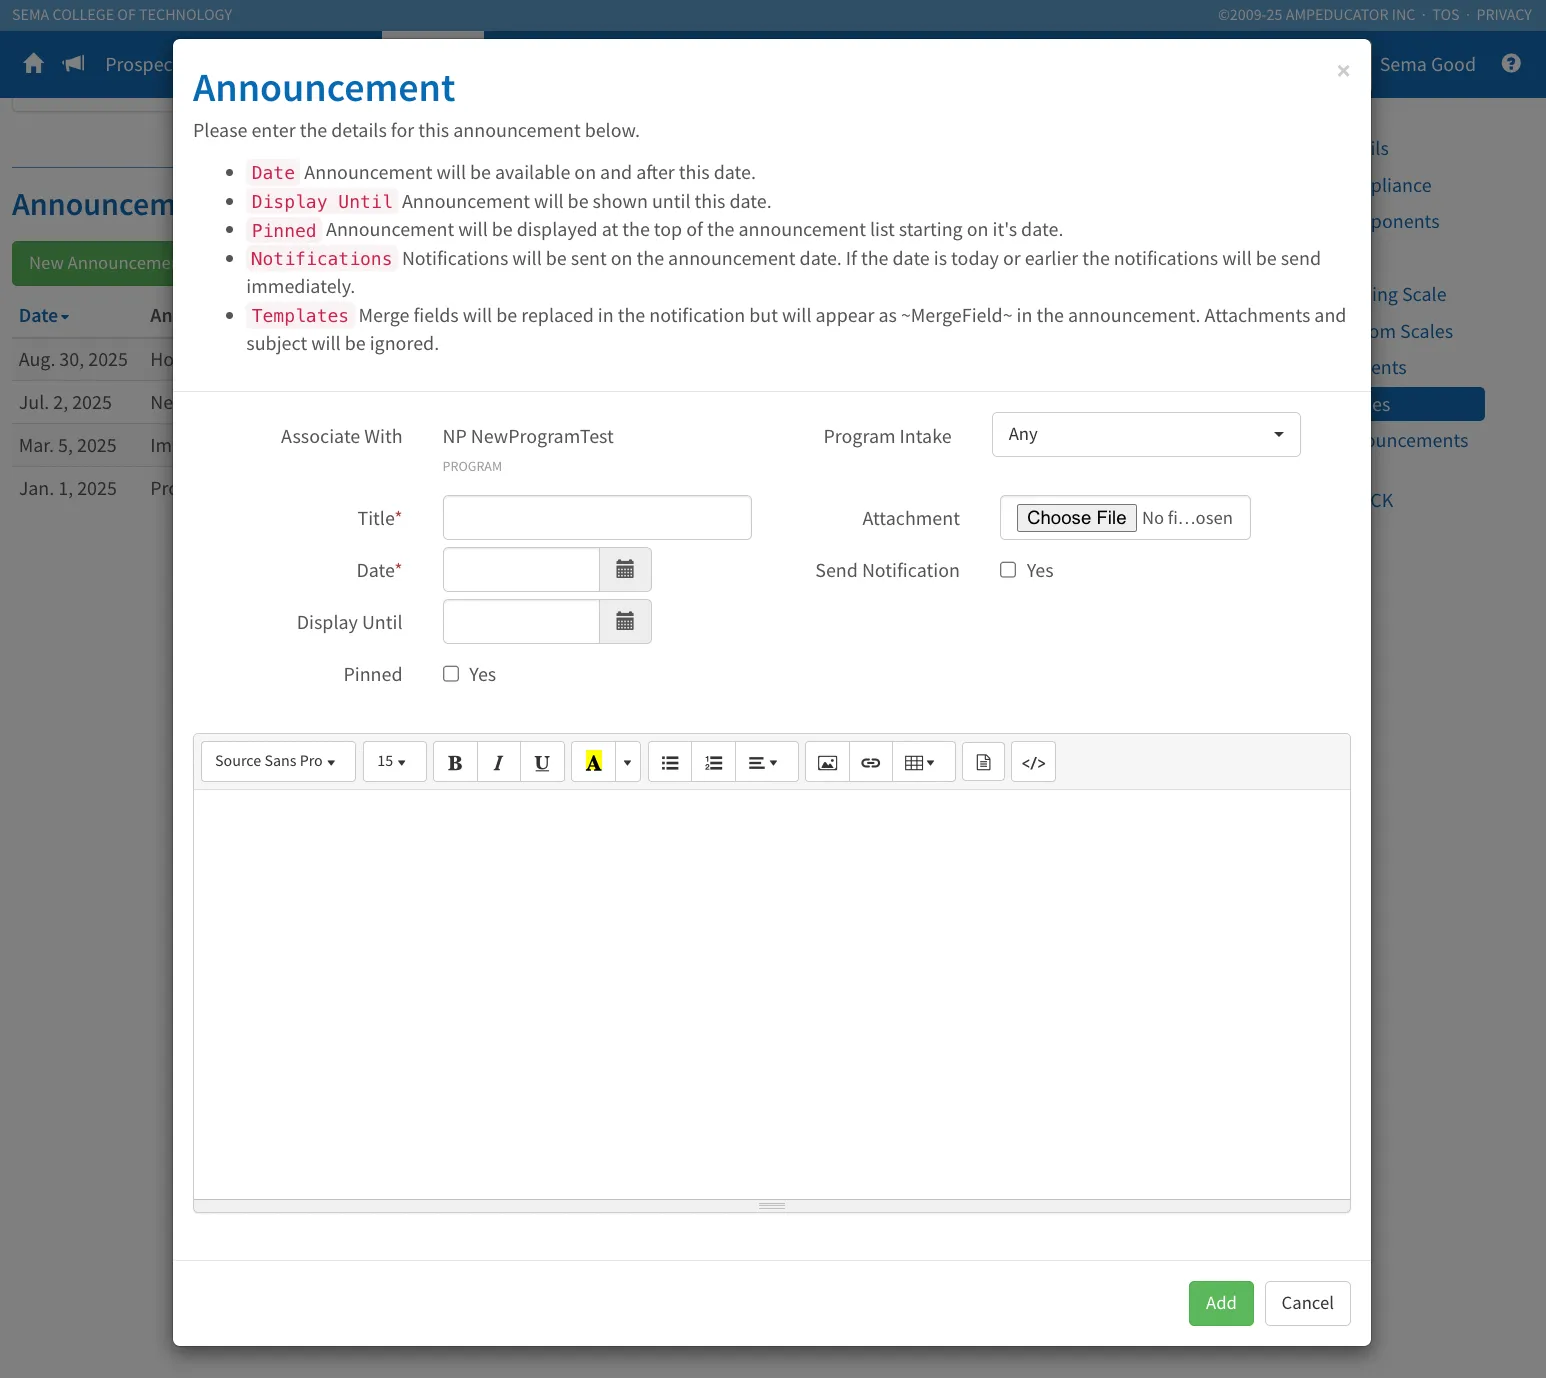
- Title: The heading that appears at the top of the announcement in both the portal and email (if selected).
- Message:The full content of your announcement. You can include links, details, or instructions for students.
- Program Intake: Choose whether the announcement applies to all intakes within the program or only specific ones.
- Date: The date the announcement will first appear to students (or be scheduled to post).
- Display Until: The date the announcement will stop appearing on the Student Portal dashboard.
- Pin Announcement: Keeps the announcement fixed at the top of the list for higher visibility.
- Send Email Notification: Sends the announcement by email in addition to displaying it on the dashboard. If prescheduled, the post appears at midnight on the set date and the email is sent the following morning.
- Attachments: Allows you to include files, such as PDF schedules or event flyers, with the announcement.
This feature helps streamline communication so students always know what’s happening in their program.
Enrolling Students into Programs
Once you’ve finished setting up and configuring your program, you’re ready to start enrolling students. Enrollment can be done individually or in groups, depending on your institution’s needs.
Enrolling Individual Students
To enroll a single student, go to the Student’s Profile and select the Academics tab, and click or scroll to the Programs section.
Click Enroll in Program, which opens the modal where you can enter all required details.
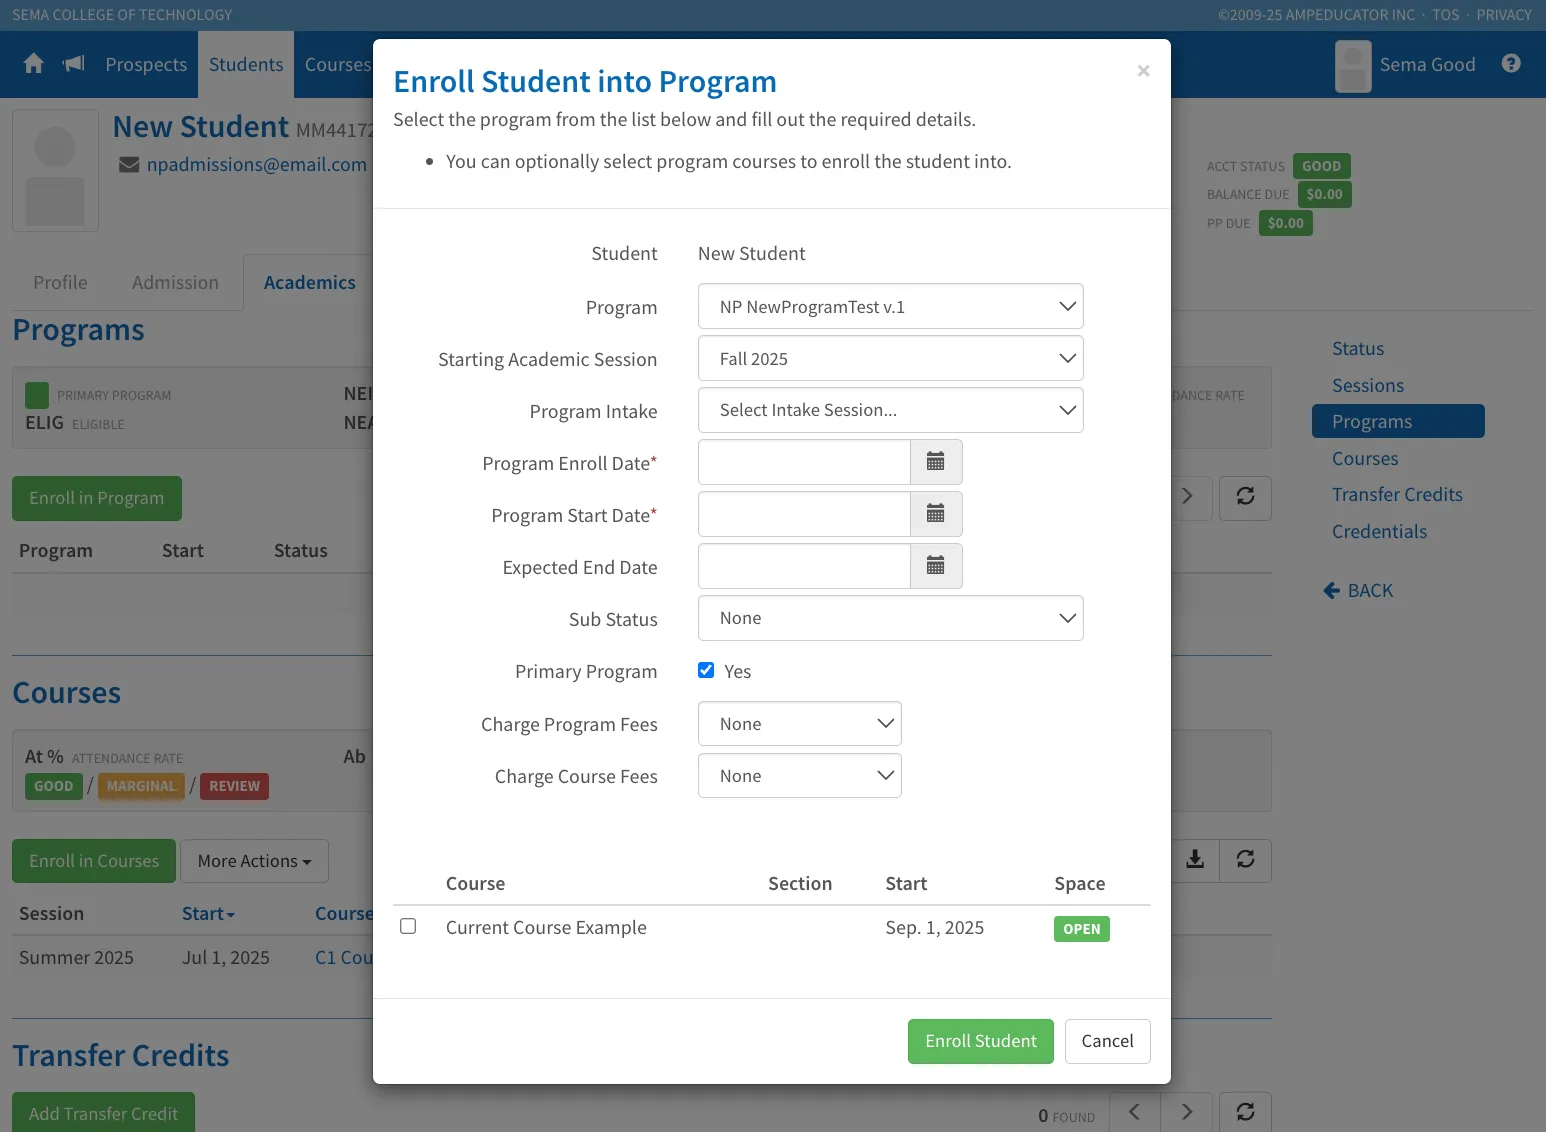
- Program – Select the program the student will be enrolled in.
- Starting Academic Session – Choose the academic session the student is beginning in (e.g., Fall 2025).
- Program Intake – If your institution uses intakes, select the applicable one here.
- Program Enroll Date – The date the student’s enrollment is officially processed.
- Program Start Date – The date the program begins for this student.
- Expected End Date – Automatically filled based on the program’s duration, but can be adjusted if needed.
- Sub Status – Optional secondary status (e.g., “Leave,” “Probation”).
- Primary Program – Check this box if this is the student’s main program of study.
- Charge Program Fees / Charge Course Fees – Choose whether to apply program- or course-level charges or invoices at enrollment (options: None, Charge Account, or Invoice Account).
After selecting the Program and Starting Academic Session, any available courses linked to that program will automatically appear at the bottom of the modal.

You can check the box next to a course to enroll the student directly into it as part of this process.
Once all details are complete, click Enroll Student to finalize the enrollment.
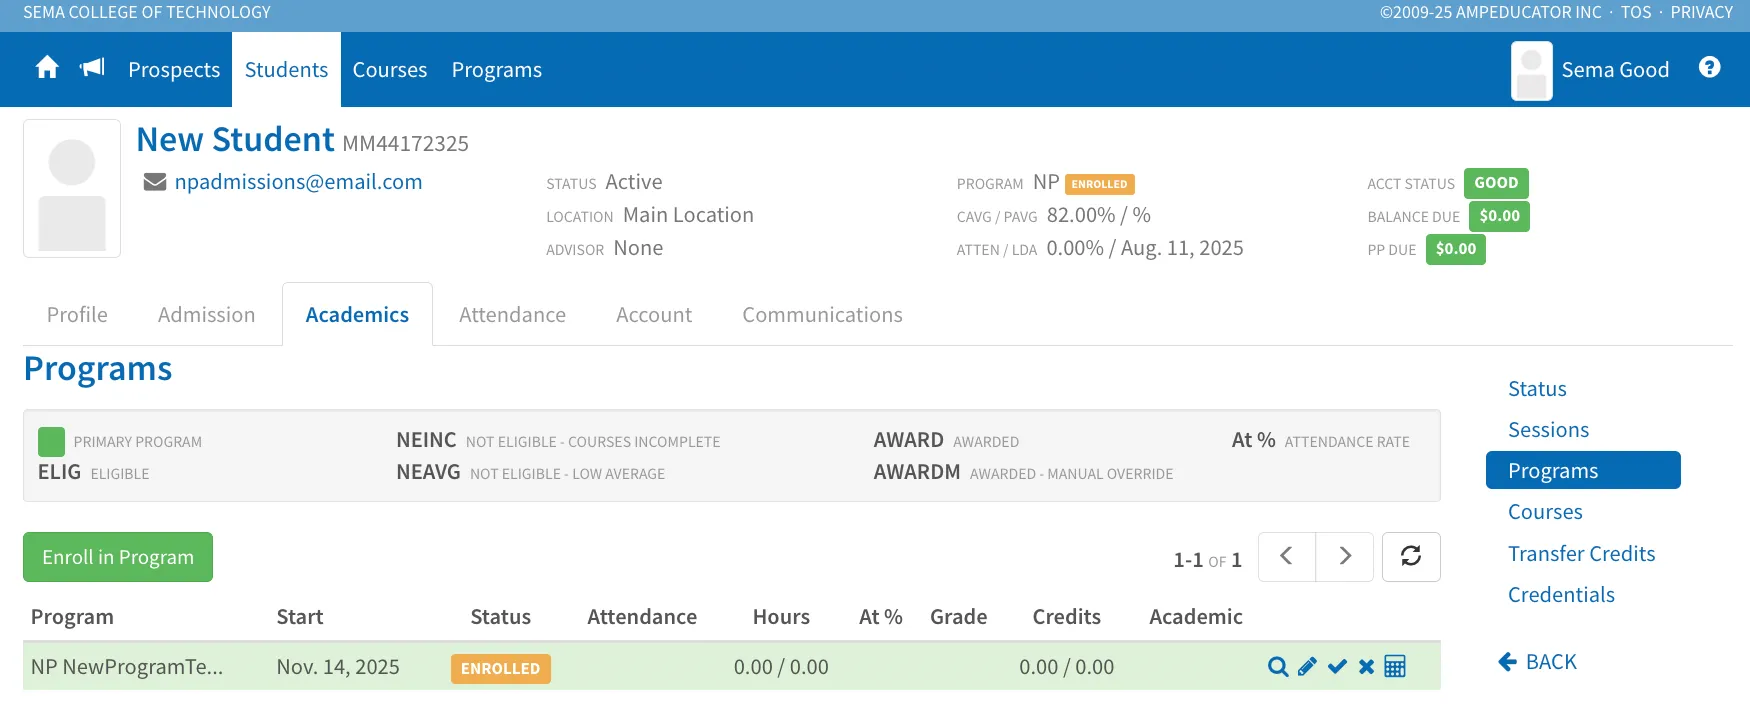
The program will now appear in the student’s Programs list under their Academics tab, confirming the student’s active enrollment.
Enrolling Groups of Students
If you need to enroll multiple students into the same program at once, you can do this directly from the Student List view. This method is especially useful for new cohorts or large intakes.
To start, select all the students you want to enroll, then click More Actions → Enroll in Program.
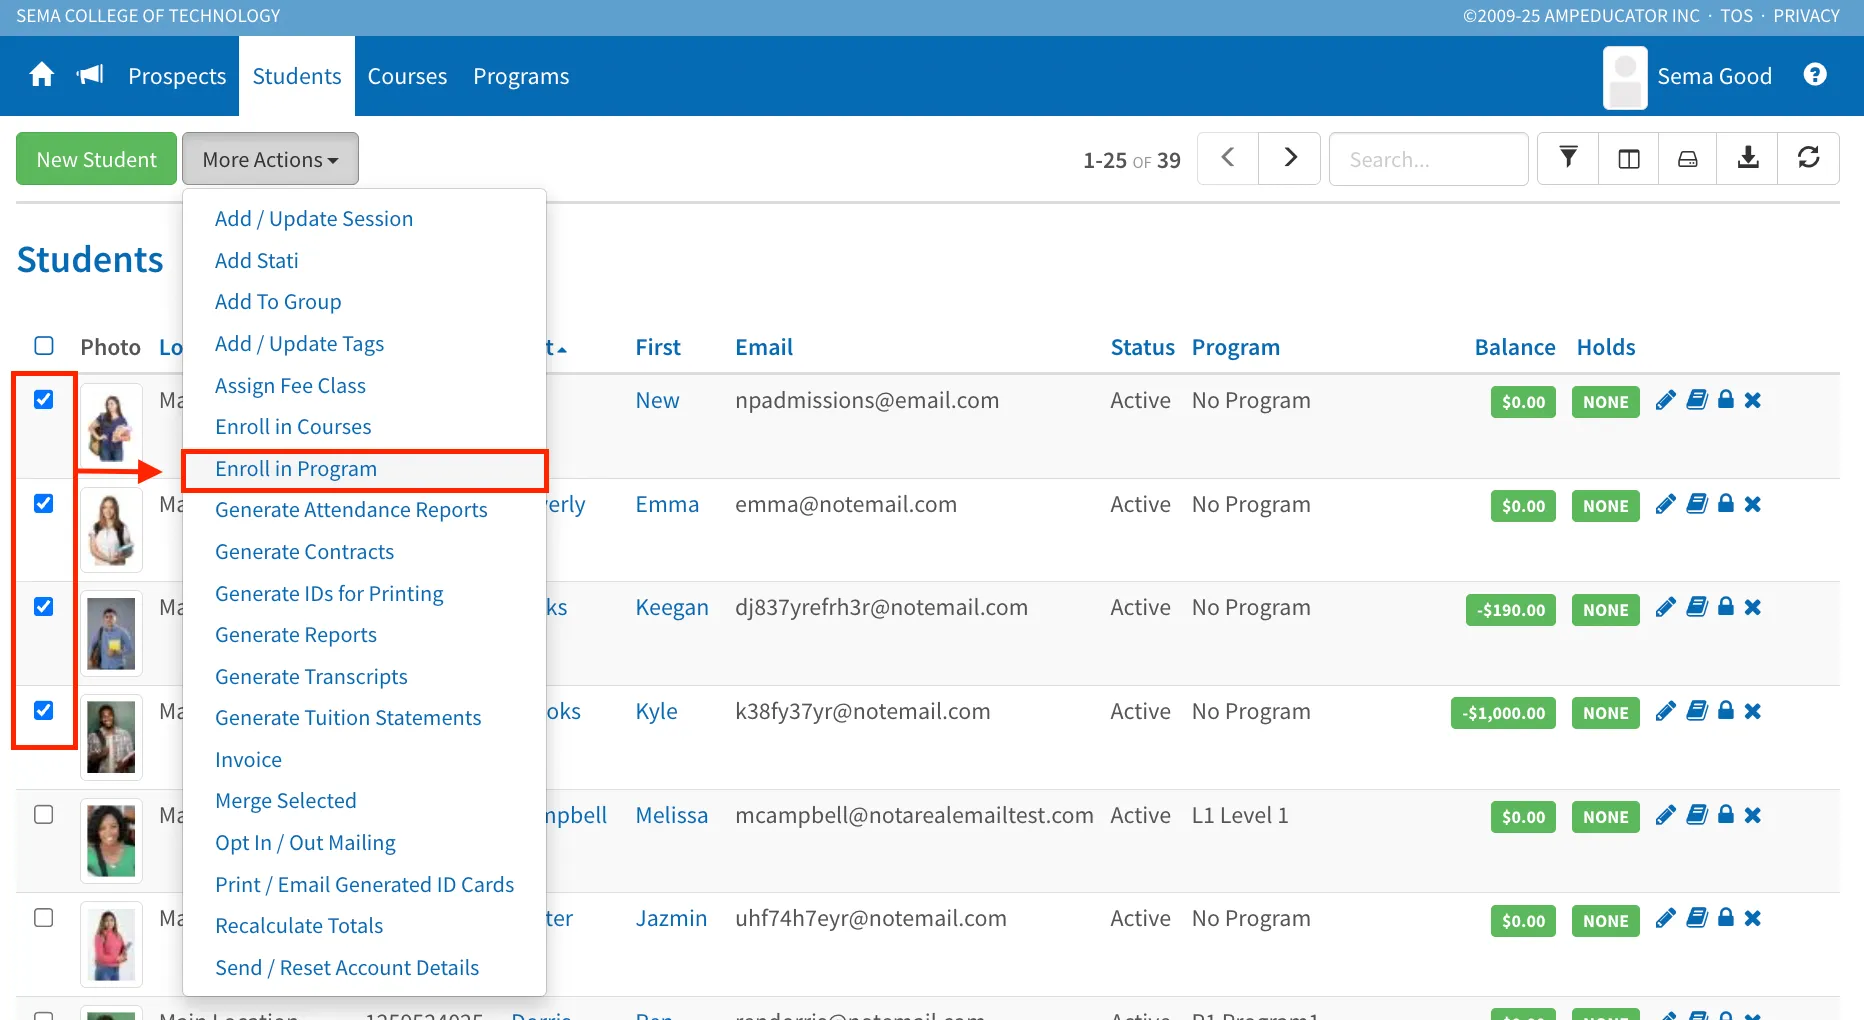
This will open the Enroll Students into Program modal, where you can choose:
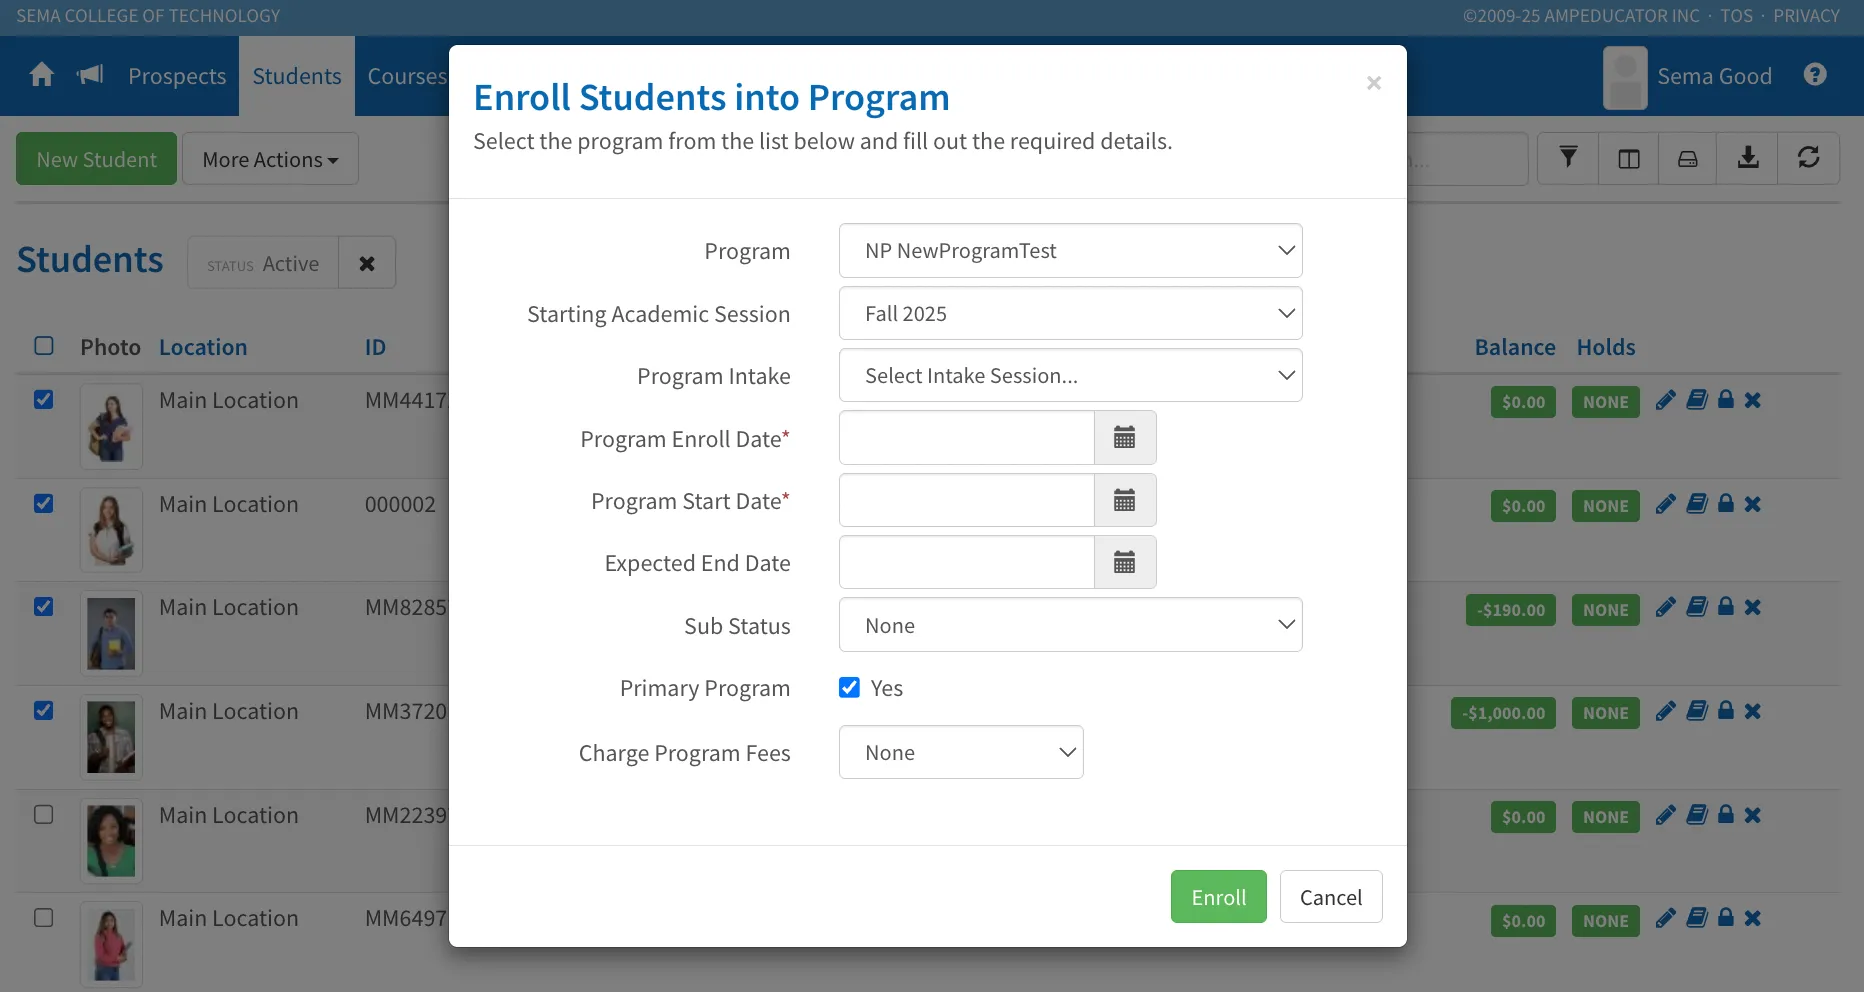
- Program: Choose the program the group will be enrolled in.
- Starting Academic Session: Select the session the enrollment applies to (e.g., Fall 2025).
- Program Intake: Optional; select if your institution uses intake sessions.
- Program Enroll Date: The date the enrollment is recorded.
- Program Start Date: The date the program officially begins.
- Expected End Date: Automatically calculated but can be modified.
- Sub Status: Indicates whether students are enrolled Full Time or Part Time.
- Primary Program: Check if this should be the student’s main program.
- Charge Program Fees: Choose whether to apply program-level charges or invoices at enrollment (None, Charge Account, or Invoice Account).
Once complete, click Enroll to finalize the process. Each student will then appear as enrolled in the selected program within their Academics / Programs section.
You may need to refresh the Student List to see the updated enrollments.
Auditing Programs
Once students are enrolled, you can audit their progress within a program to review academic performance, attendance, and completion details.
The Program Audit provides a detailed overview of how each student is progressing through their enrolled program — including completed and remaining courses, grades, attendance, and earned credits.
To access a student’s program audit, go to the student’s profile, open the Academics tab, and click the magnifying glass icon beside the program name.
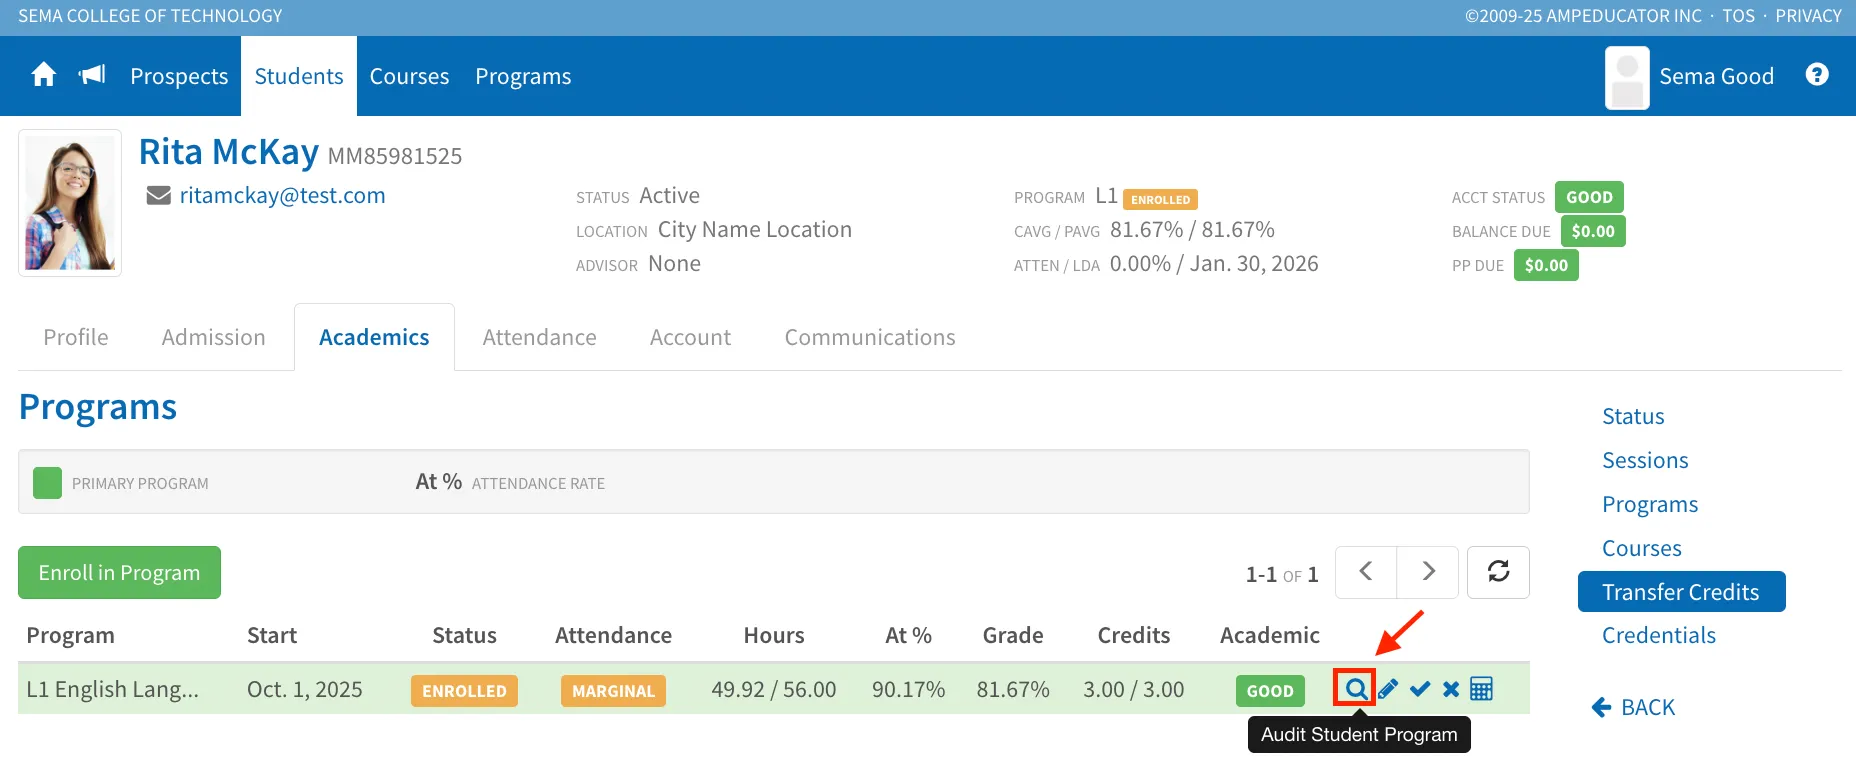
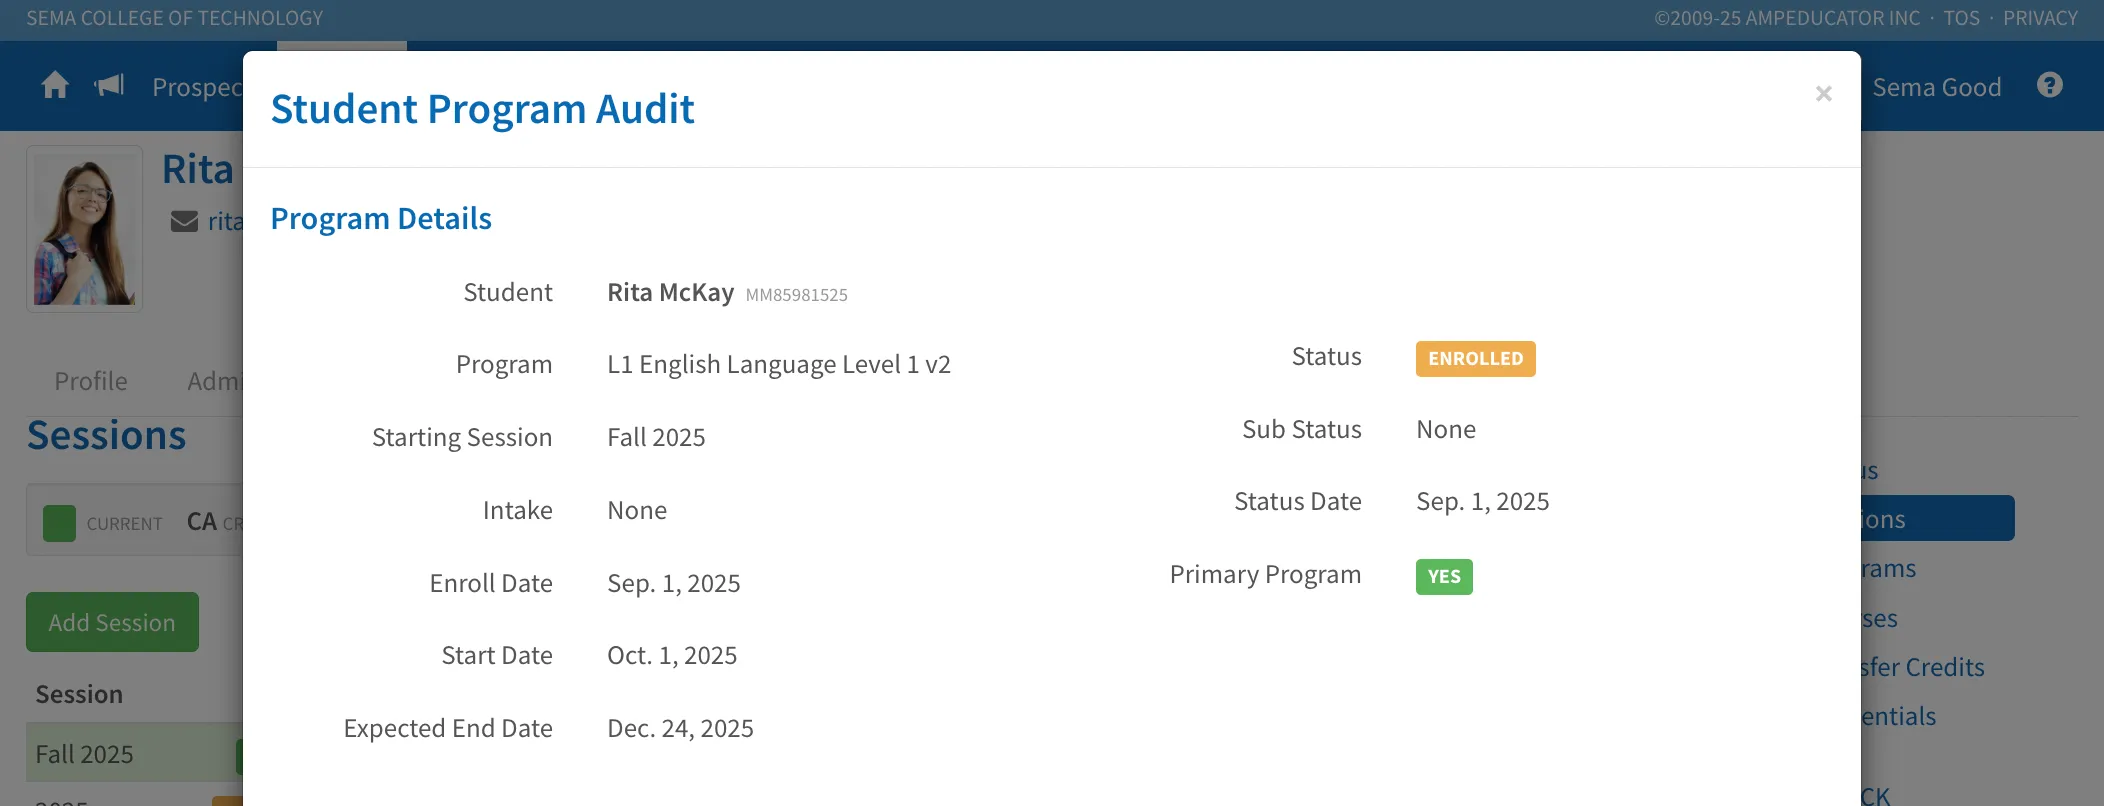
The audit includes the following sections:
Program Details: Displays general information about the enrollment — including the program name, session, start and end dates, and current enrollment status.
Program Academics: Shows total credits earned, final percentage and grade, academic standing, and any applied overrides.

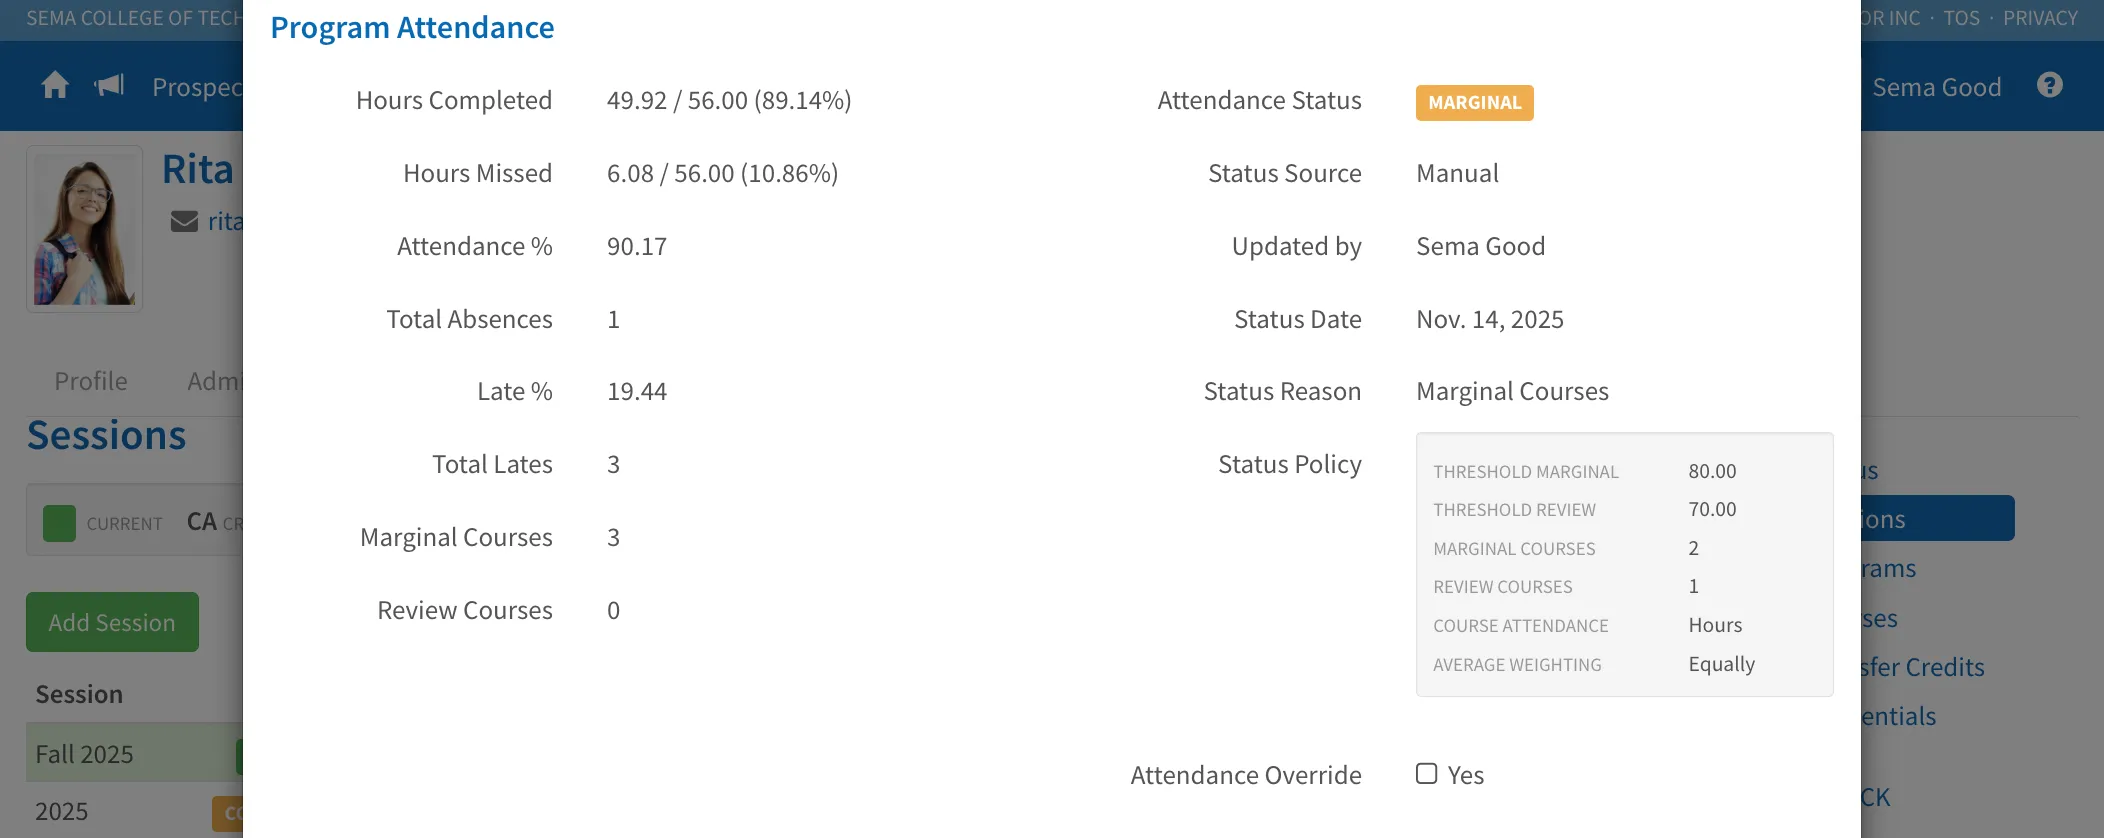
Program Attendance: Tracks hours completed and missed, attendance percentage, lateness, and attendance status (e.g., Good, Marginal, Review).
Program Credentials: Indicates whether the student is eligible for a credential and if it has been awarded.

Program Status Changes: Logs any updates to the student’s enrollment status, with date, reason, and user recorded.

Program Courses: Lists all courses associated with the program, including their completion status, grades, and earned credits.
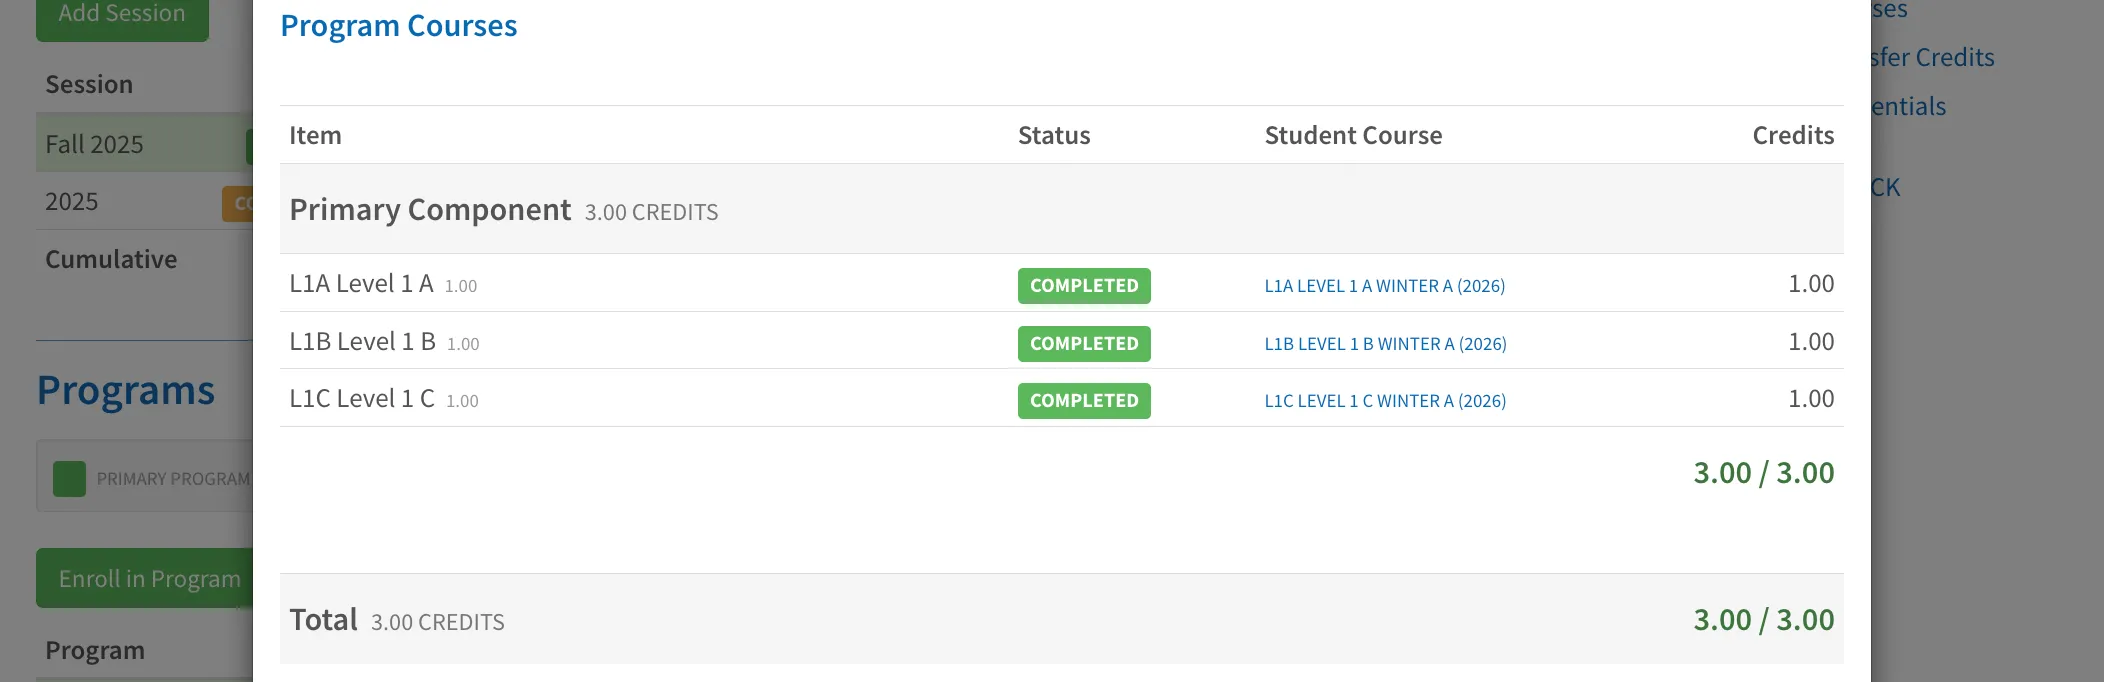
The program audit provides a clear, comprehensive view of a student’s academic and attendance performance, making it easy to confirm completion and credential eligibility.
Completing a Program and Awarding a Credential
When a student has finished all program requirements, you can mark the program as complete and award their credential if eligible. For more about creating and configuring credentials see Institution Config / Credentials.
To complete a program, go to the student’s Academics Tab → Programs and click the Complete Student icon beside the program name.
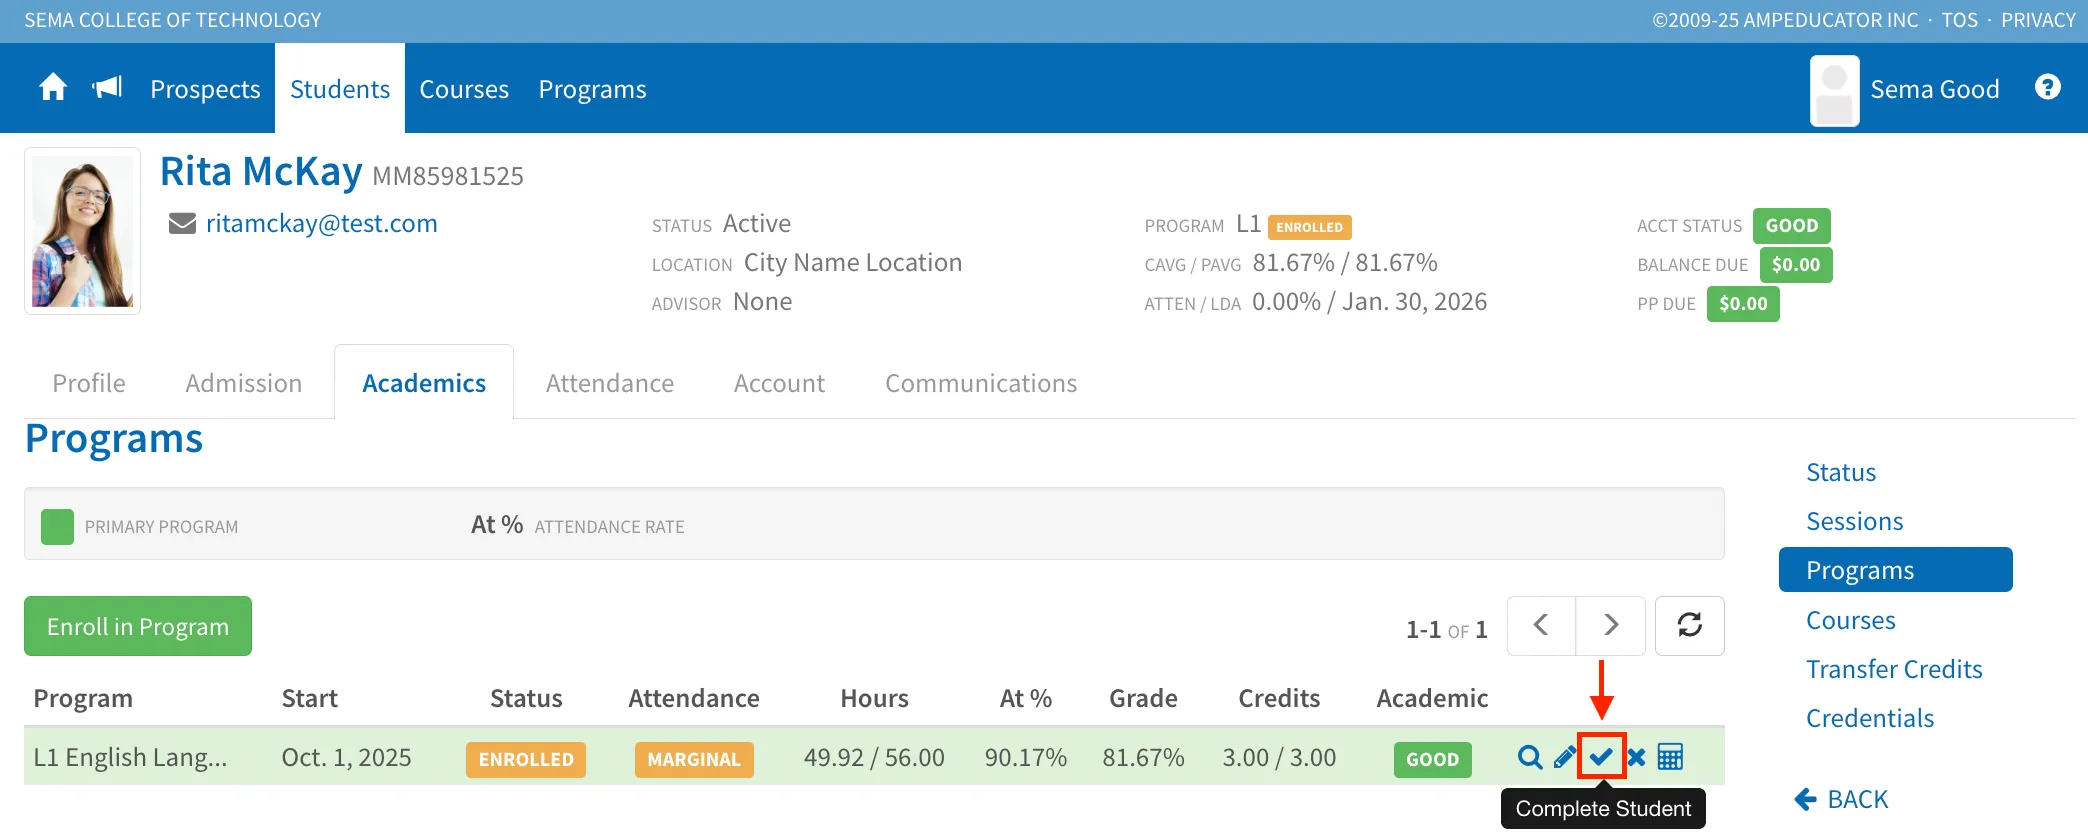
This opens the Complete Student Program modal, where you can confirm completion details and apply any final overrides.
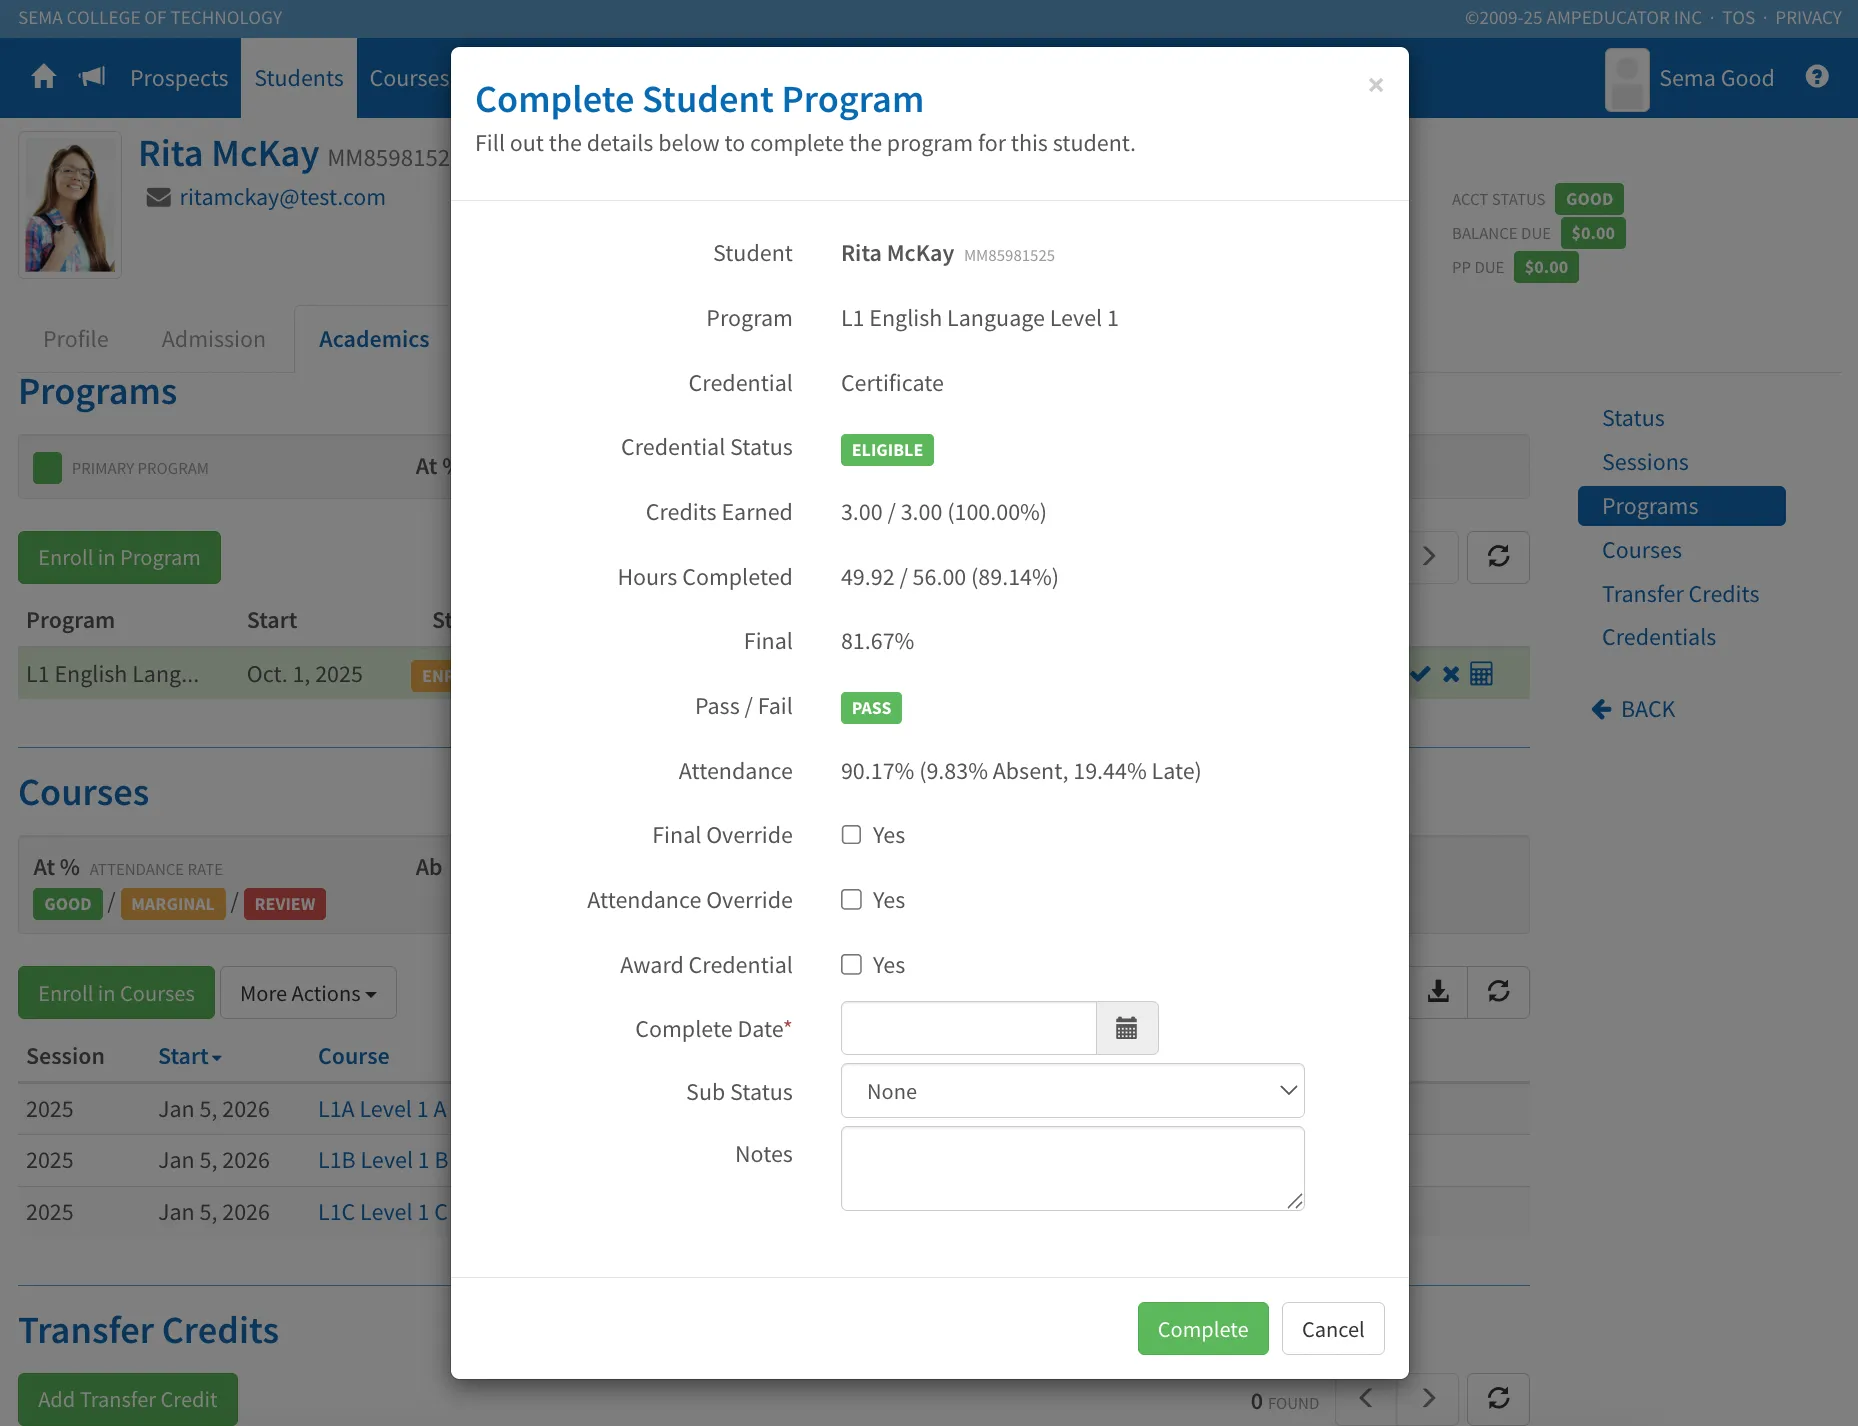
The fields include:
- Student / Program / Credential: Displays the student name, enrolled program, and associated credential.
- Credential Status: Indicates whether the student is eligible for a credential based on program requirements.
- Credits Earned: Shows total program credits completed and the percentage of credits earned.
- Hours Completed: Displays total instructional hours completed and the percentage based on program requirements.
- Final: The student’s final grade for the program.
- If Final Override is checked, additional fields appear to manually enter a new final percentage and specify an override reason.
- Pass / Fail: Shows the final pass/fail result based on the student’s grade.
- Attendance: Displays attendance details, including attendance percentage, absences, and late percentages.
- If Attendance Override is checked, additional fields appear to manually enter a new attendance percentage and lateness percentage, along with a reason.
- Award Credential: Check this box to award the student’s credential.
- When selected, the credential is automatically added to the student’s profile and becomes visible in their student portal.
- Credentials can be configured in Institution Config → Credentials.
- Complete Date: The official date the program was completed.
- Sub Status: Select an optional secondary status such as Credential Pending or Early Completion.
- Only sub-statuses configured under Institution Config / Programs / Sub Stati will appear in this list.
- Notes: Enter any relevant comments or details about the completion.
After confirming all details, click Complete to finalize.
Once the program is completed, the student’s program status will update to Completed, and the record will display updated final grades, attendance, and academic standing.
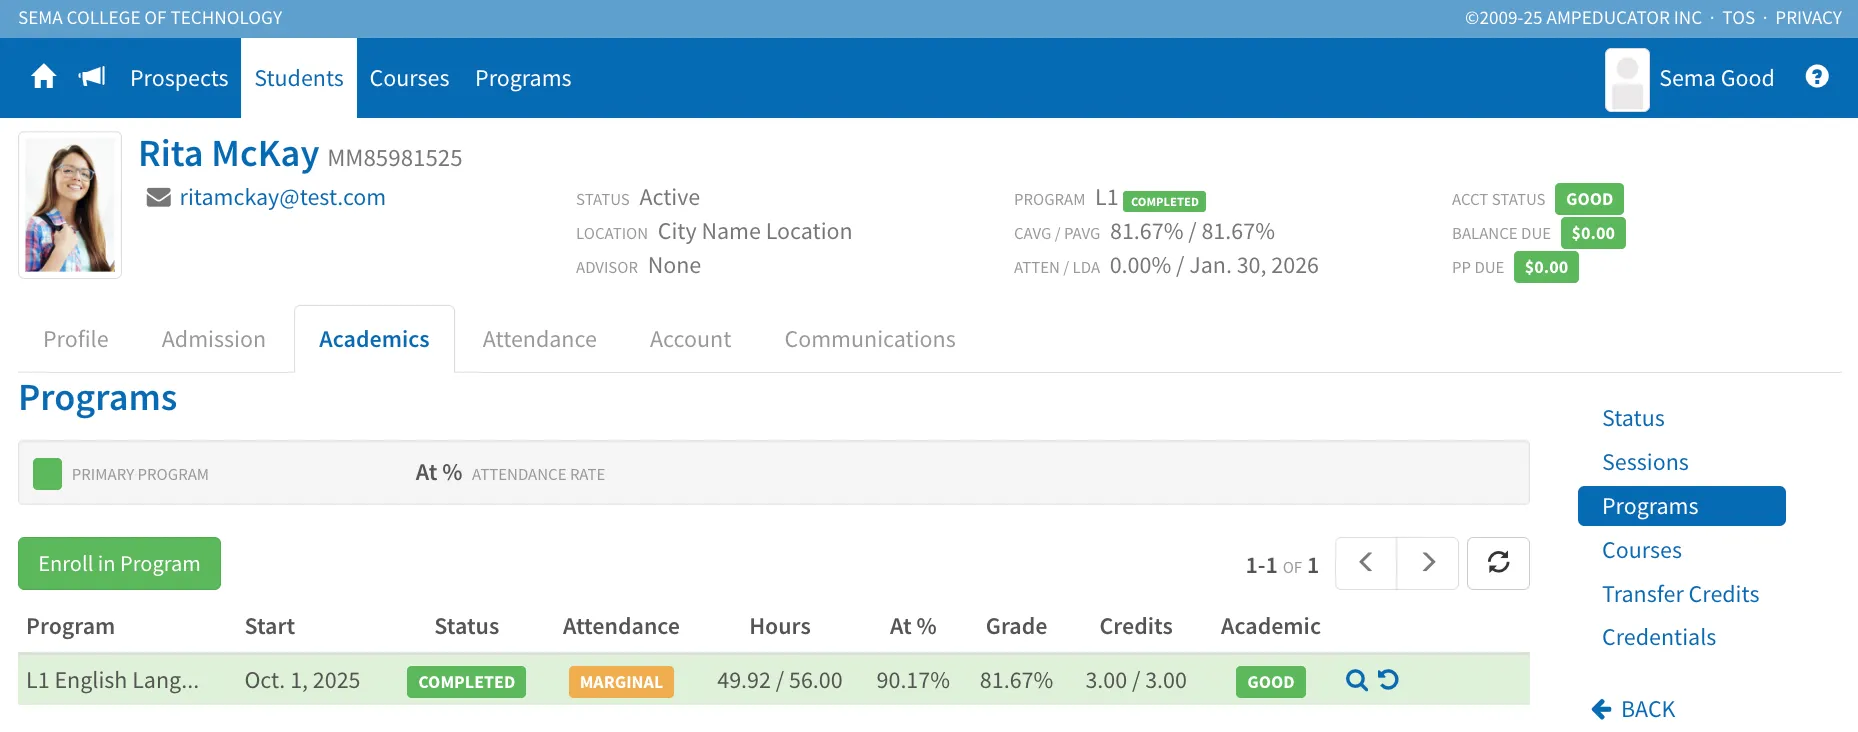
Any awarded credential will also be automatically visible on both the student’s profile and in their student portal.
Generating a Program Transcript
You can generate a student transcript either individually or in bulk, depending on your needs.
Note: When generating transcripts that are restricted to specific programs, session and overall cumulative totals are not displayed. This is because those values are calculated across all programs and sessions, not just the selected one.
Generating Individual Program Transcripts
To generate one for a single student, go to their Profile → Academics → Courses section and open the More Actions menu, then select Generate Transcript.
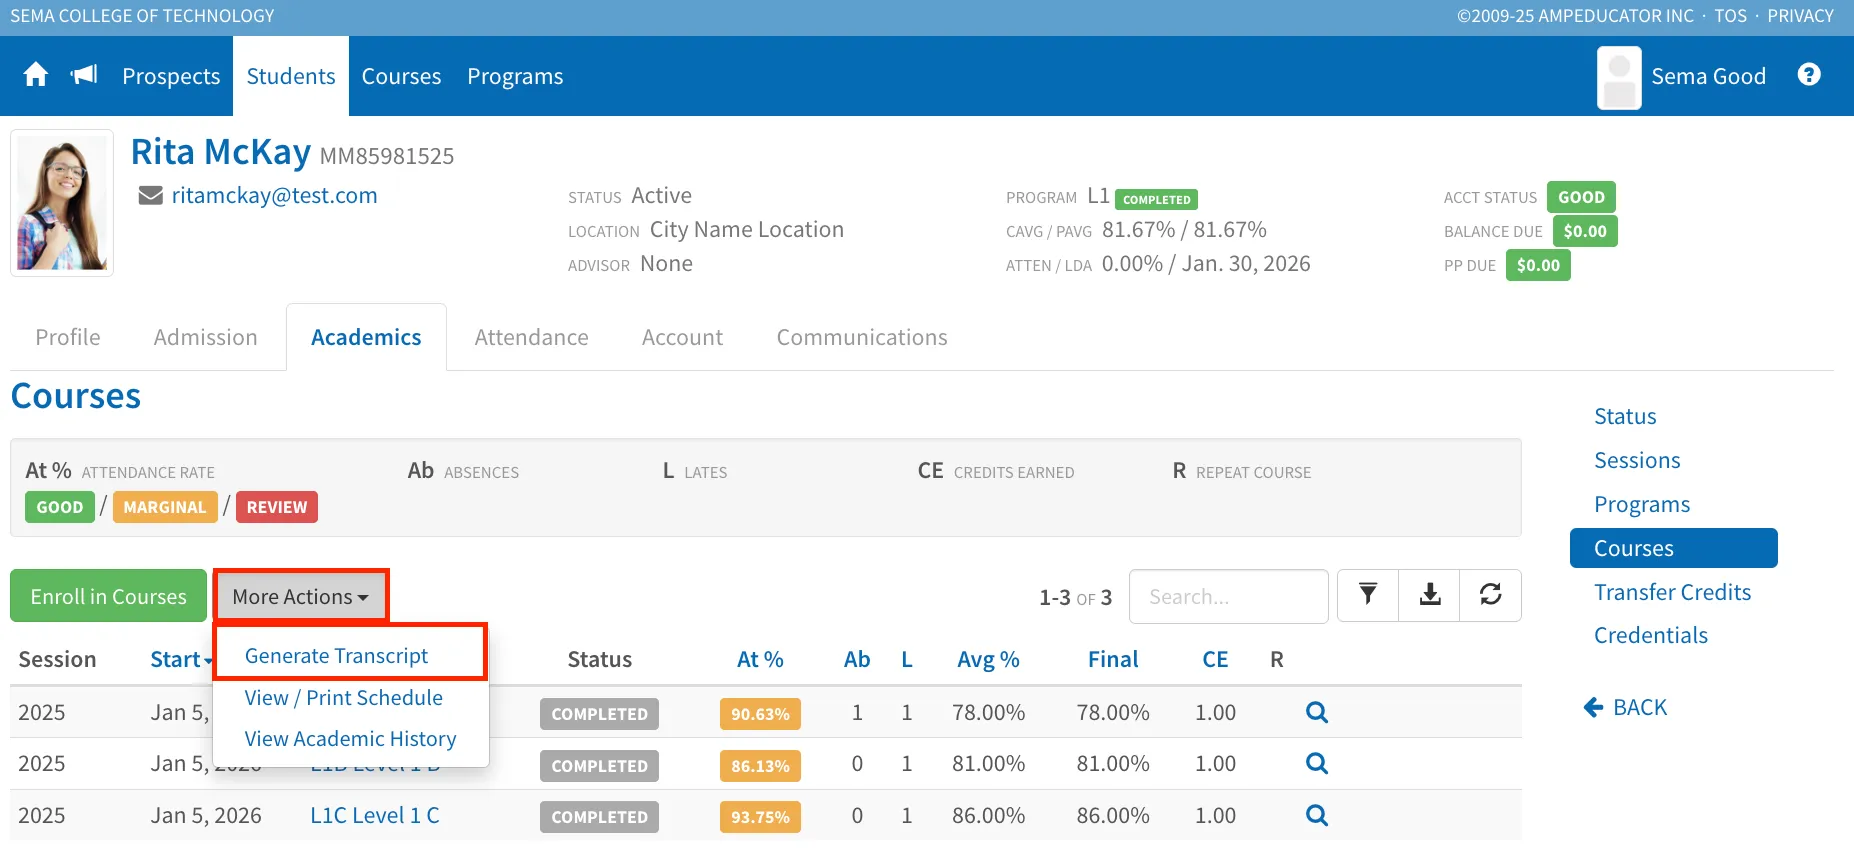
The Generate Student Transcript modal will open, where you can review and adjust the following options:
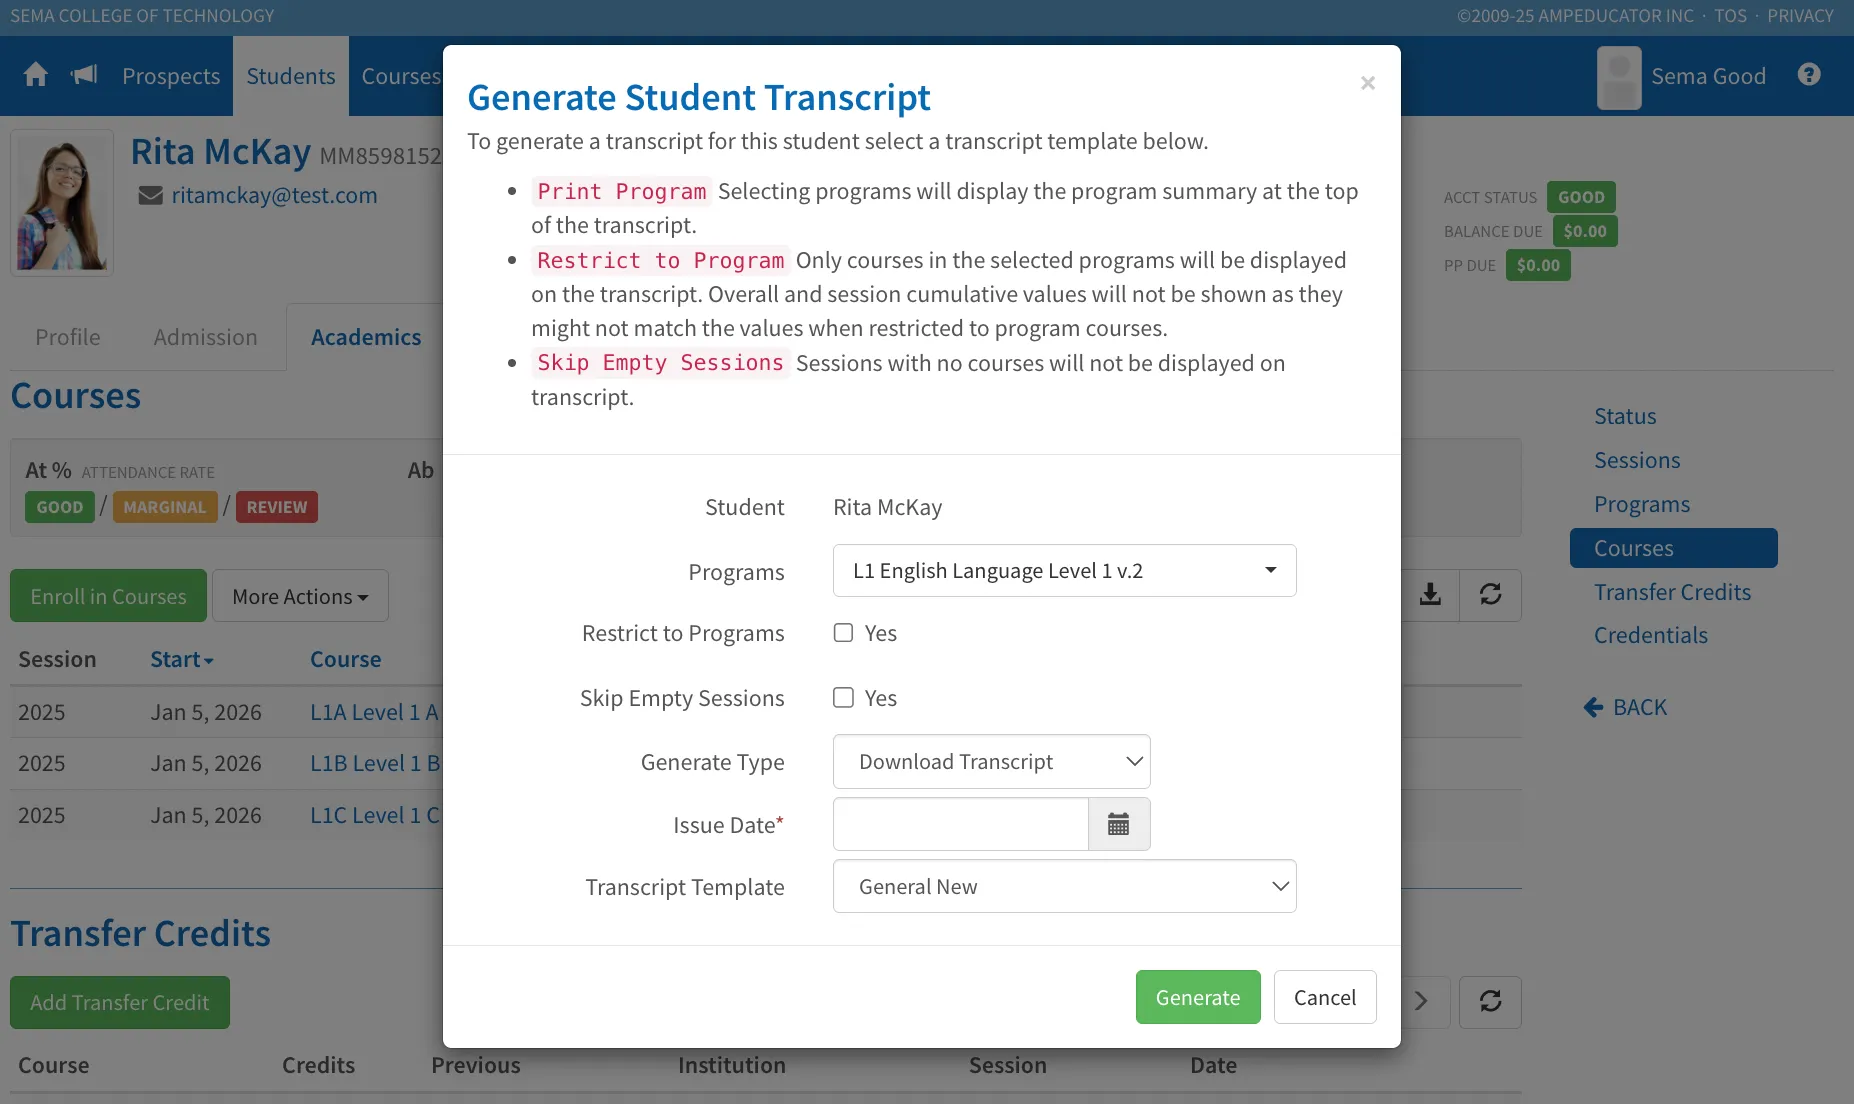
- Student: Automatically displays the student’s name.
- Programs: Select which program’s transcript you’d like to generate. By default, the student’s primary program is selected.
- Restrict to Program: When selected, only courses within the chosen program will appear on the transcript. Overall and session cumulative values won’t be shown, since they may not match the totals when restricted to a single program.
- Skip Empty Sessions: When selected, any sessions without courses will not be displayed on the transcript, ensuring that only sessions with active courses are included.
- Generate Type: Choose how you want to generate or share the transcript:
- Download Transcript – Immediately downloads the PDF to your device.
- Save to Documents – Saves a copy of the transcript to the student’s Documents tab.
- Email to Student – Sends the transcript directly to the student via email.
- Issue Date: Sets the date that will appear on the transcript.
- Transcript Template: Select the template to use. You can choose the default provided by ampEducator or one created under Institution Config / Transcripts / Transcript Templates.
When you’re ready, click Generate. The transcript will be created according to your chosen settings and include the student’s program details, attendance, grades, and course history based on your selected template.
Generating Program Transcripts in Bulk
You can also generate transcripts for multiple students at once directly from the Students List.
To do this, select the checkboxes beside the students you want to include, then click More Actions → Generate Transcripts.
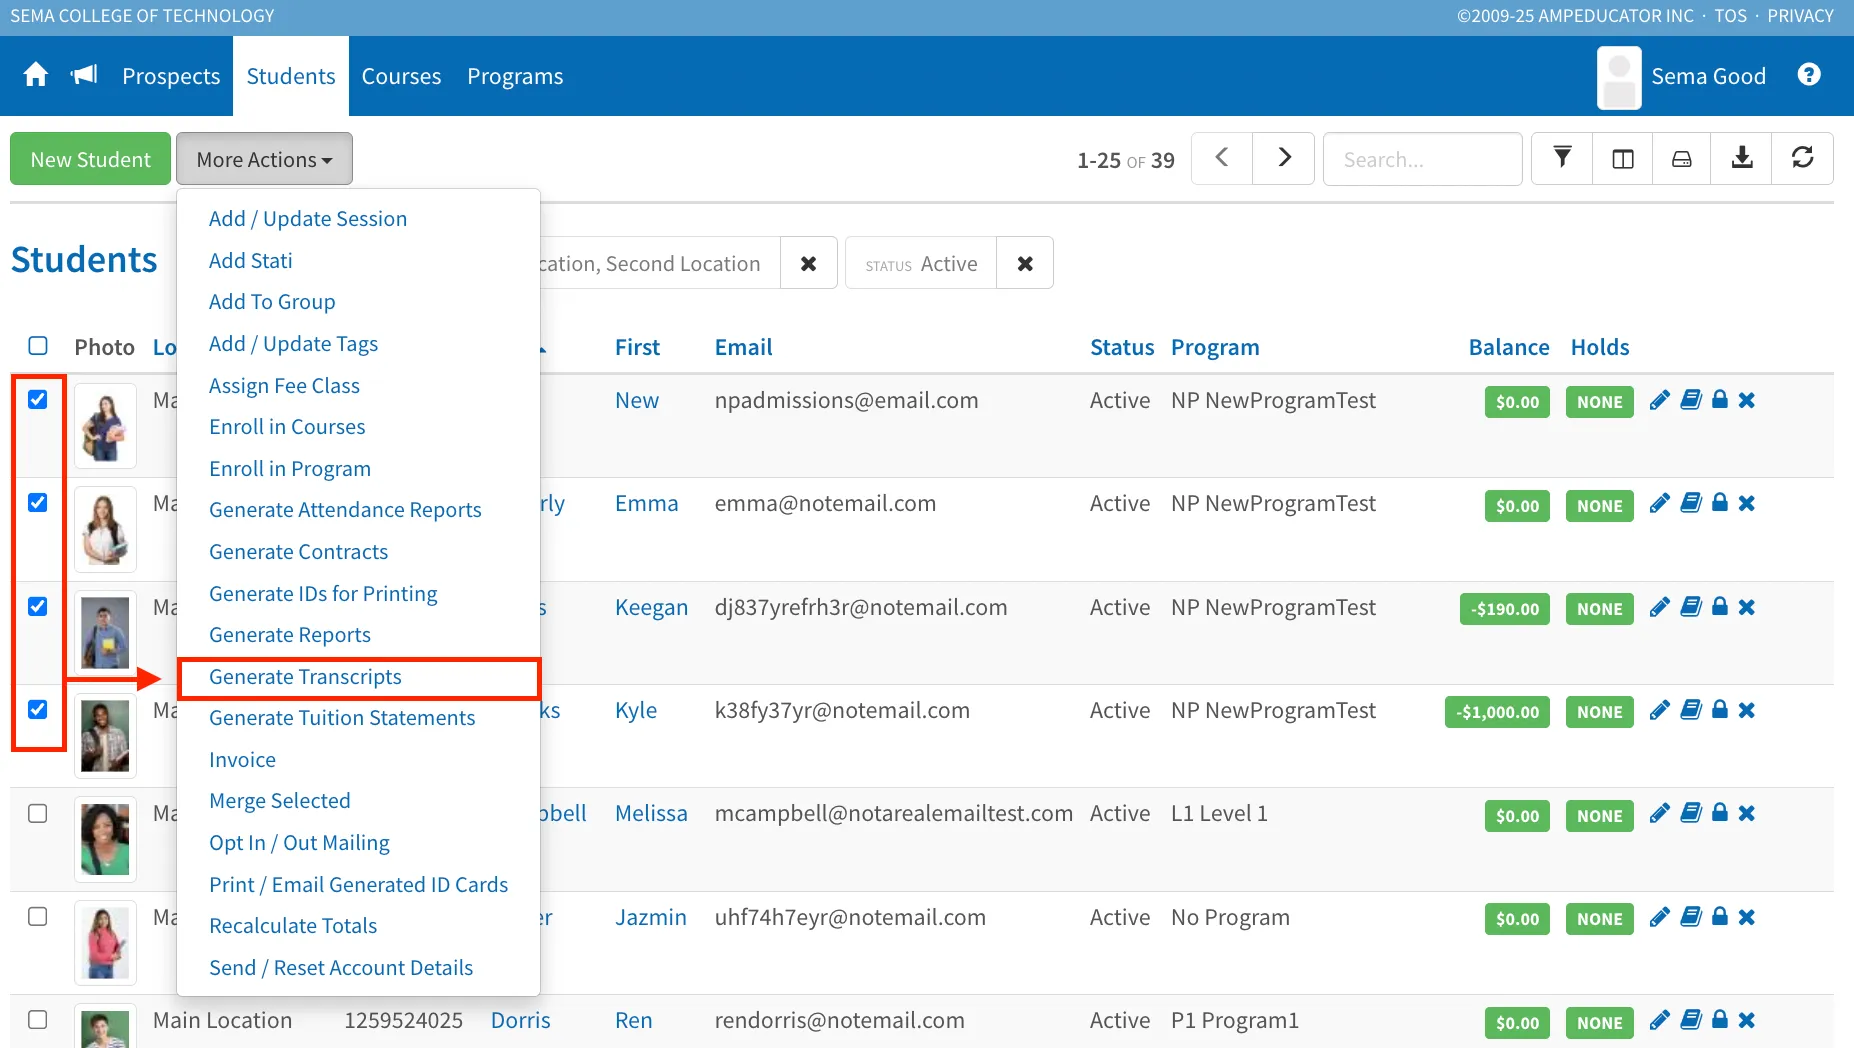
The Generate Student Transcripts modal will appear with the following options:
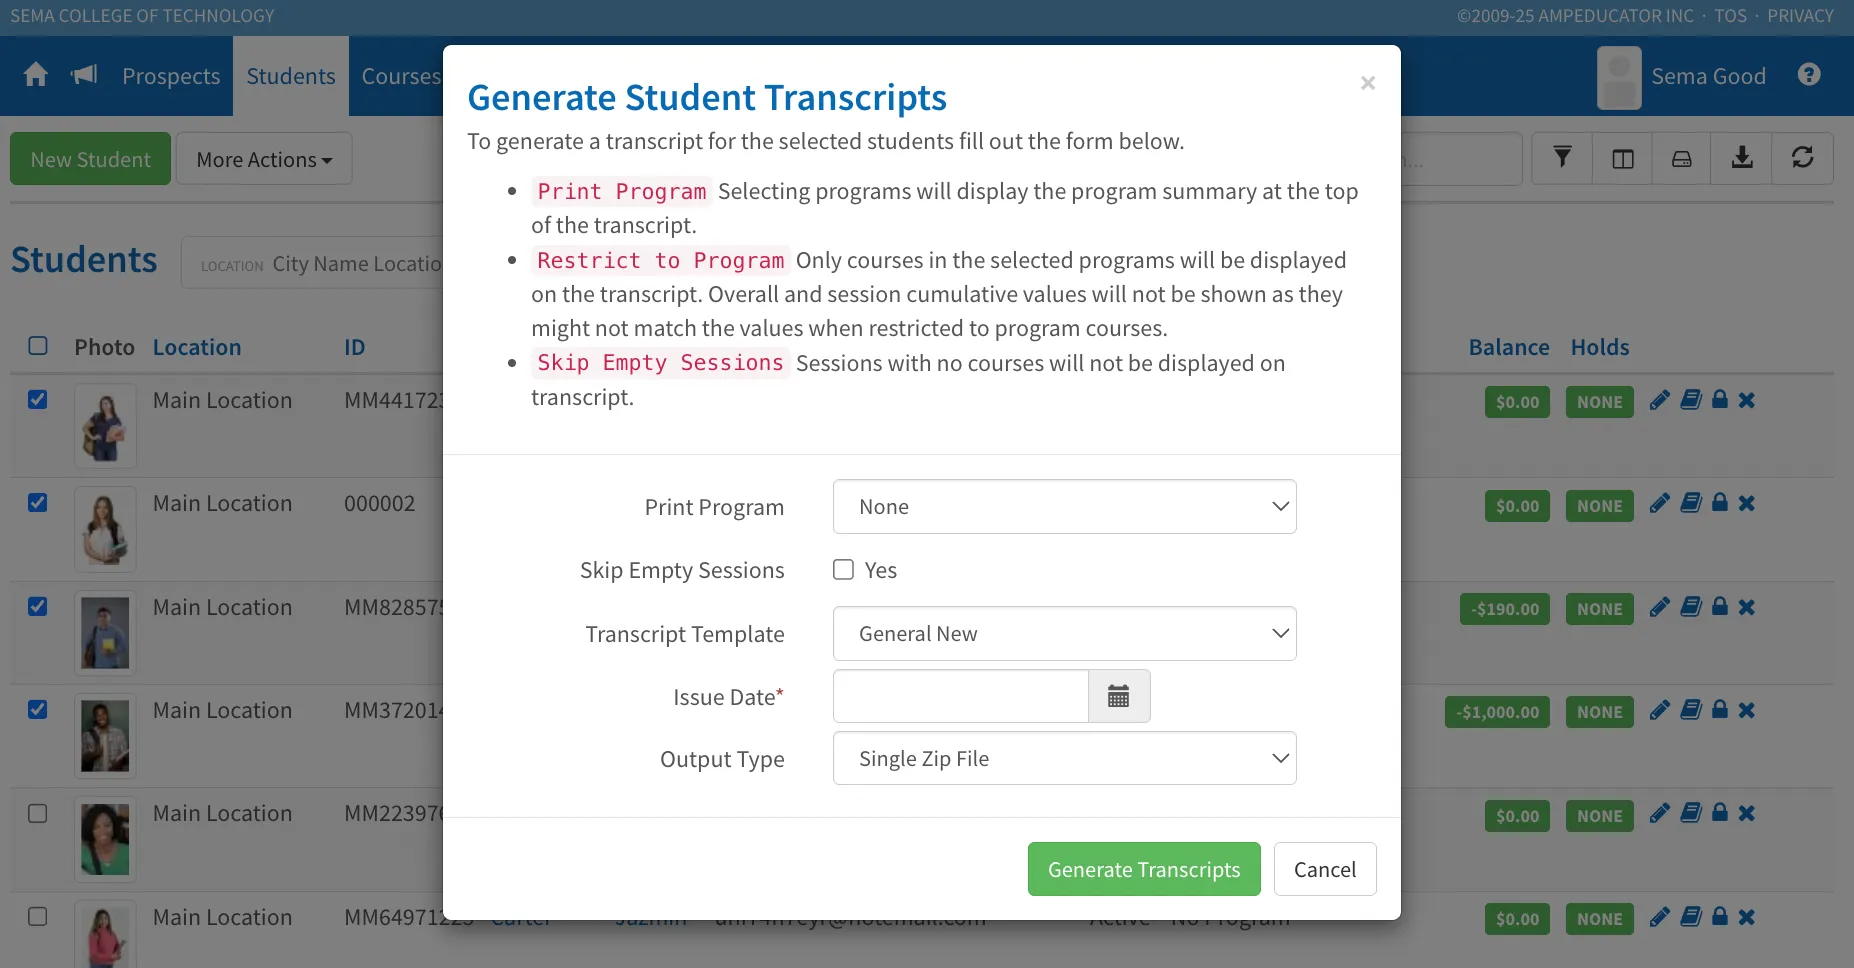
- Print Program: Select whether to include program summaries at the top of each transcript.
- None – No program information will be shown.
- Primary Program Only – Only the student’s primary program details will be included.
- All Programs – Displays summaries for all programs the student is enrolled in.
- Skip Empty Sessions: When selected, any sessions without courses will not be displayed on the transcript.
- Transcript Template: Choose the transcript layout to use. You can select the default template provided by ampEducator or one created under Institution Config → Transcripts → Transcript Templates.
- Issue Date: Sets the date that will appear on each transcript.
- Output Type: Choose how to generate and save the transcripts:
- Single Zip File – Downloads a ZIP file containing individual PDF transcripts for each student.
- Single PDF File – Combines all selected transcripts into one PDF.
- Save to Student Documents – Automatically saves a copy of each transcript to the Documents tab in each student’s profile.
Once your selections are complete, click Generate Transcripts to begin processing. ampEducator will automatically generate all transcripts according to your chosen settings and template configuration.
Wrapping Up
By following these steps, you’ve learned how to fully configure and manage academic programs in ampEducator — from initial setup and grading configuration to enrolling students, completing programs, and generating transcripts.
This completes the Programs section of your setup. Your institution can now track student progress, calculate grades automatically, and issue credentials and transcripts with ease.