Digital Contracts and Signatures Tutorial
Managing contracts is an important part of the student enrollment process, but many institutions still rely on printed documents, handwritten signatures, and manual document storage.
With ampEducator's contract management tools and digital signature integrations, institutions can manage the entire process electronically—from creating contract templates and generating student-specific agreements to collecting digital signatures and storing completed contracts automatically.
Whether you're creating enrollment agreements, payment plans, refund policy acknowledgements, or other student documents, ampEducator provides a complete workflow for managing contracts from creation to completion.
In this guide, you'll learn how to:
- Create and configure contract templates
- Design contract layouts and content
- Configure digital signature fields
- Generate contracts for students
- Send contracts for signature
- Track contract status and completion
- Access signed contracts and signature certificates
By the end of this guide, you'll understand the complete contract workflow and be ready to implement digital contracts at your institution.
Understanding the Contract Workflow
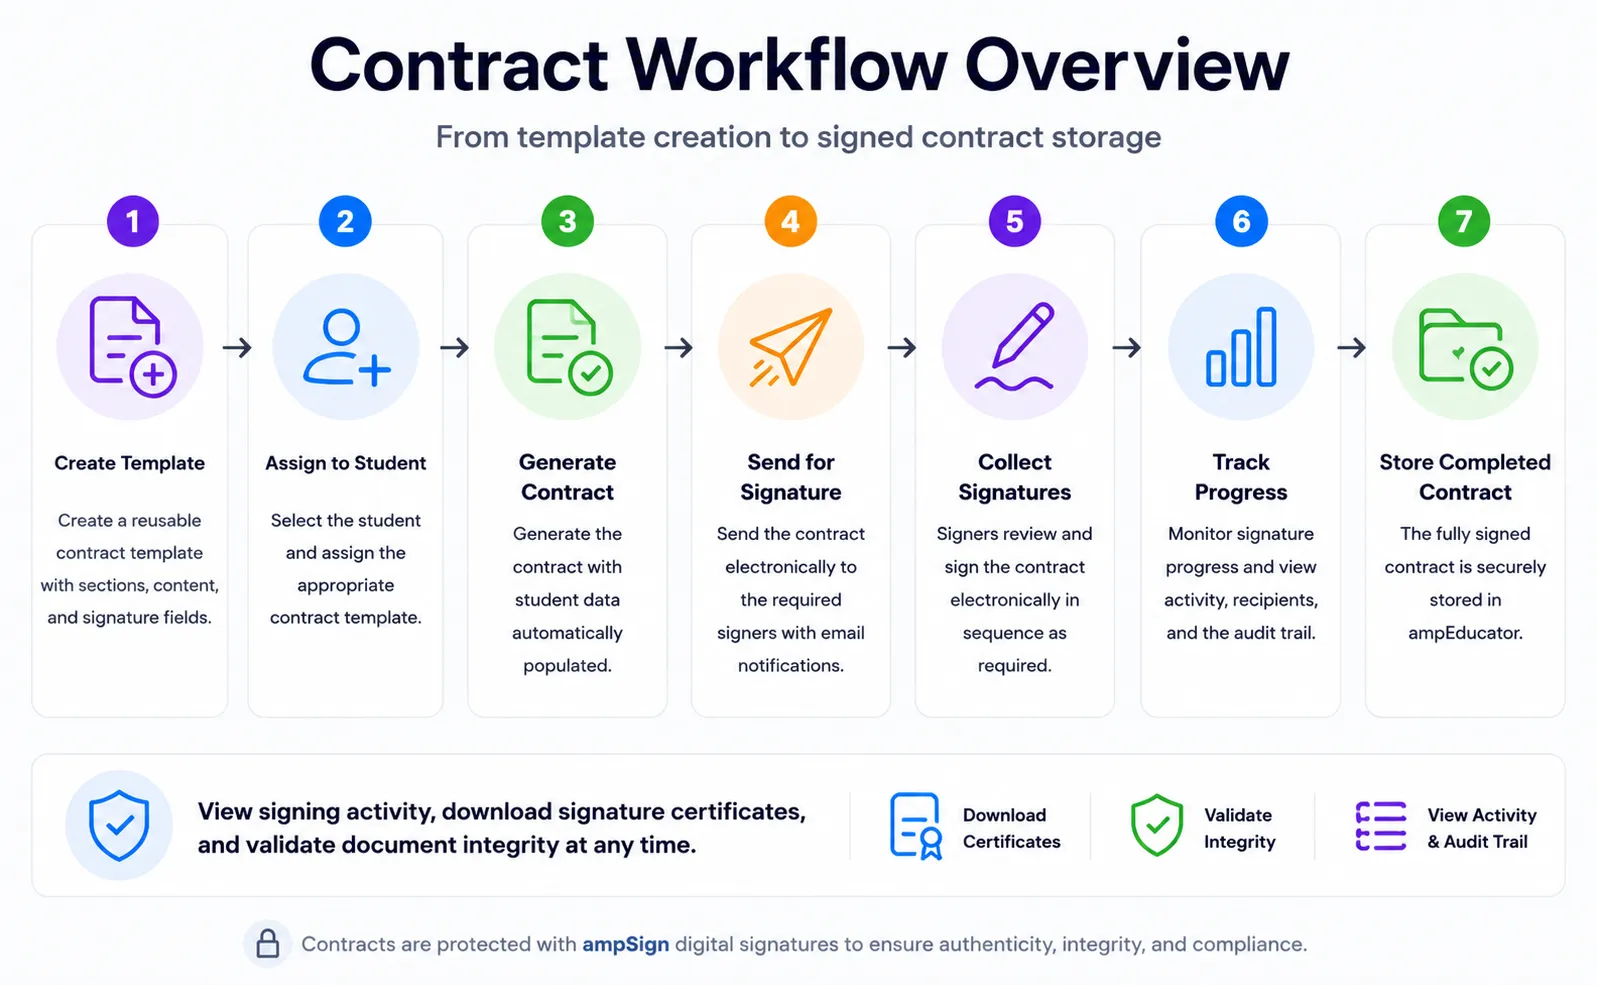
Before creating contracts, it's important to understand how the contract workflow works in ampEducator.
Contracts move through four main stages: creating a template, assigning the contract to a student, generating the completed document, and collecting signatures.
1. Contract Templates: Contract templates serve as the foundation for your contracts. They define the content, structure, and signature requirements of the document and can be reused for multiple students.
2. Student Contracts: Once a template has been created, it can be assigned to a student. At this stage, contract-specific details such as dates, signers, and other information can be reviewed and updated.
3. Generated Contracts: When a contract is generated, ampEducator combines the template with student information to create a completed contract document. Dynamic fields such as names, program information, and fees are automatically populated.
4. Digital Signatures: Generated contracts can be sent electronically for signature. Once all required parties have signed, the completed contract is automatically stored within ampEducator for future reference.
Creating a Contract Template
Contract templates serve as the foundation for all contracts generated within ampEducator. Once created, a template can be reused for multiple students and programs, helping ensure consistency and reduce manual work.
Navigating to Contracts
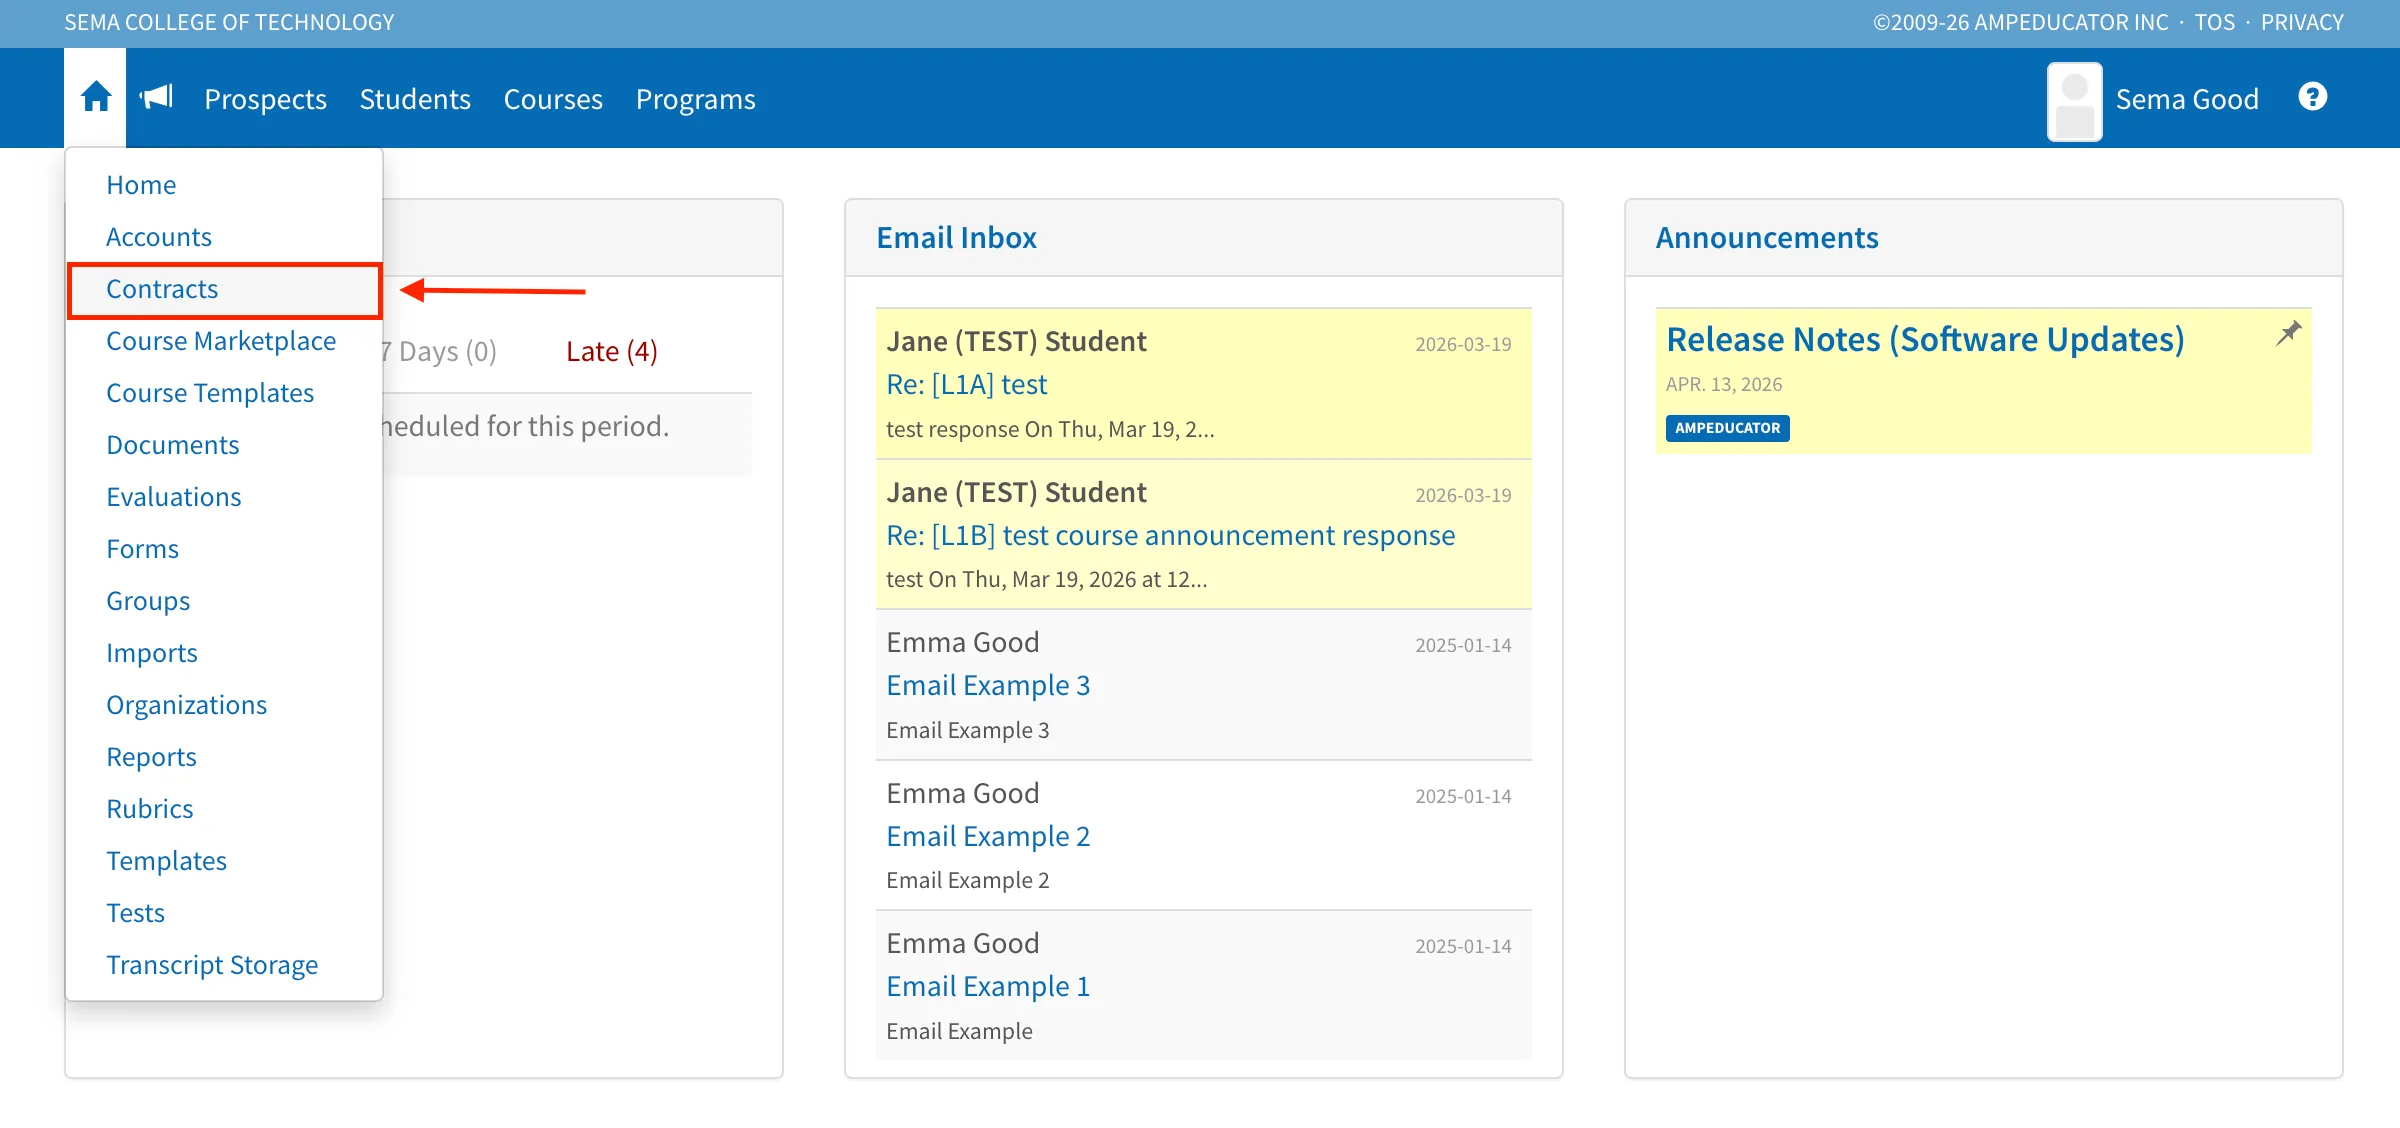
To create or manage contract templates, navigate to Home → Contracts
Contract Management
The Contracts page displays all contract templates available to your institution.
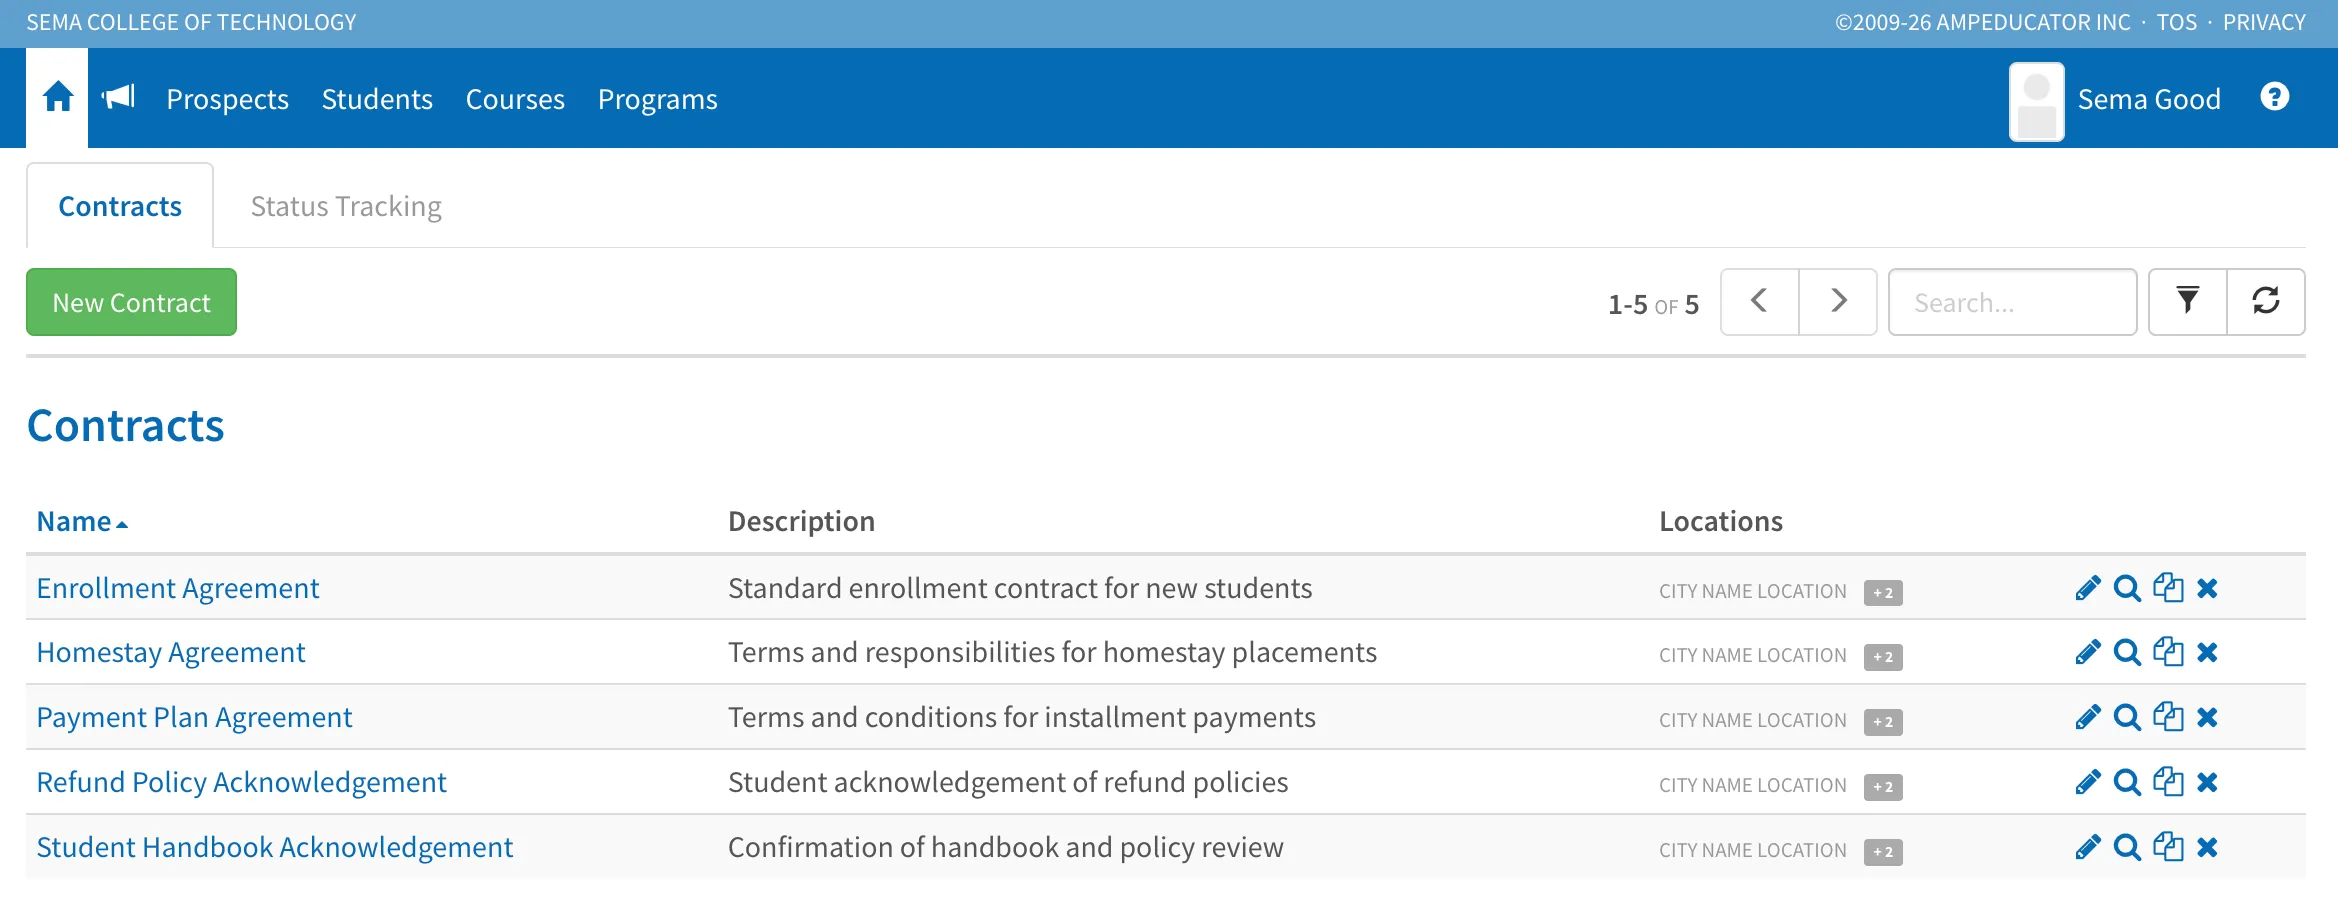
From this page, you can:
- Create new contract templates
- Edit existing contracts
- Duplicate contracts
- View contract details
- Delete unused contracts
Creating a New Contract
To create a new contract template, click the New Contract button.
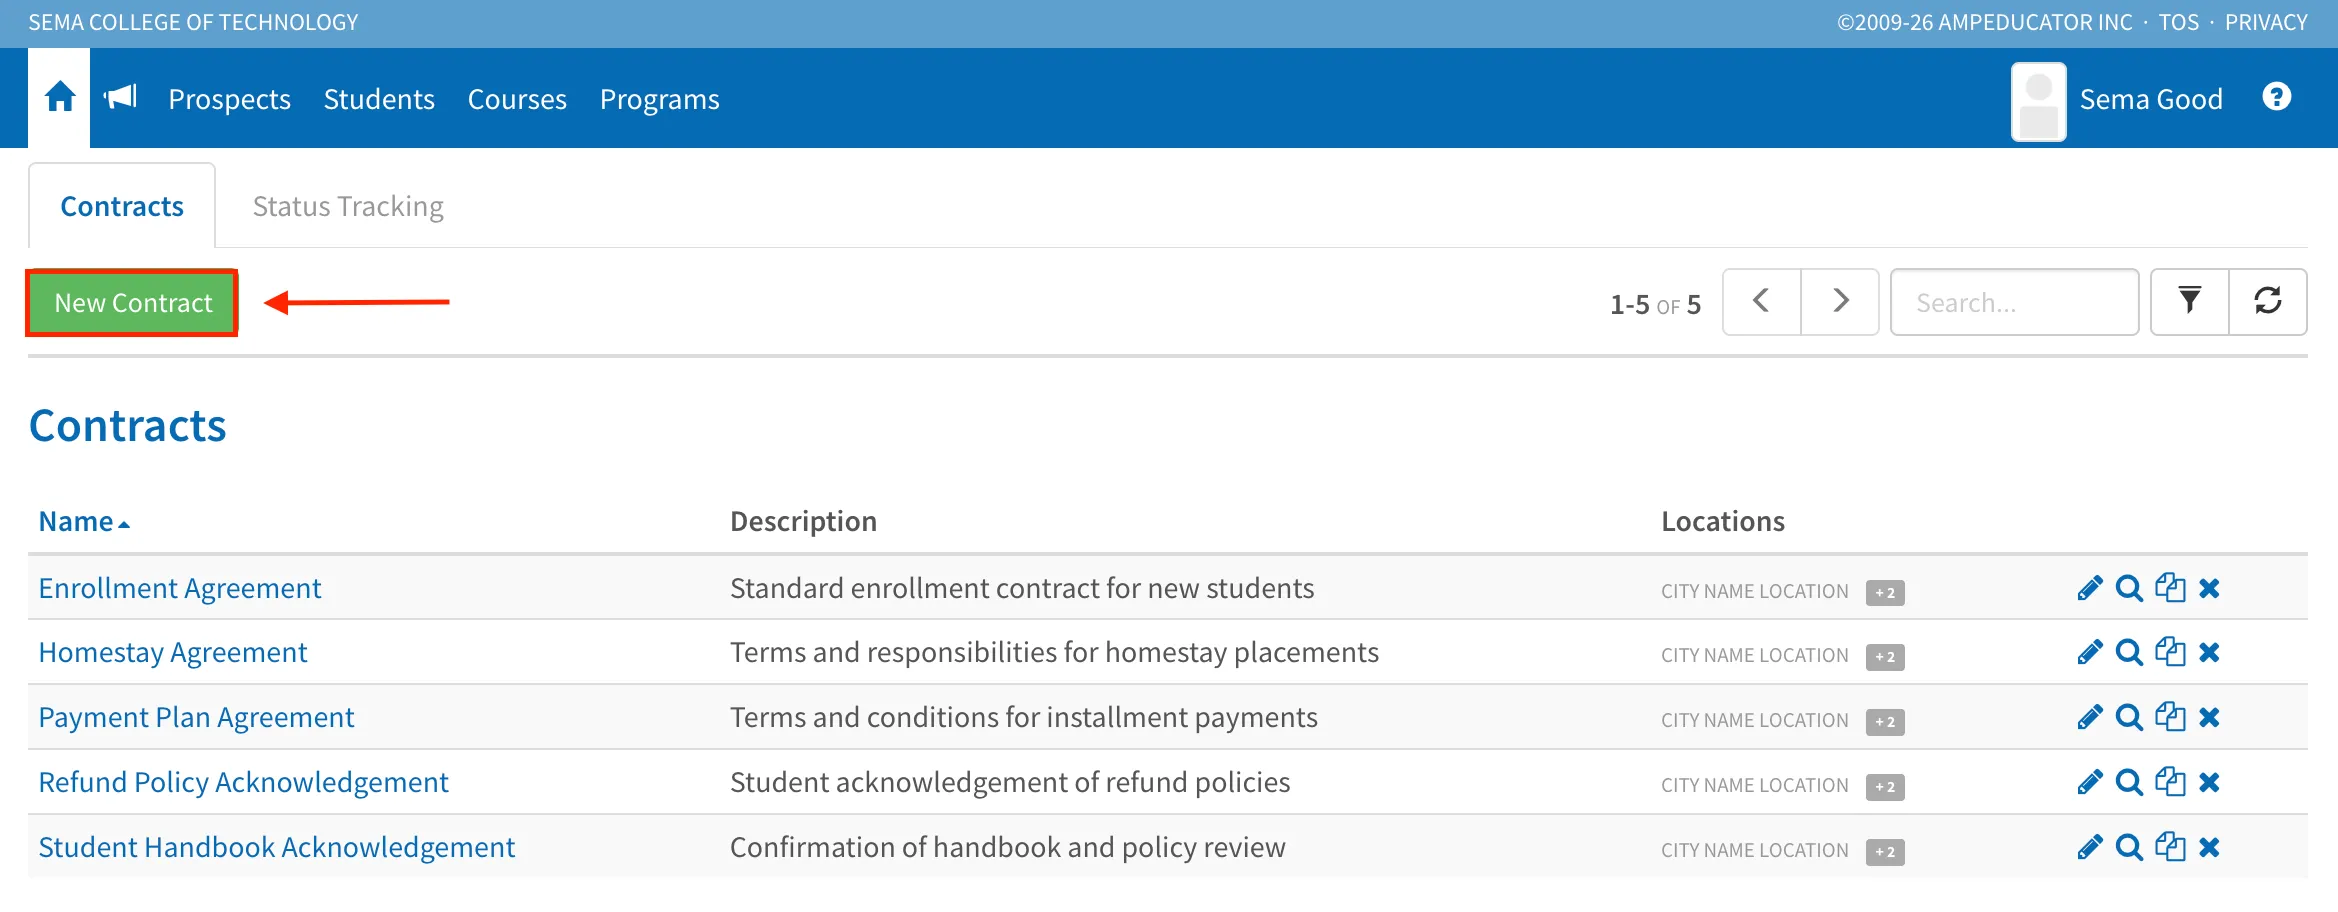
The New Contract window will appear, allowing you to enter the basic contract information and configure access permissions before creating the contract.
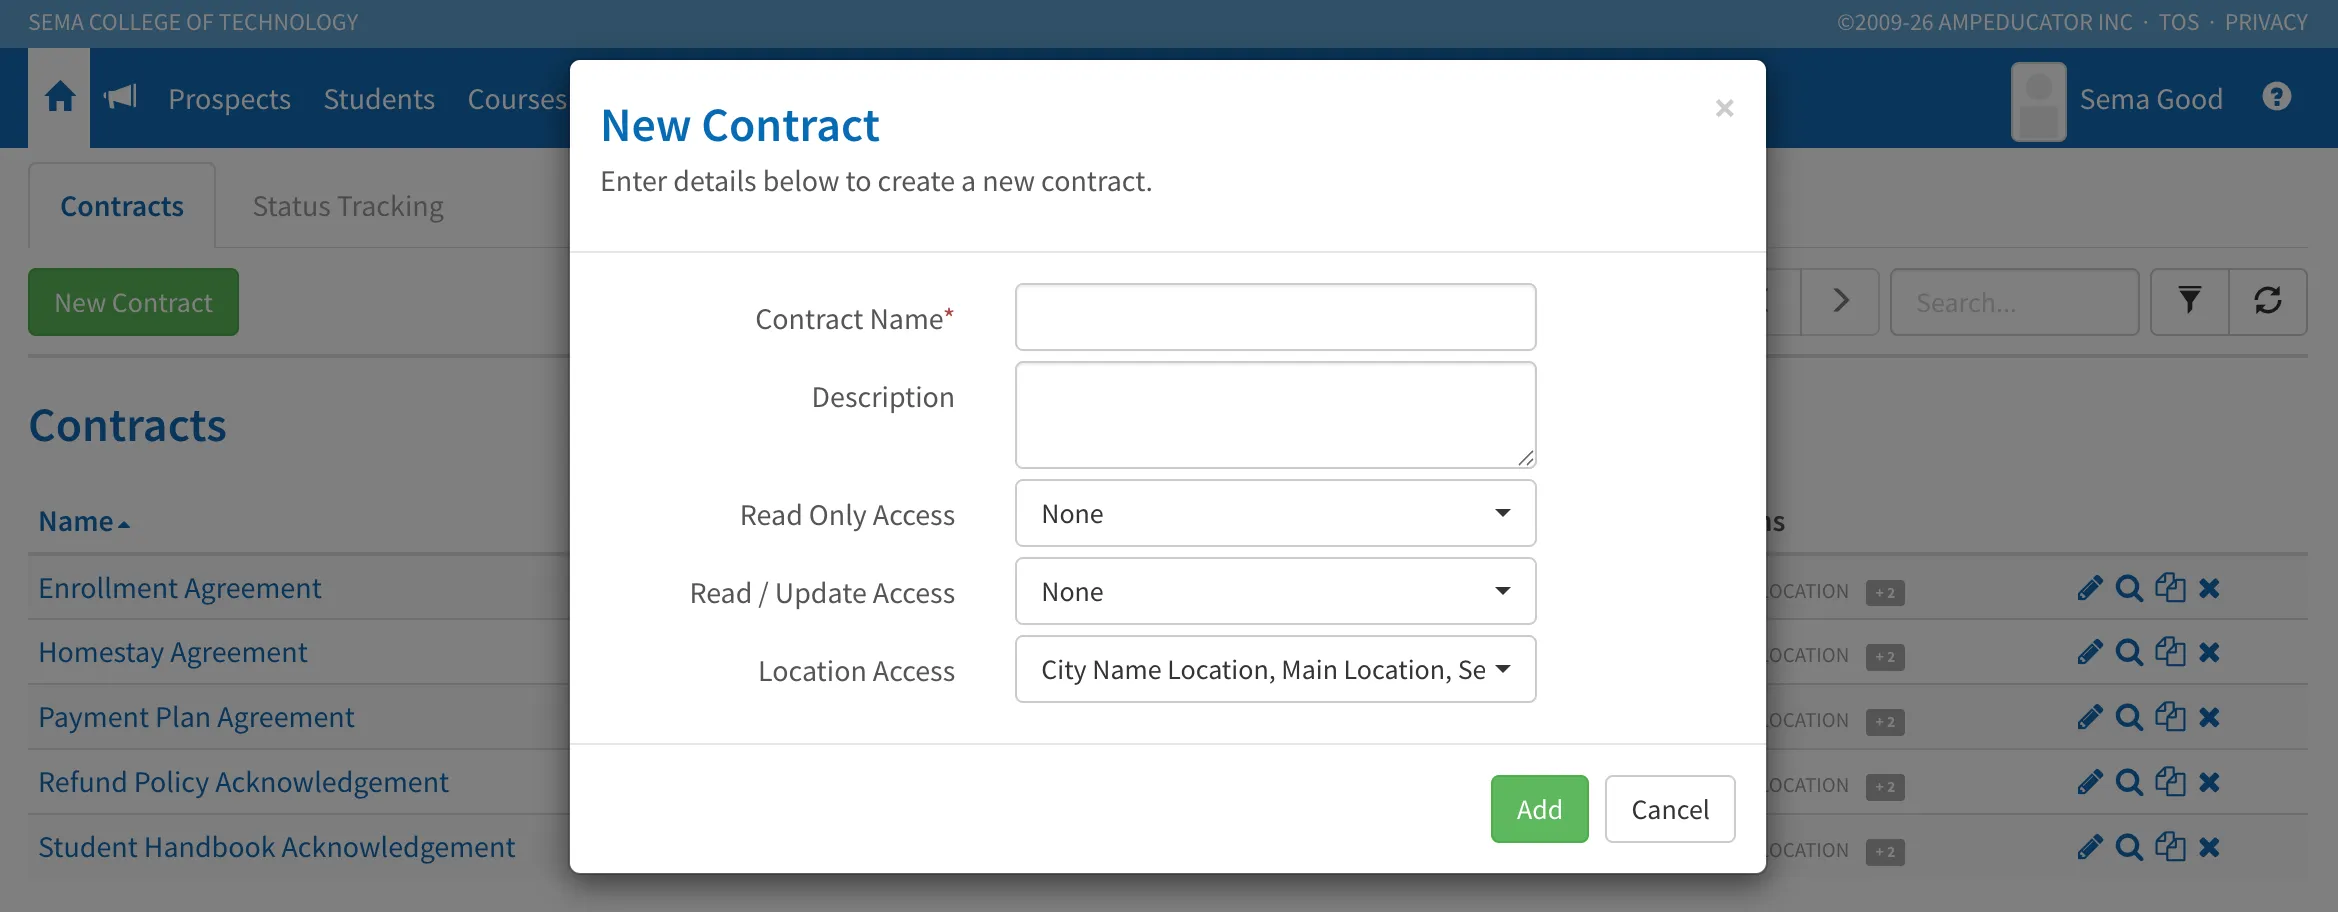
Complete the following fields:
- Contract Name: The name of the contract template. This name will be displayed throughout ampEducator when assigning and managing contracts.
- Description: An optional description used to provide additional information about the purpose of the contract.
- Read Only Access: Determines which user groups can view the contract without making changes.
- Read / Update Access: Determines which user groups can edit the contract and update its settings and content.
- Location Access: Determines which locations can access and use the contract template.
Once all required information has been entered, click Add to create the contract.
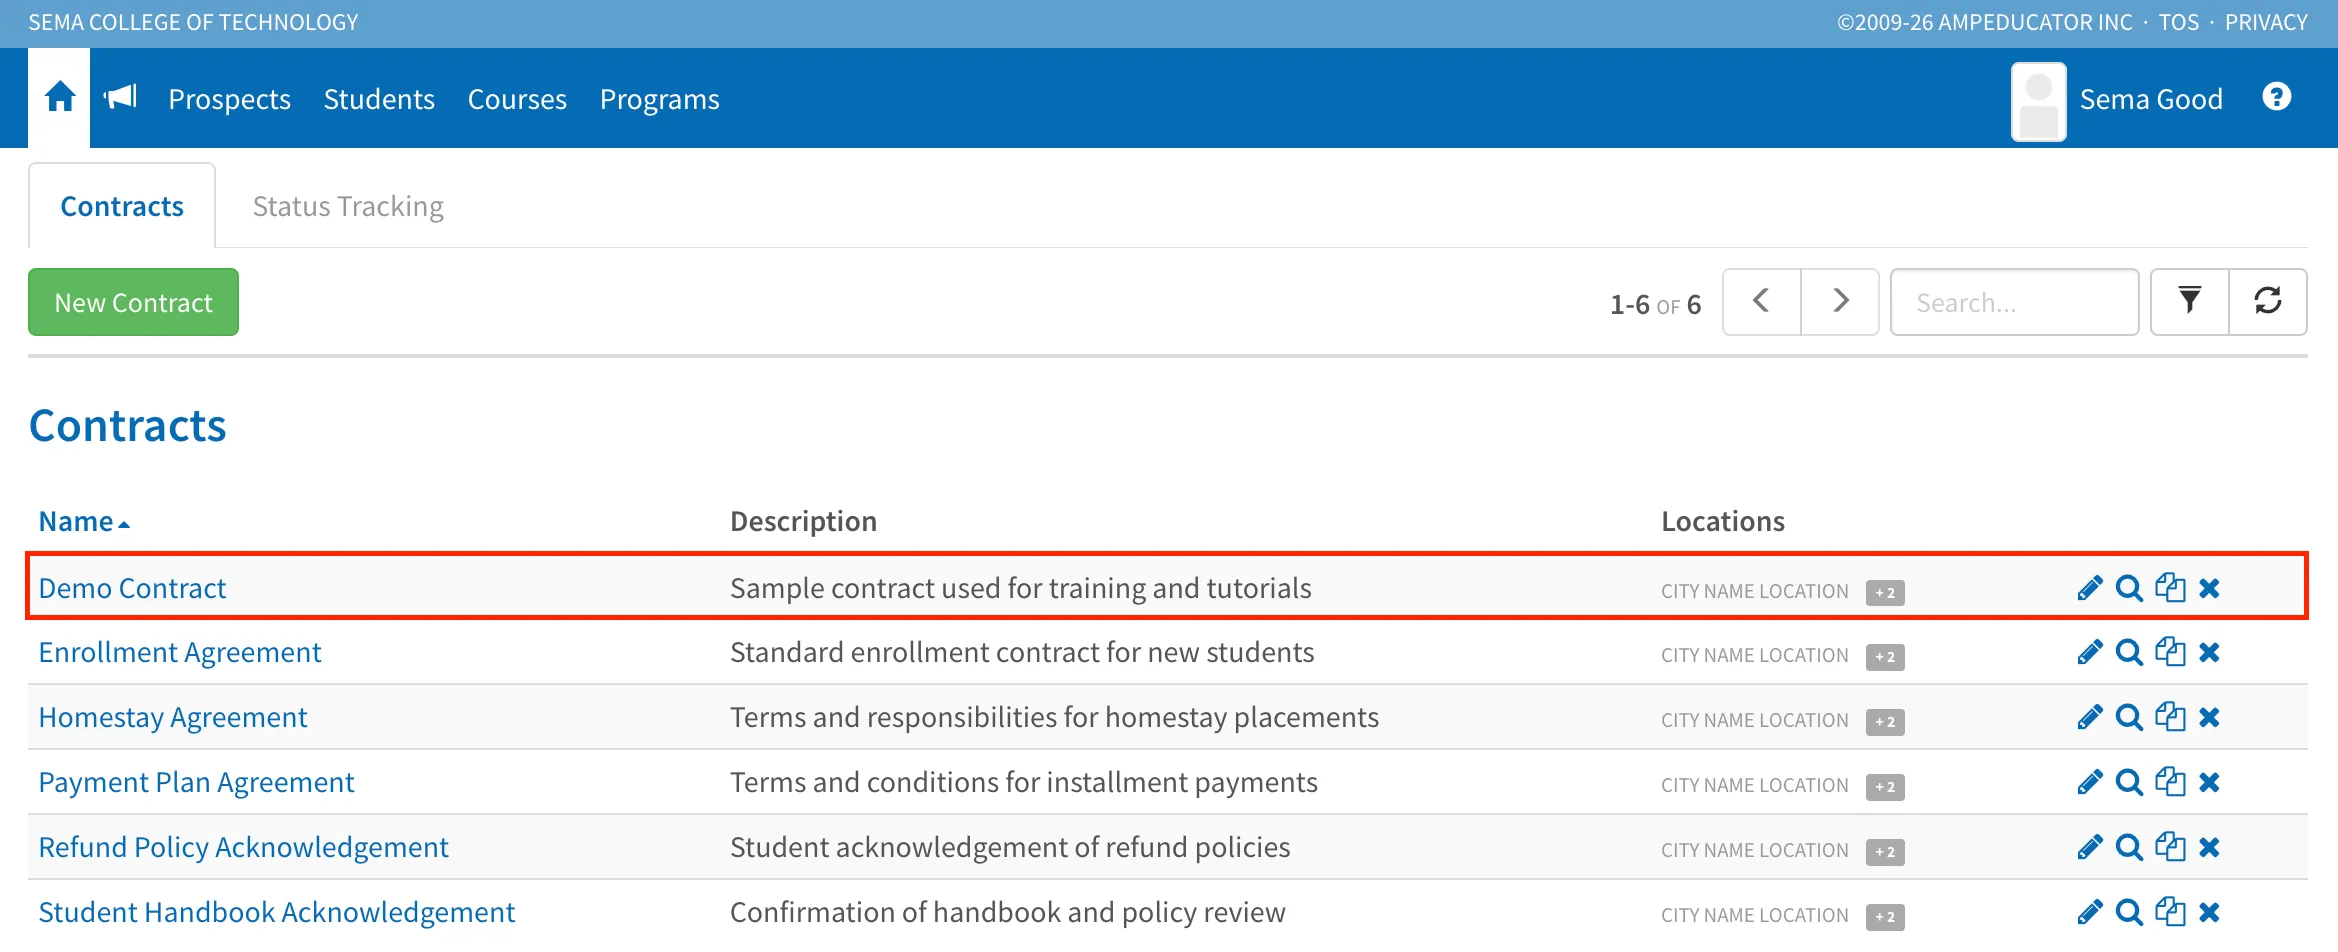
The contract will now appear in the Contracts list and is ready to be configured.
Designing Your Contract
After a contract template has been created, it can be opened for editing and design.
From the Contracts page, click the contract name or the edit icon beside the contract you want to update.
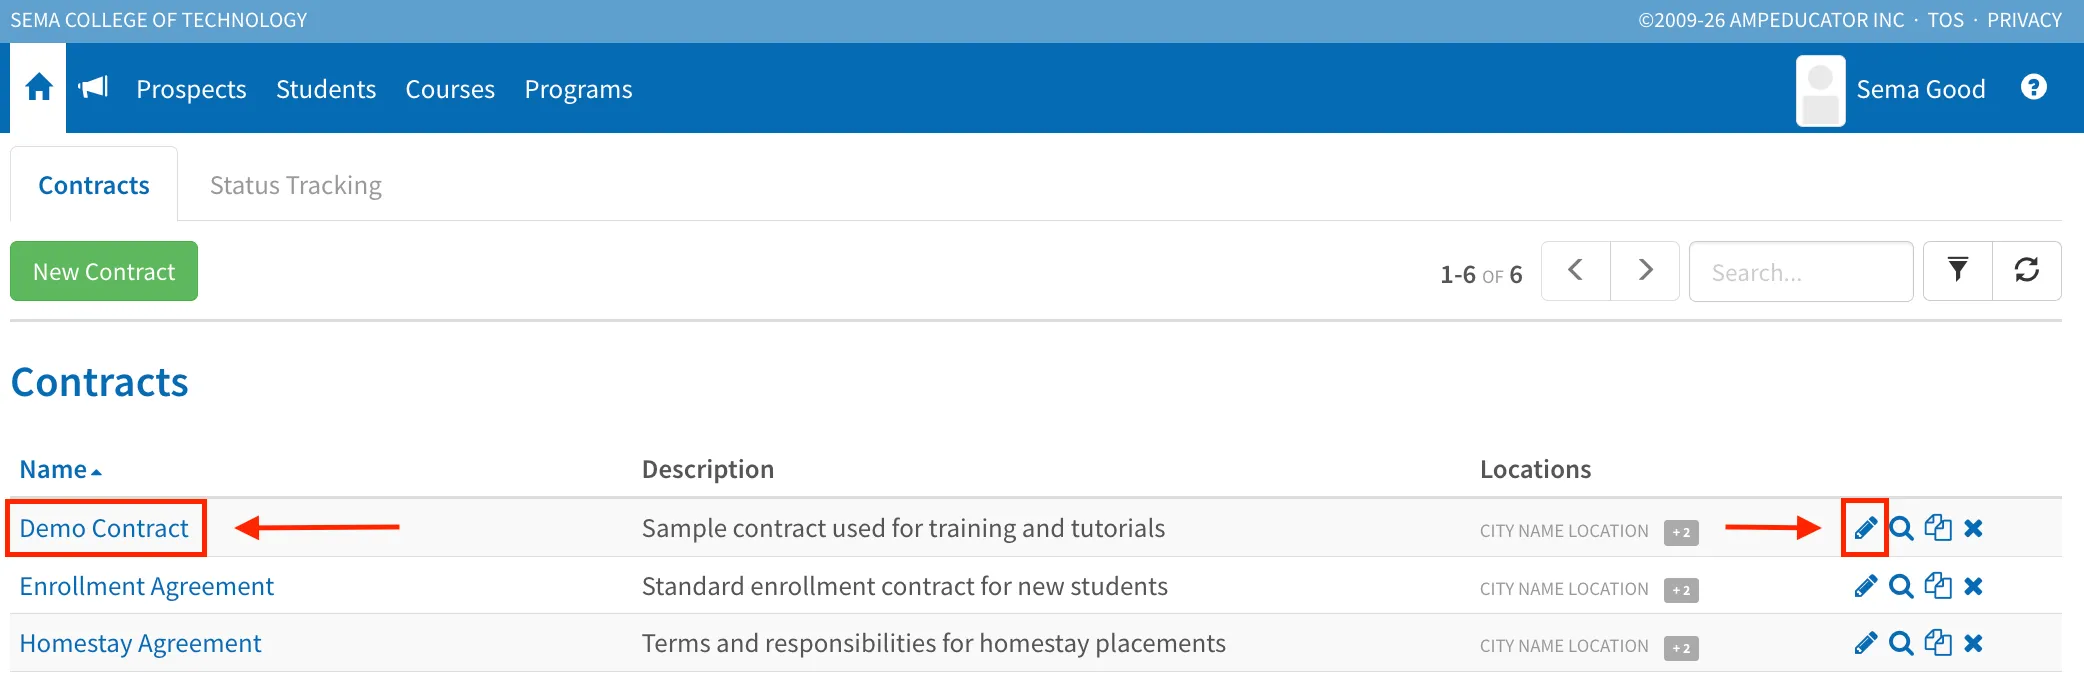
The Contract Designer consists of two main areas:
- Details – Configure contract settings, permissions, formatting, and availability.
- Design – Build the contract by adding sections, fields, content, and signature requirements.
Contract Details
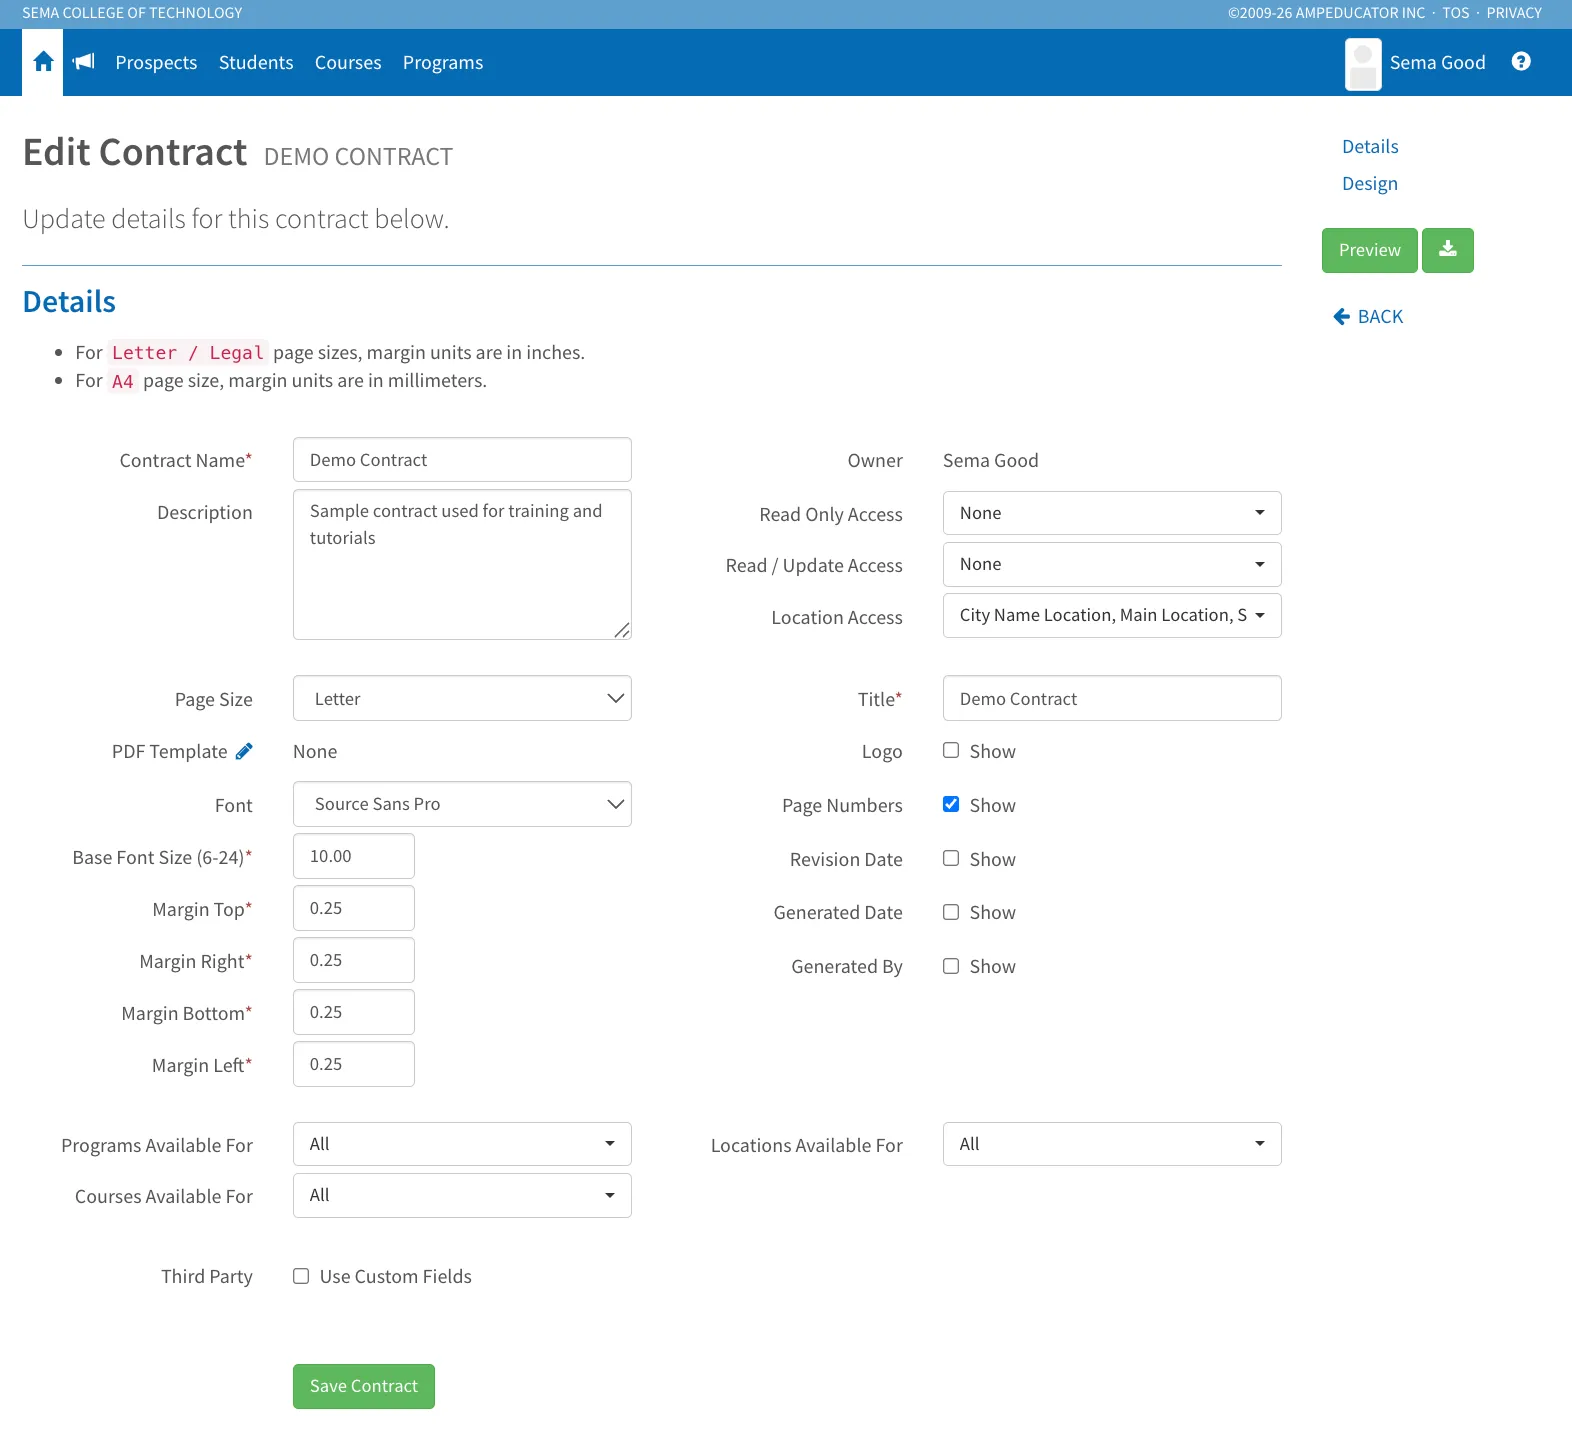
The Contract Details section allows you to control how the contract looks, who can access it, and when it can be used.
Access Permissions
Access settings determine who can view, edit, and use the contract template.
- Read Only Access: Allows selected users to view the contract without making changes.
- Read / Update Access: Allows selected users to modify the contract template.
- Location Access: Limits access to specific campus locations.
Appearance & Formatting
The Appearance & Formatting settings control how contracts are displayed when generated. Use these options to apply branding, customize document layout, and configure page formatting.
- Title: Displays a custom title at the top of the generated contract.
- Logo: Displays your institution logo on the contract.
- Page Numbers: Adds page numbers throughout the document.
- Revision Date: Displays a revision date for version tracking.
- Generated Date: Displays the date the contract was generated.
- Generated By: Displays the user who generated the contract.
- PDF Template: Allows you to apply a custom PDF template. PDF templates can be used to add branded headers, footers, watermarks, or background designs so contracts match your institution's look and feel.
- Page Size: Determines the page size used when generating the contract PDF.
- Font: Sets the font used throughout the document.
- Base Font Size: Sets the default font size for contract content.
- Margins: Controls the spacing around the edges of the document.
These settings allow you to align contracts with your institution's branding and document standards.
Contract Availability
Contracts can be restricted to specific programs, courses, or locations.
- Programs Available For: Limits the contract to selected programs.
- Courses Available For: Limits the contract to selected courses.
- Locations Available For: Limits the contract to selected locations.
This is useful when different agreements are required for different programs or campuses.
Third-Party Signers
Some institutions require signatures from individuals other than the student, such as parents or guardians or employers
Enabling Use Custom Fields allows the contract to pull a third party's name and email address from Student Custom Fields.
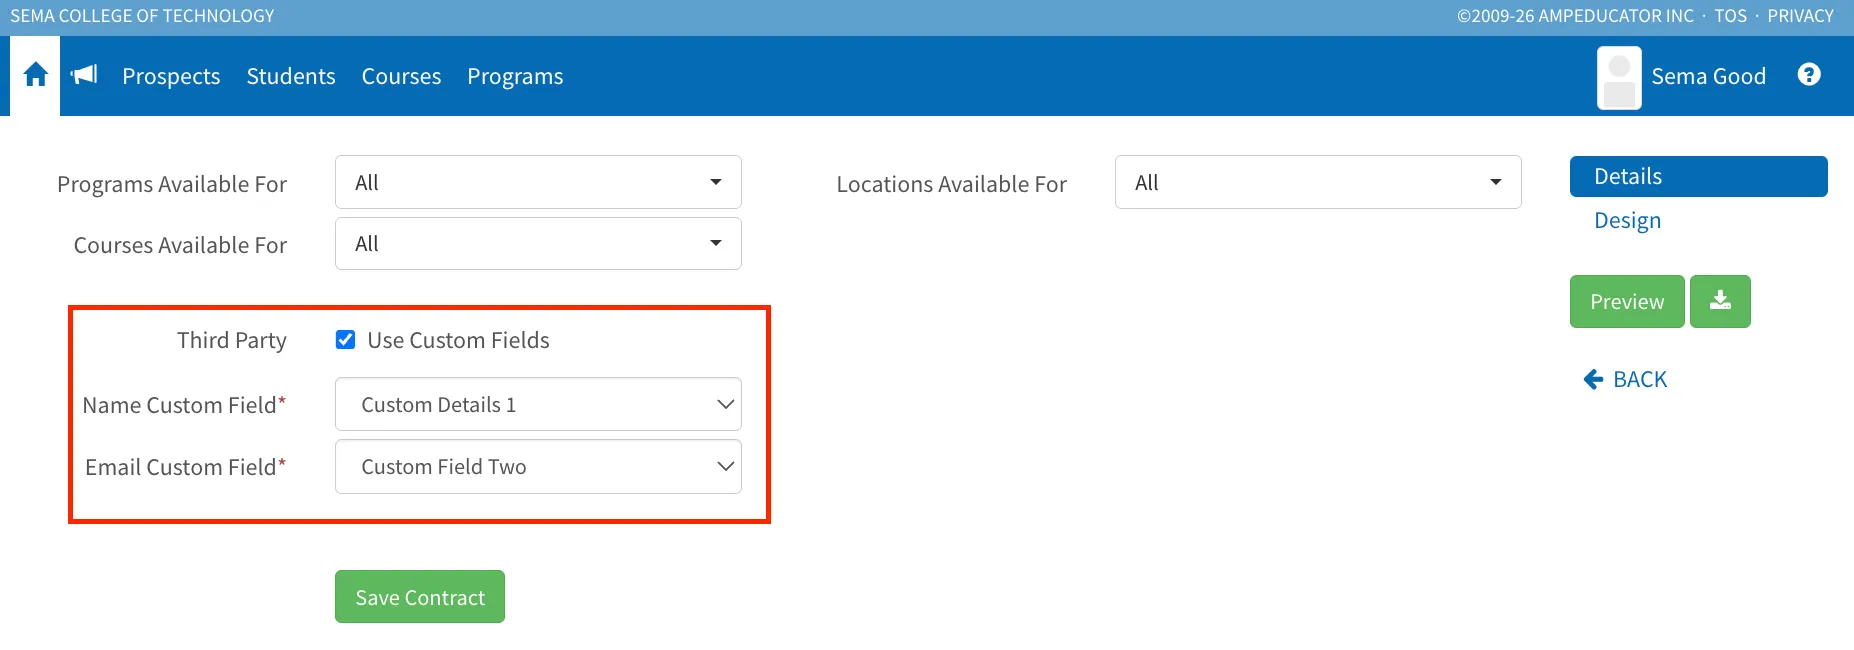
This can be used when a contract requires additional signatures beyond the student, such as a parent signing on behalf of a minor student or a sponsor acknowledging financial responsibility.
Contact Design
The Design section is where you build the contents of your contract.
Contracts are organized into sections, which can contain student information, fees, payment plans, signatures, custom text, and other contract elements. Sections can be added, removed, reordered, and customized to meet your institution's requirements.
Default Contract Sections
When a new contract is created, ampEducator automatically includes several commonly used sections to help you get started. These sections can be customized, reordered, or removed depending on your institution's requirements.
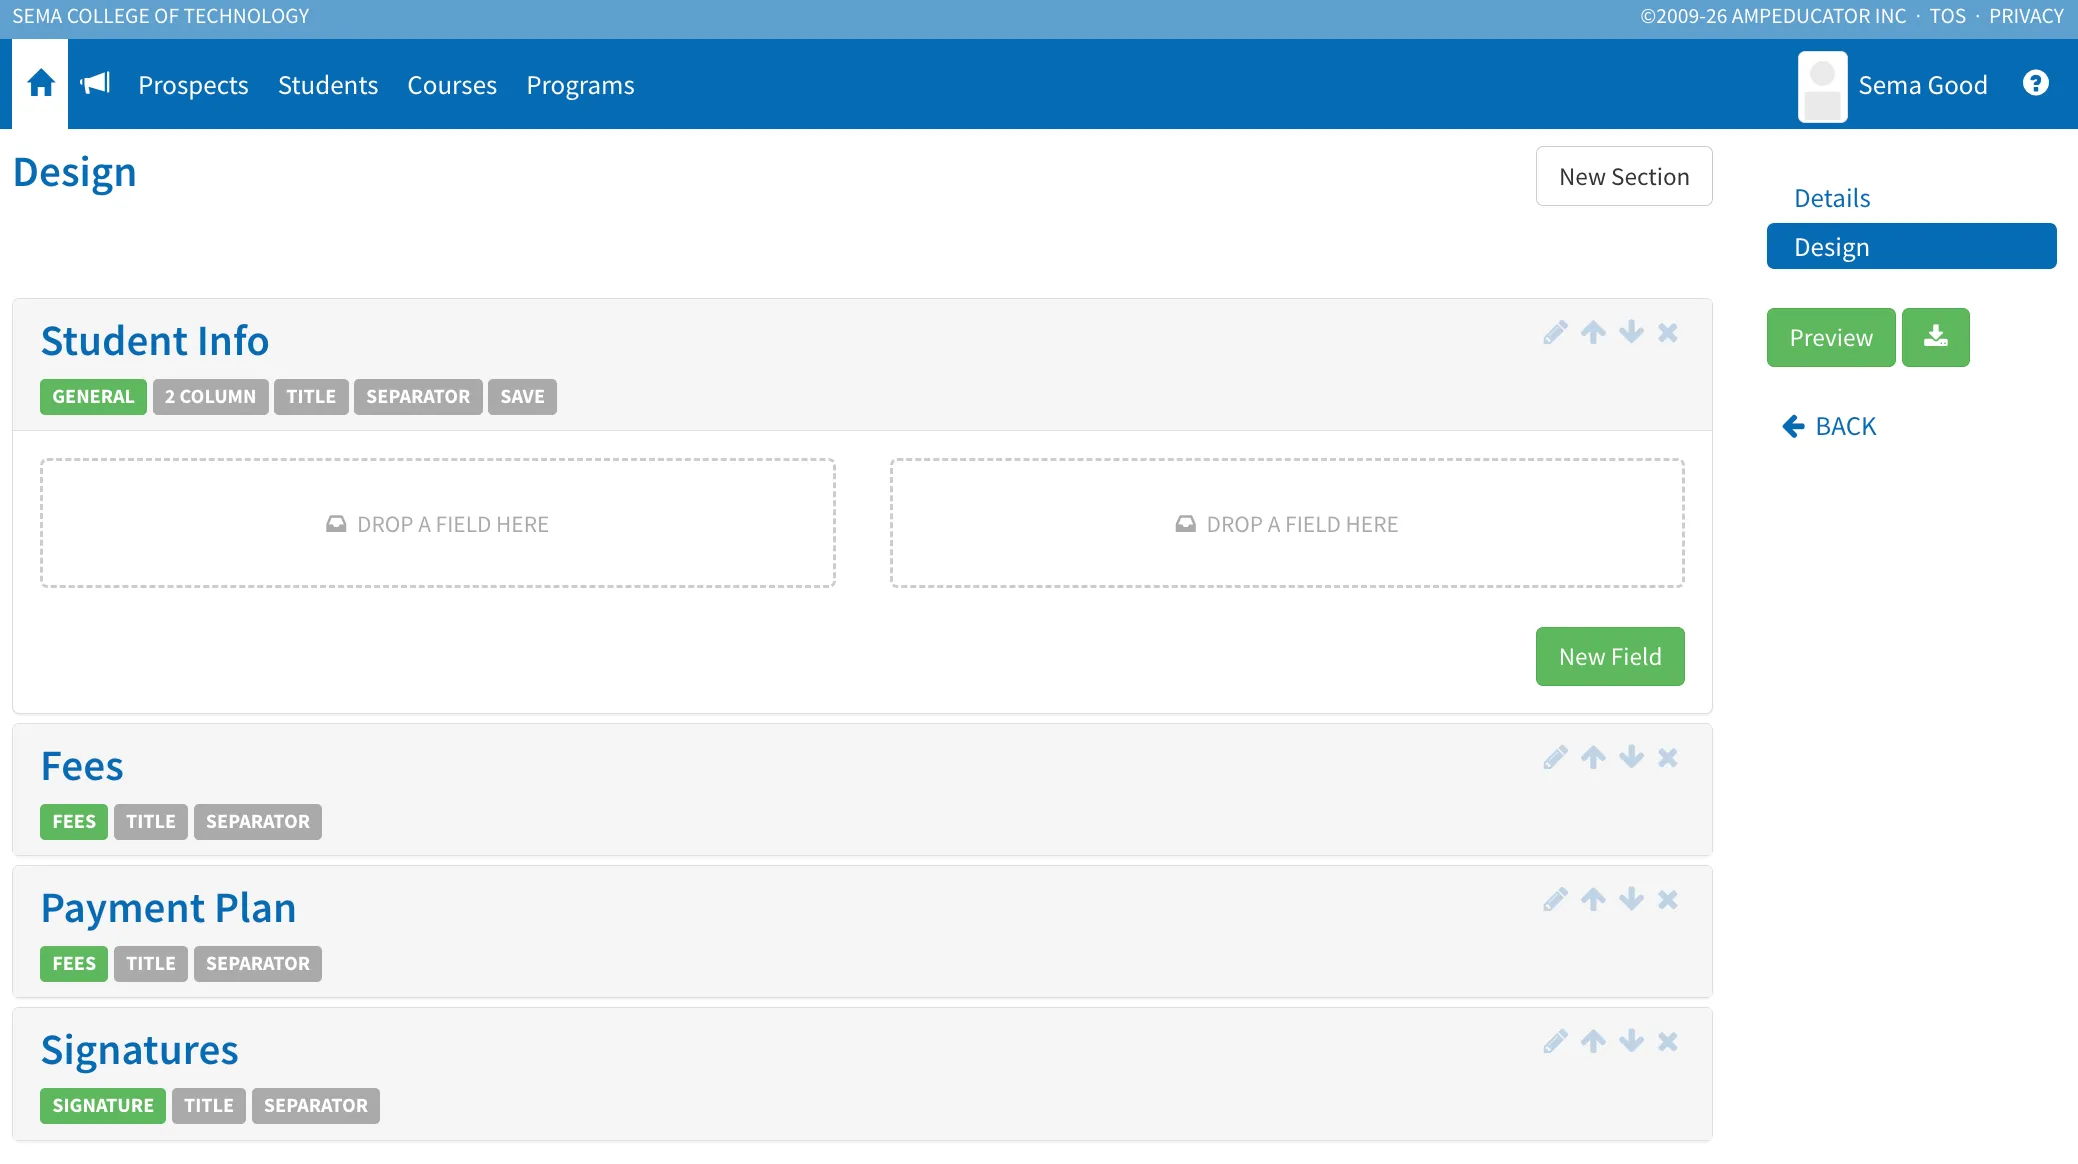
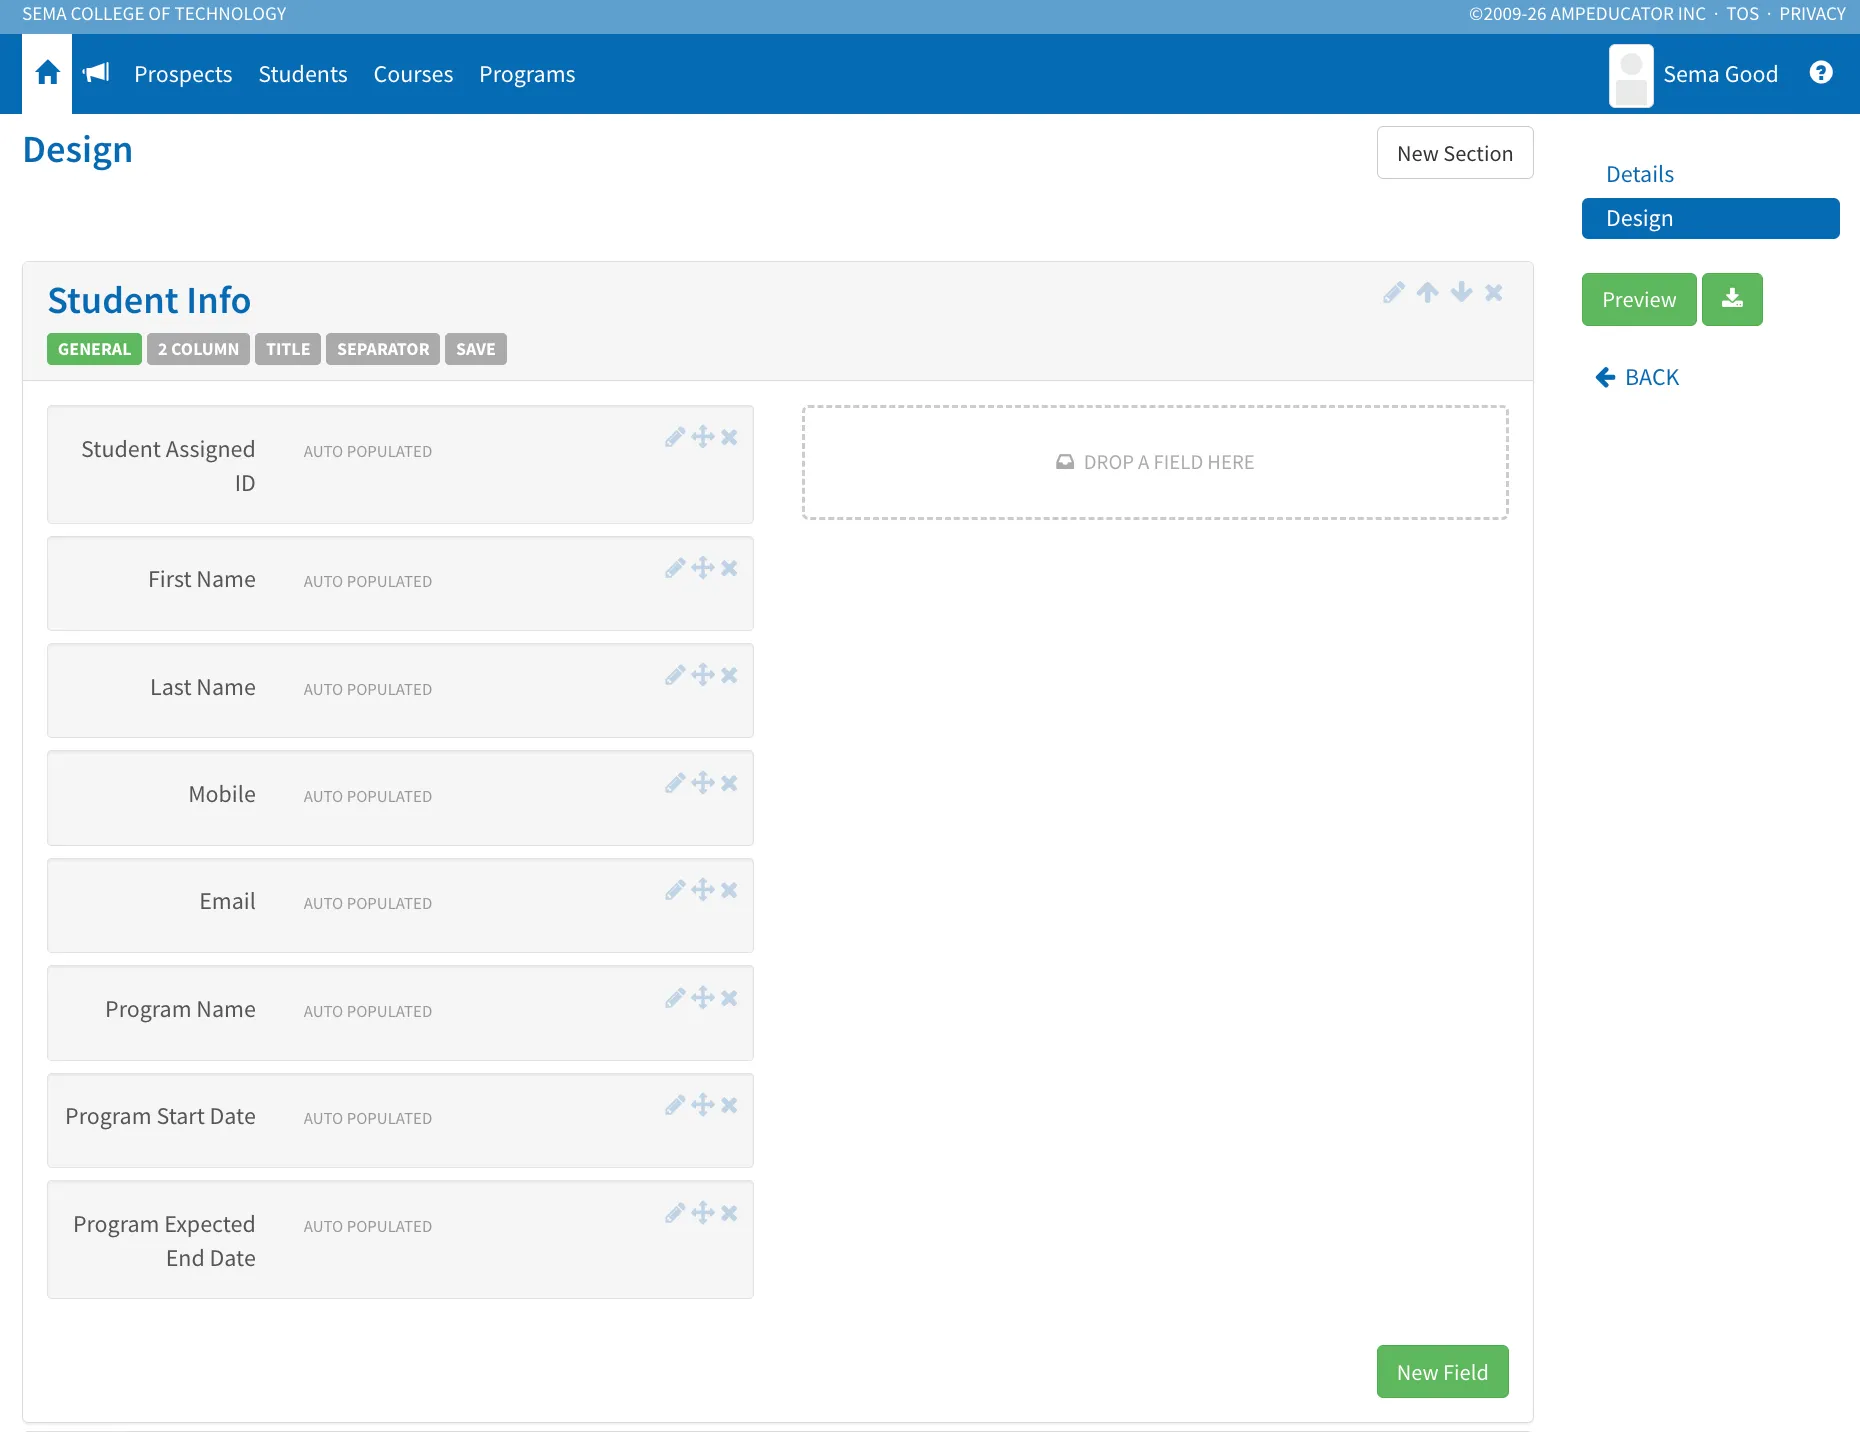
Student Info: The Student Info section is used to display information from the student's record. This information is automatically populated when the contract is generated and may include details such as the student's name, contact information, program, academic session, and other student record fields.
Fees: The Fees section displays fee information associated with the student's enrollment. This may include tuition, application fees, material fees, and other charges depending on how your institution has configured student accounts.
Payment Plan: The Payment Plan section can be used to display scheduled payments and instalment information. This is commonly used when students are paying tuition over multiple payments rather than in a single payment.
Signatures: The Signatures section is used to collect digital signatures and acknowledgements. Signature sections can be configured to require signatures from students, third parties, or other designated signers.
These default sections provide a foundation for many common contract types, but they can be fully customized to meet your institution's needs. In the next section, we'll look at how to edit and configure contract sections.
Student Information
The Student Info section is typically the first section that institutions customize.
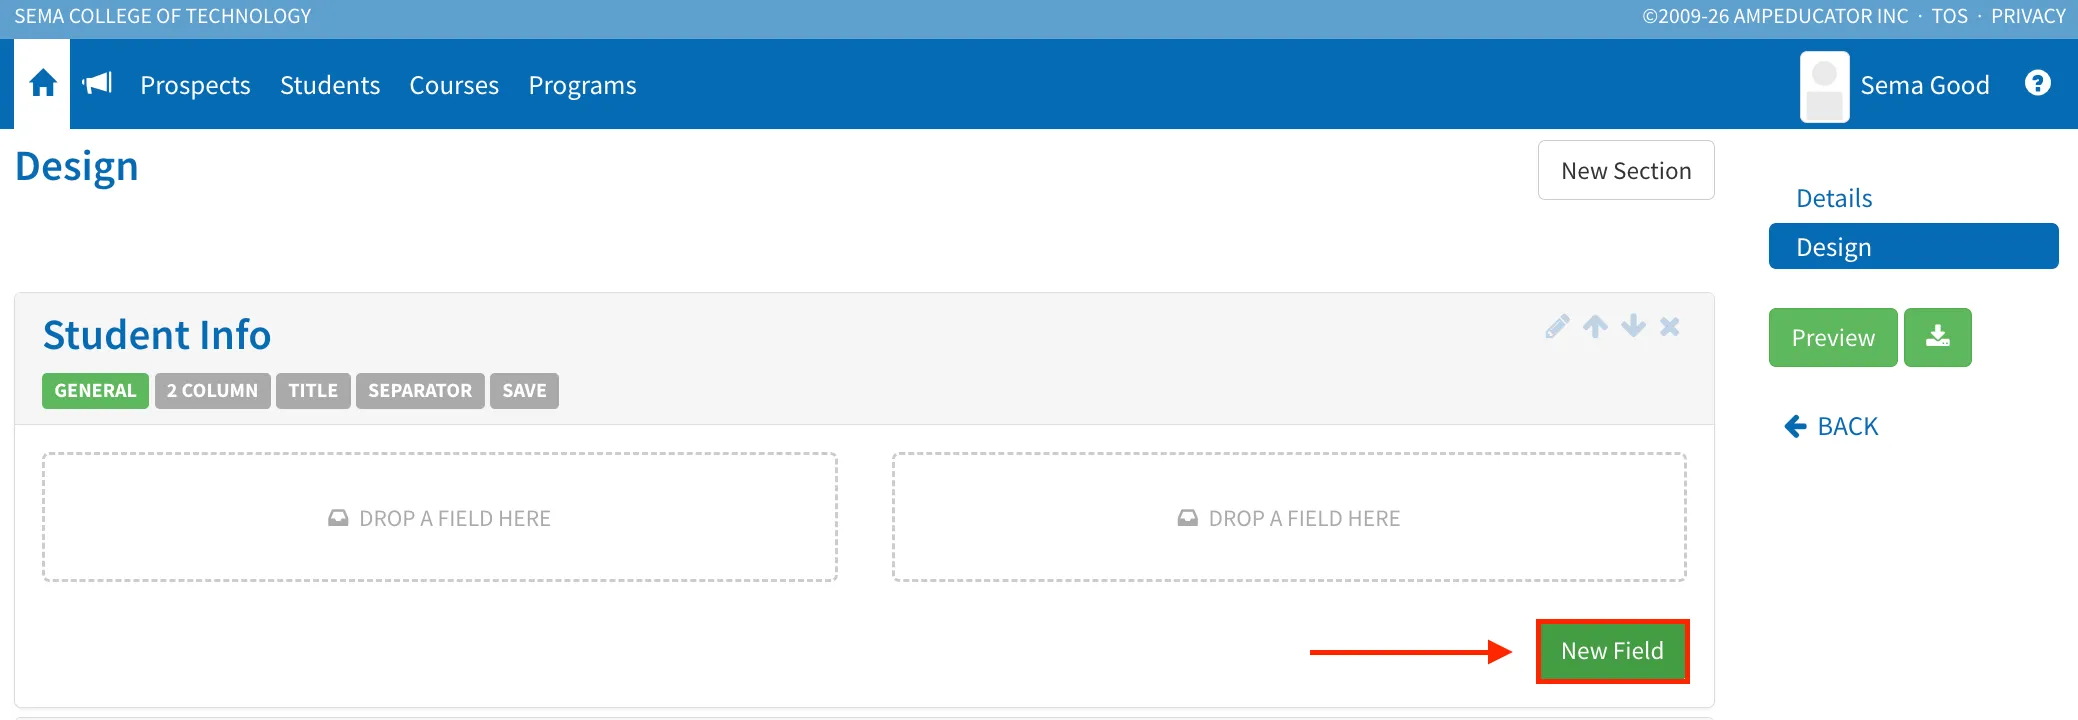
To add information from a student's record, click New Field within the Student Info section.
The Add Contract Field window will appear.
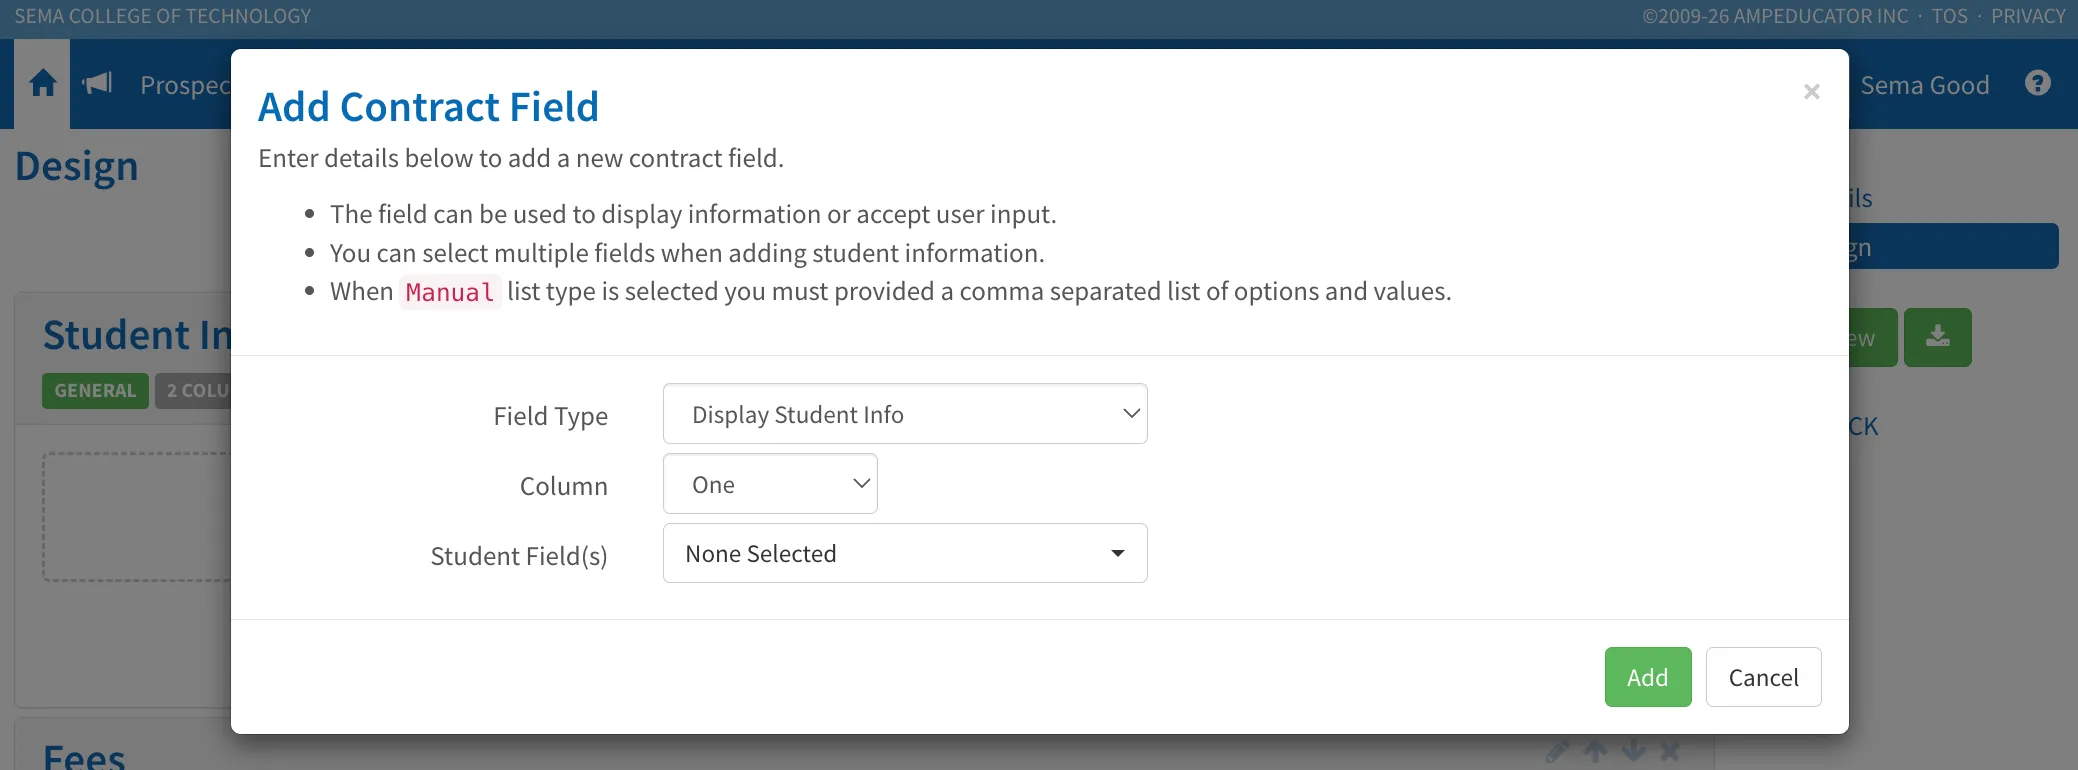
The options available in this window will vary depending on the selected field type.
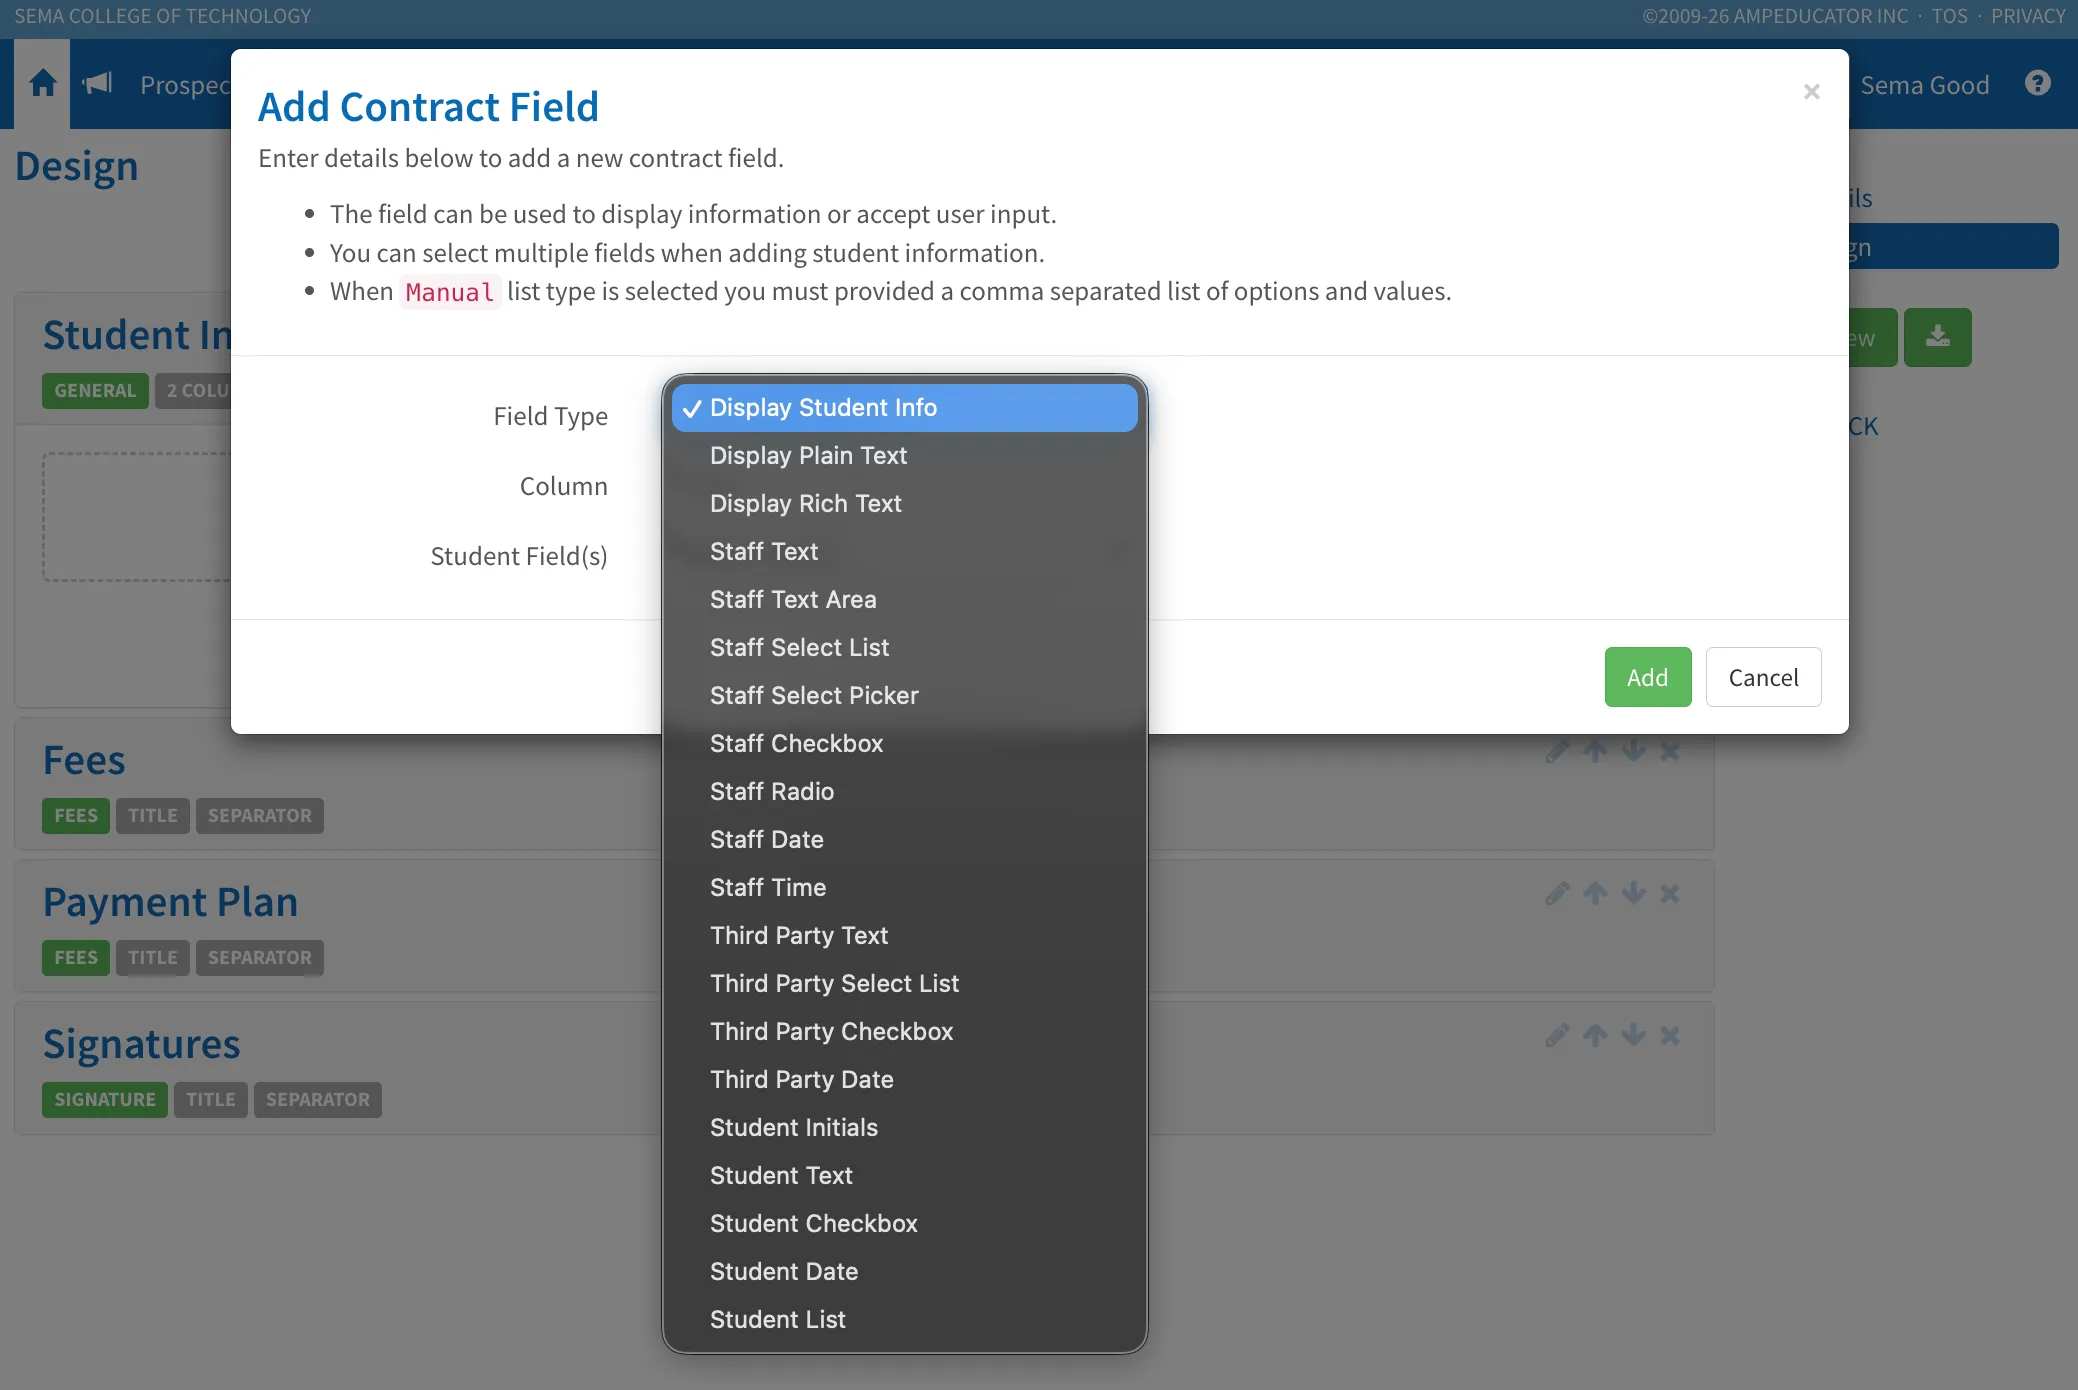
Display Student Info Field Type
One of the most commonly used field types is Display Student Info. This field type allows you to automatically populate information from the student's record when the contract is generated.
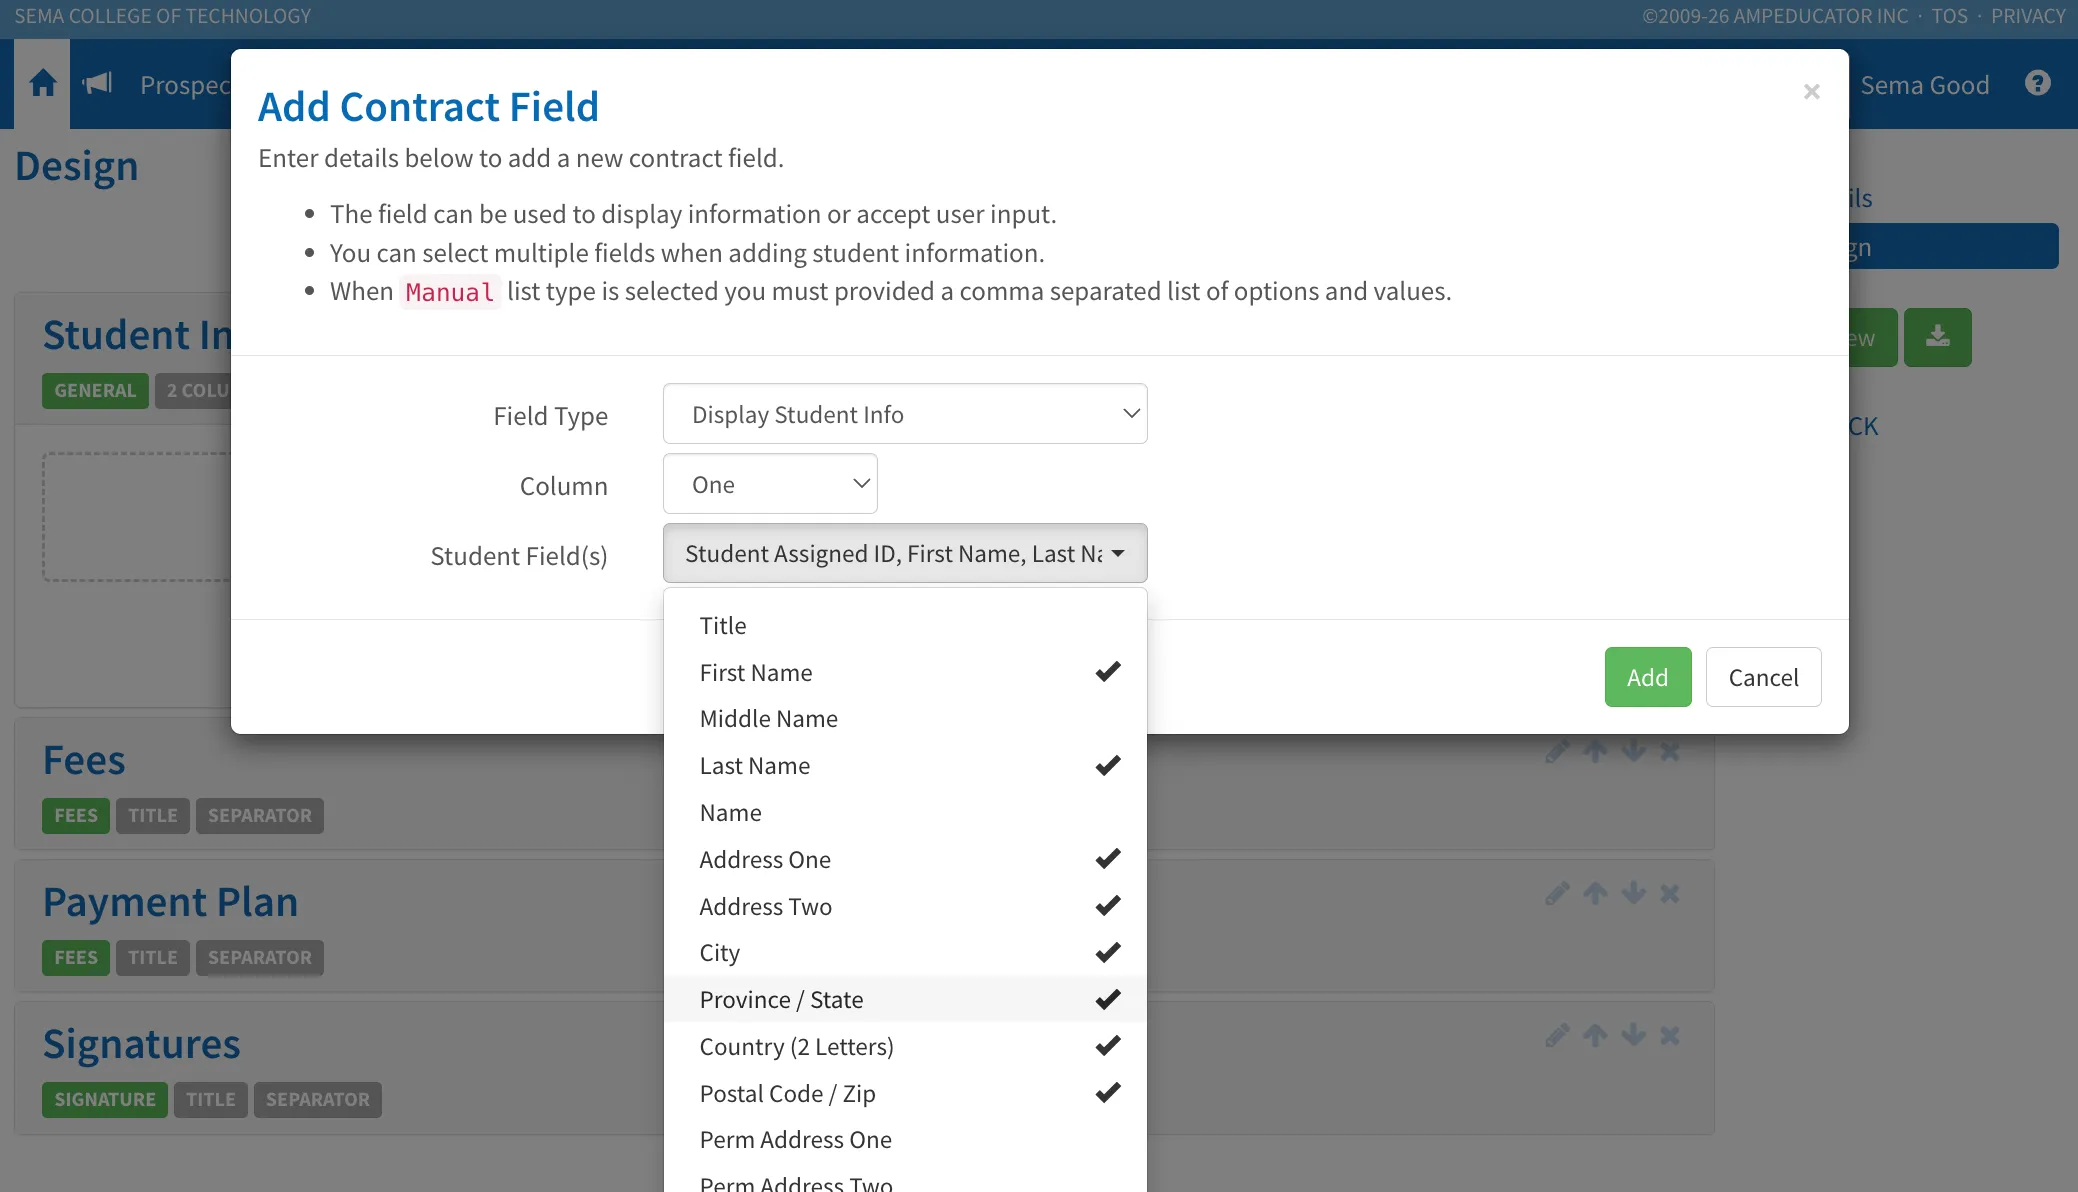
After selecting Display Student Info, choose the student fields you would like to display. Multiple student fields can be added to create a complete Student Information section that automatically populates when contracts are generated.
After selecting your student fields, they will be added to the section. Each field displays as a separate block within the contract designer.
Fees
The Fees section allows you to display tuition, fees, and other charges on the contract.
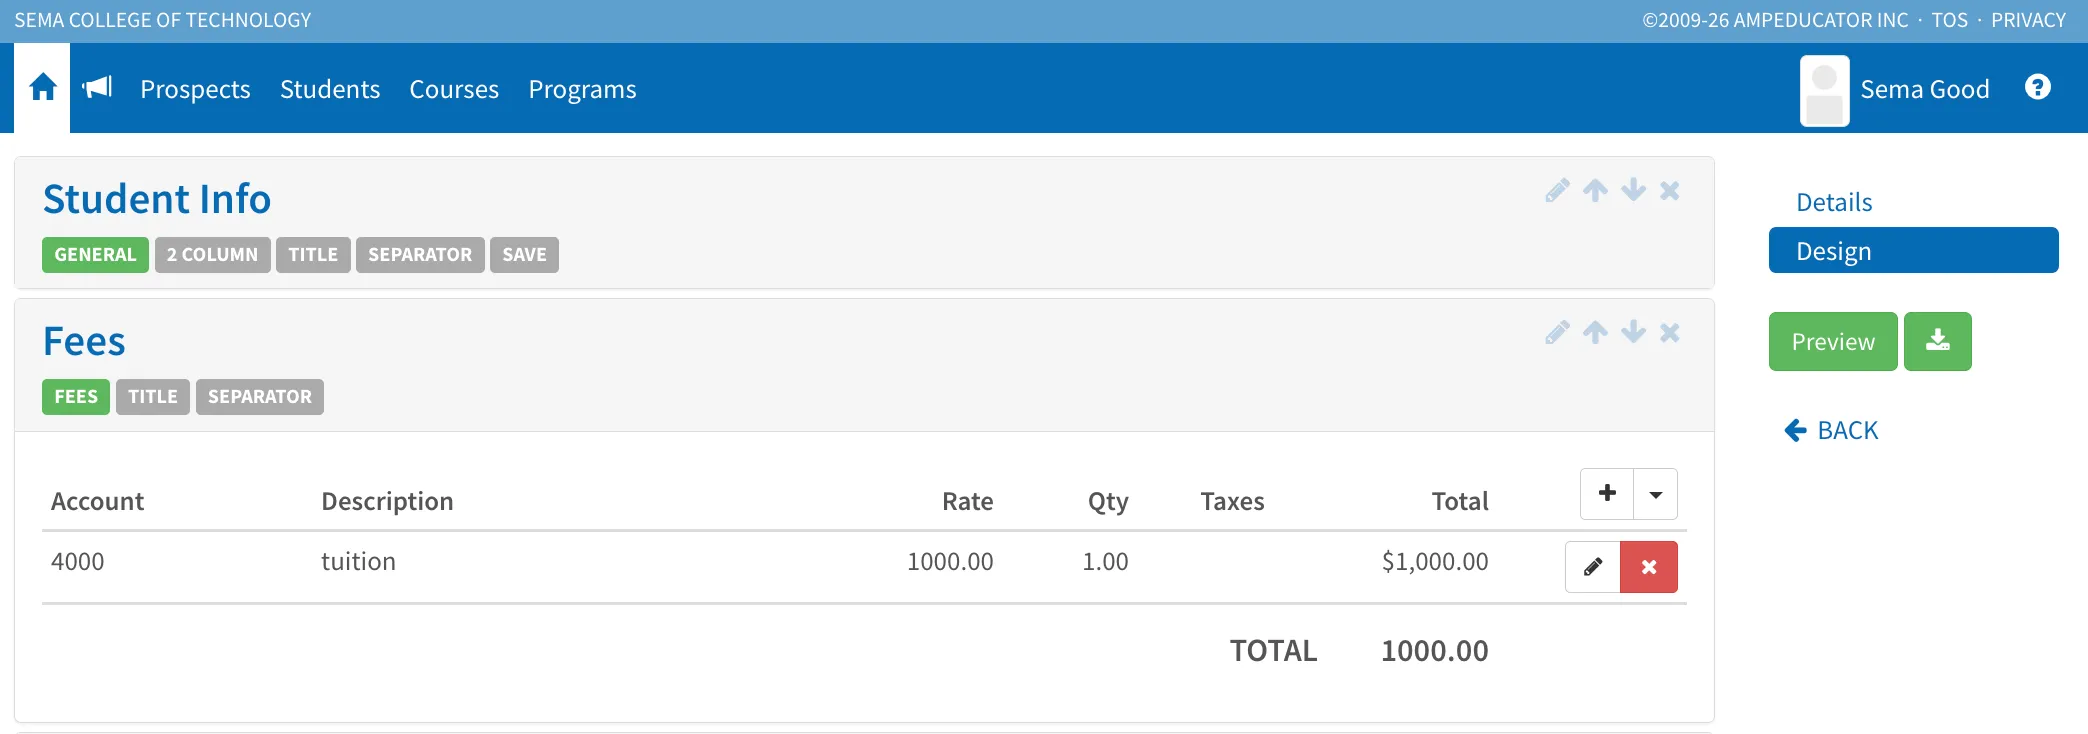
You can either:
- Automatically pull fees from configured Programs, Academic Sessions, or Courses.
- Manually enter fee items directly into the contract.
Adding Fees Automatically
If your institution has fees configured within Programs, Academic Sessions, or Courses, click the dropdown arrow icon.
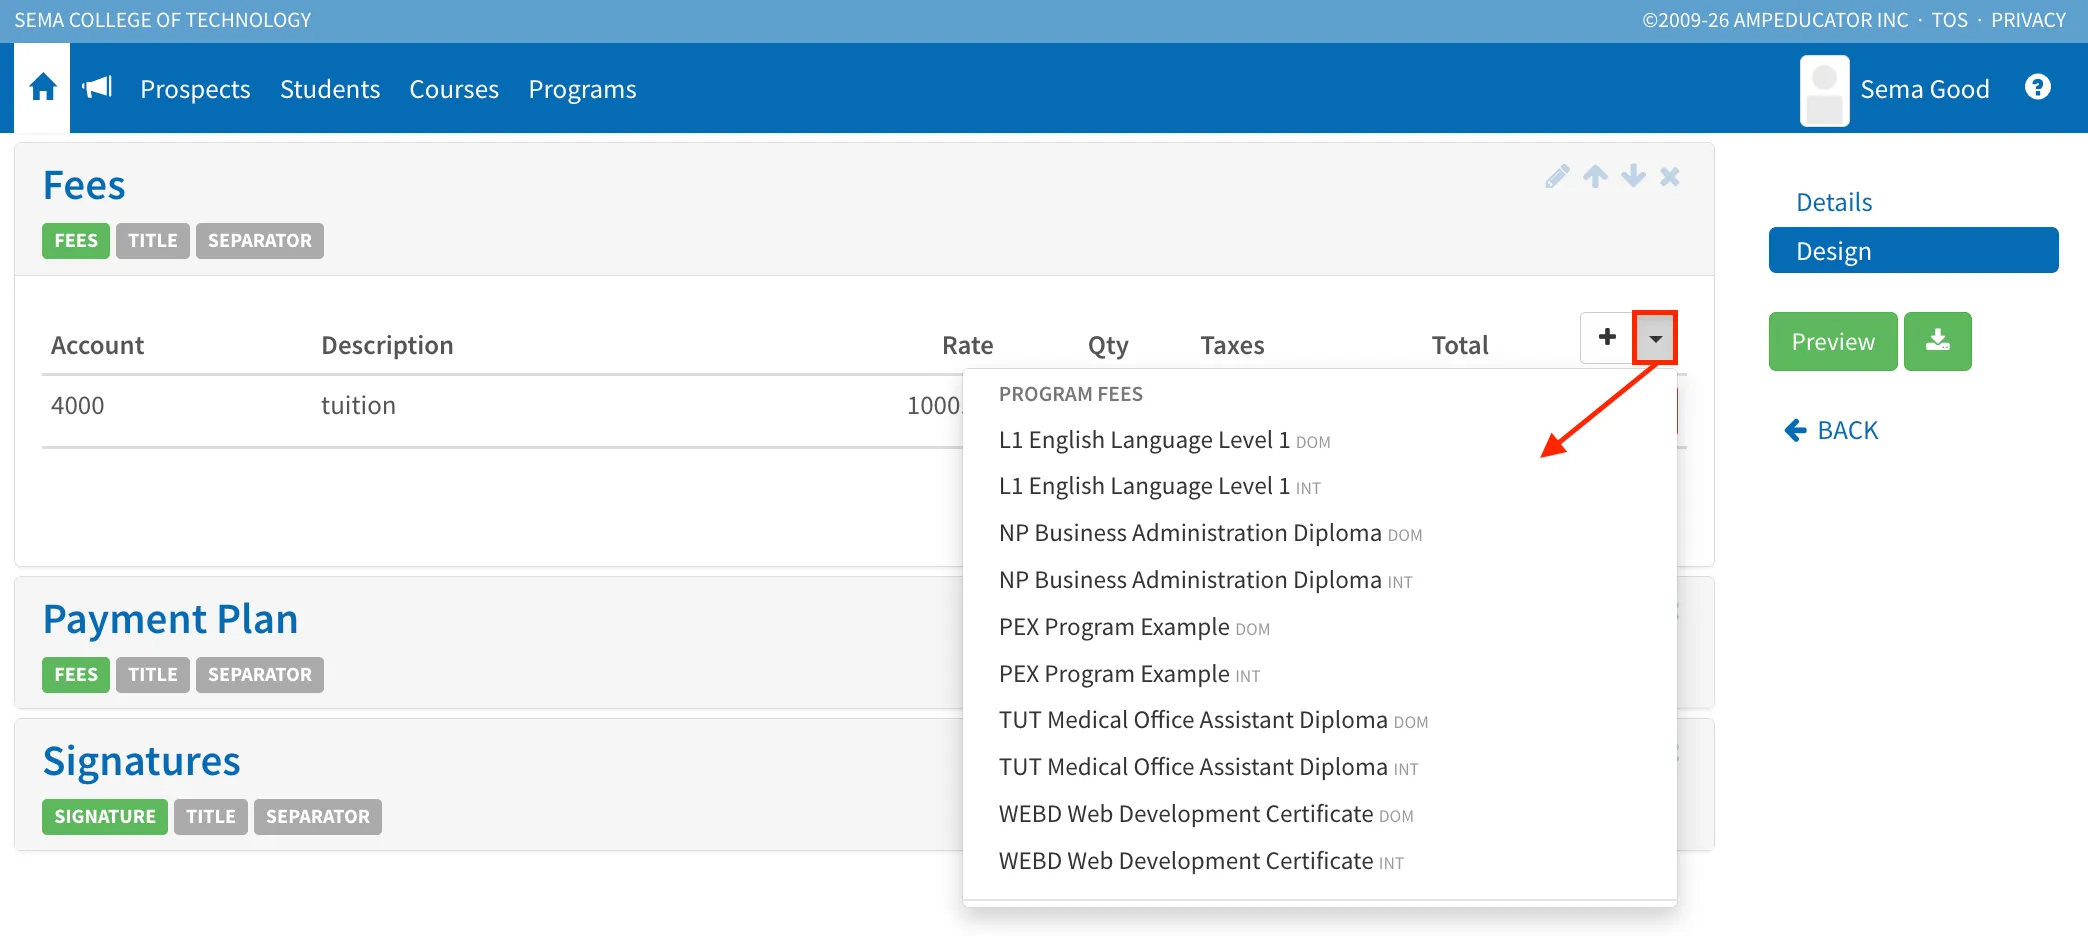
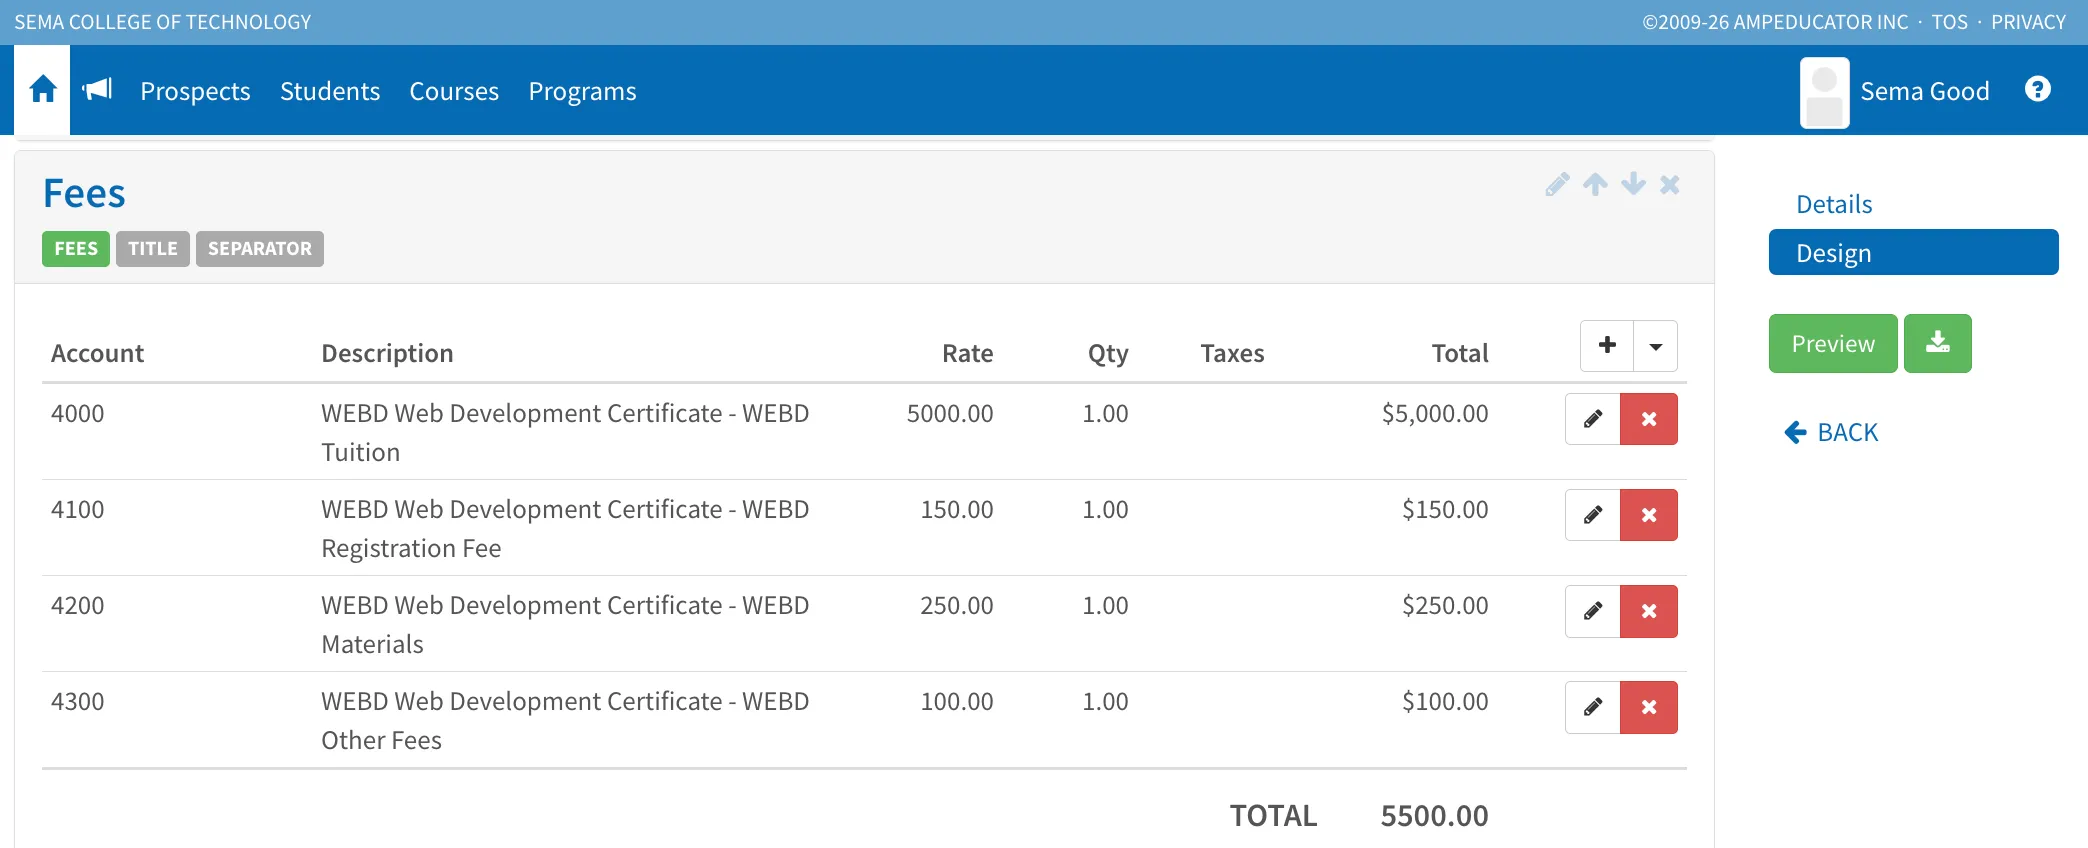
Select the fee schedule you would like to use, and the fee items will automatically be added to the contract.
Adding Fees Manually
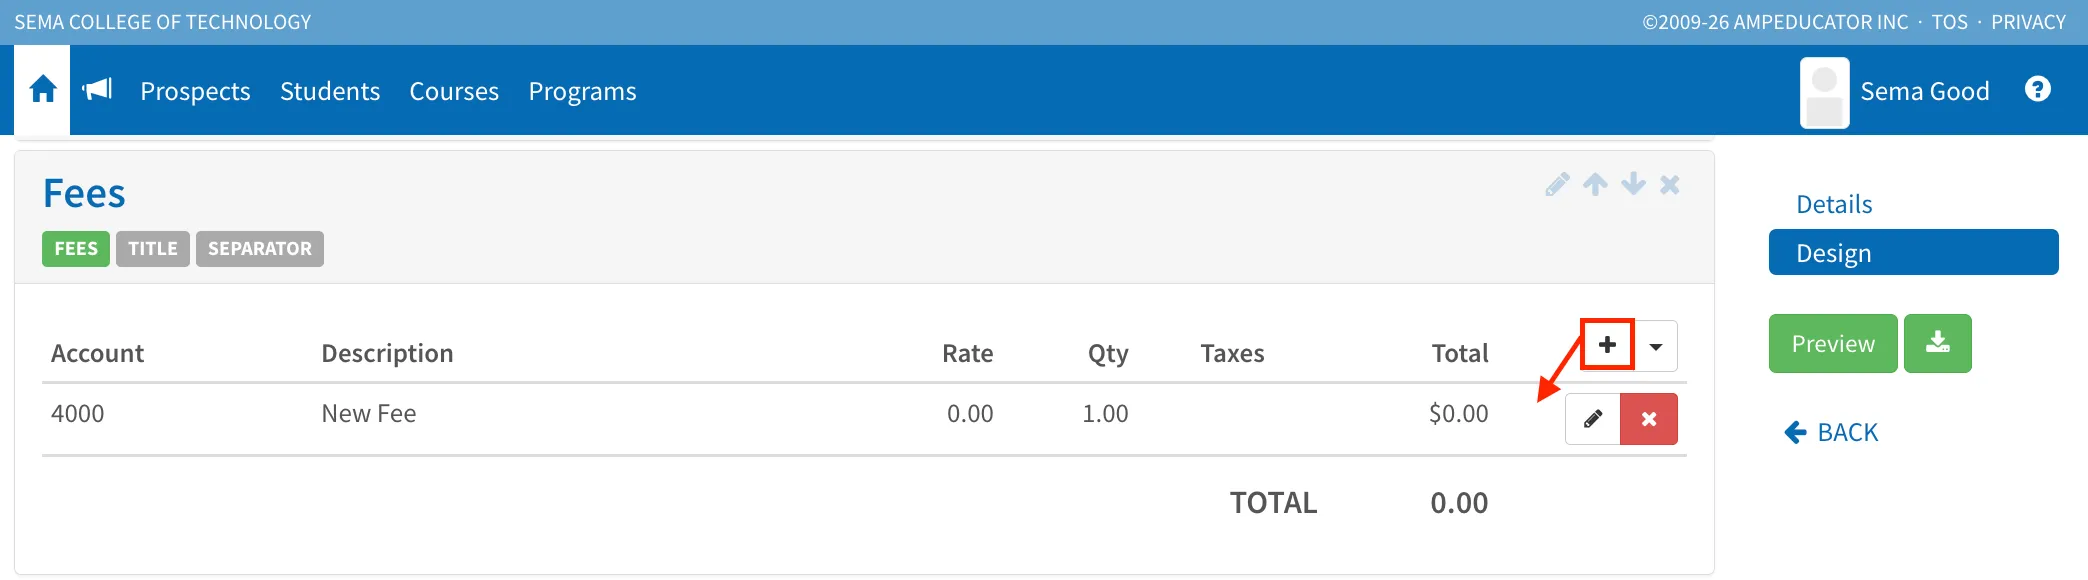
If fees are not configured elsewhere in the system, click the Add New Fee (+) icon to create a fee item manually.
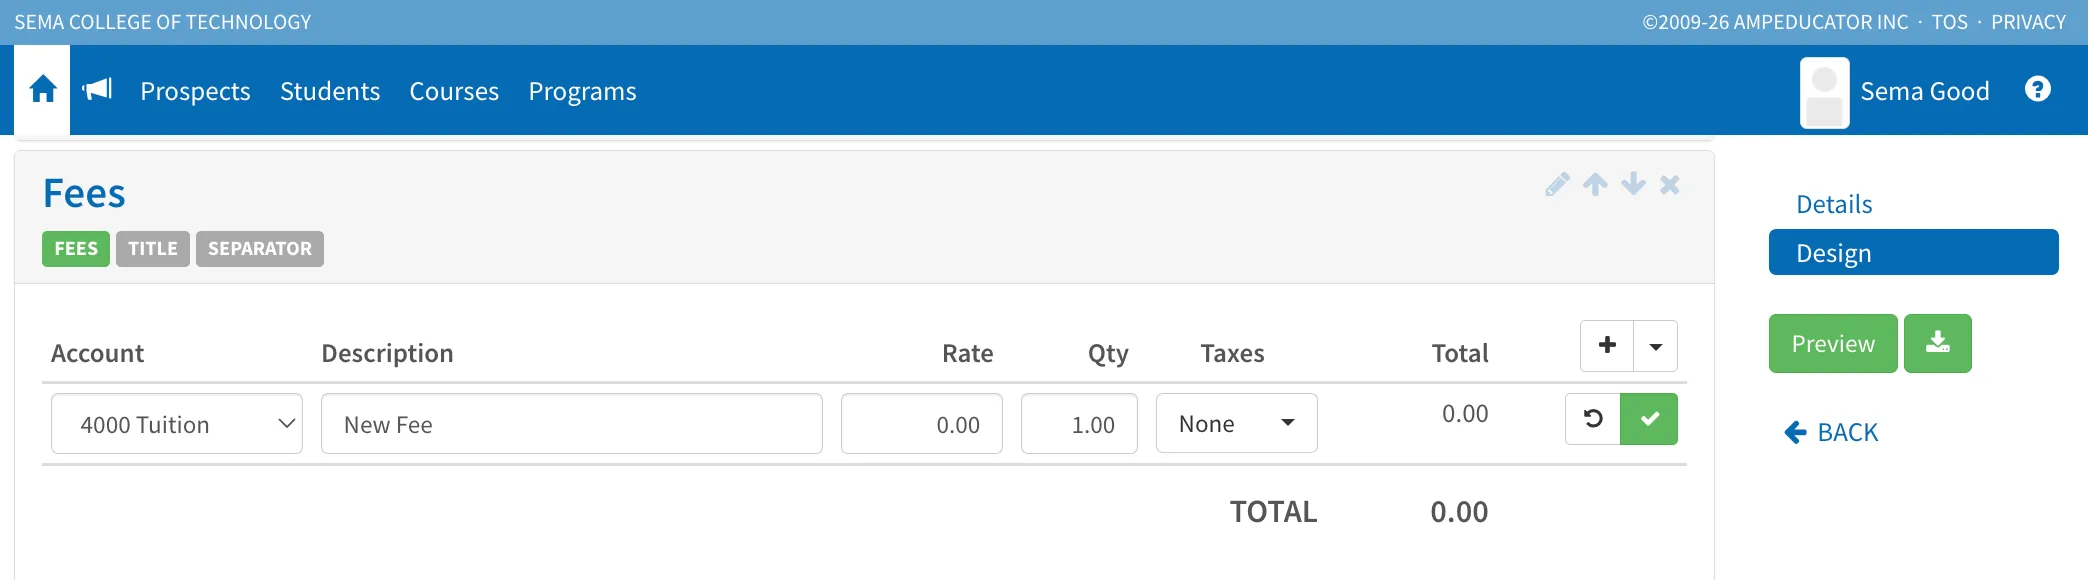
A new line item will be added to the fee table.
Editing Fee Items
After adding a fee, click the Edit icon beside the line item.
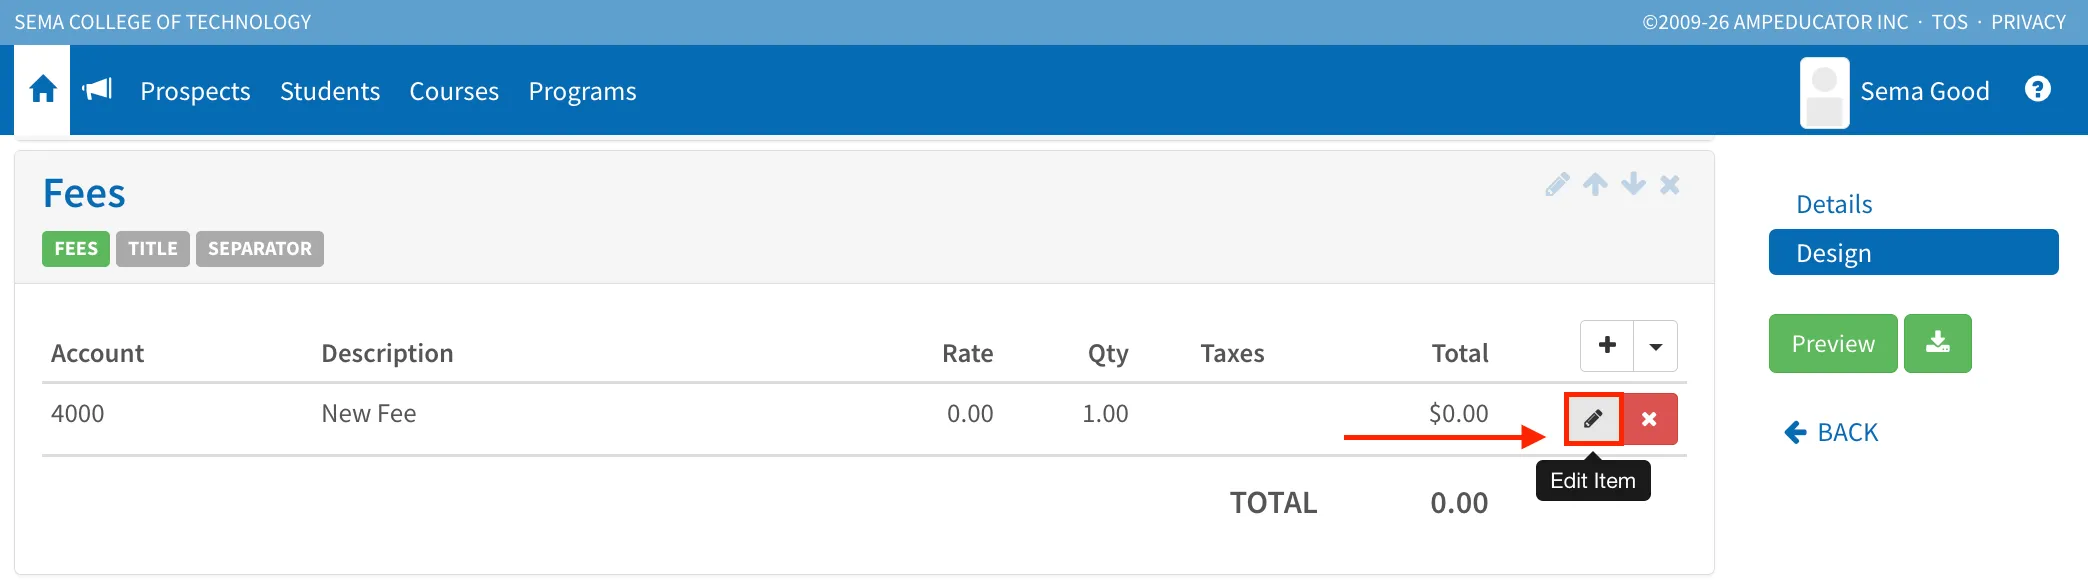
The following fields can be configured:
- Account – The accounting account associated with the fee.
- Description – The fee description displayed on the contract.
- Rate – The fee amount.
- Quantity – Number of units being charged.
- Taxes – Applicable tax settings.
Saving Fee Items
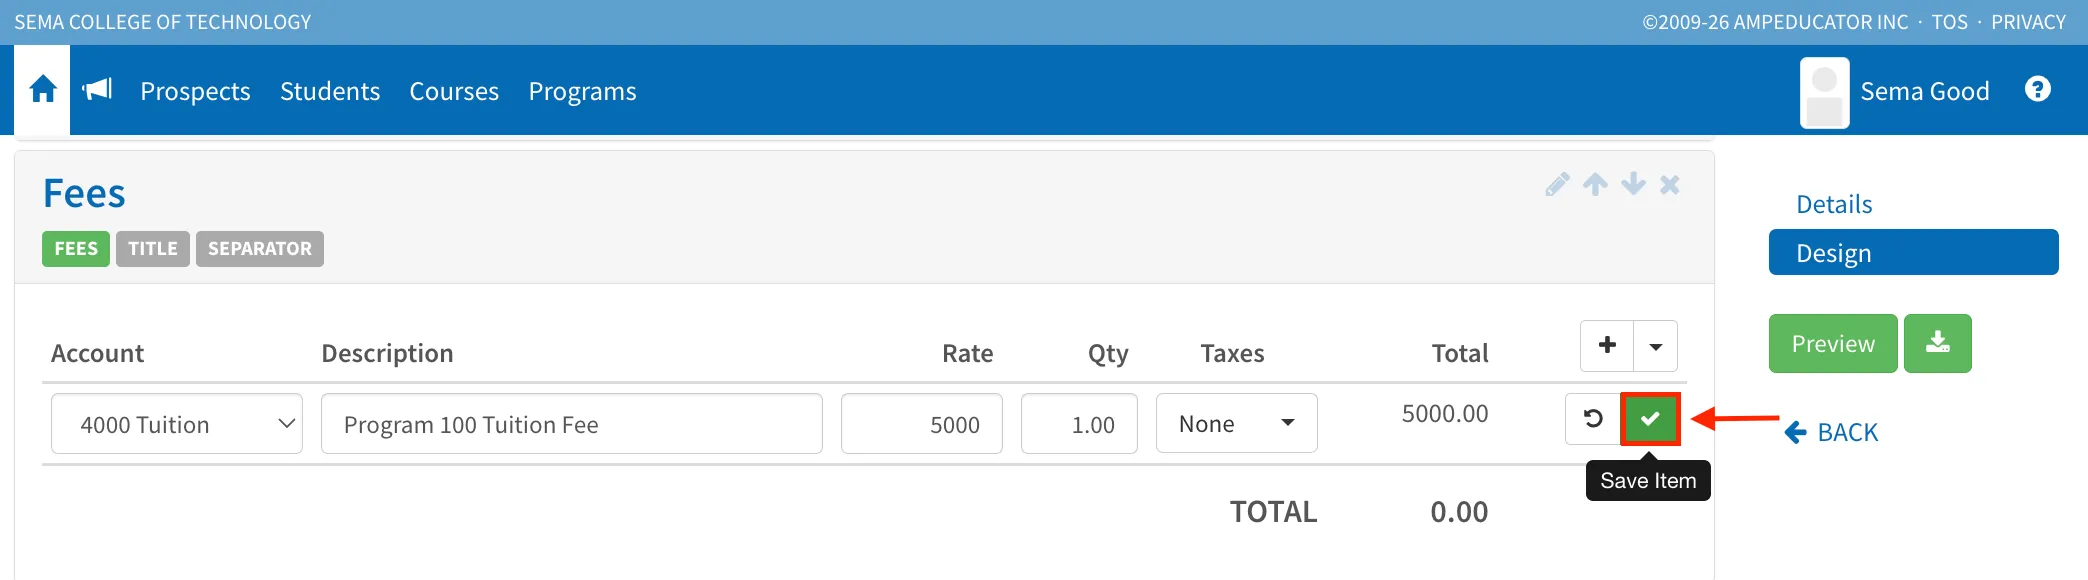
Once all fee details have been entered, click Save Item to add the fee to the contract.
After saving, the fee will appear in the fee table and be included in the contract total.
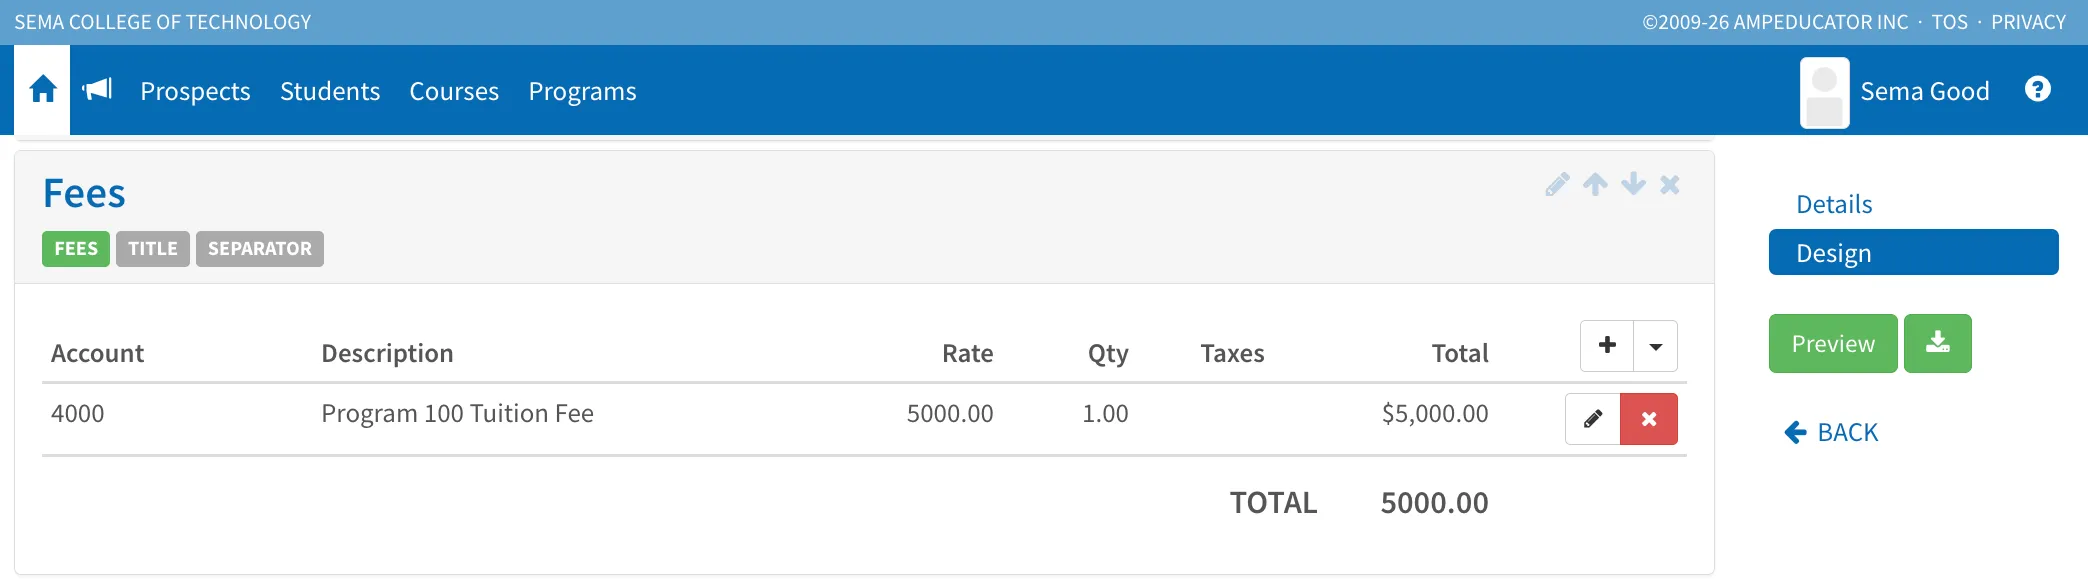
Multiple fee items can be added to a contract. Repeat the process as needed to include tuition, application fees, material fees, technology fees, housing fees, or any other charges required by your institution.
Payment Plans
The Payment Plan section allows you to define when and how fees will be paid. Payment plan items can be added manually to create a schedule of installments that will appear on the contract.
Adding Payment Plan Items
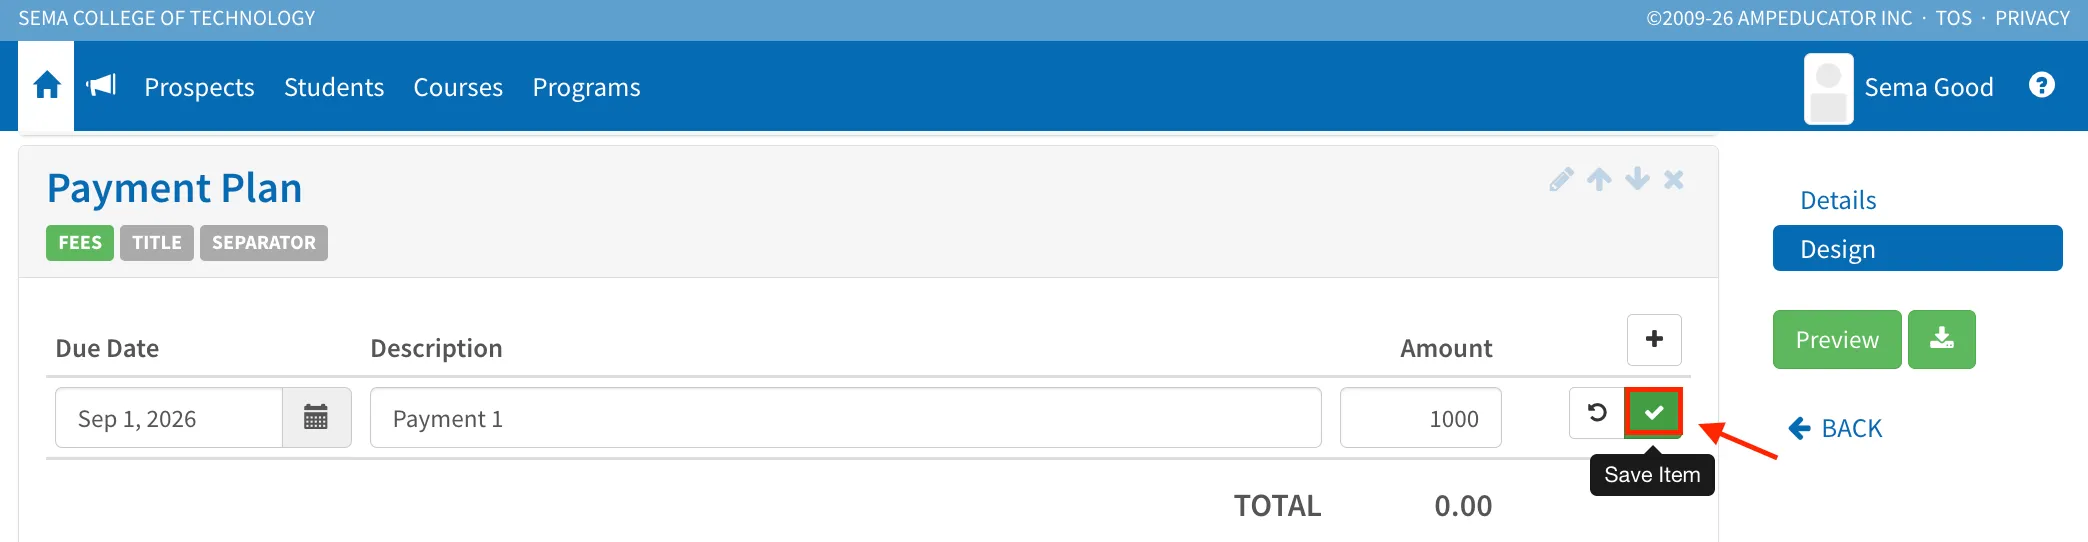
To add a payment plan item, click the Add Payment Plan Item (+) button.
A new payment plan row will be added.
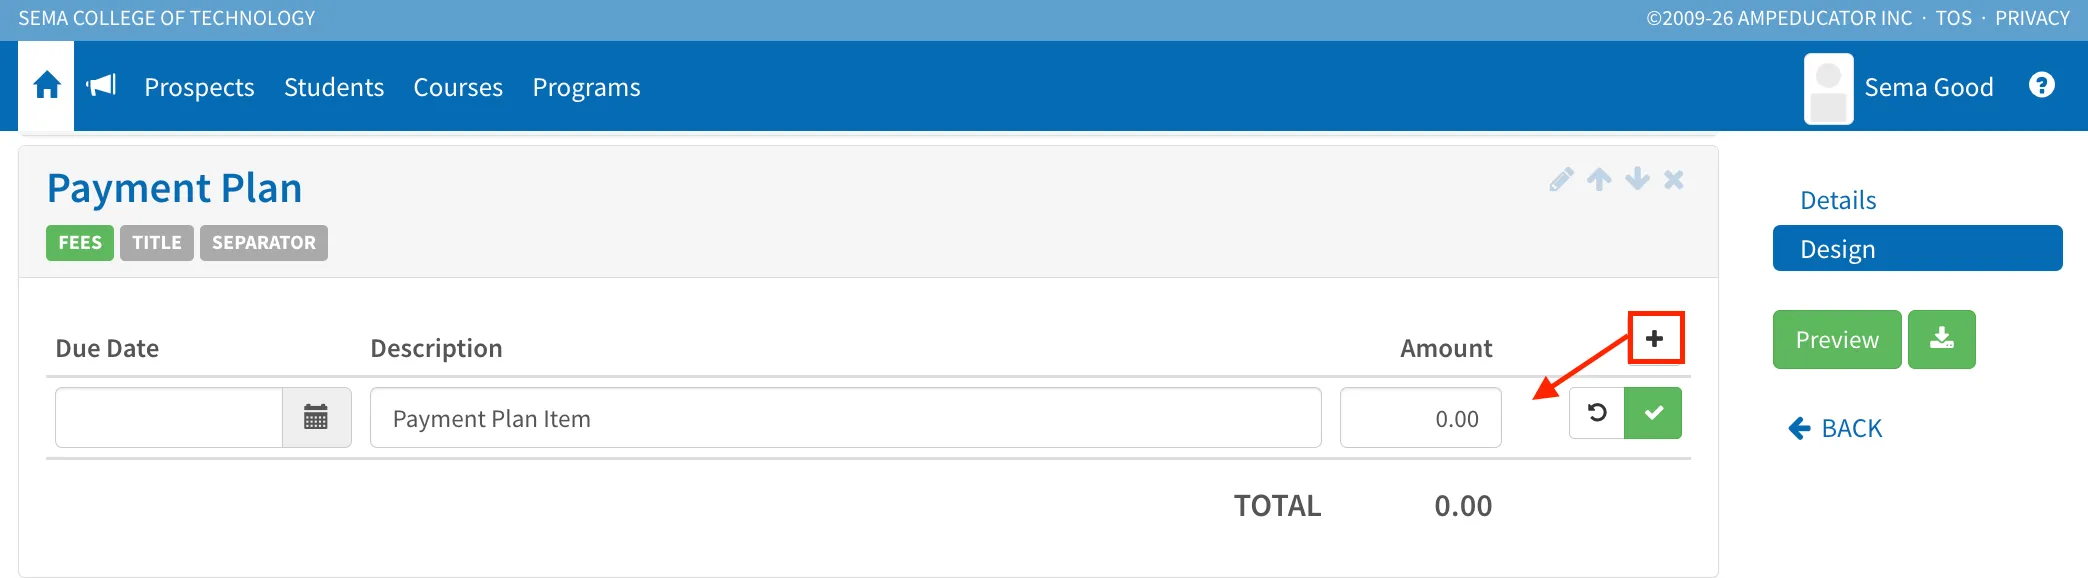
The following fields can be configured:
- Due Date – The date the payment is due.
- Description – A description of the payment installment.
- Amount – The amount due for that payment.
Once all payment details have been entered, click Save Item to add the payment to the contract.
After saving, the payment will appear in the payment plan table and be included in the payment plan total.
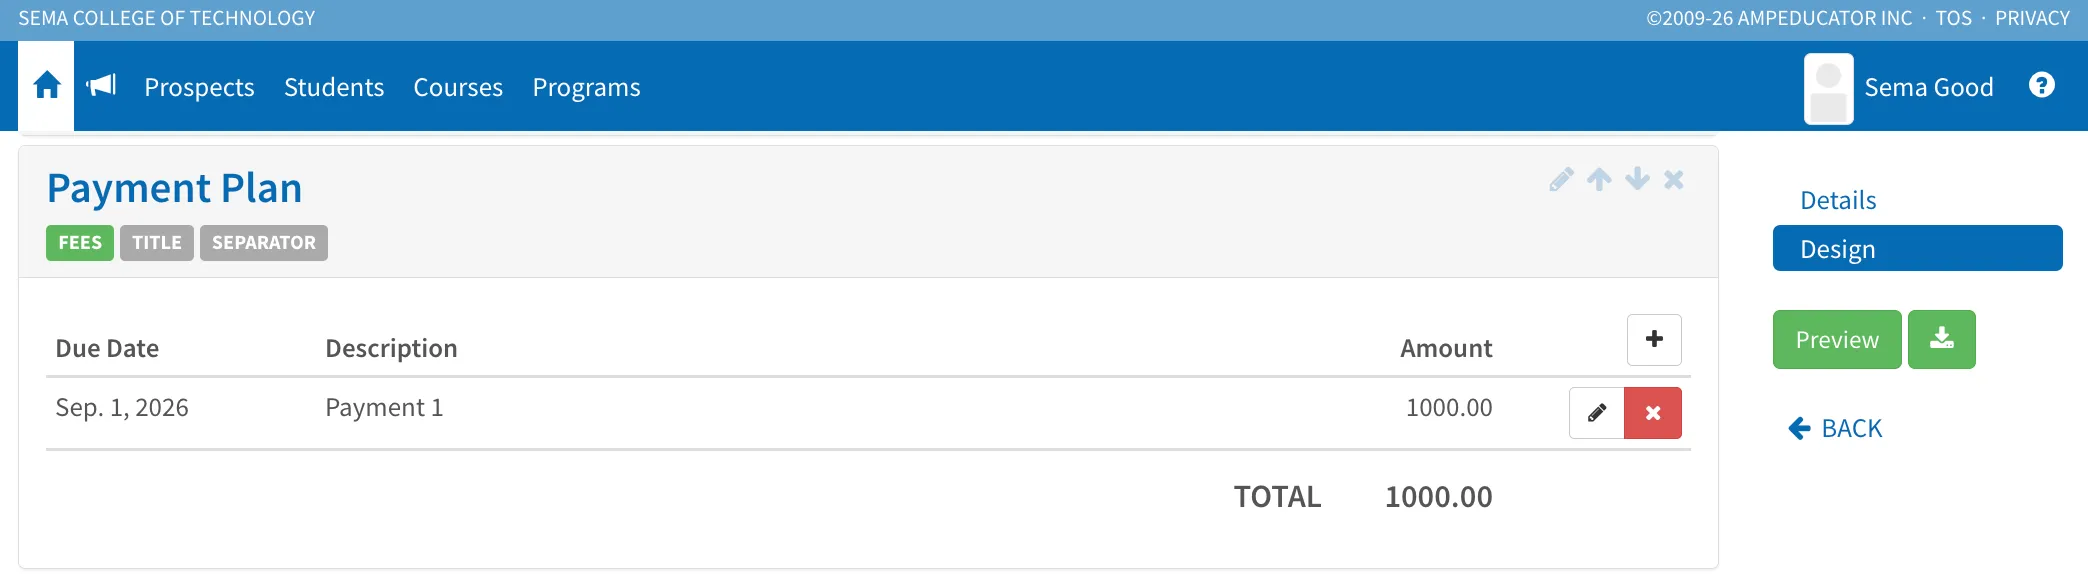
Multiple payment plan items can be added to create installment schedules, deposit structures, monthly payment plans, or any other payment arrangement required by your institution.
Signatures
The Signatures section controls who must sign the contract and how signatures are displayed.
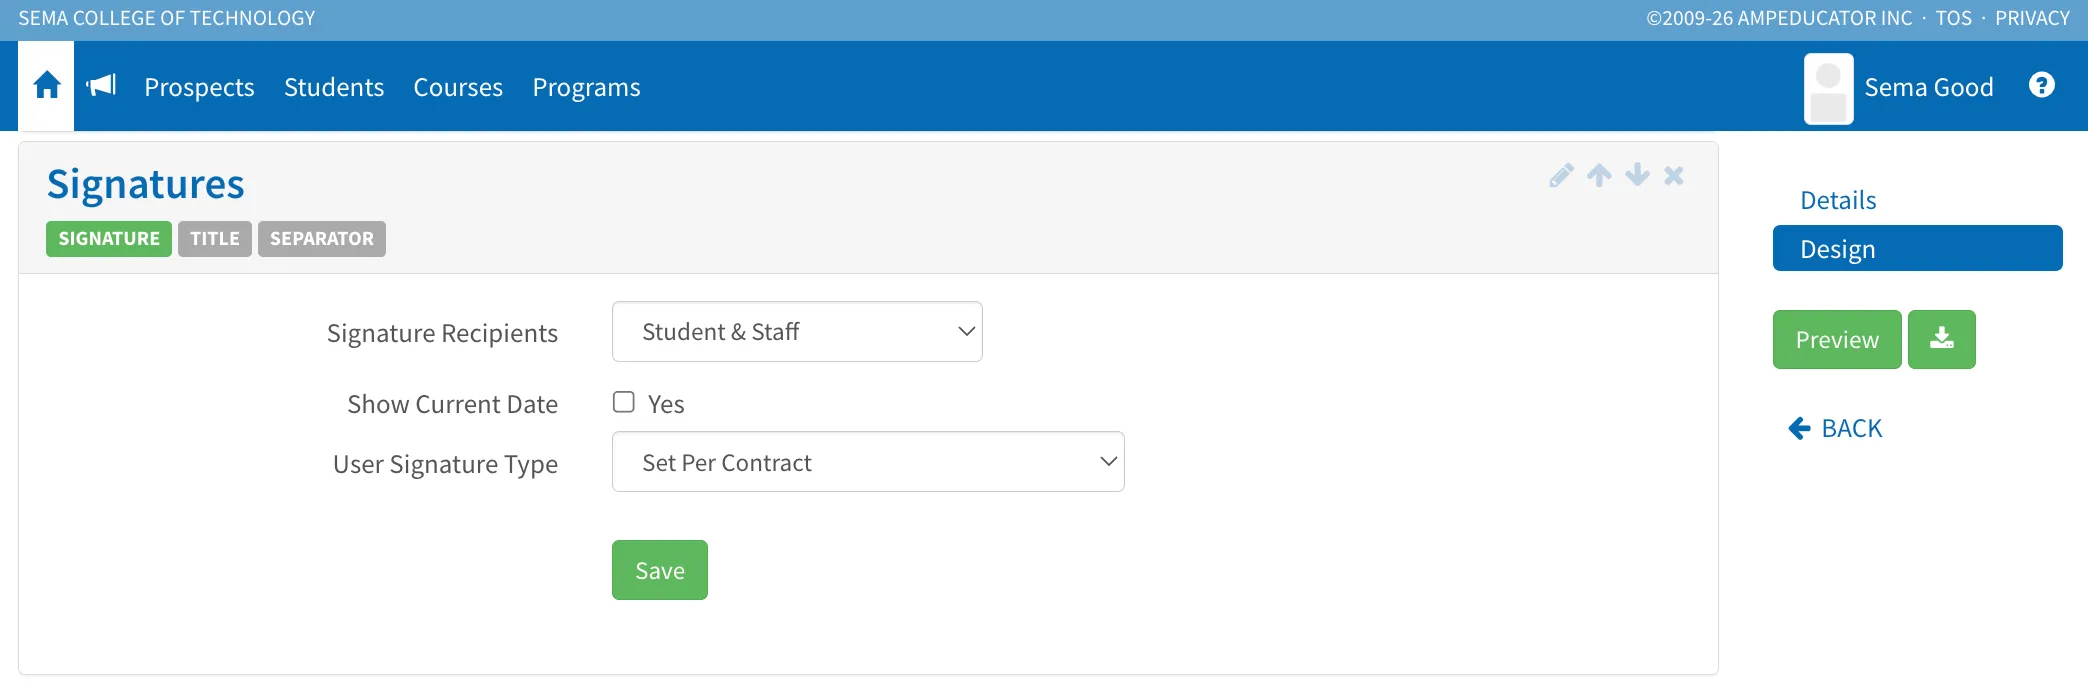
By default, contracts can be configured to collect signatures from students, staff members, and third-party signers such as parents, guardians, sponsors, or agents.
Signature Recipients
Use the Signature Recipients dropdown to determine who is required to sign the contract.
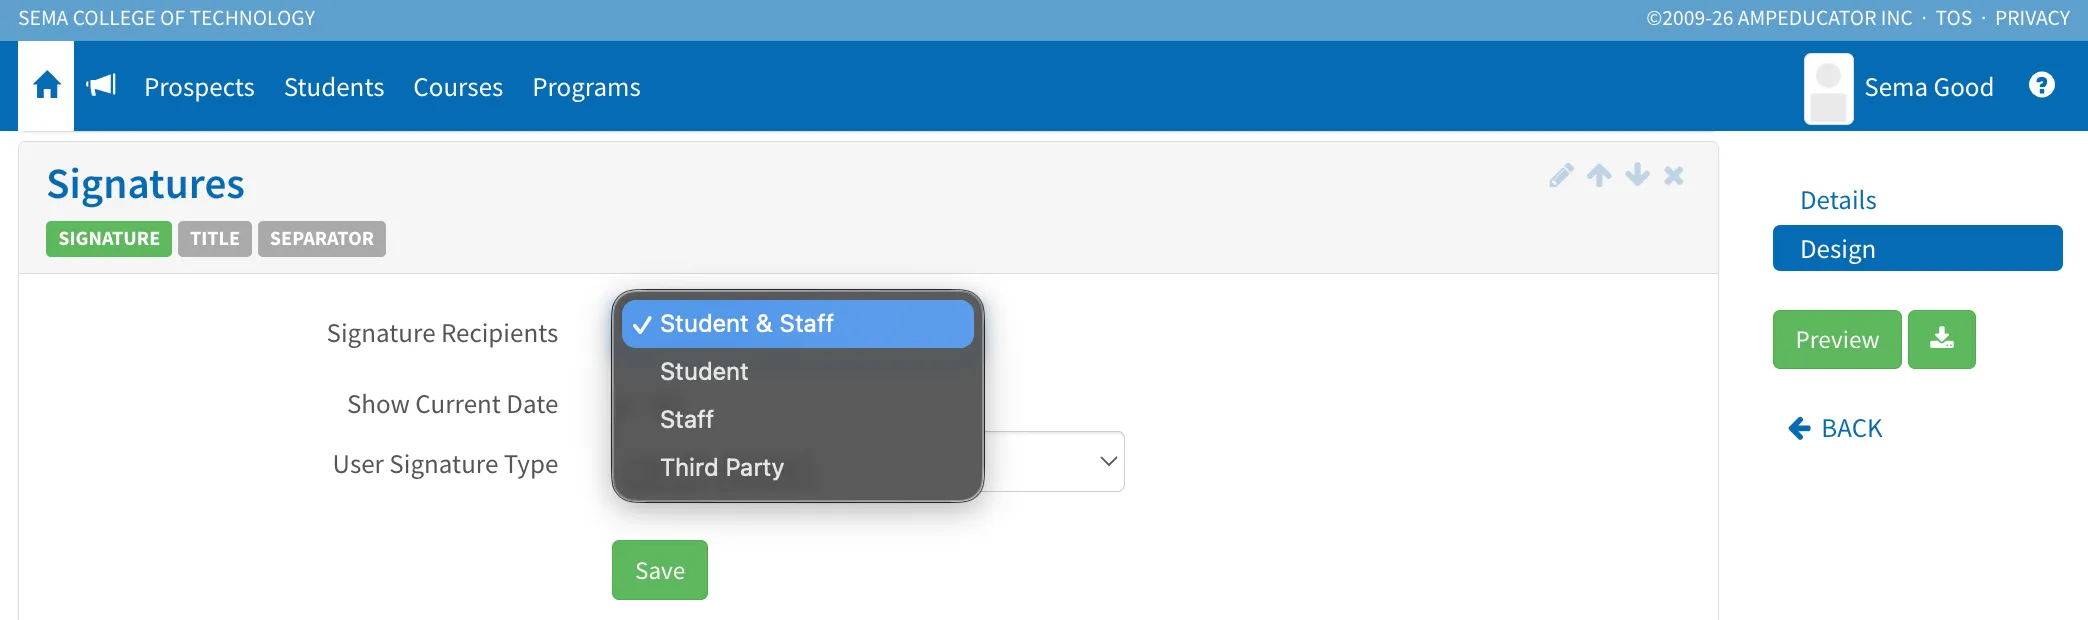
Available options include:
- Student – Only the student is required to sign.
- Staff – Only a staff member is required to sign.
- Third Party – A configured third-party signer is required to sign.
- Student & Staff – Both the student and staff member must sign.
Show Current Date
Enable Show Current Date to automatically display the signing date beside each signature.
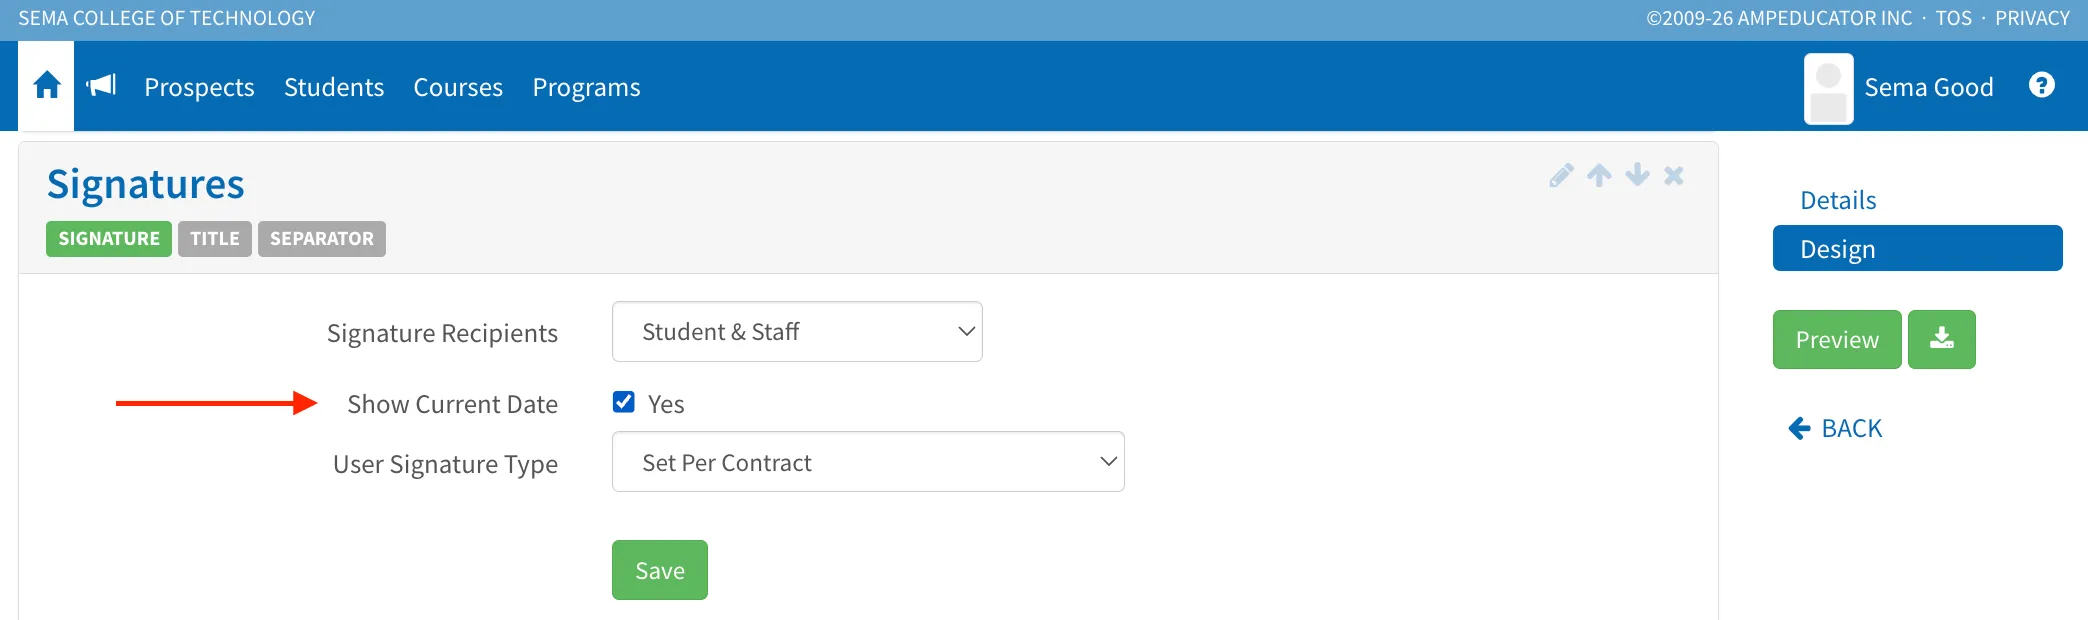
This helps provide an audit trail showing when the contract was signed.
Staff Signatures
When Staff is included as a signature recipient, additional options become available.
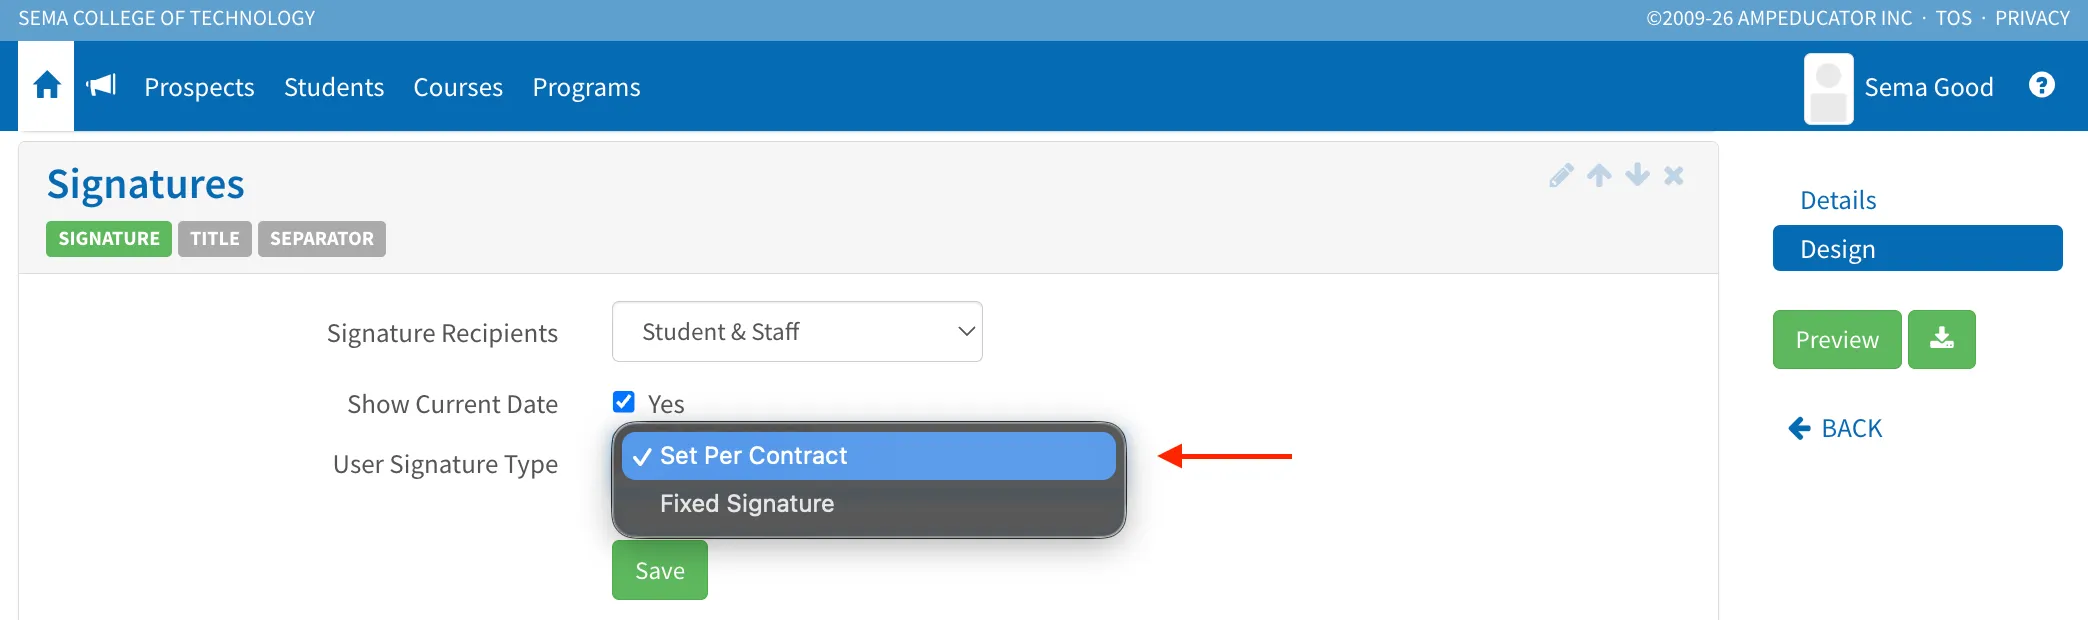
Choose how staff signatures should be handled:
- Set Per Contract – The staff member generating the contract provides their signature when the contract is created.
- Fixed Signature – A predefined signature image is stored in the contract template and used whenever the contract is generated.
Fixed Signatures
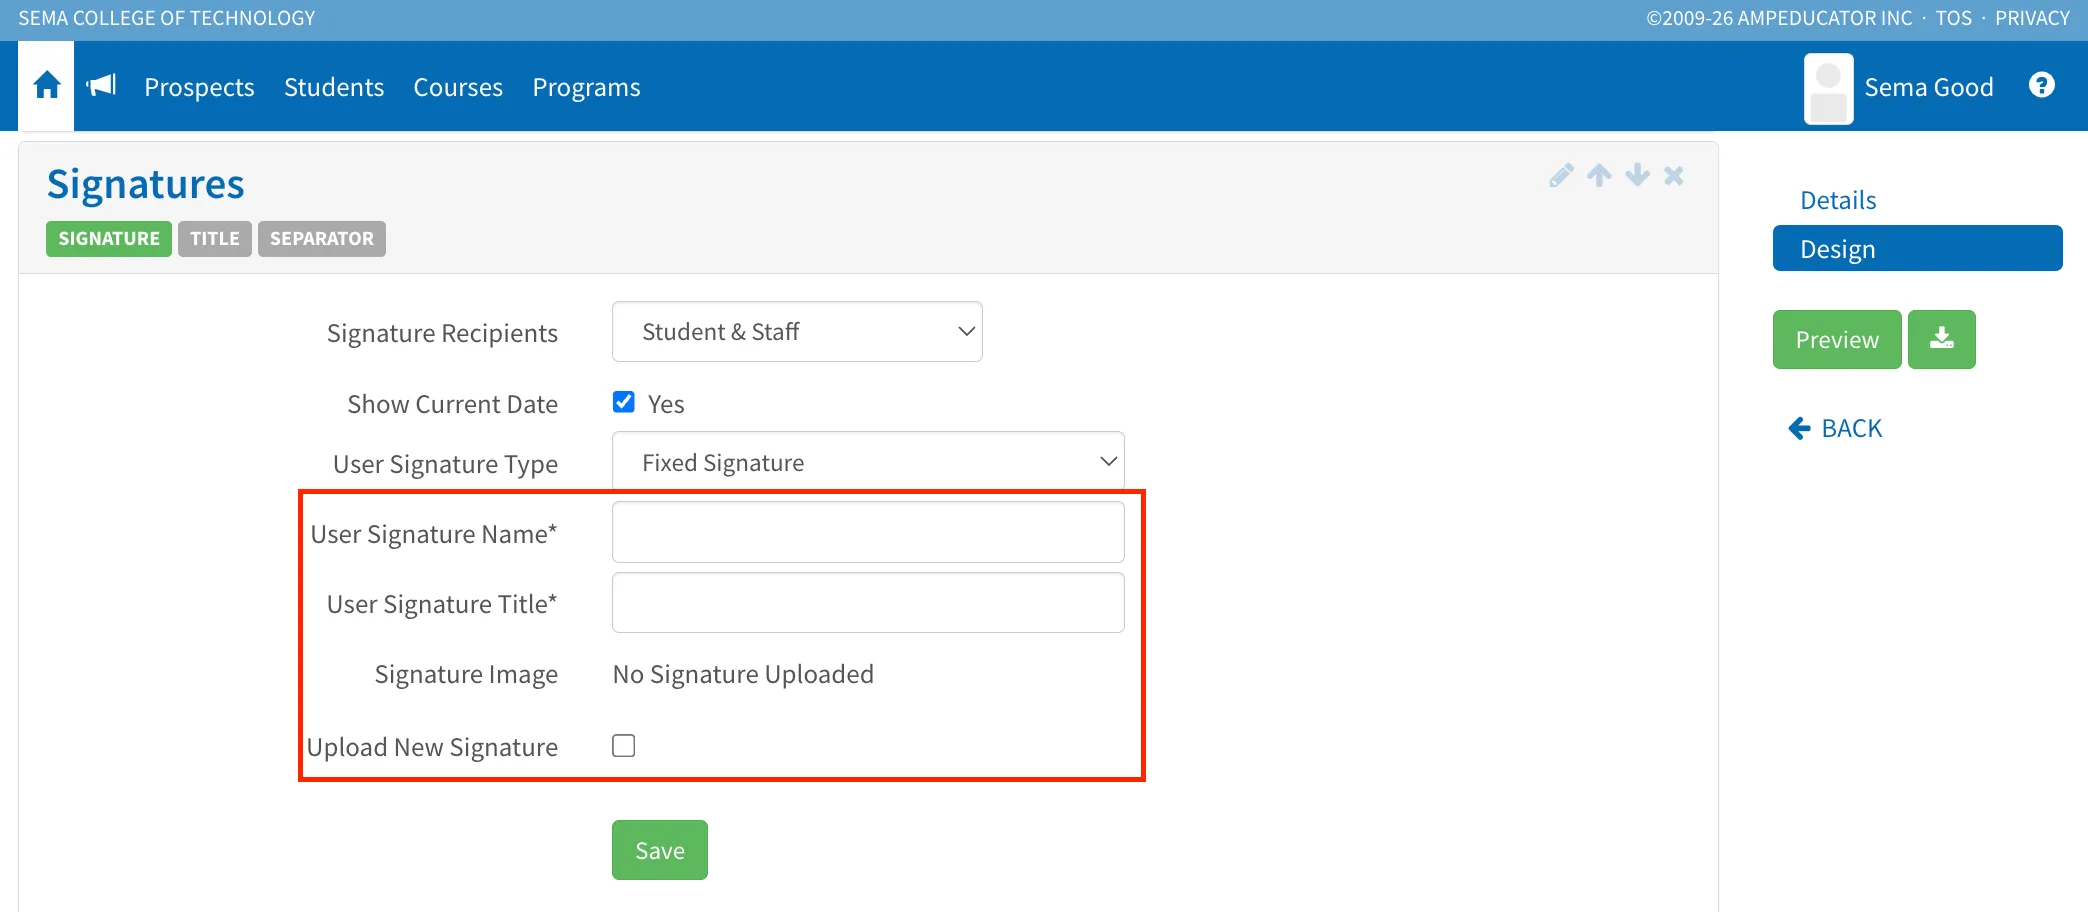
When using a fixed signature, you can configure:
- User Signature Name – The name displayed beneath the signature.
- User Signature Title – The title displayed beneath the signature.
- Signature Image – The signature image that will appear on generated contracts.
Third-Party Signatures
If your contract requires signatures from parents, guardians, sponsors, or agents, select Third Party as a signature recipient.
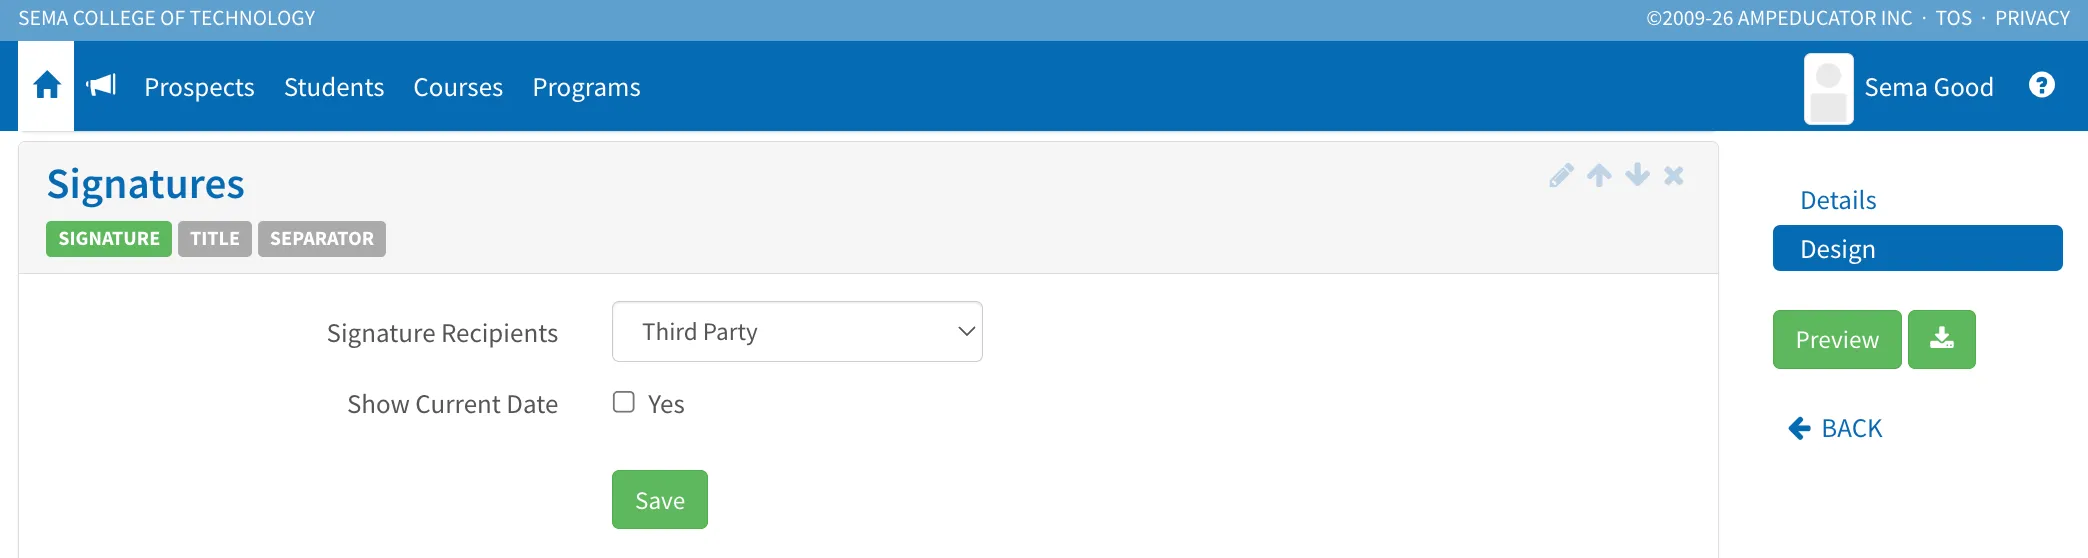
Third-party signers are configured through the Third-Party Signers section of the contract template.
Managing Contract Sections
Each contract section can be customized to control how it appears within the generated contract.
To edit a section, click the Edit icon in the upper-right corner of the section.
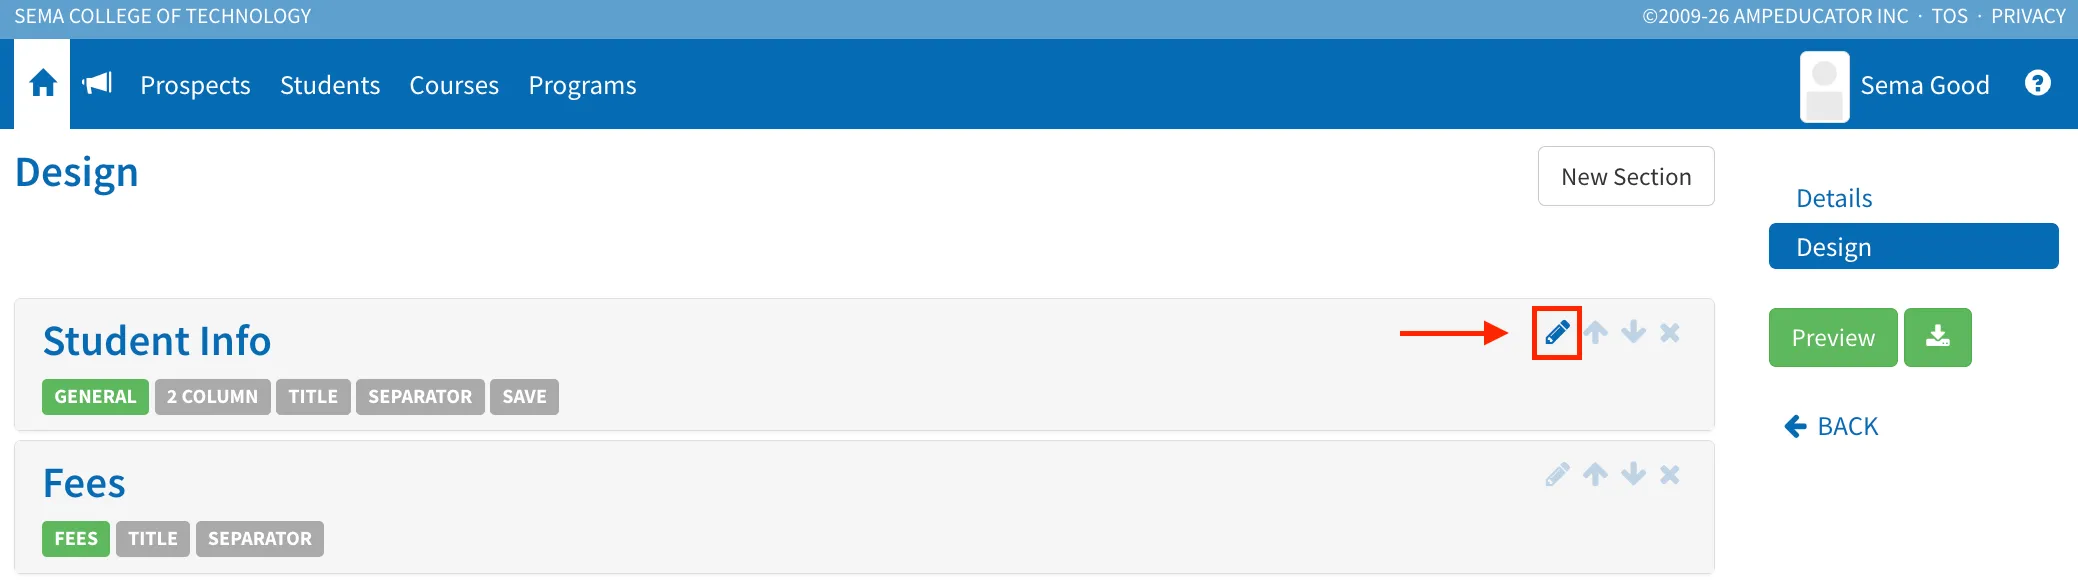
After clicking the Edit icon, the Edit Contract Section window will appear. This window contains the settings used to control how the section is displayed within the contract.
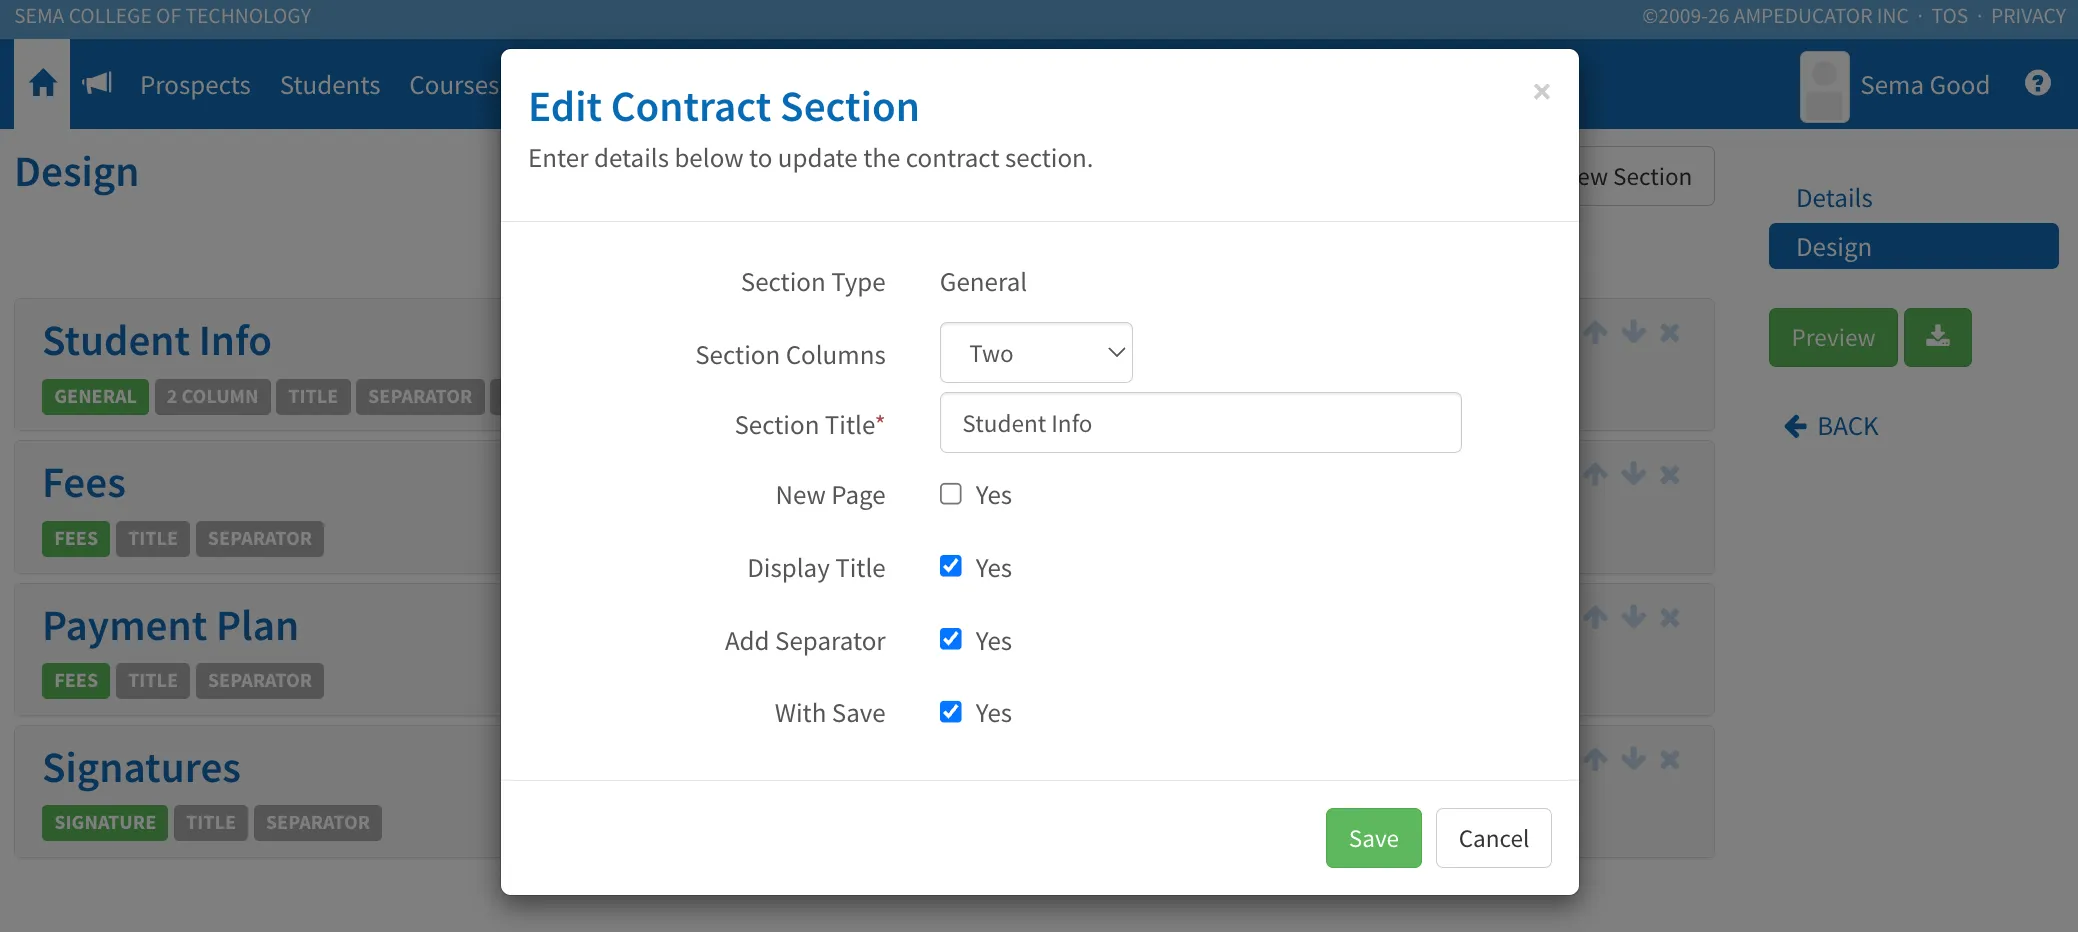
The available options will vary depending on the section type, but common settings include:
- Section Title: The title displayed at the top of the section.
- New Page: Starts the section on a new page in the generated contract.
- Display Title: Controls whether the section title is shown.
- Add Separator: Adds a horizontal divider line below the section.
For General sections, additional options may be available:
- Section Columns: Display information in a single-column or two-column layout.
- With Save: Adds a save option for forms that may be completed over multiple sessions.
Once your changes have been made, click Save to update the section.
In addition to editing a section, you can also:
- Reorder sections using the up and down arrows.
- Delete sections that are not required.
- Add new sections using the New Section button.
Creating Custom Sections
In addition to the default contract sections, you can create custom sections to collect additional information, display policies, or capture acknowledgements from students and third-party signers.
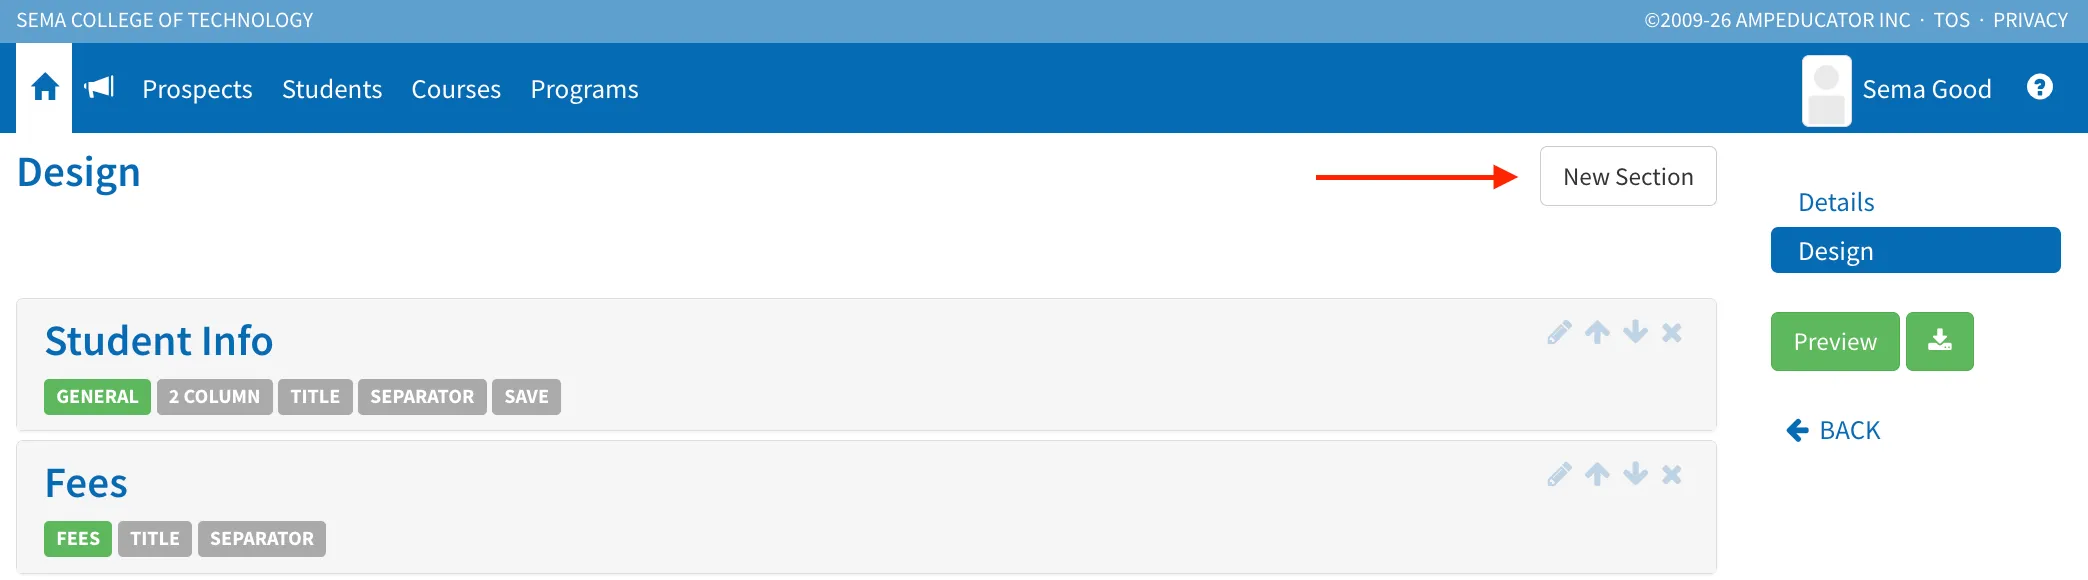
To create a new section, click New Section.
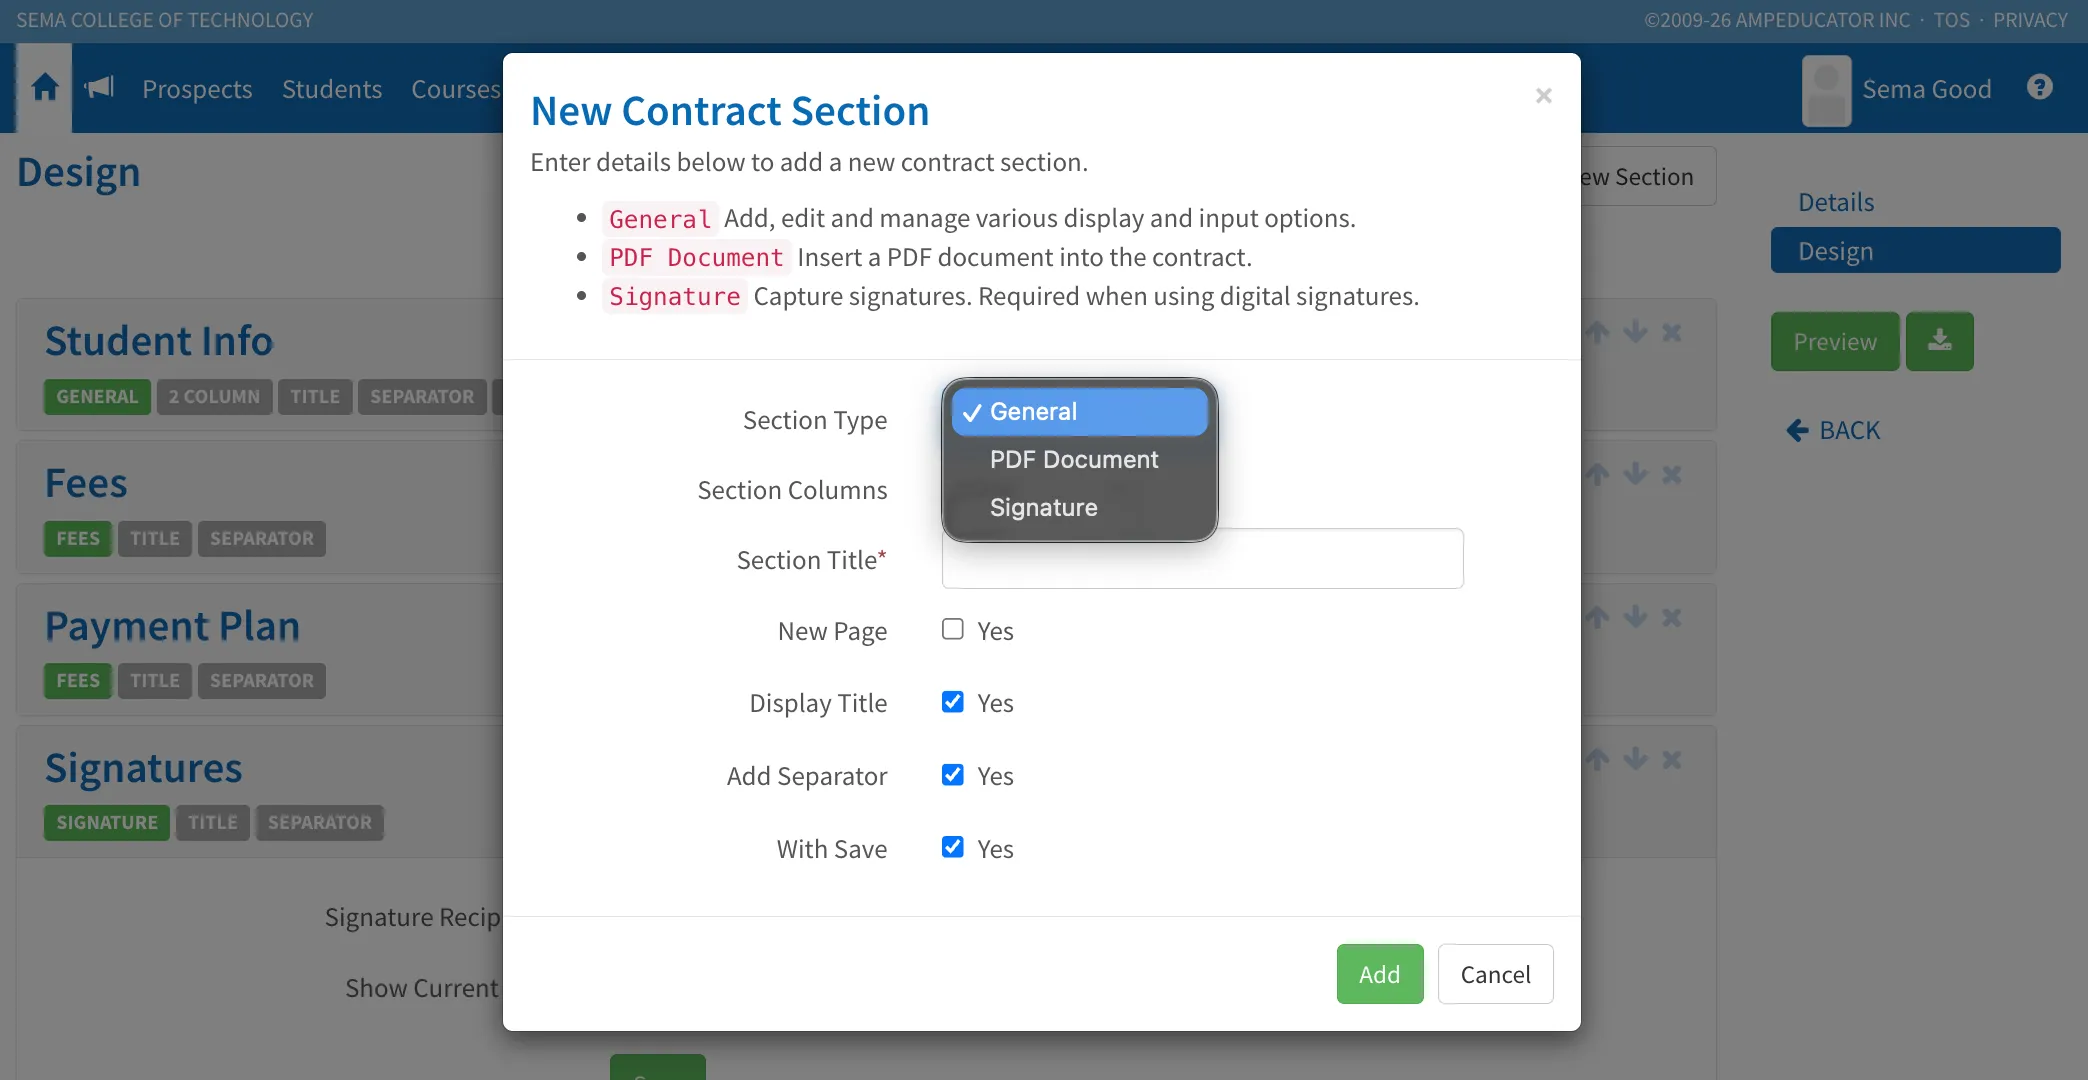
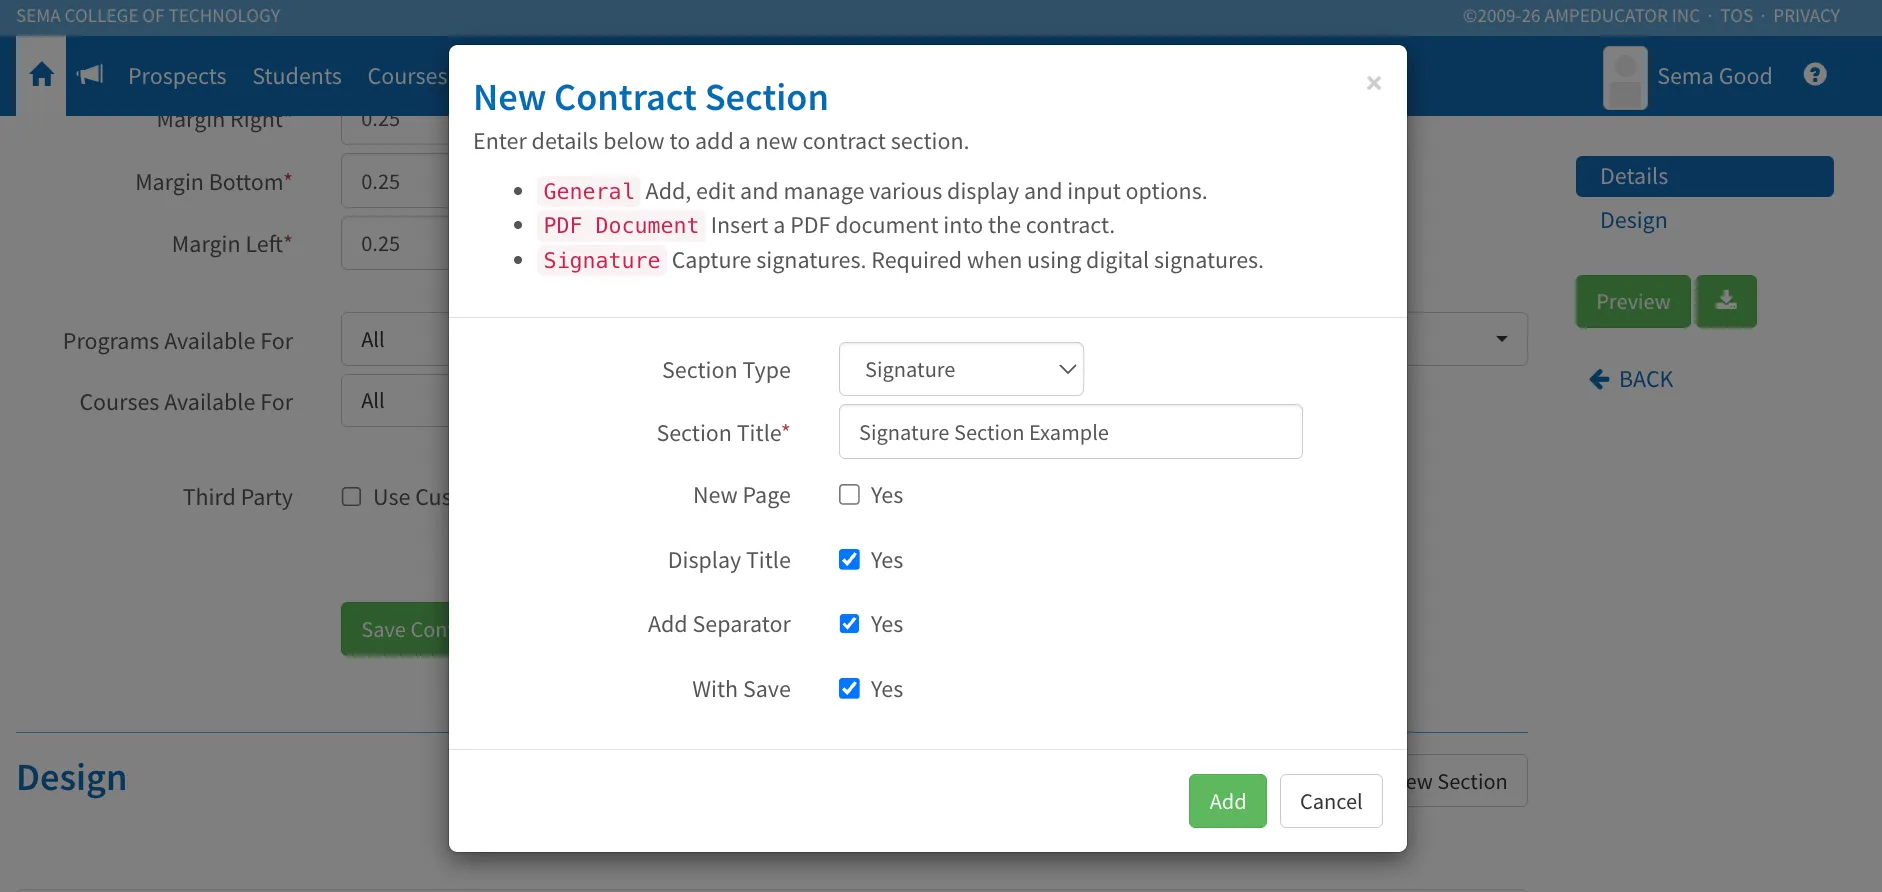
The New Contract Section window will appear.
Section Options
All section types support the following options:
- Section Title – The title displayed at the top of the section.
- New Page – Starts the section on a new page in the generated contract.
- Display Title – Controls whether the section title is displayed.
- Add Separator – Adds a horizontal divider beneath the section.
- With Save – Allows information entered into the section to be saved and reused.
General sections also include:
- Section Columns – Displays content in either a one-column or two-column layout.
Once a section has been added, fields can be added to the section to display information or collect responses.
Section Types
There are three section types available: General, PDF Document, and Signatures.
General Sections
General sections are the most flexible section type available in a contract. They can be used to display information, collect responses, gather acknowledgements, and capture additional details from students, third parties, and staff.
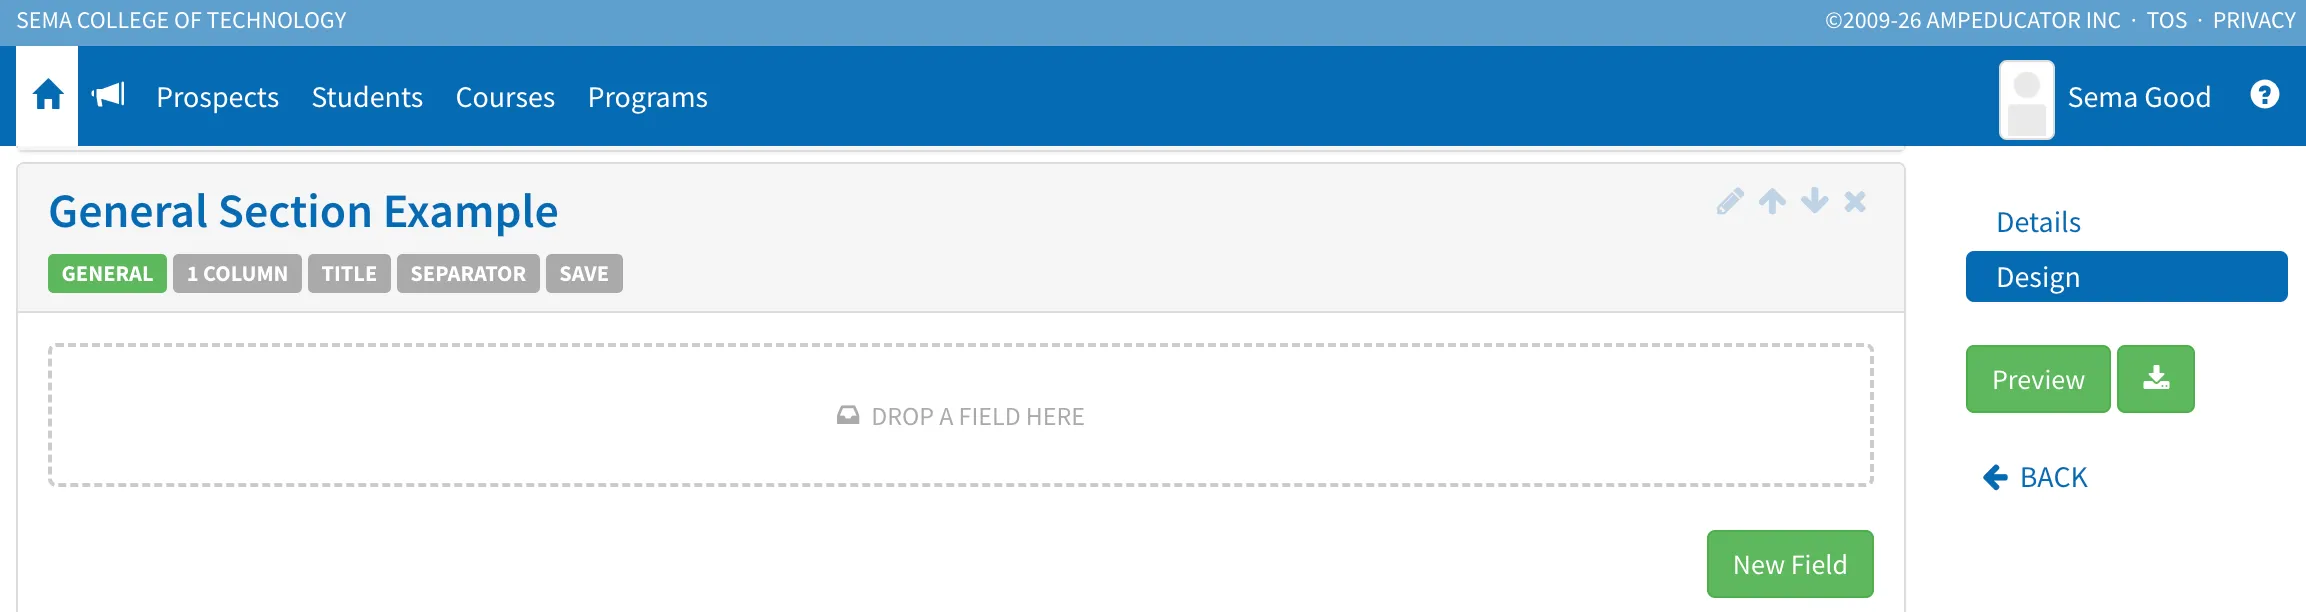
Unlike PDF Document sections, General sections support interactive contract fields that can be completed during the contract process.
Adding Contract Fields
Contract fields can be added to any General section. To add a field, open the General section and click New Field. The Add Contract Field window will appear.
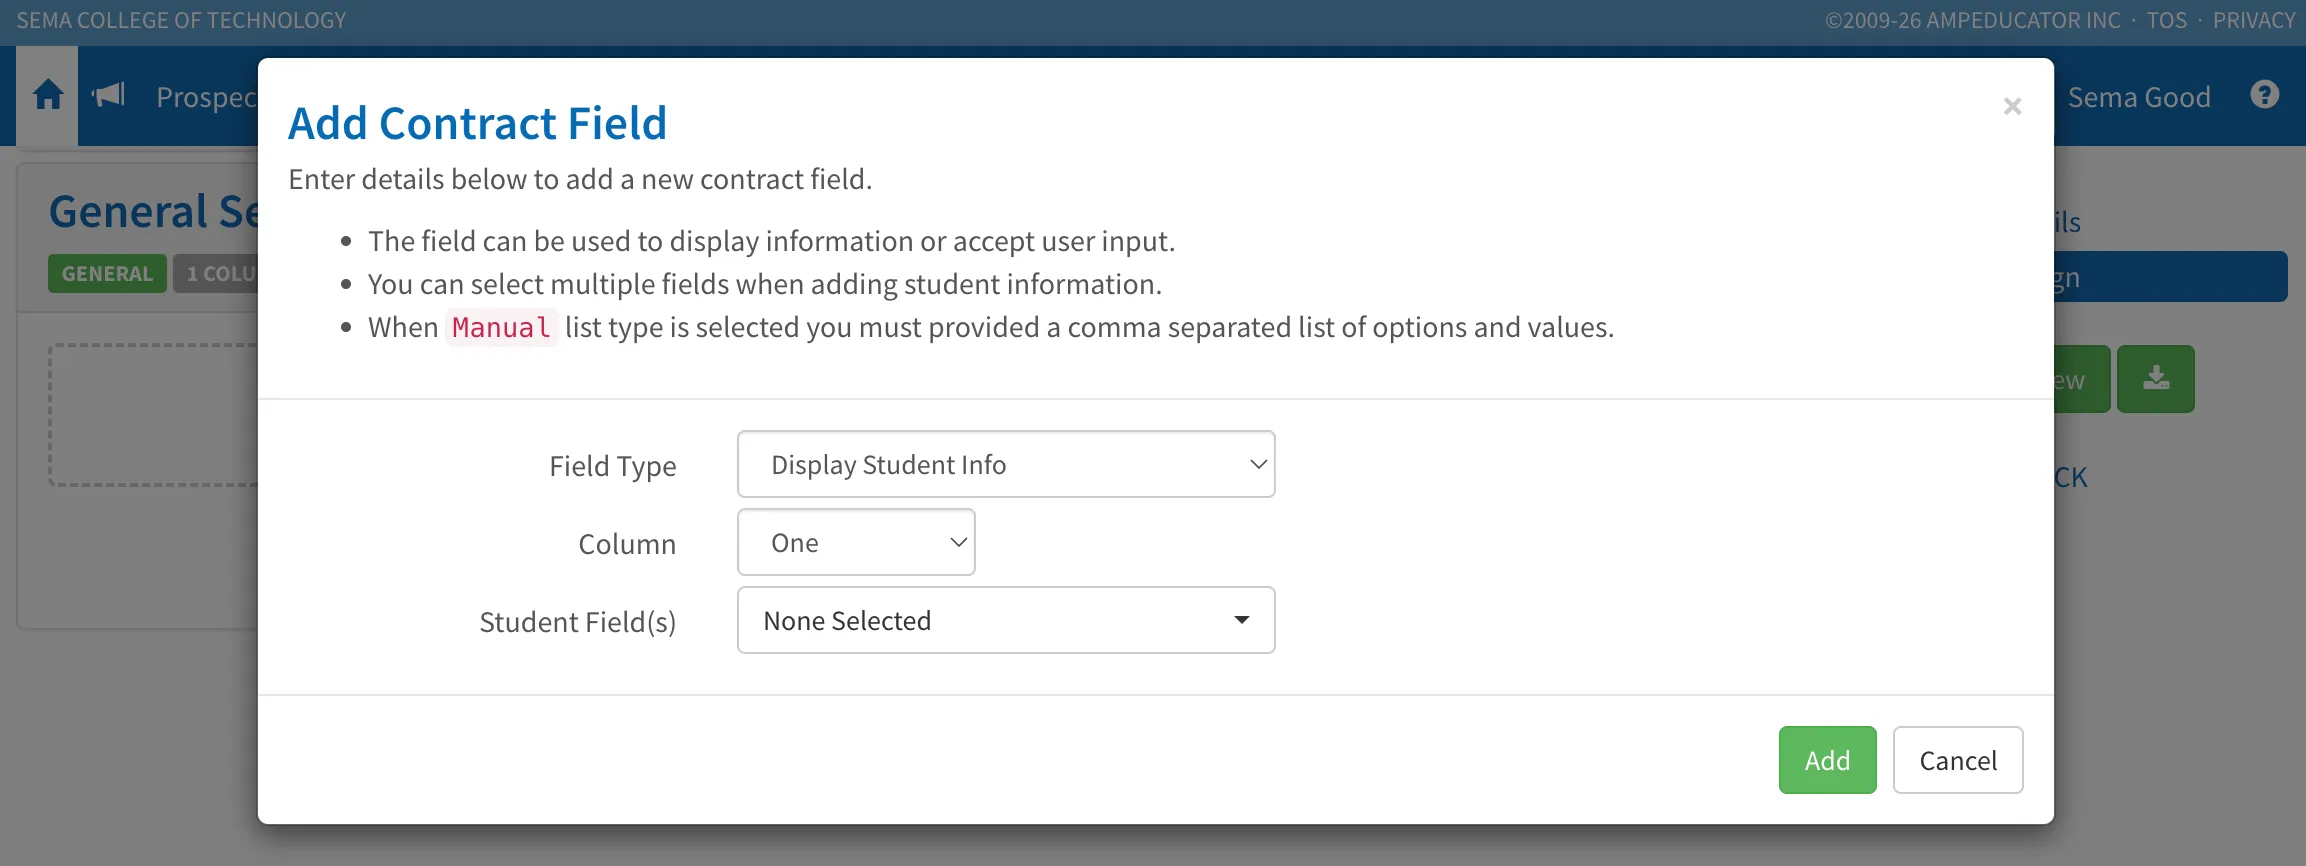
From here, select the desired Field Type and configure any available options. Depending on the field type selected, additional settings may be available such as labels, option lists, field mapping, required fields, or automatic population from student records.
After configuring the field, click Add to save it to the section.
Contract fields can be used to display information, collect responses, gather acknowledgements, and capture additional details as part of the contract completion process.
Contract Field Types
Contract fields allow you to display information and collect responses directly within a contract. They can be used to show student information, gather acknowledgements, and capture additional details from students, staff, or third-party signers.
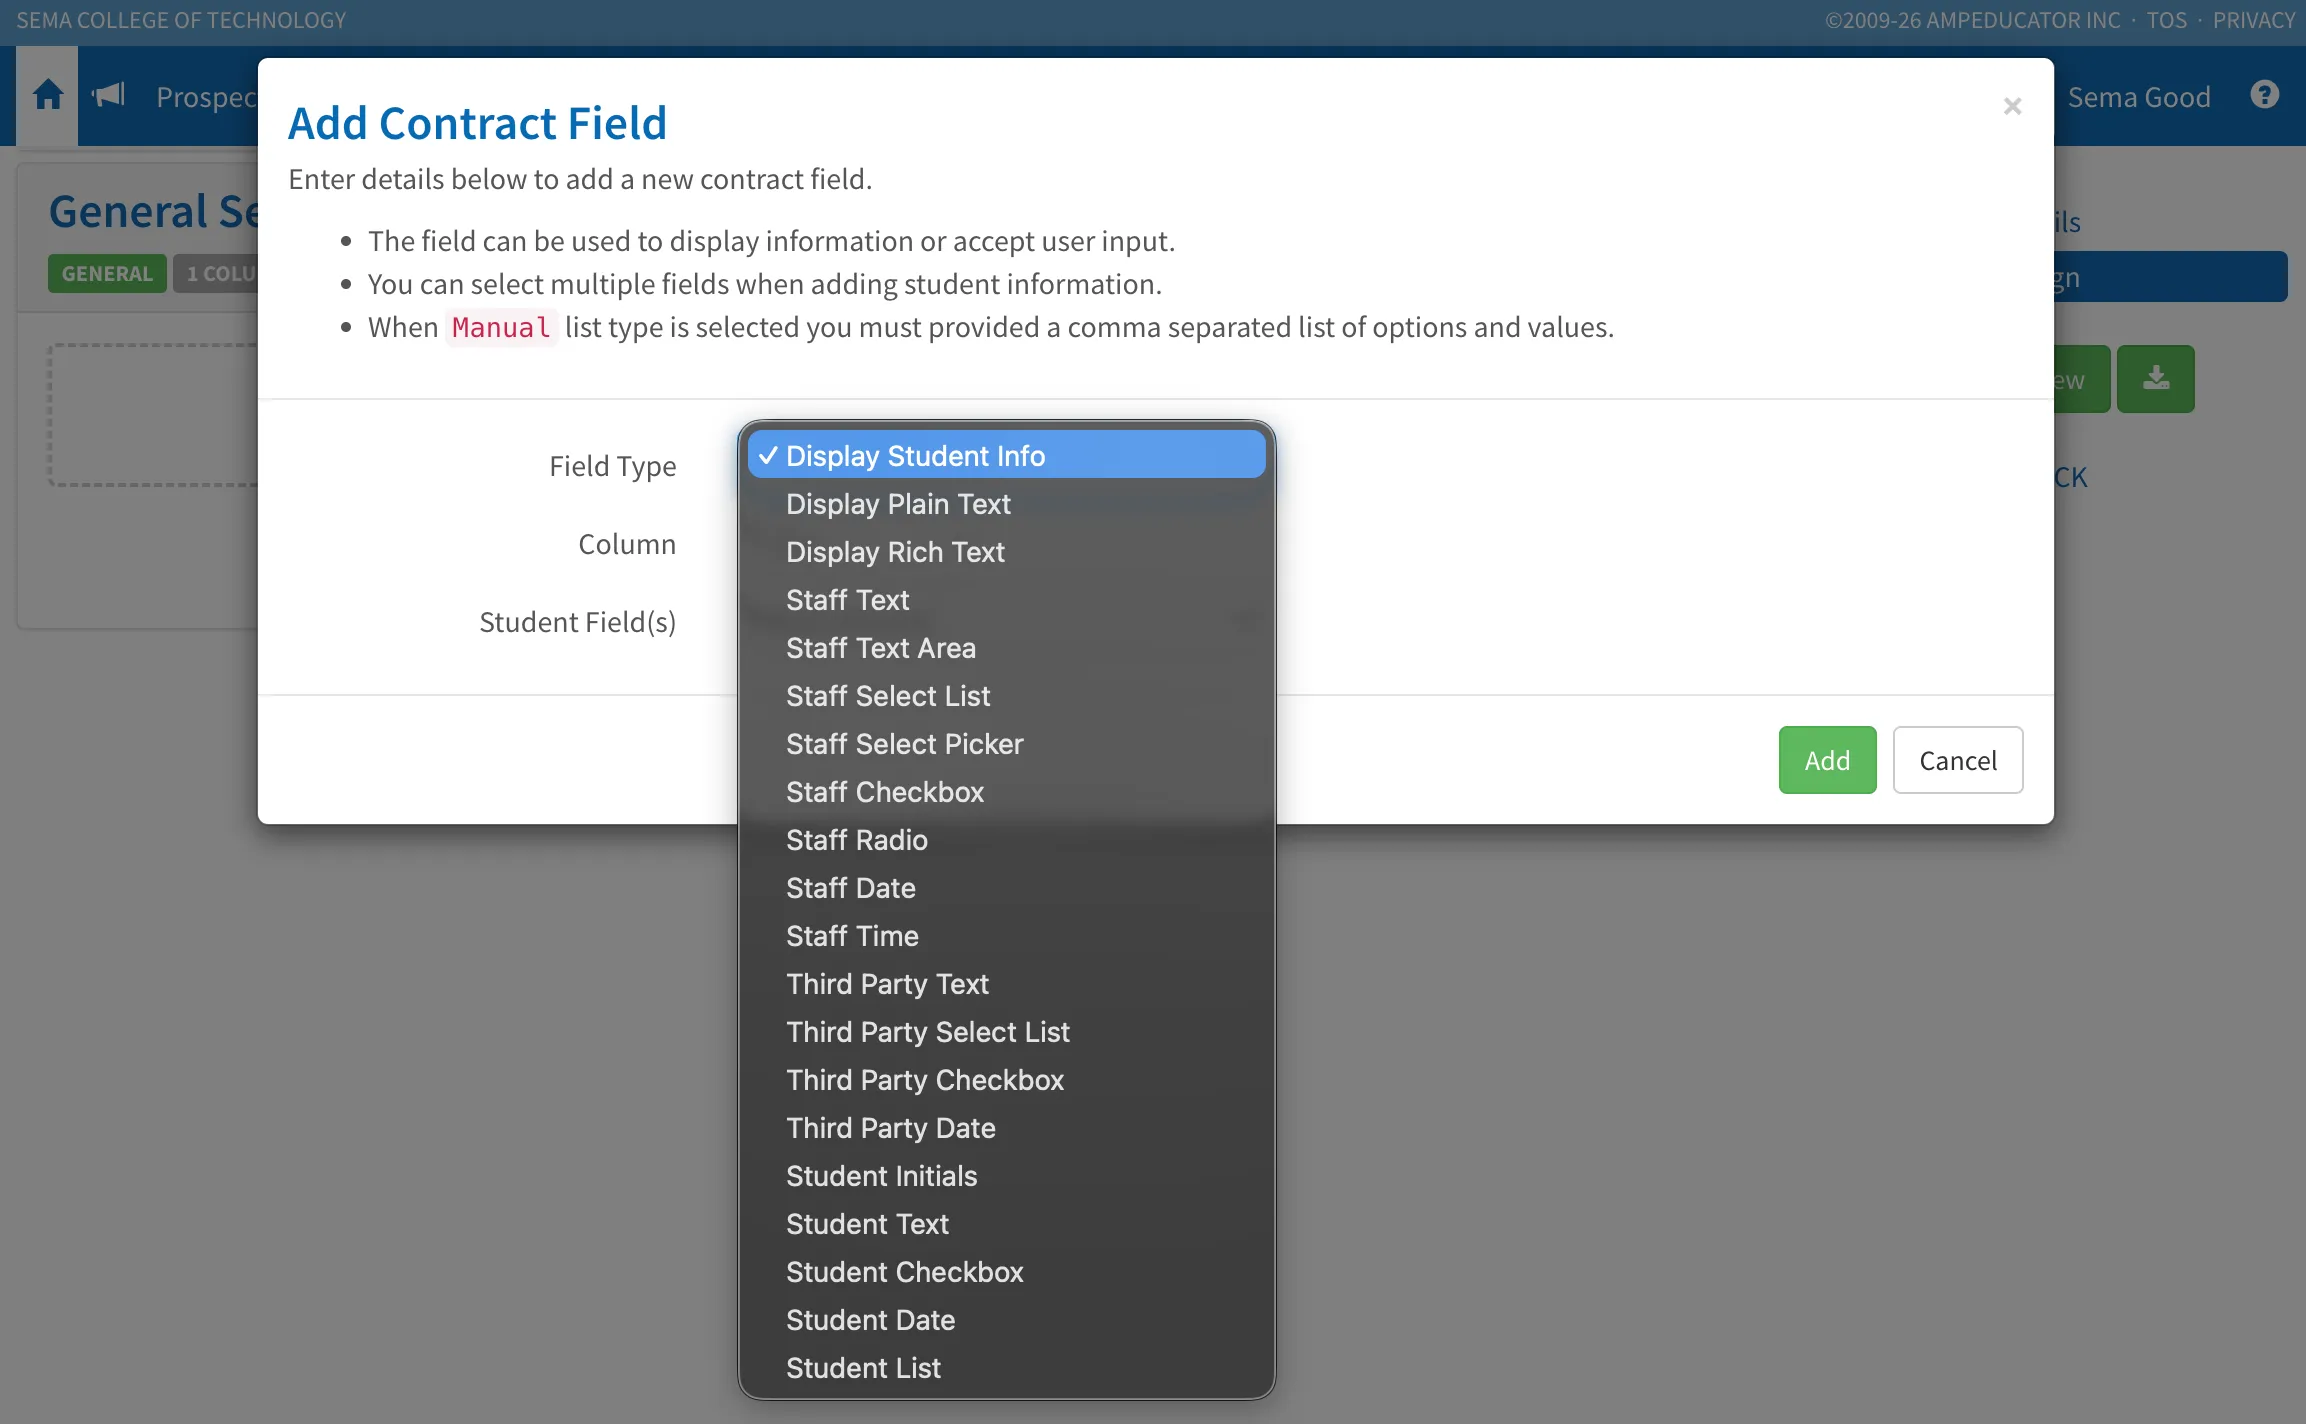
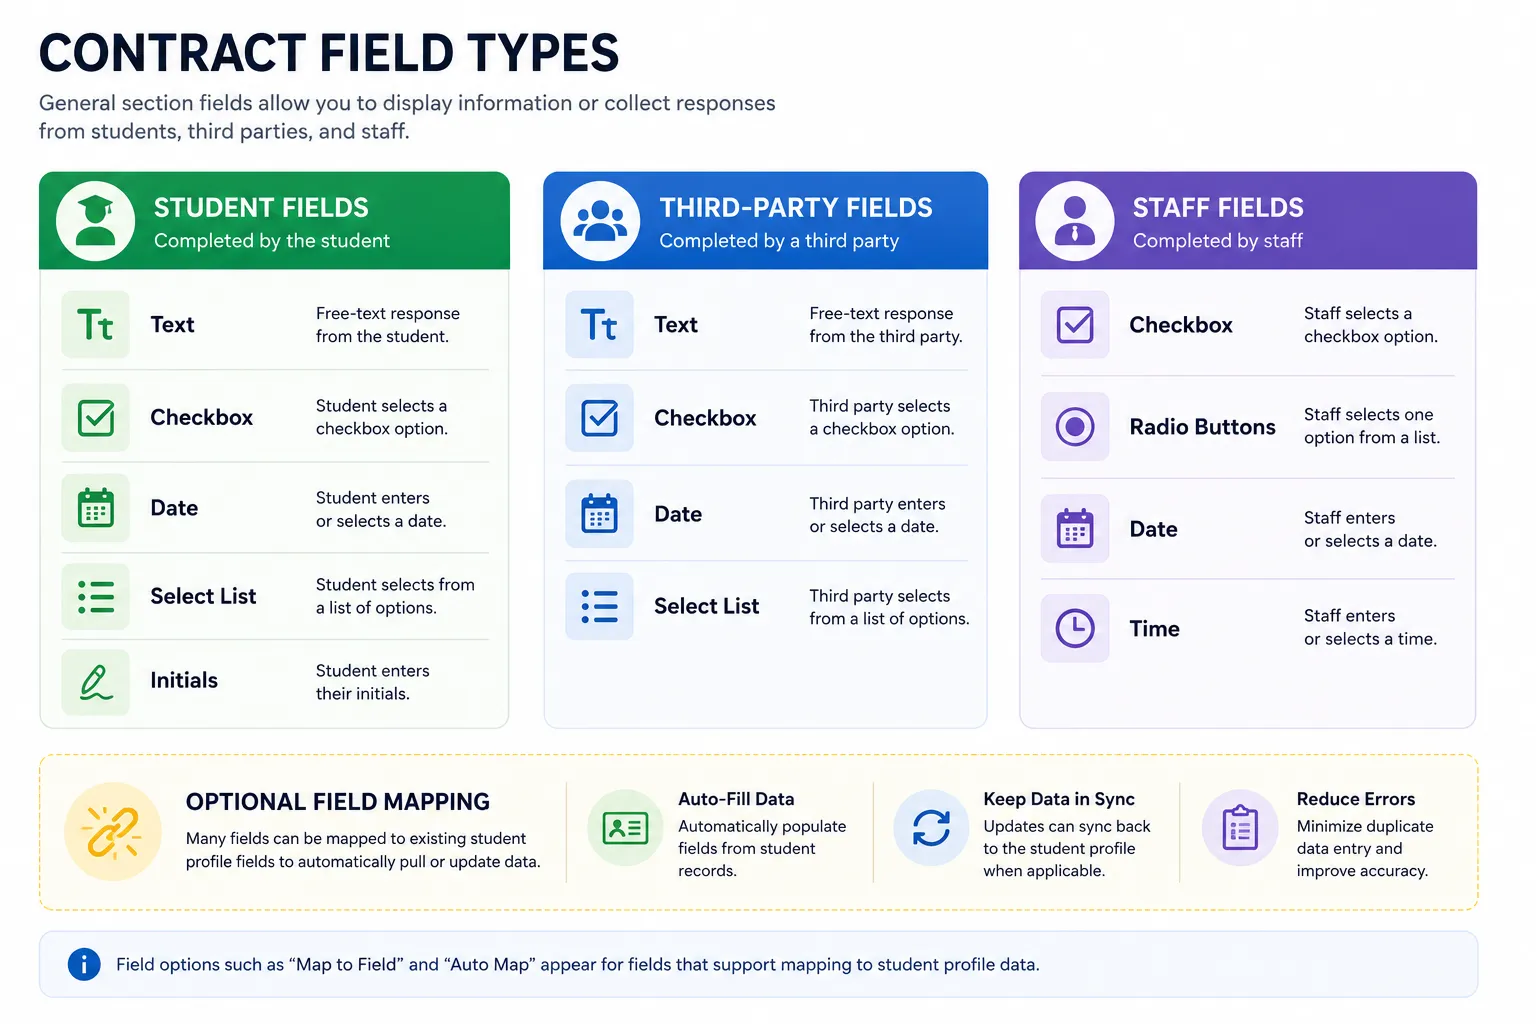
Depending on the selected field type, additional options may be available such as required responses, predefined selections, field mapping, and automatic population from existing student records.
Display Student Information
The Display Student Information field allows information from the student's profile to be displayed directly within a contract.
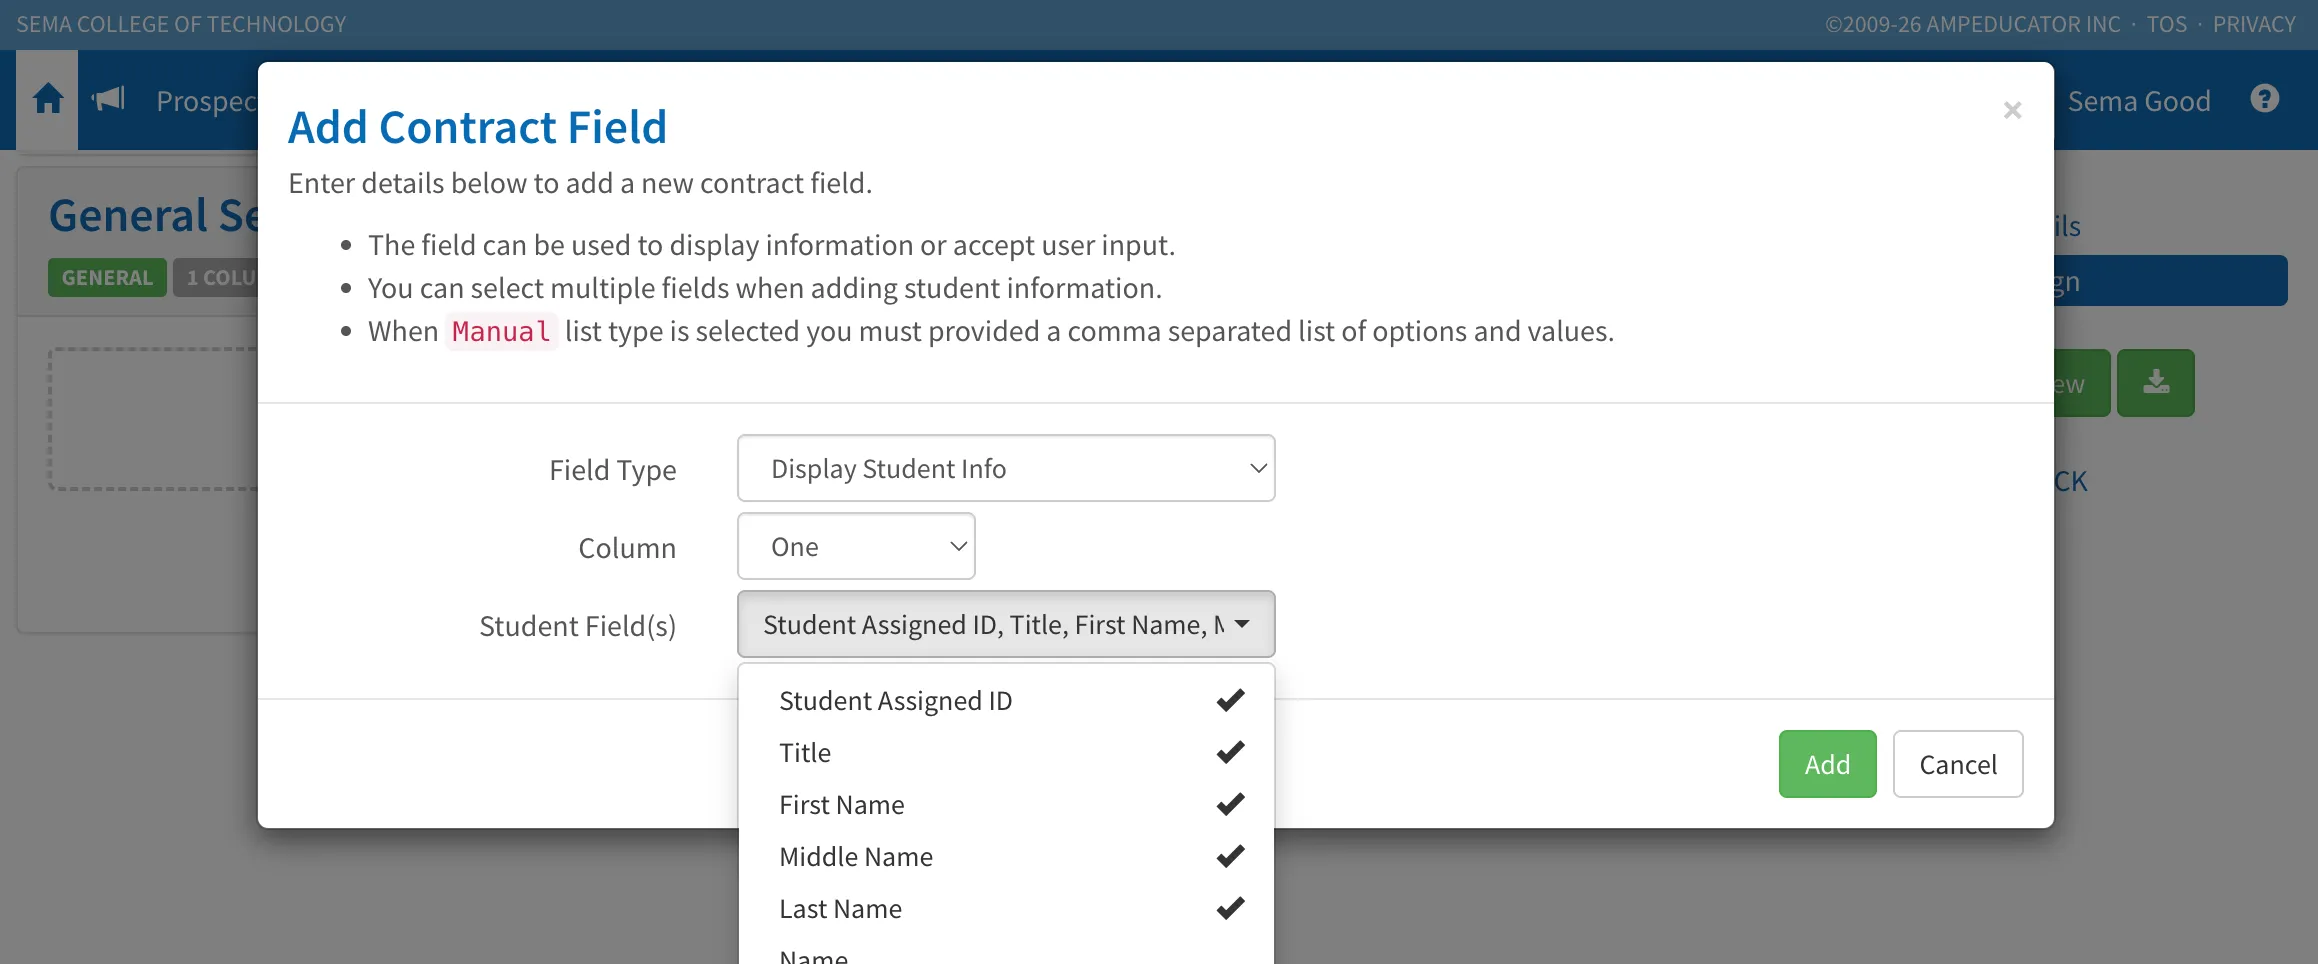
One or more student profile fields can be selected, allowing existing information such as contact details, addresses, or emergency contact information to appear automatically within the contract.
This field is display-only and does not require the student or staff to enter information.
Text Fields
Used when information needs to be entered manually.
- Student Text: Completed by the student. Commonly used for comments, explanations, or additional information.
- Staff Text: Completed by staff. Often used for internal notes or contract-specific information.
- Third-Party Text: Completed by a third-party signer. Used when additional information is required from a parent, guardian, sponsor, or other signer.
Checkbox Fields
Used to collect acknowledgements or yes/no confirmations.
- Student Checkbox: Completed by the student.
- Staff Checkbox: Completed by staff.
- Third-Party Checkbox: Completed by a third-party signer.
Date Fields
Used to capture a date within the contract.
- Student Date: Completed by the student.
- Staff Date: Completed by staff.
- Third-Party Date: Completed by a third-party signer.
Selection Fields
Used when the signer must choose from predefined options.
- Student List: Completed by the student.
- Staff Select List: Completed by staff.
- Third-Party Select List: Completed by a third-party signer.
Initials
- Student Initials: Requires the student to enter their initials. Commonly used to acknowledge specific clauses, policies, or sections of a contract.
Field Mapping
Certain Student and Third-Party field types support field mapping. Field mapping allows information entered into a contract field to be copied to a field within the student's profile.
For example, a Student Text, Date, Checkbox, or List field could be mapped to a student profile field such as Gender, Phone Number, Date of Birth, or a custom student field.
The Map to Field option specifies which student profile field should receive the information collected in the contract.
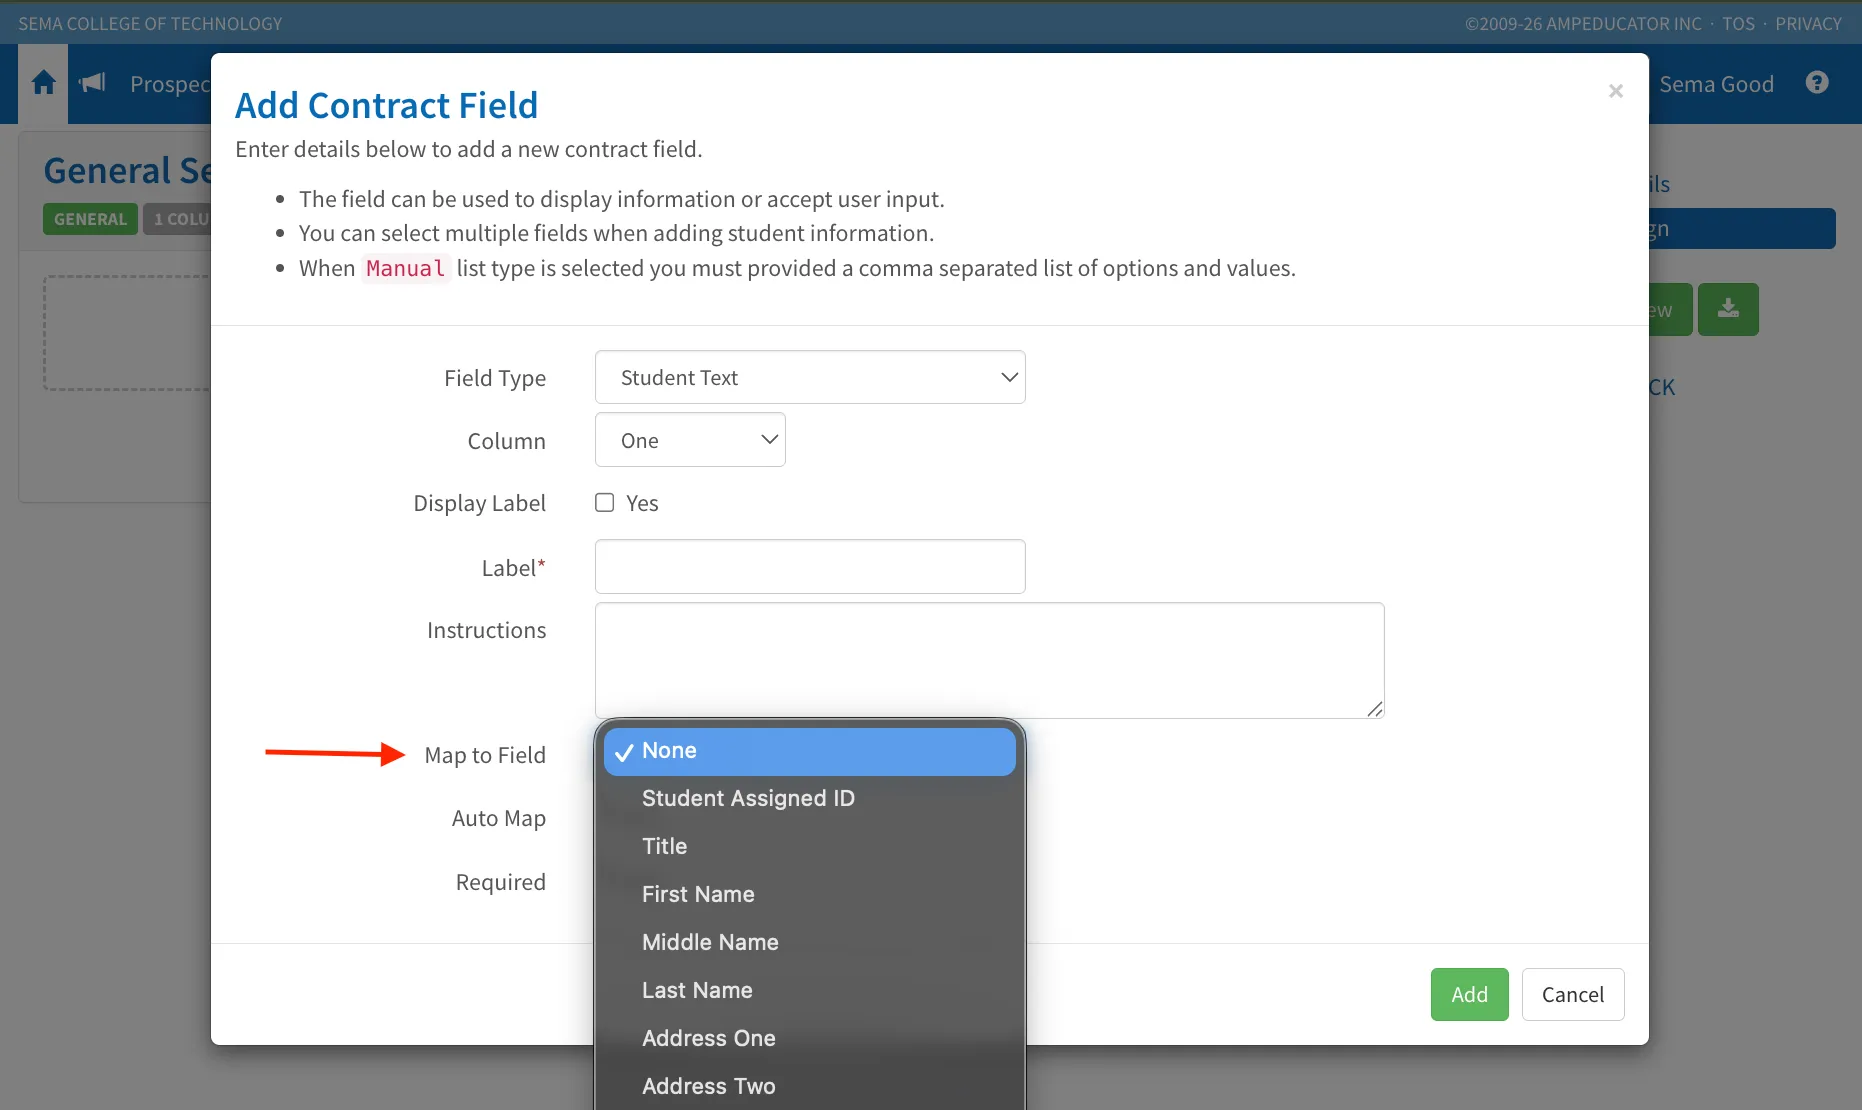
If a field is mapped but Auto Map is not enabled, the information can be reviewed and applied manually when processing the completed contract.
The Auto Map option automatically applies the selected field mapping when the contract is completed.
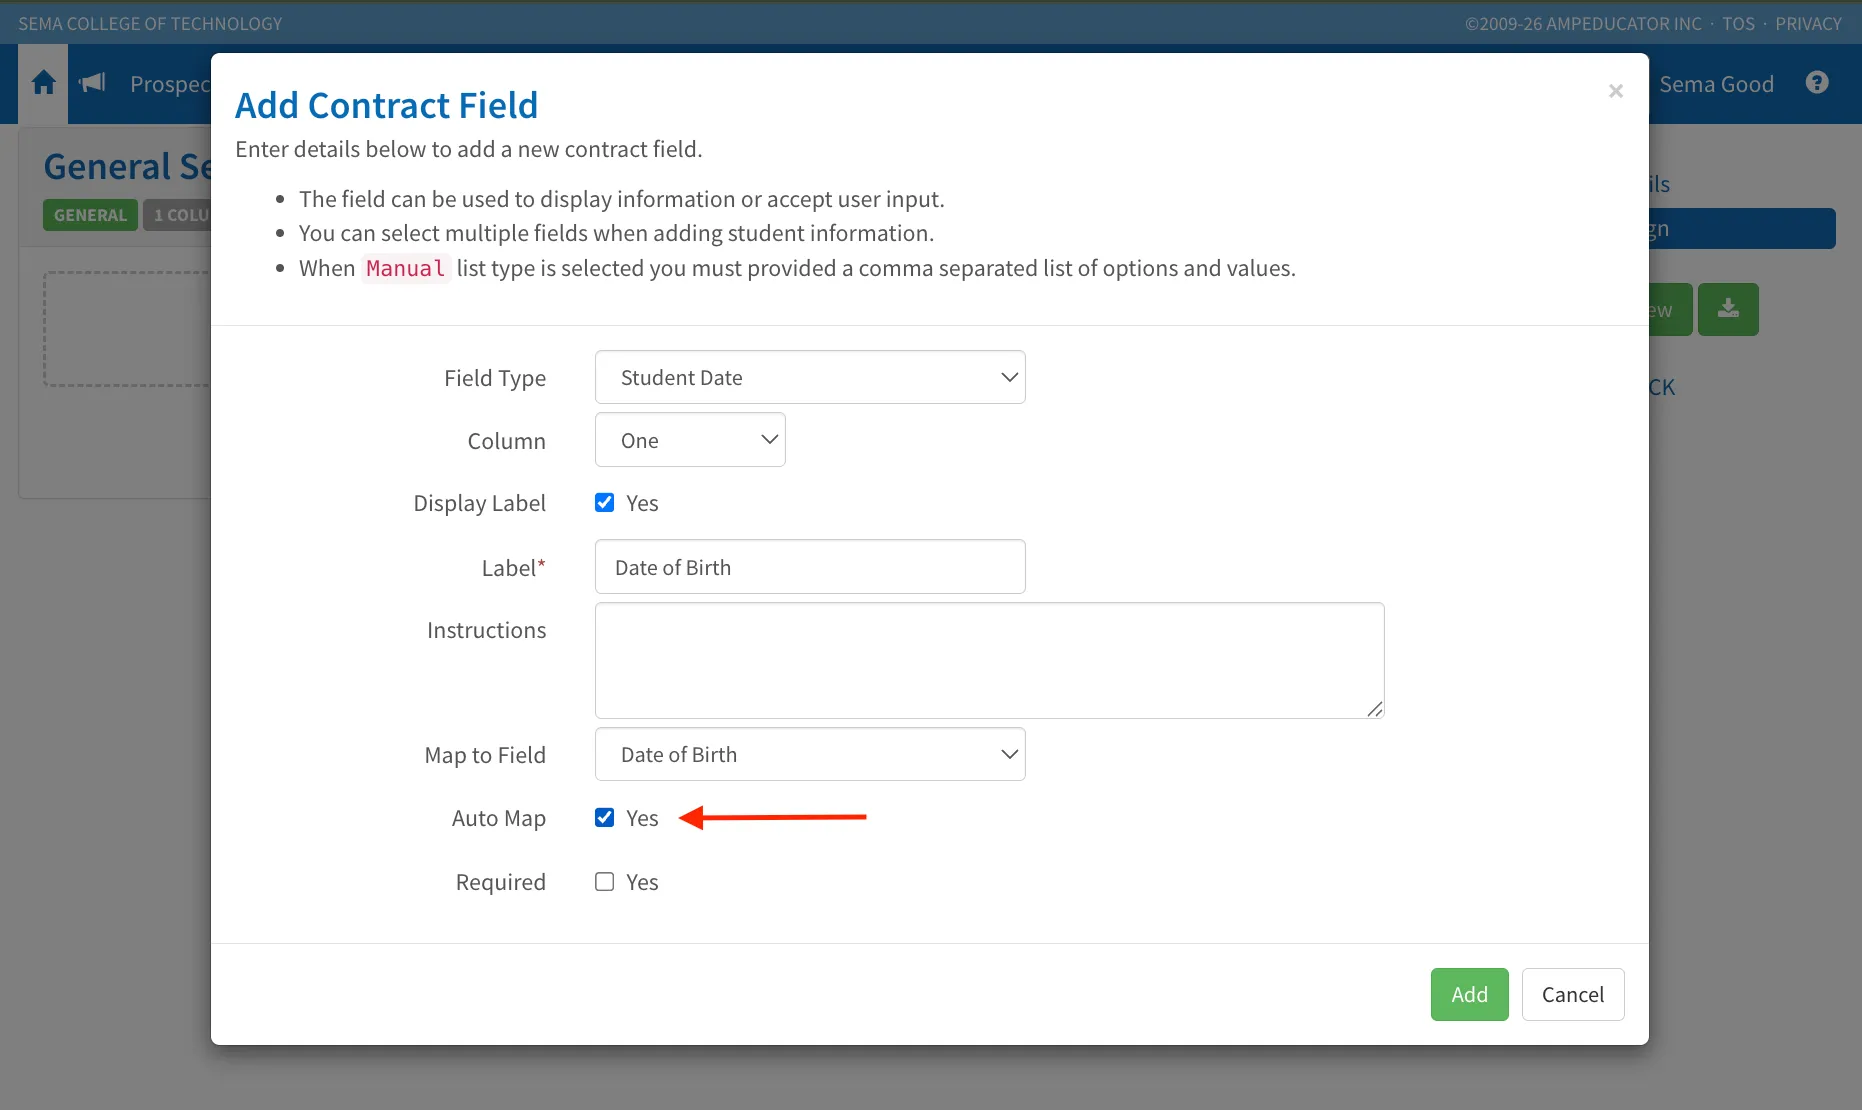
When enabled, information entered into the contract field is automatically copied to the mapped student profile field without requiring manual review.
PDF Document Sections
PDF Document sections allow you to include existing PDF files within a contract. This can be used for policies, disclosures, handbooks, housing agreements, refund policies, or other supporting documents.
To attach a PDF, select Choose File, select the PDF from your device, and then click Update New File.
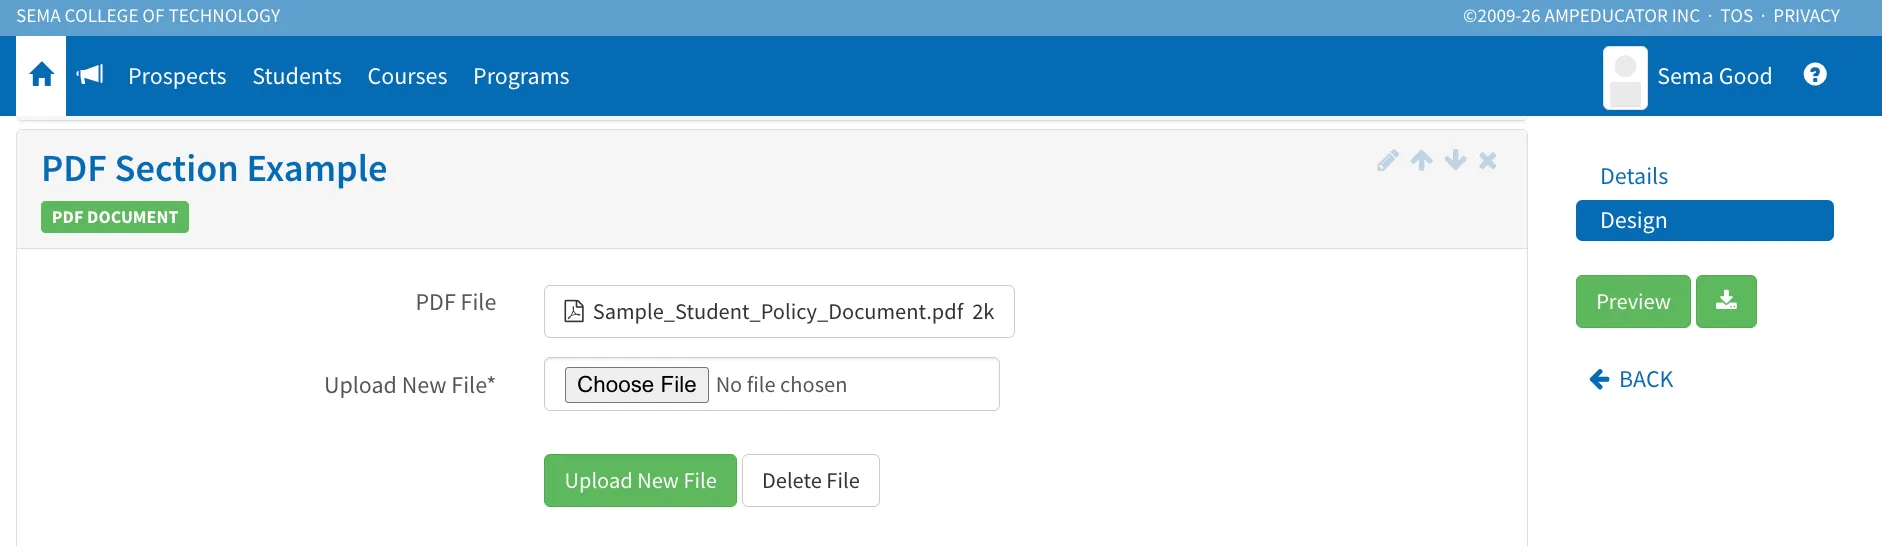
After uploading, the PDF will be attached to the contract and available when the contract is viewed or printed.
Signature Sections
Signature sections can be added to collect signatures elsewhere within the contract.
Once added, Signature sections are configured in the same way as the default Signatures section included with new contract templates.
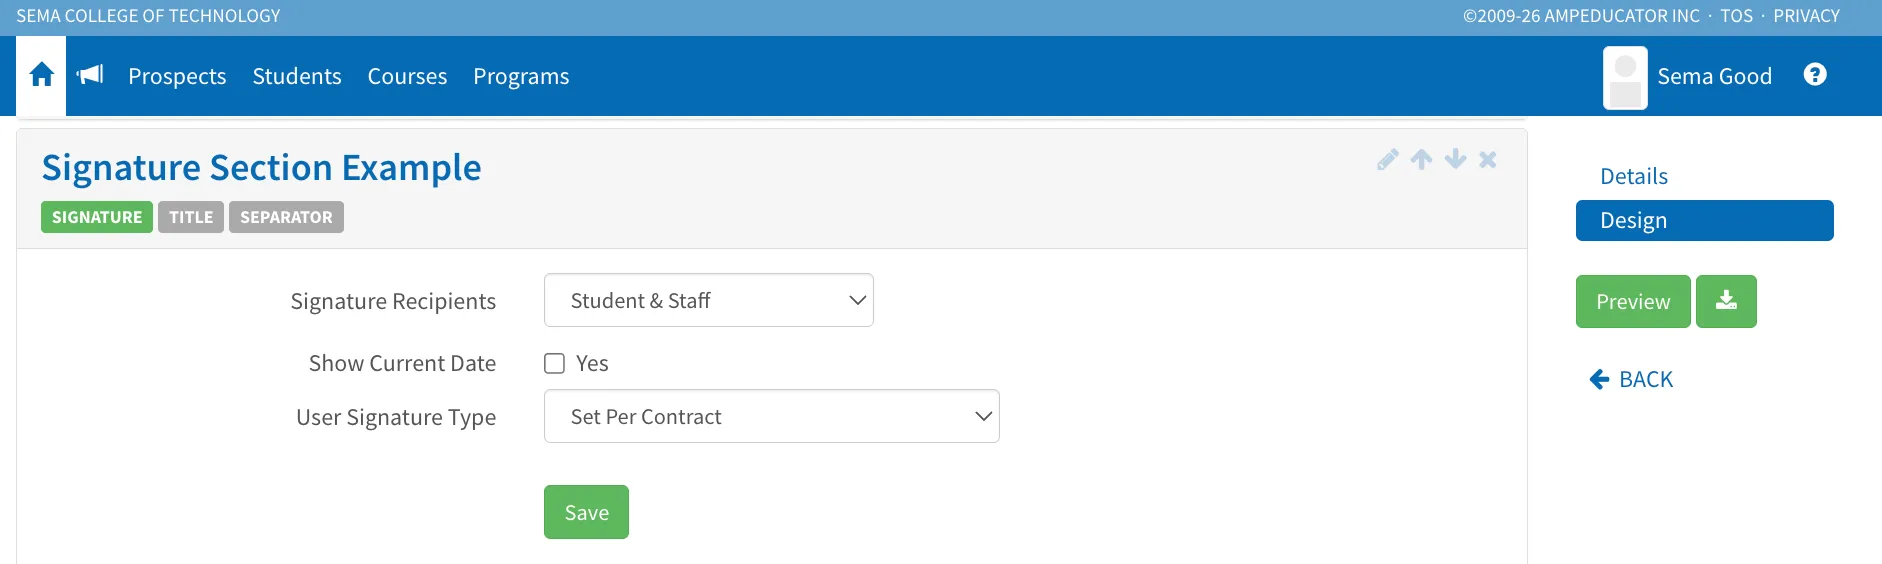
For more information on signature recipients, fixed signatures, third-party signers, and signature settings, refer to the Signatures section earlier in this guide.
Previewing and Downloading Contracts
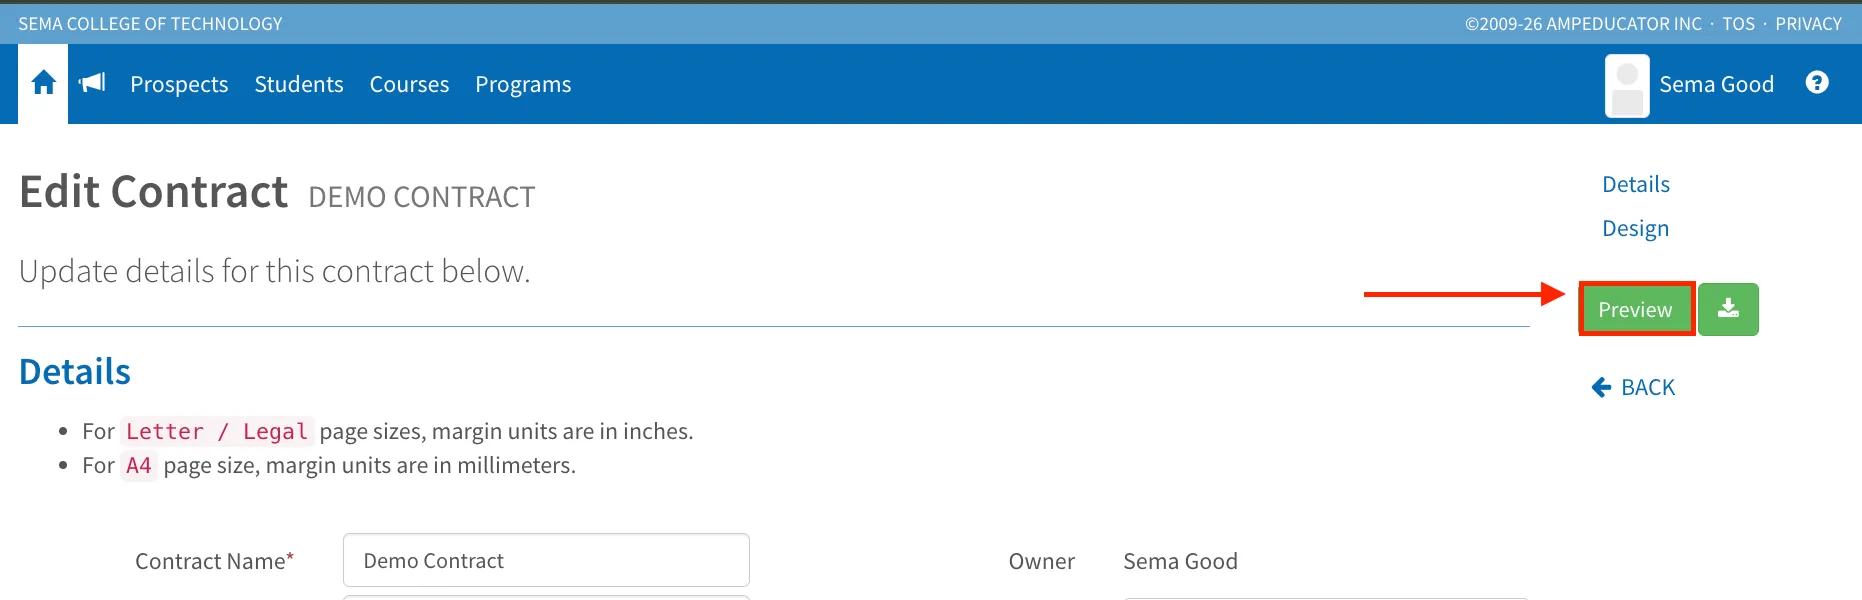
Before using a contract, you can preview it to review the layout, formatting, and field placement.
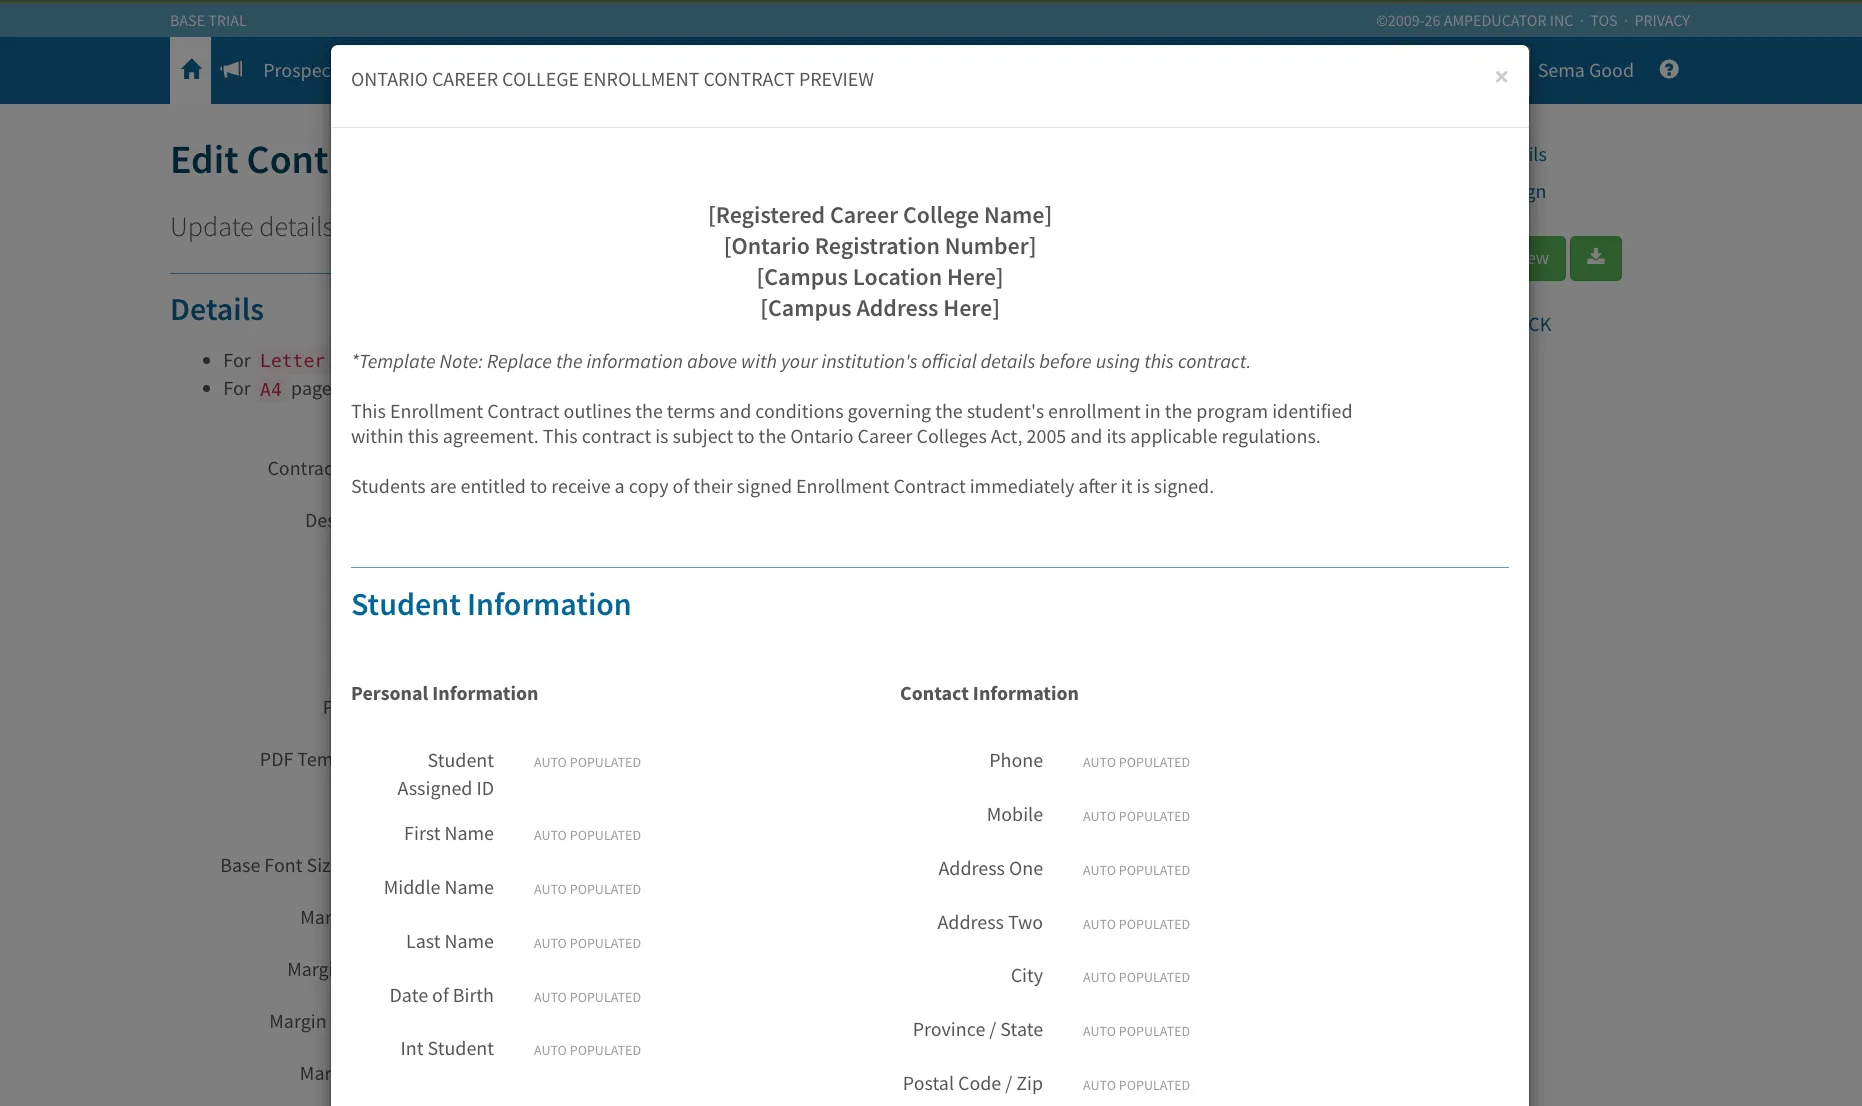
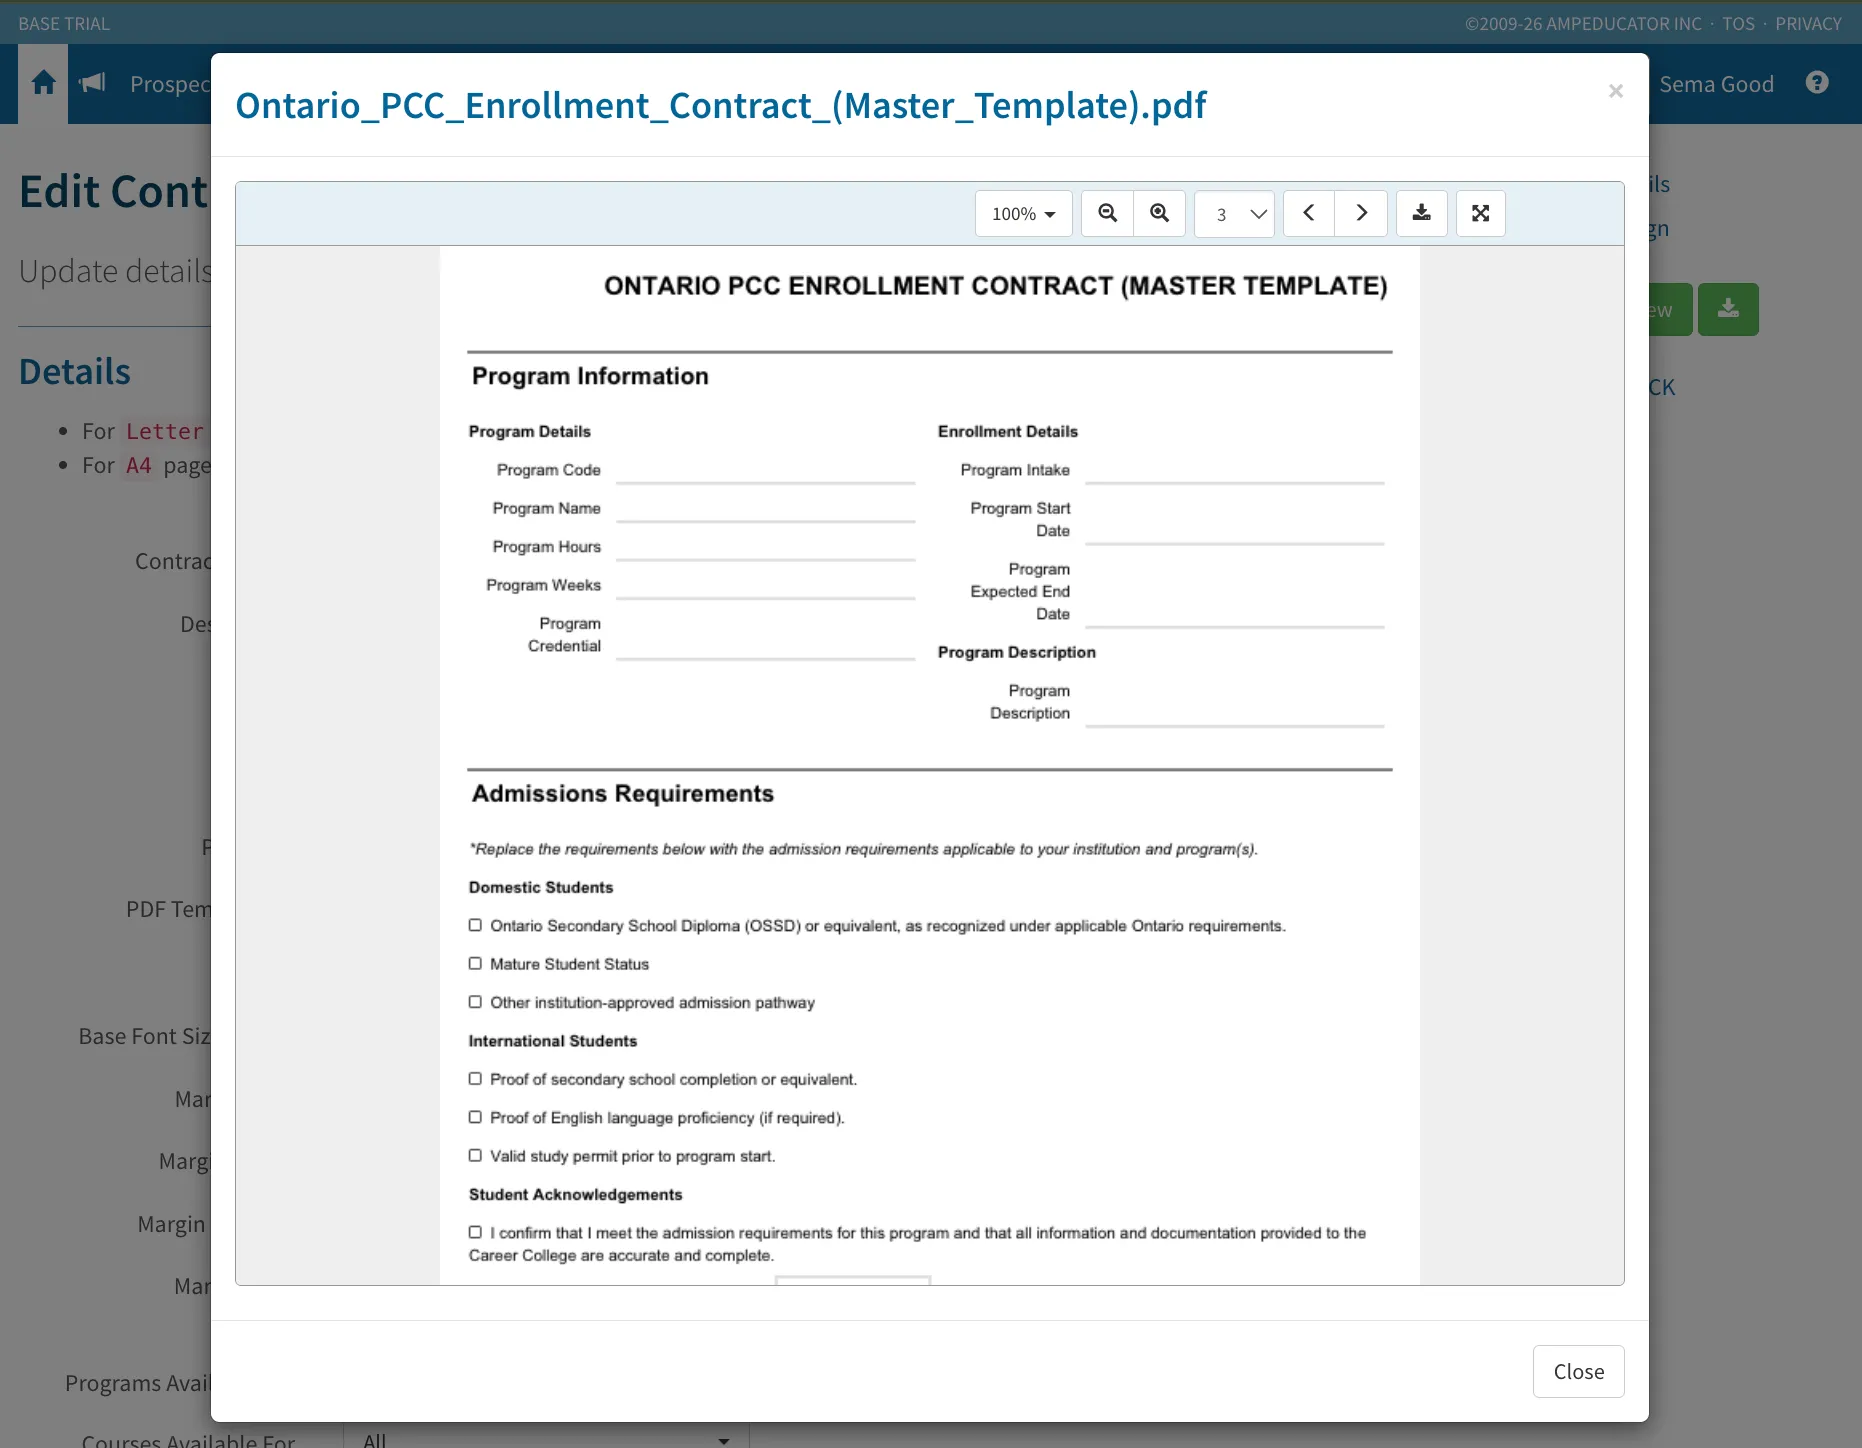
Selecting Preview opens a sample version of the contract using the current template settings.
This allows you to verify that sections, fields, signatures, and supporting documents appear as expected.
Selecting Download generates a PDF copy of the contract.
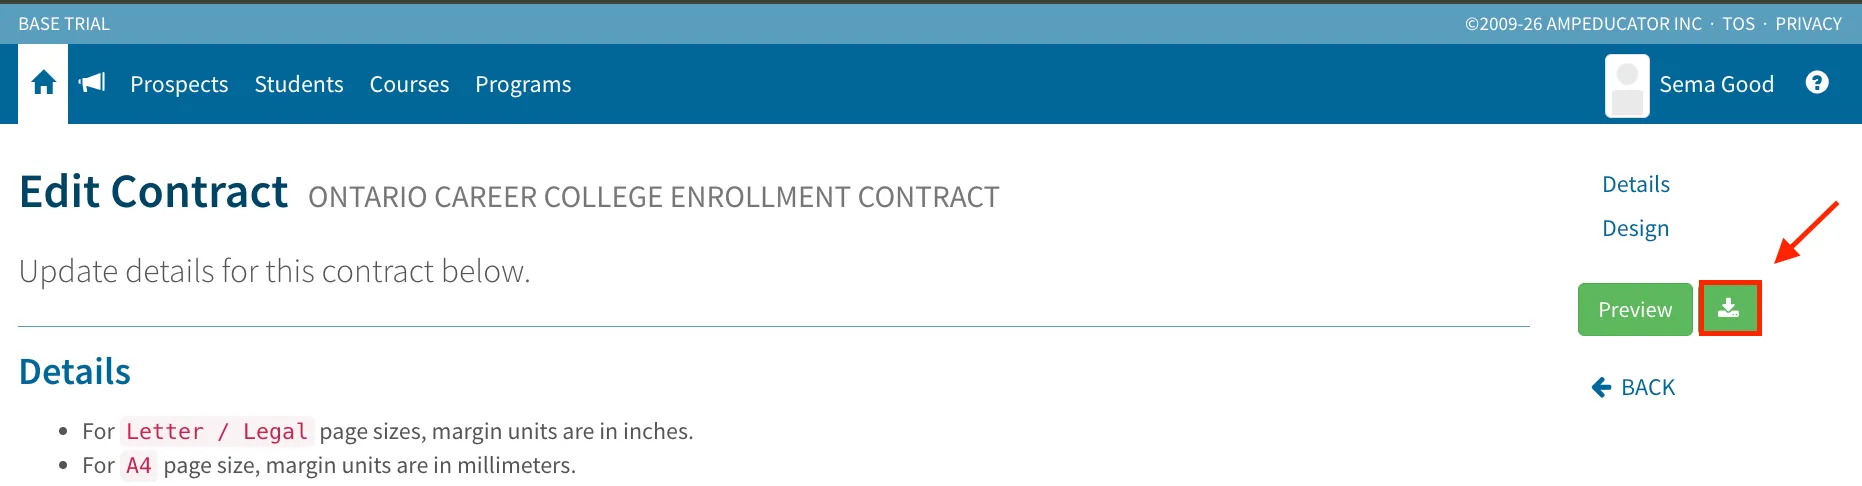
This can be useful for reviewing the final document, sharing it outside the system, or keeping a local copy for reference.
Adding Contracts to Students
Once a contract template has been created, it can be assigned to individual students.
Contracts are managed within the student's profile. To access a student's contracts, navigate to Students Profile / Profile Tab / Contracts Section.
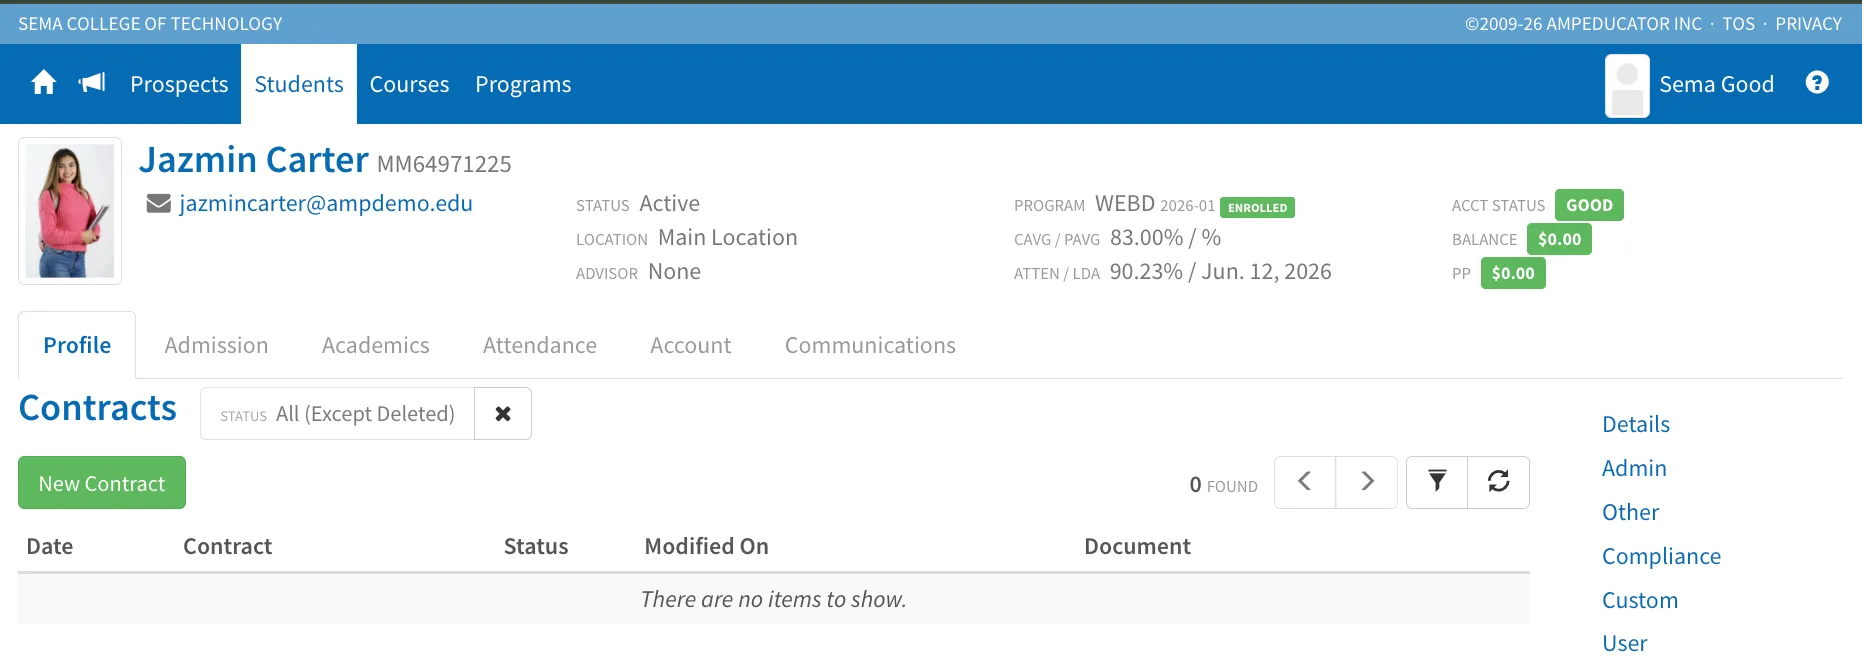
The Contracts section displays all contracts associated with the selected student and provides options to create, generate, send, and manage contracts throughout their lifecycle.
Adding a New Contract
To add a contract to a student click New Contract. The New Contract window will appear.
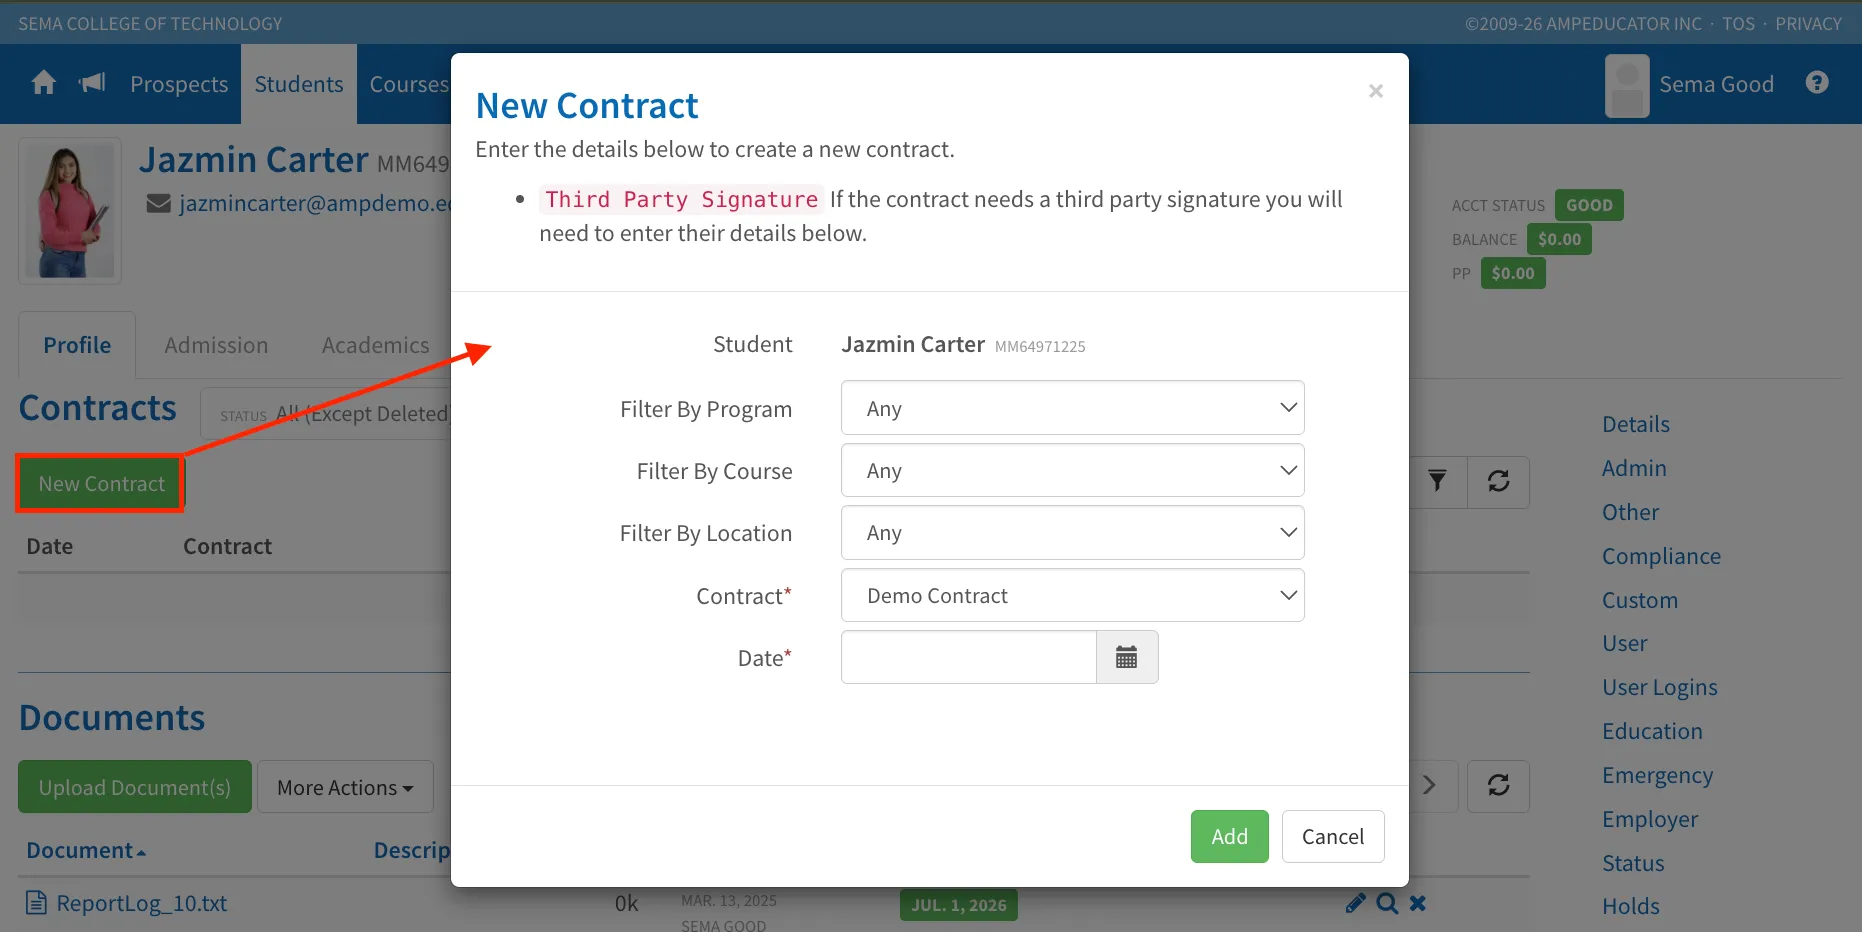
Use the available filters to narrow the list of contract templates by Program, Course, or Location if needed.
Select the desired Contract, enter the Date, and then click Add.
After the contract has been added, it will appear in the student's Contracts section with a status of Pending.
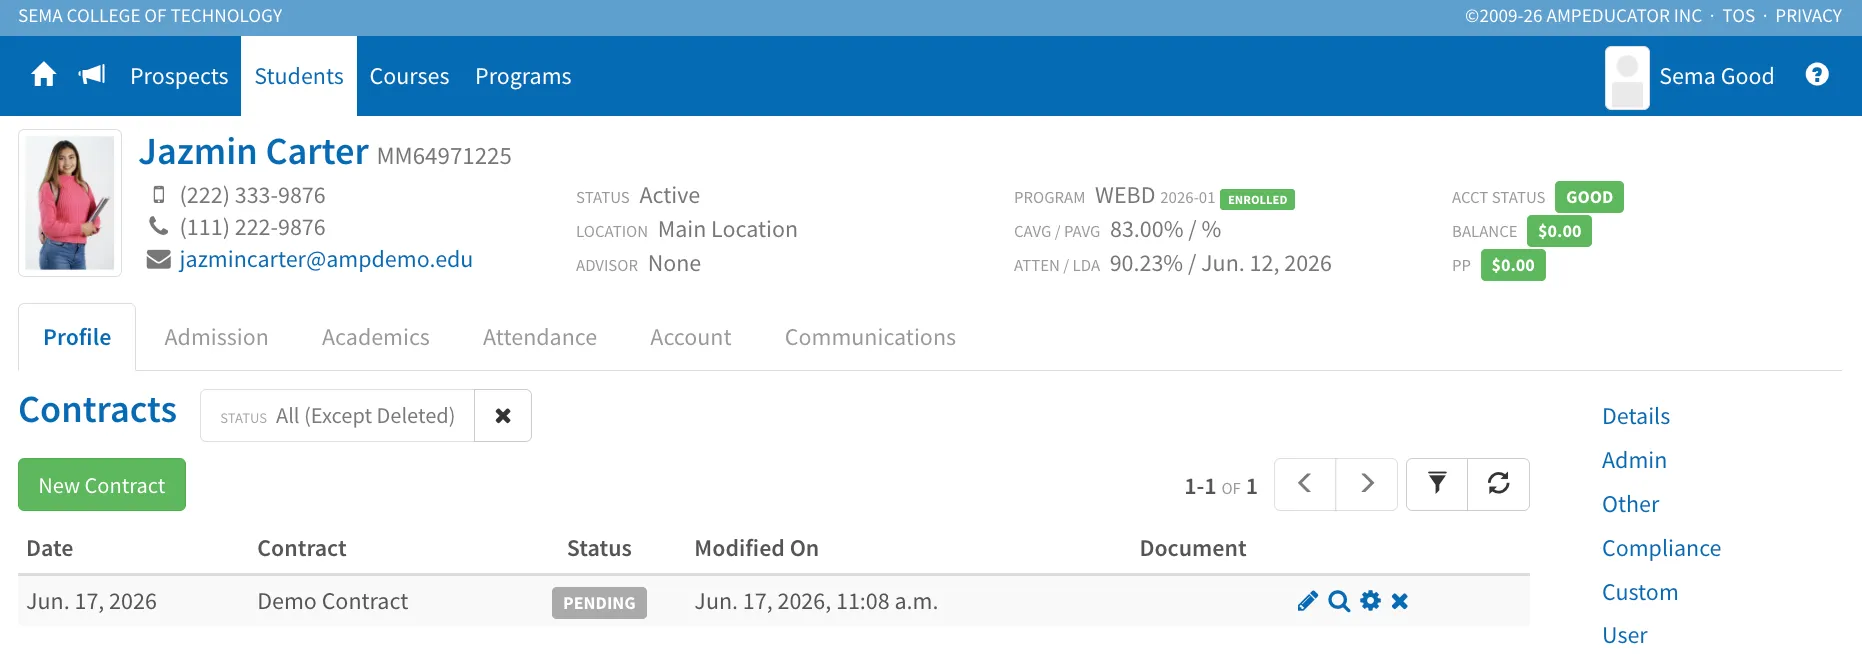
At this stage, the contract record has been created but has not yet been generated or sent for signature.
Managing Student Contracts
After a contract has been added, it will appear in the student's Contracts section with a status of Pending. The actions available for a contract are displayed to the right of the contract.
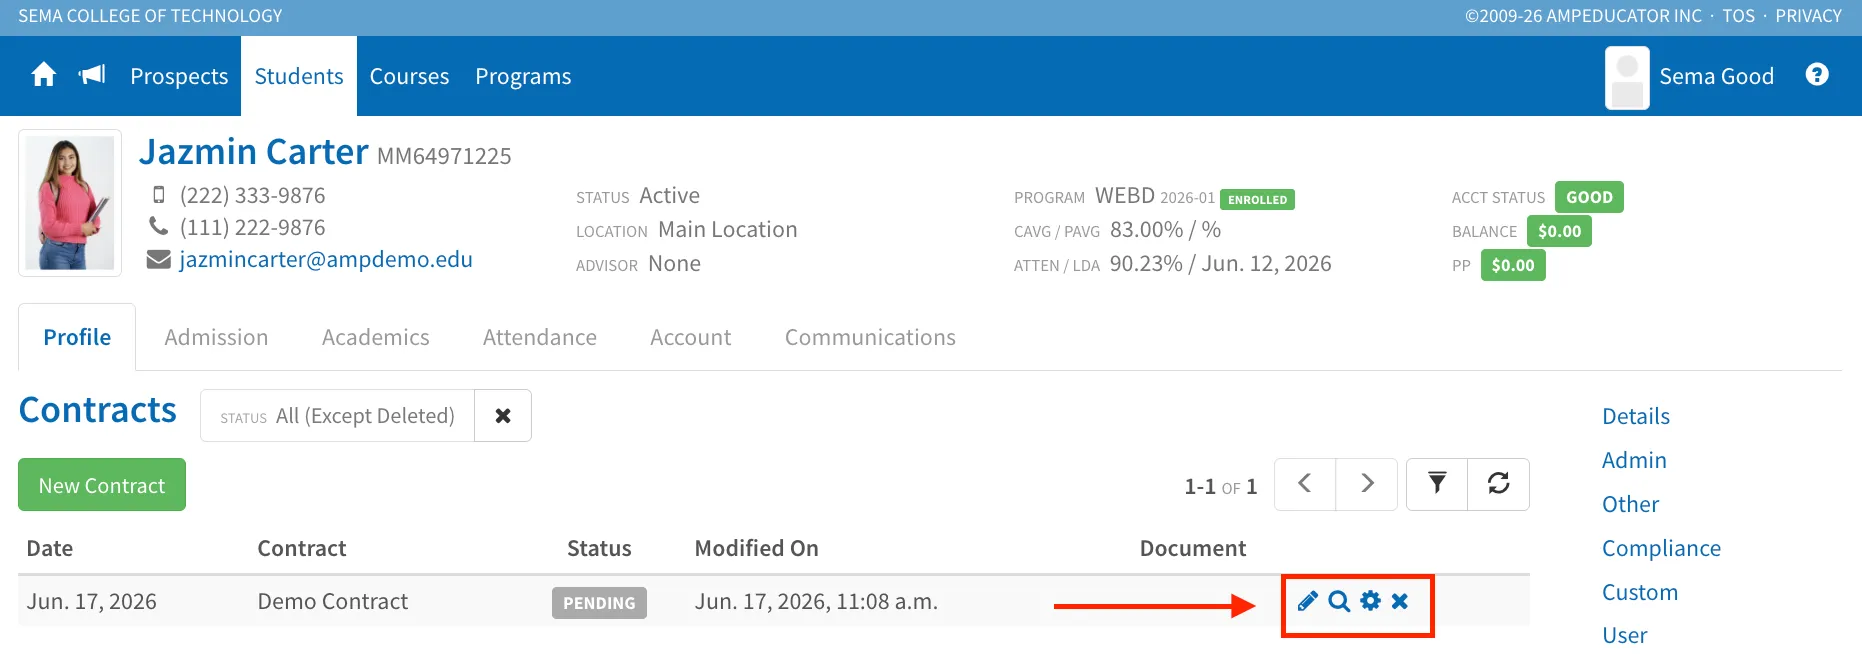
The available actions are:
- Edit: Modify the contract details and configuration.
- View: View the contract record and associated information.
- Generate: Generate the contract document using the selected template and student information.
- Delete: Remove the contract from the student's record.
Before a contract can be sent for signature, it must first be generated.
Generating Contracts
Once a contract has been added and reviewed, select Generate (⚙️) from the Document column.
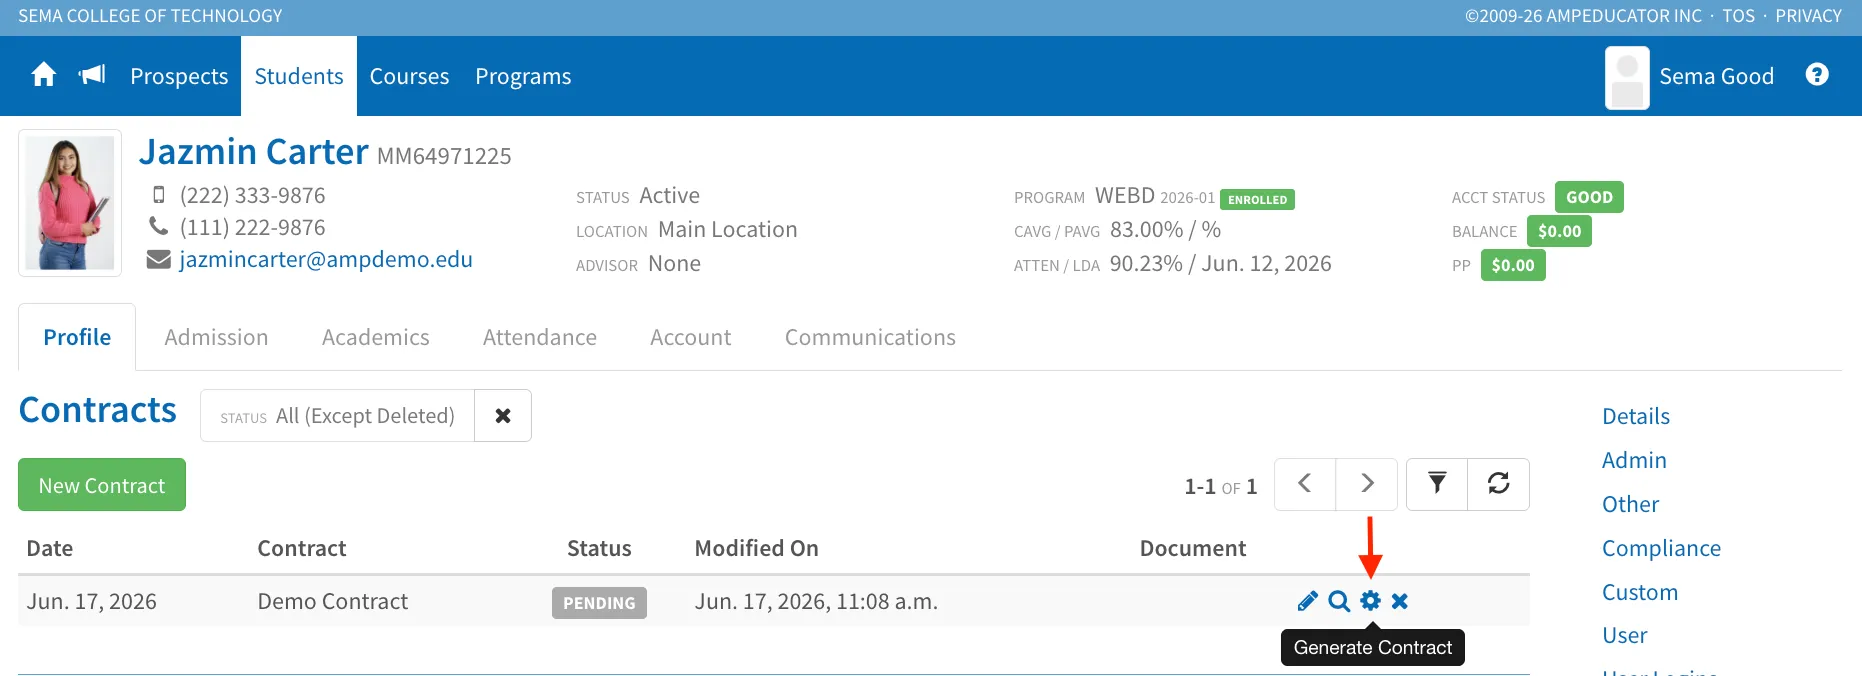
The system will generate the contract using the selected template and populate any configured student information, fees, payment plans, signatures, and contract fields.
After generation is complete, the contract PDF will appear in the Document column and additional actions become available.
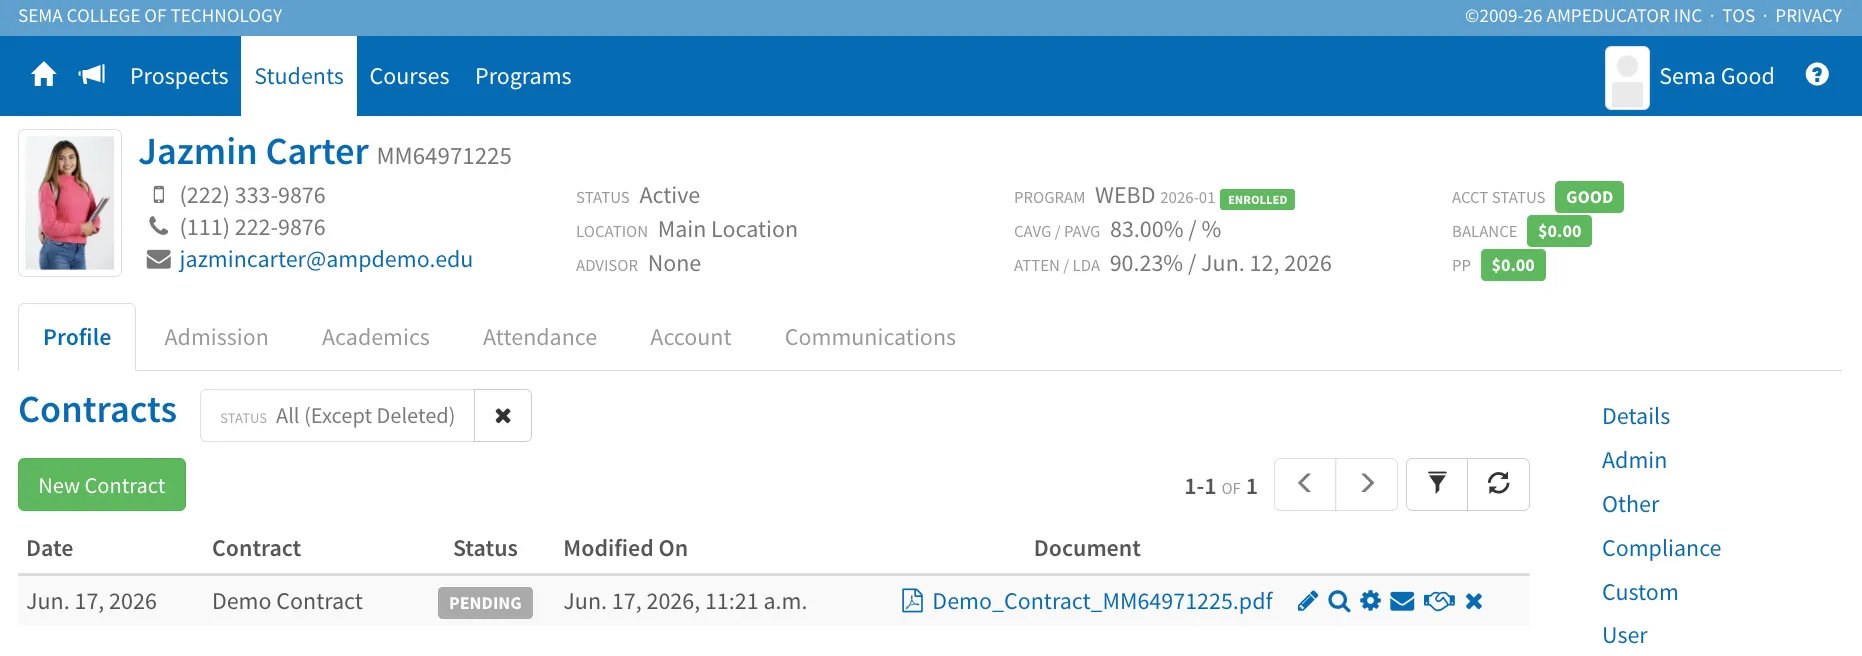
The available actions are:
- Download PDF: Download a copy of the generated contract.
- Edit: Modify the contract details.
- View: View the generated contract.
- Generate: Generate a new version of the contract after making changes.
- Email PDF: Email a copy of the generated contract to a recipient. This can be useful for sharing a completed or signed contract.
- Sign Contract: Send the contract to the student and any configured third-party signers for review and signature.
- Delete: Remove the contract from the student's record.
If changes are made to the contract template or student information after a contract has been generated, use Generate to re-create an updated version before sending it for signature.
Sending a Contract for Signature
Note: Before sending contracts for digital signature, ampSign or another electronic signature provider must be configured for your institution. For setup instructions, see Configuring Digital Signatures.
Once a contract has been generated and reviewed, it can be sent to the student and any configured third-party signers for completion.
To begin the signing process, click Sign Contract icon.
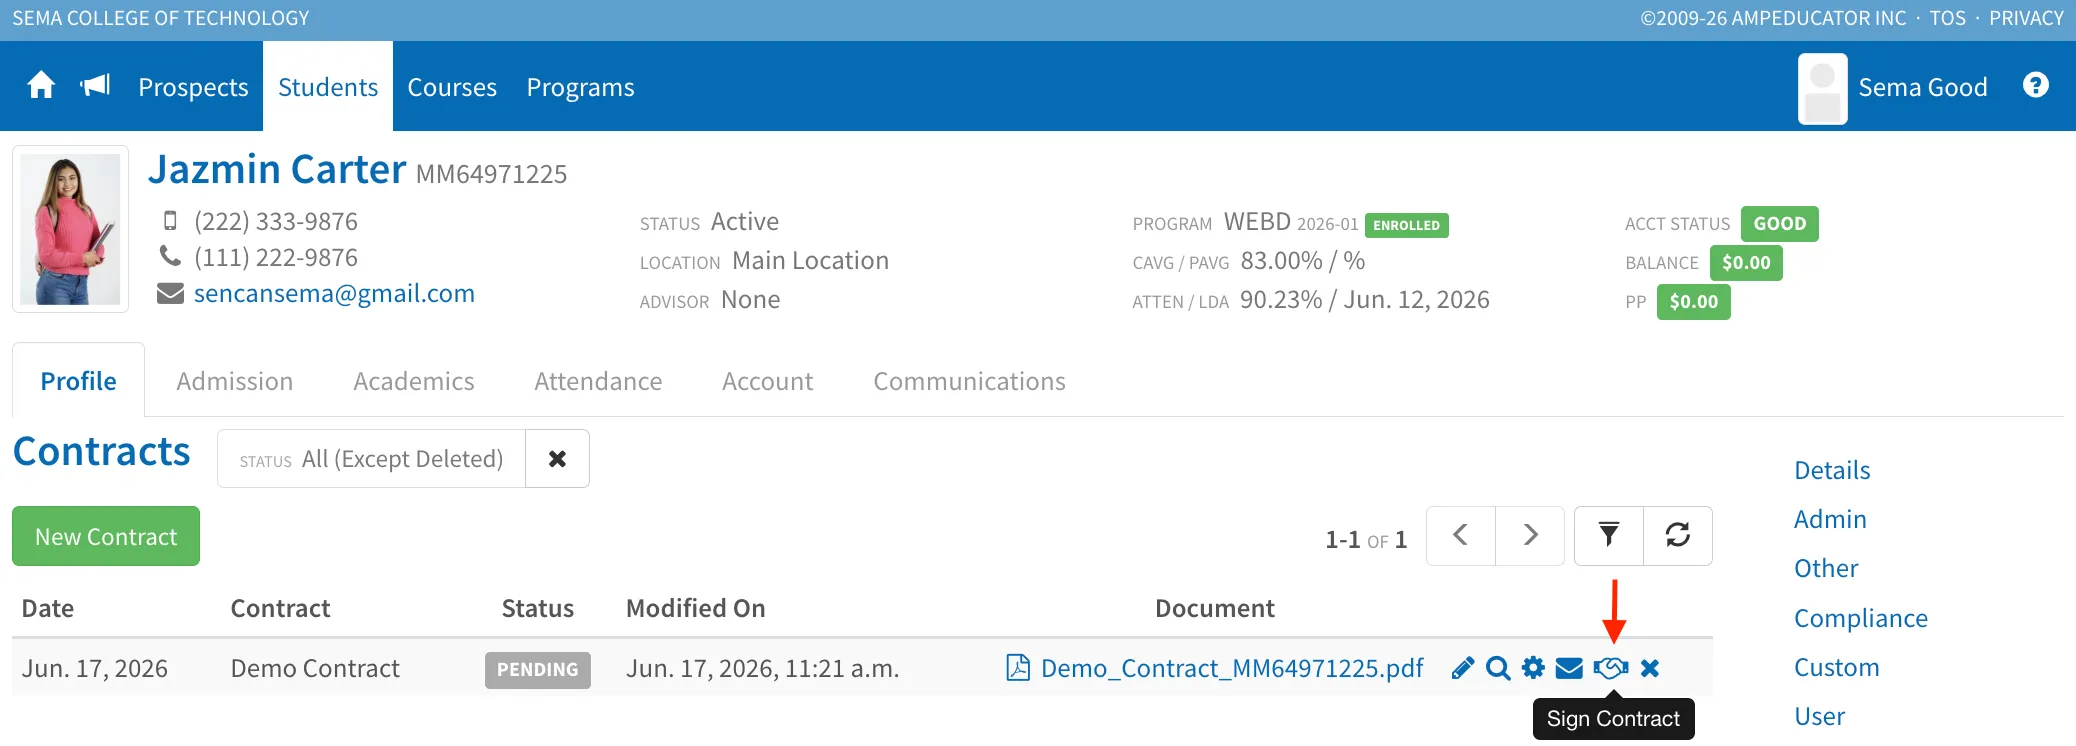
This window is used to either upload a completed contract that has already been signed, or send the contract for digital signature through ampEducator.
Signature Types
Two signature methods are available:
Upload
Select Upload when the contract has already been signed outside of ampEducator and you would like to store the completed document in the student's record.
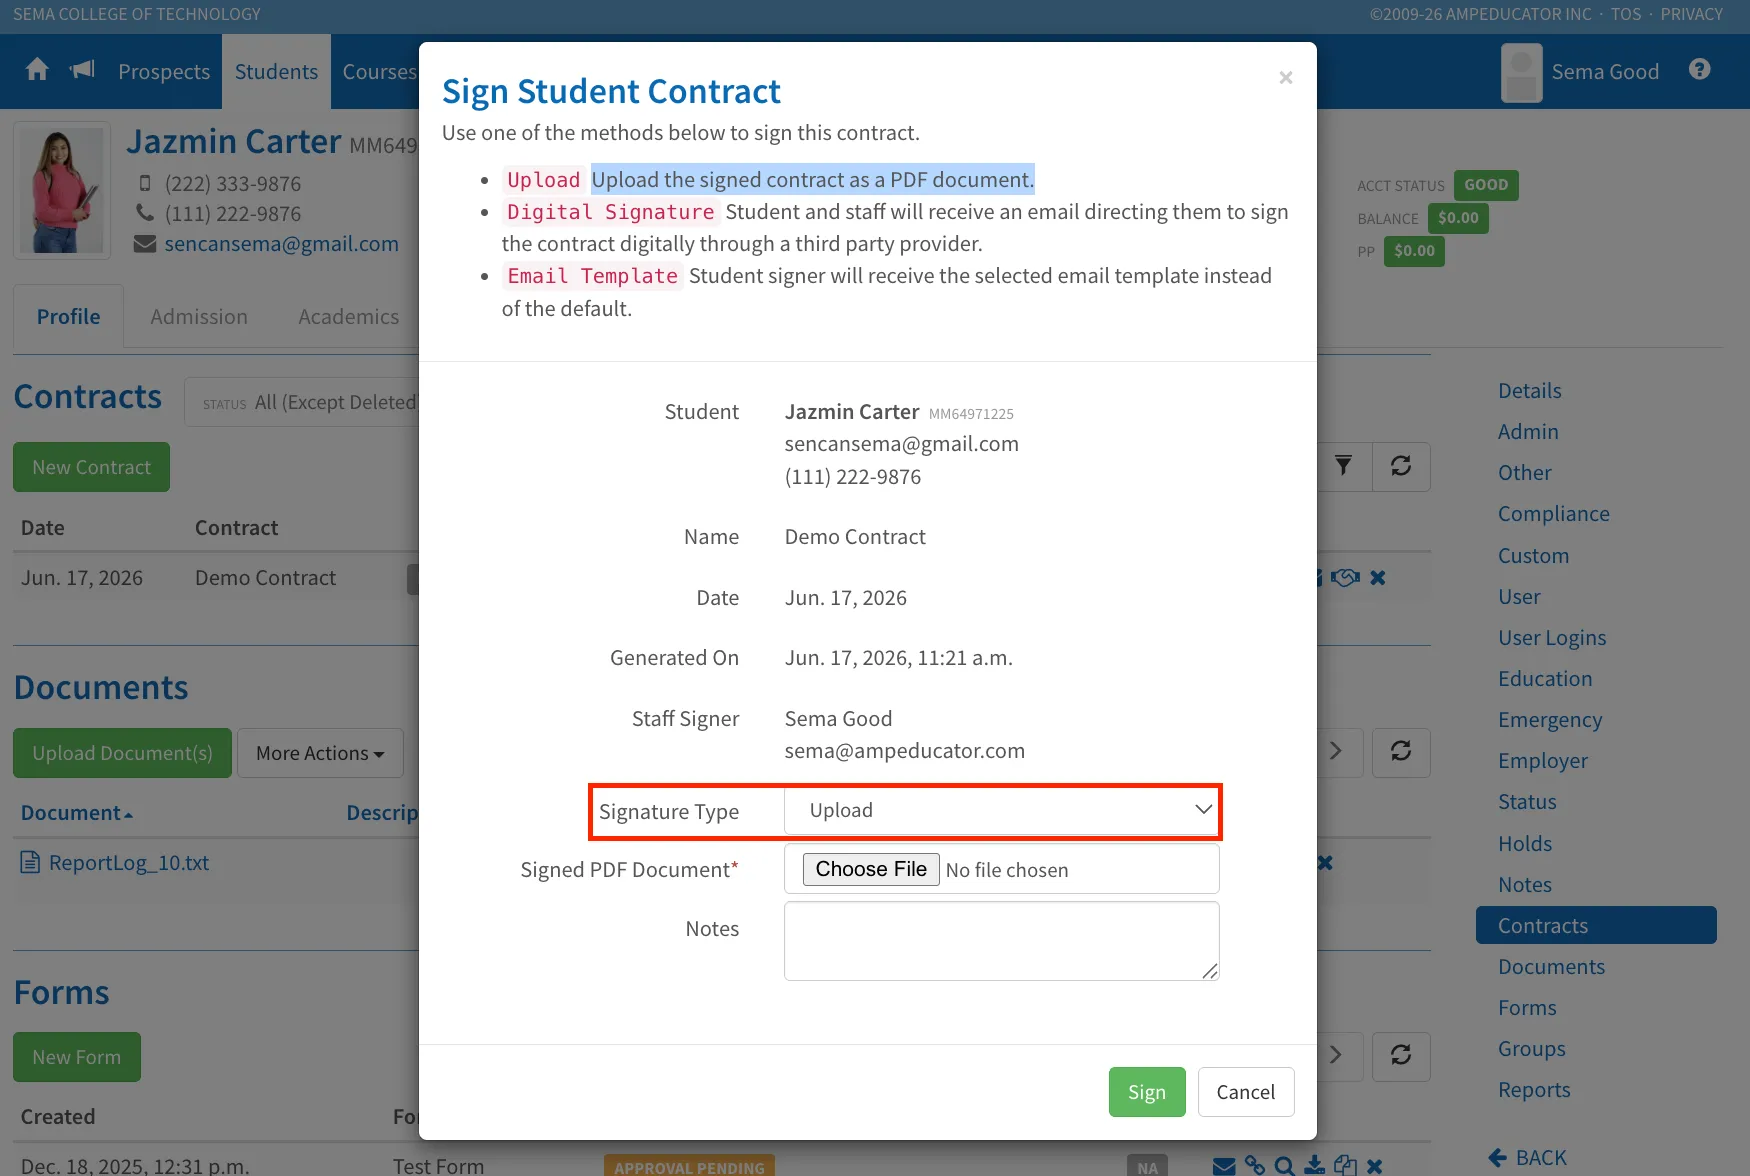
To upload a completed contract:
- Select Upload as the Signature Type.
- Click Choose File and select the signed PDF document.
- Optionally enter any notes.
- Click Sign.
The uploaded PDF will be attached to the contract record and marked as completed.
Digital
Select Digital to send the contract electronically for signature.
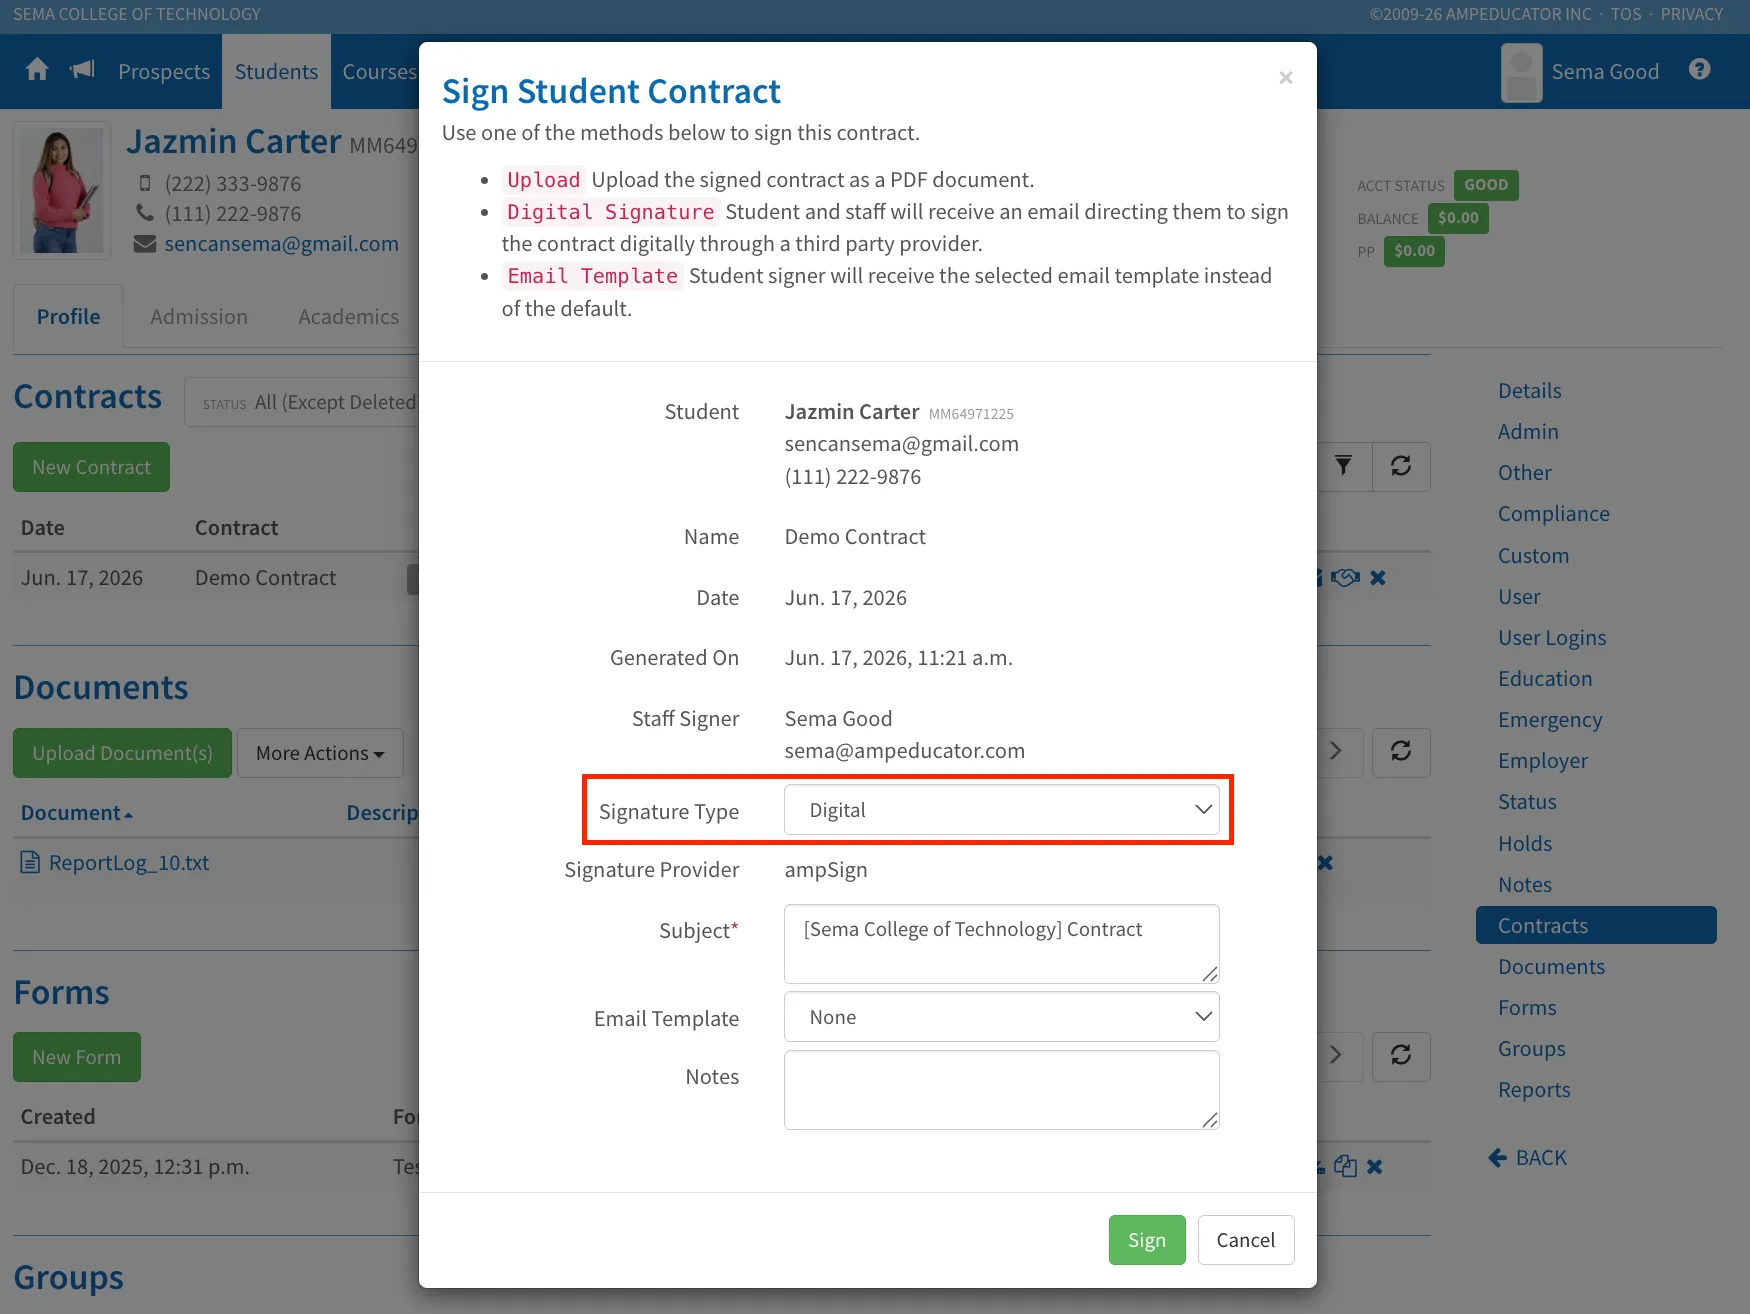
When Digital is selected, additional options become available:
- Signature Provider: The electronic signature service used to process the contract.
- Subject: The email subject line recipients will receive.
- Email Template: An optional email template that can be used instead of the default signing email.
- Notes – Internal notes related to the signing request.
After reviewing the settings, click Sign.
After clicking Sign, the contract is sent to the student and any configured third-party signers.
The contract status will update to Digital Pending, indicating that the signature request has been sent and is awaiting completion.
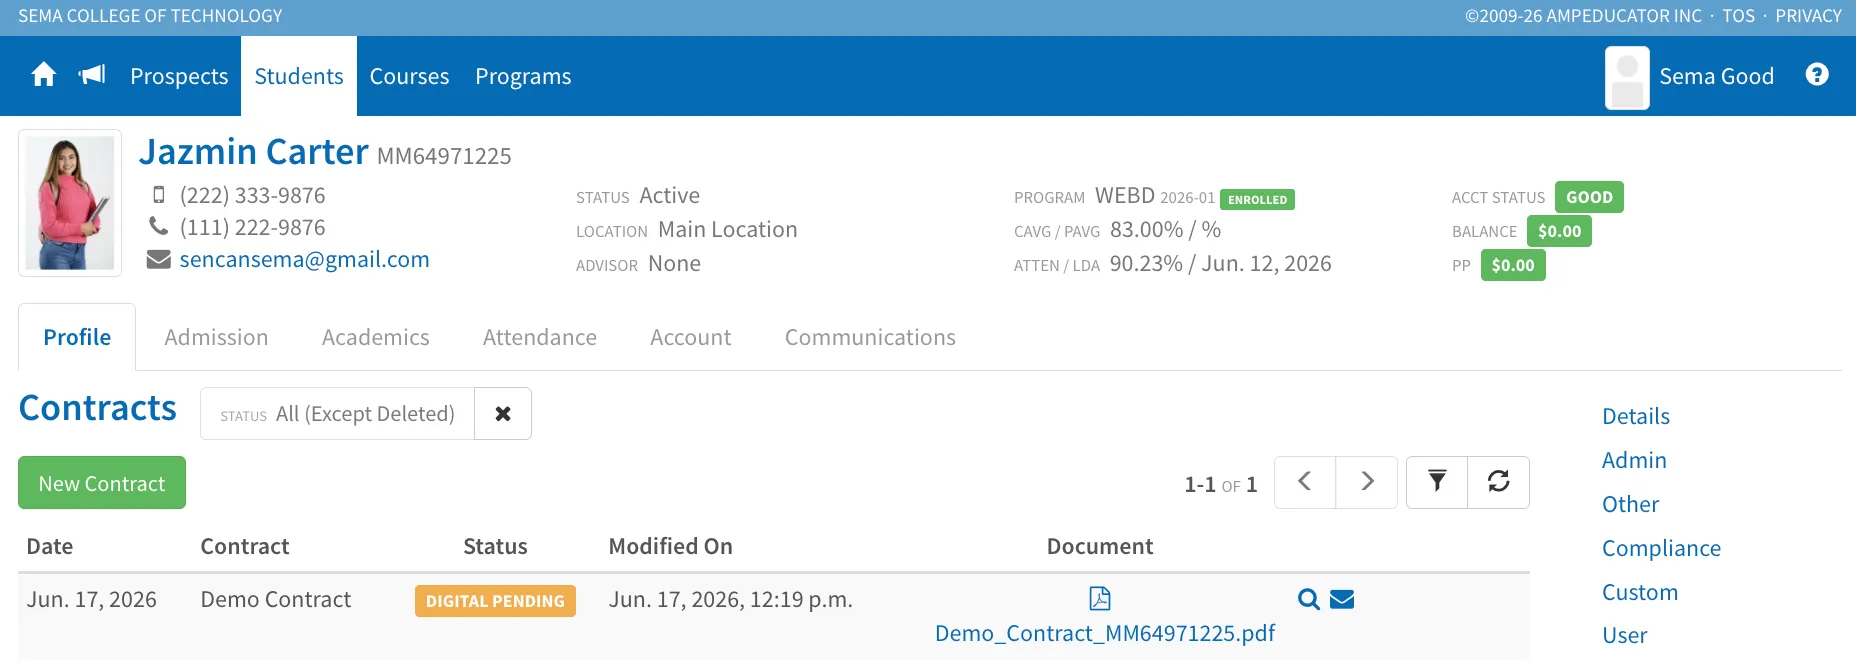
While the contract is in a Digital Pending status, staff can:
- View the generated contract.
- Email a copy of the contract PDF.
- Monitor the signing progress and recipient activity.
The contract will remain in a Digital Pending status until all required signatures have been completed.
Student Signing Experience
When the contract is sent for digital signature, the student receives an email with a link to review and sign the contract.
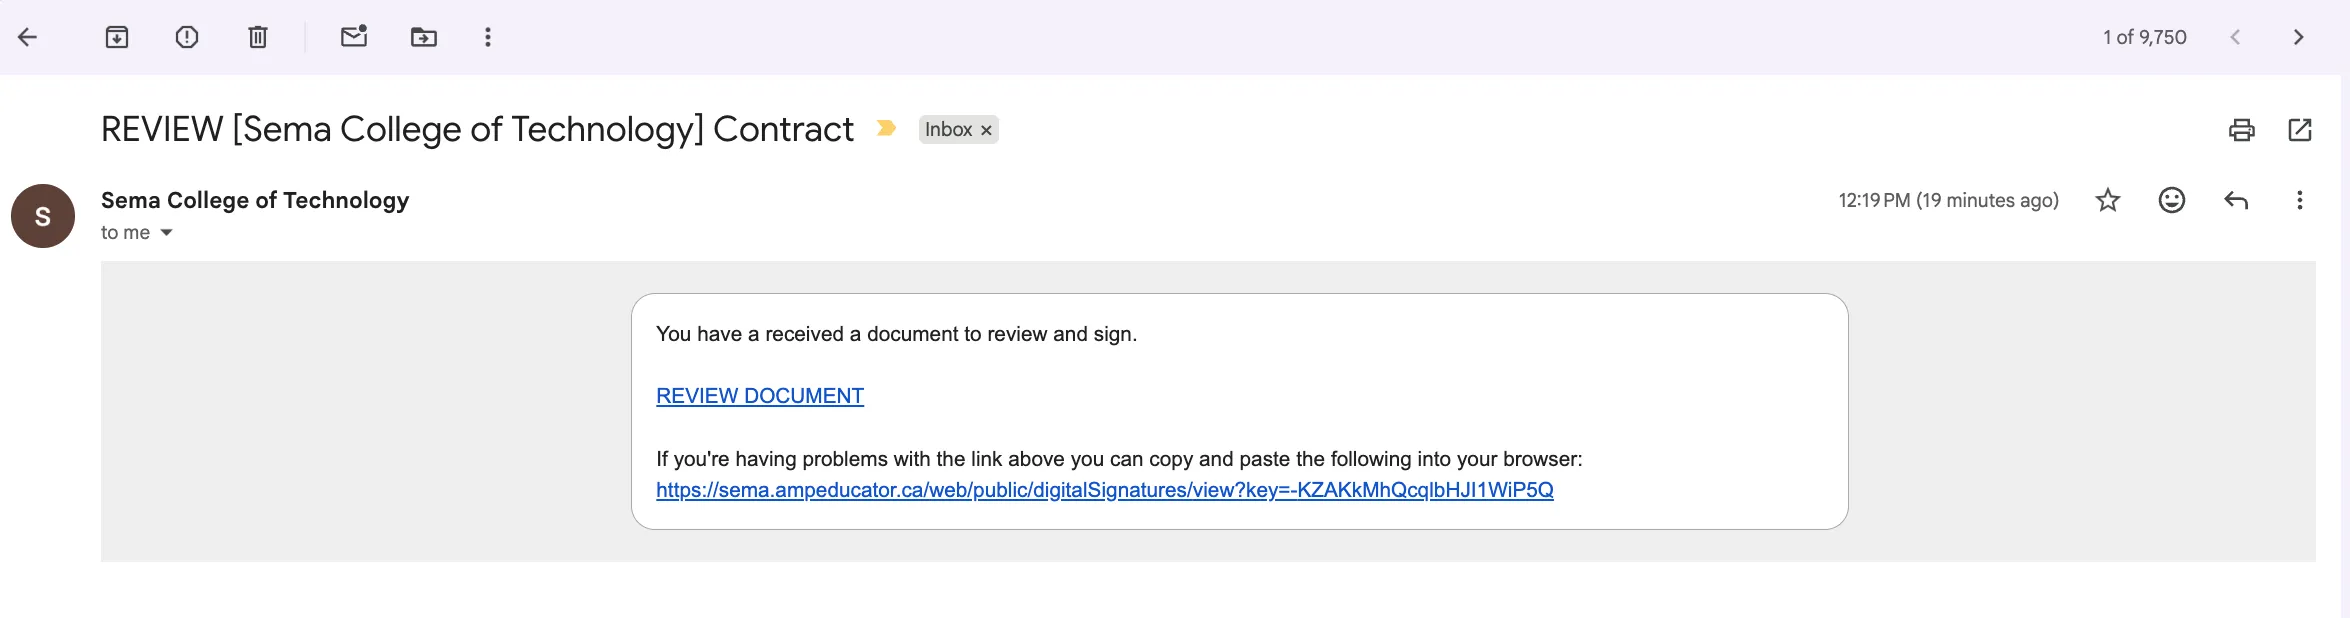
If an Email Template was selected when sending the contract, the student will receive the selected template instead of the default email.
After selecting Review Document from the email, the contract opens in the student's web browser.
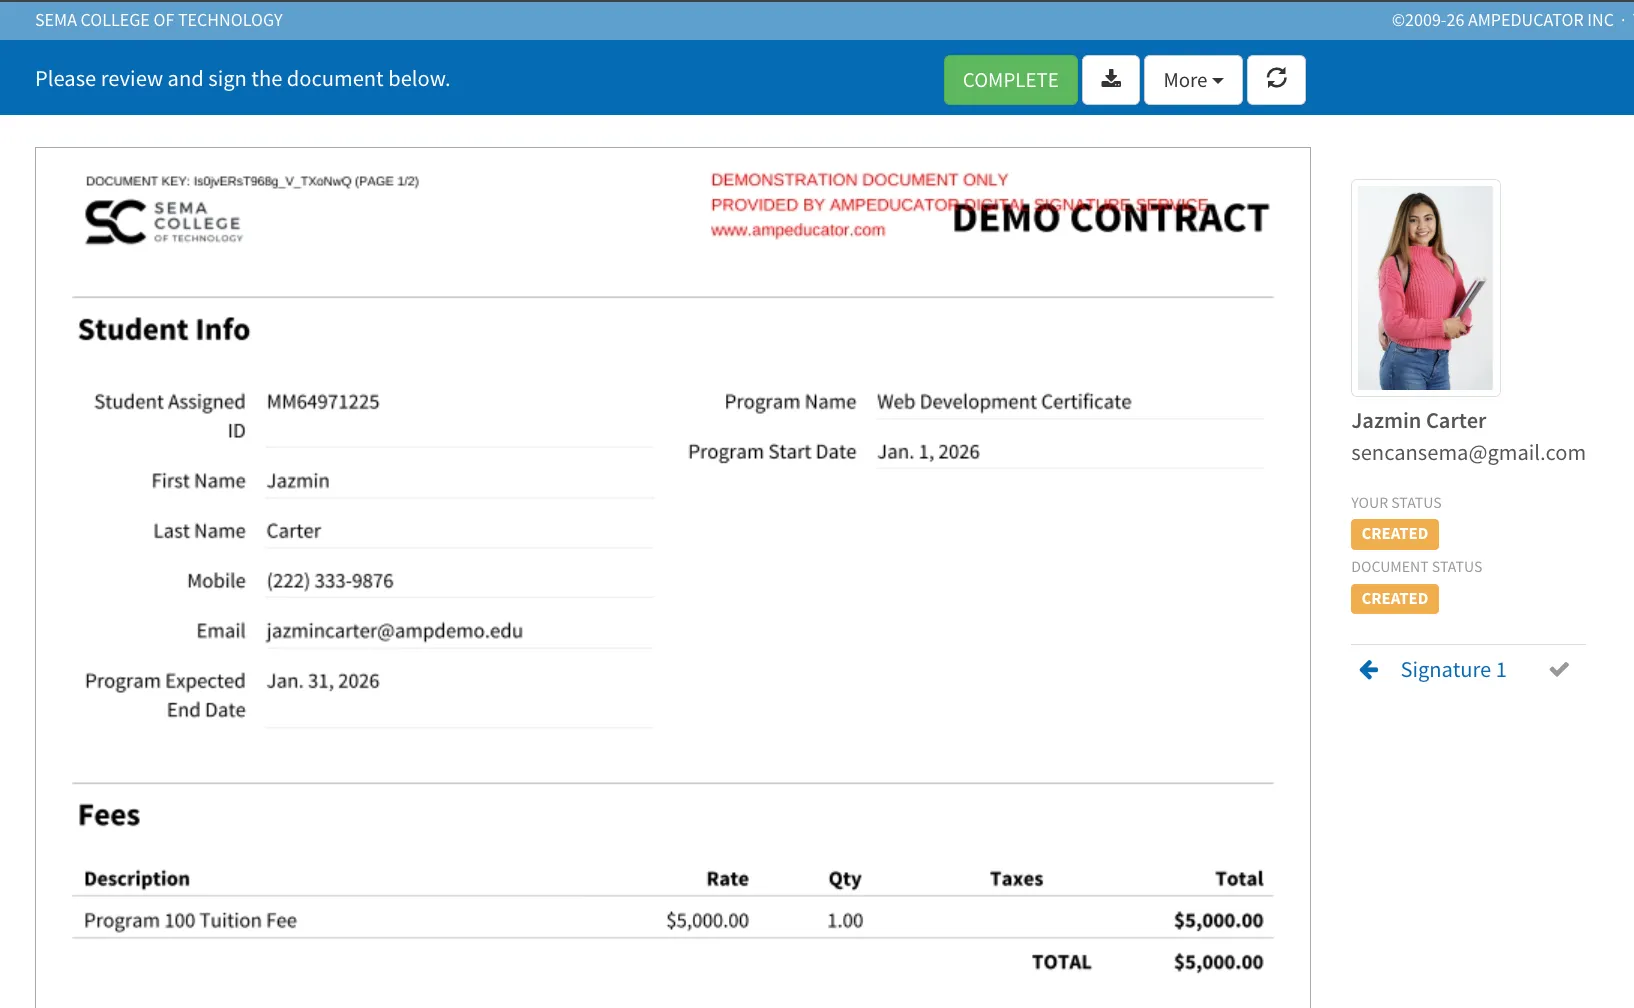
The student can review the contract contents, including any student information, fees, payment plans, policies, acknowledgements, and other contract sections configured by the institution.
Navigation controls are available to move between pages, refresh the document, or download a copy of the contract for personal records.
Tip: If your contract contains multiple signatures, initials, or required fields, recipients can use the navigation panel on the right side of the page to jump directly to each required section. Completed items are marked automatically, making it easy to see what still needs attention.
Any required signature or initial fields are displayed directly within the contract.
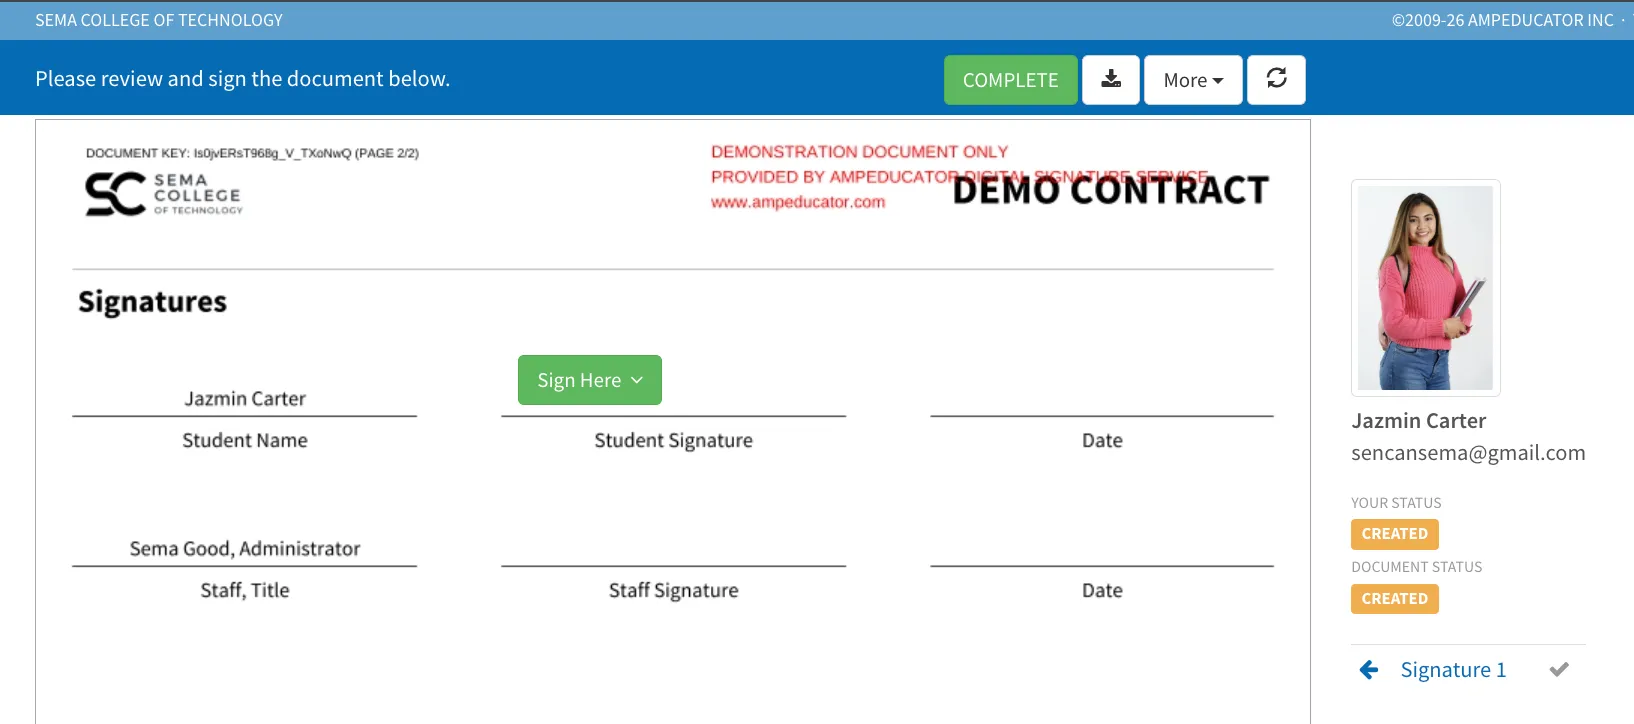
When a student selects Sign Here, the Sign Document window opens.
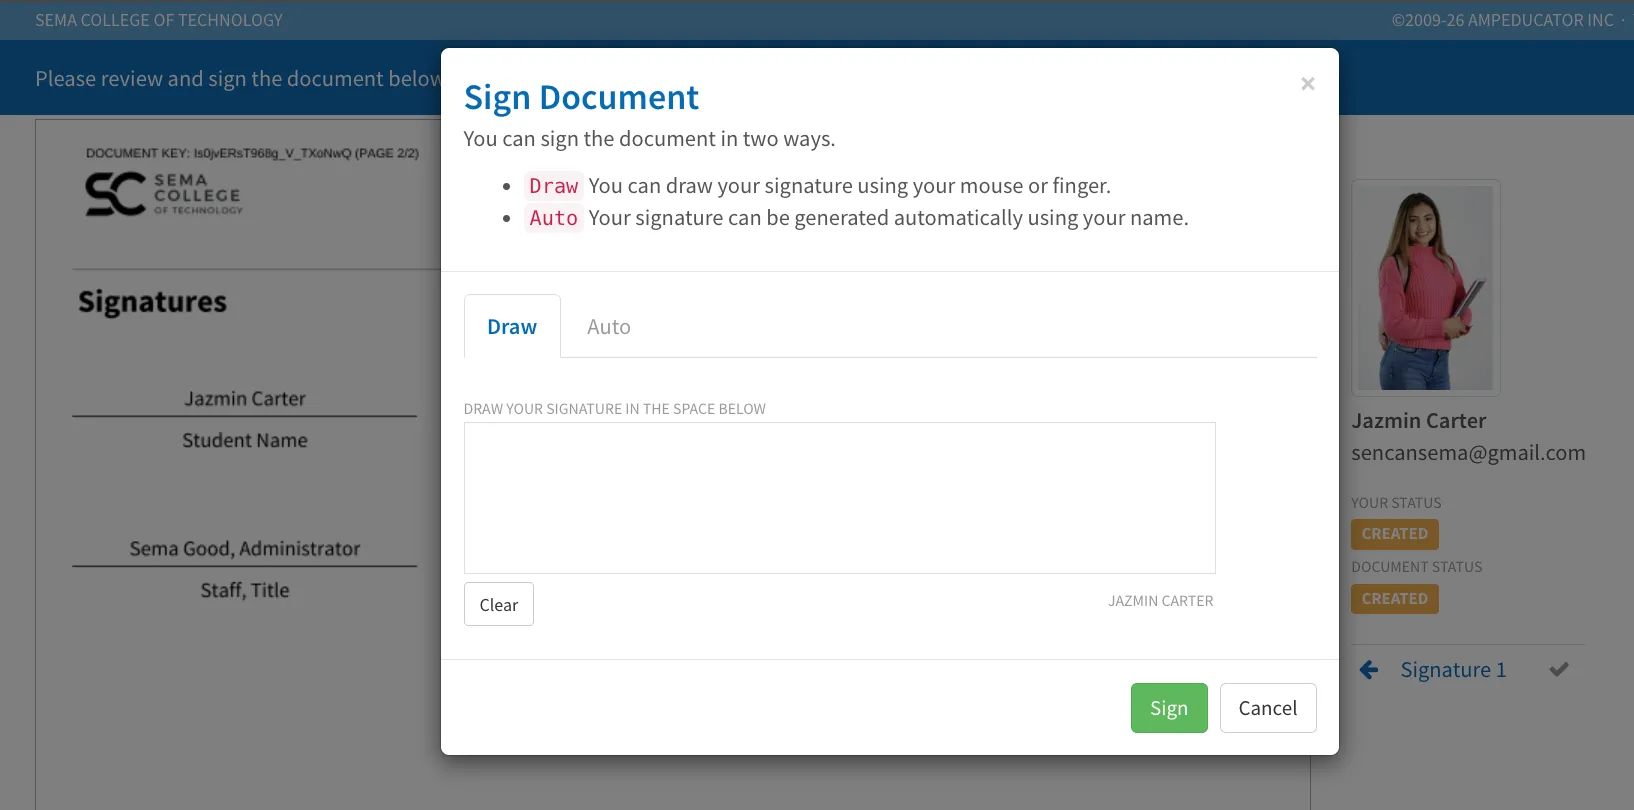
Students can choose between two signature methods:
- Draw – Draw a signature using a mouse, trackpad, touchscreen, or finger.
- Auto – Automatically generate a signature using the student's name.
After choosing their signature method and entering their signature, students click Sign to apply it to the document.
After a signature has been applied, it is immediately displayed within the contract.
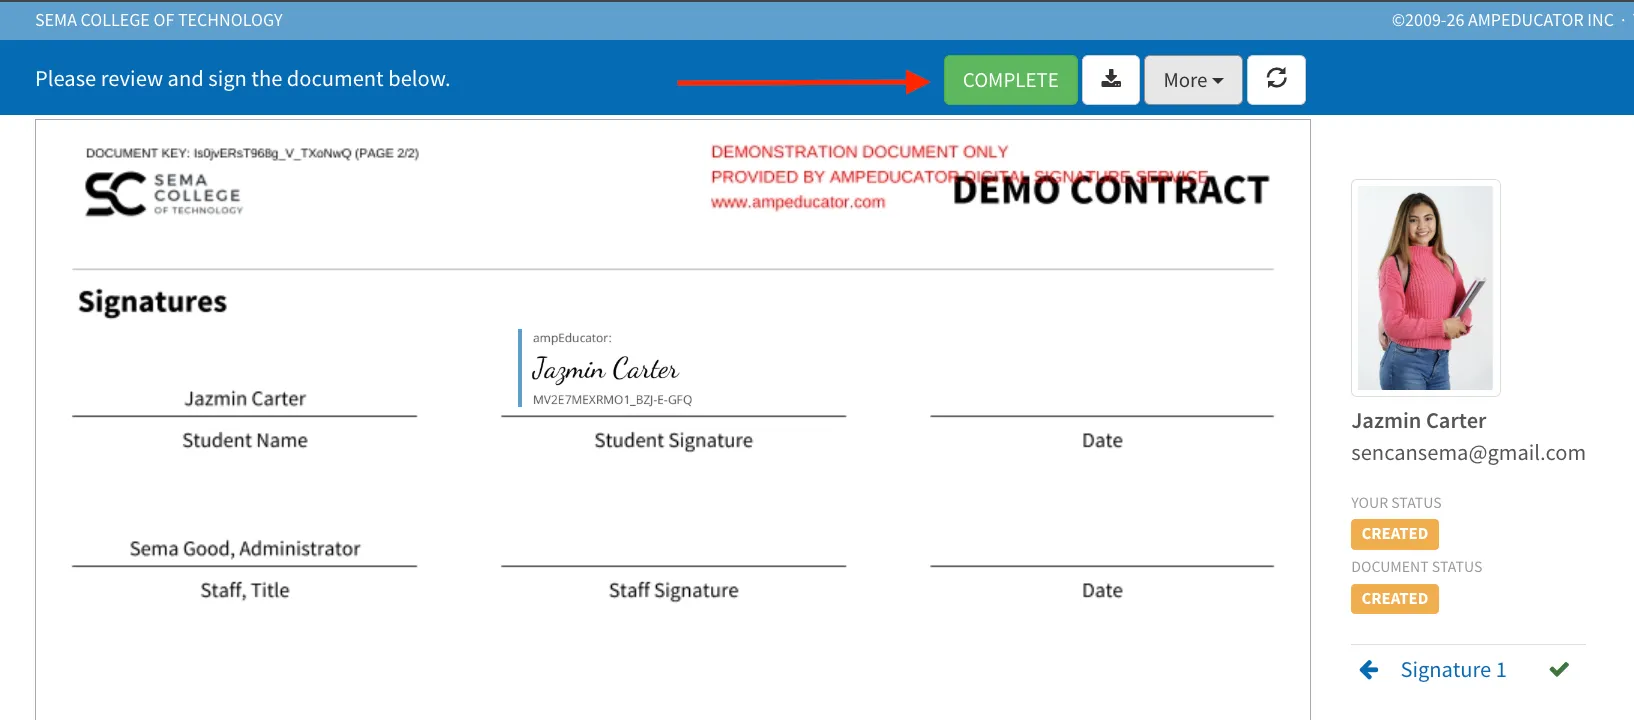
The signature field will be marked as completed, and a verification code is included with the signature for audit and validation purposes.
Once all required signing actions have been completed, the student clicks Complete at the top of the page to finalize the contract.
Before the contract is finalized, the student will be presented with an electronic signature consent confirmation.
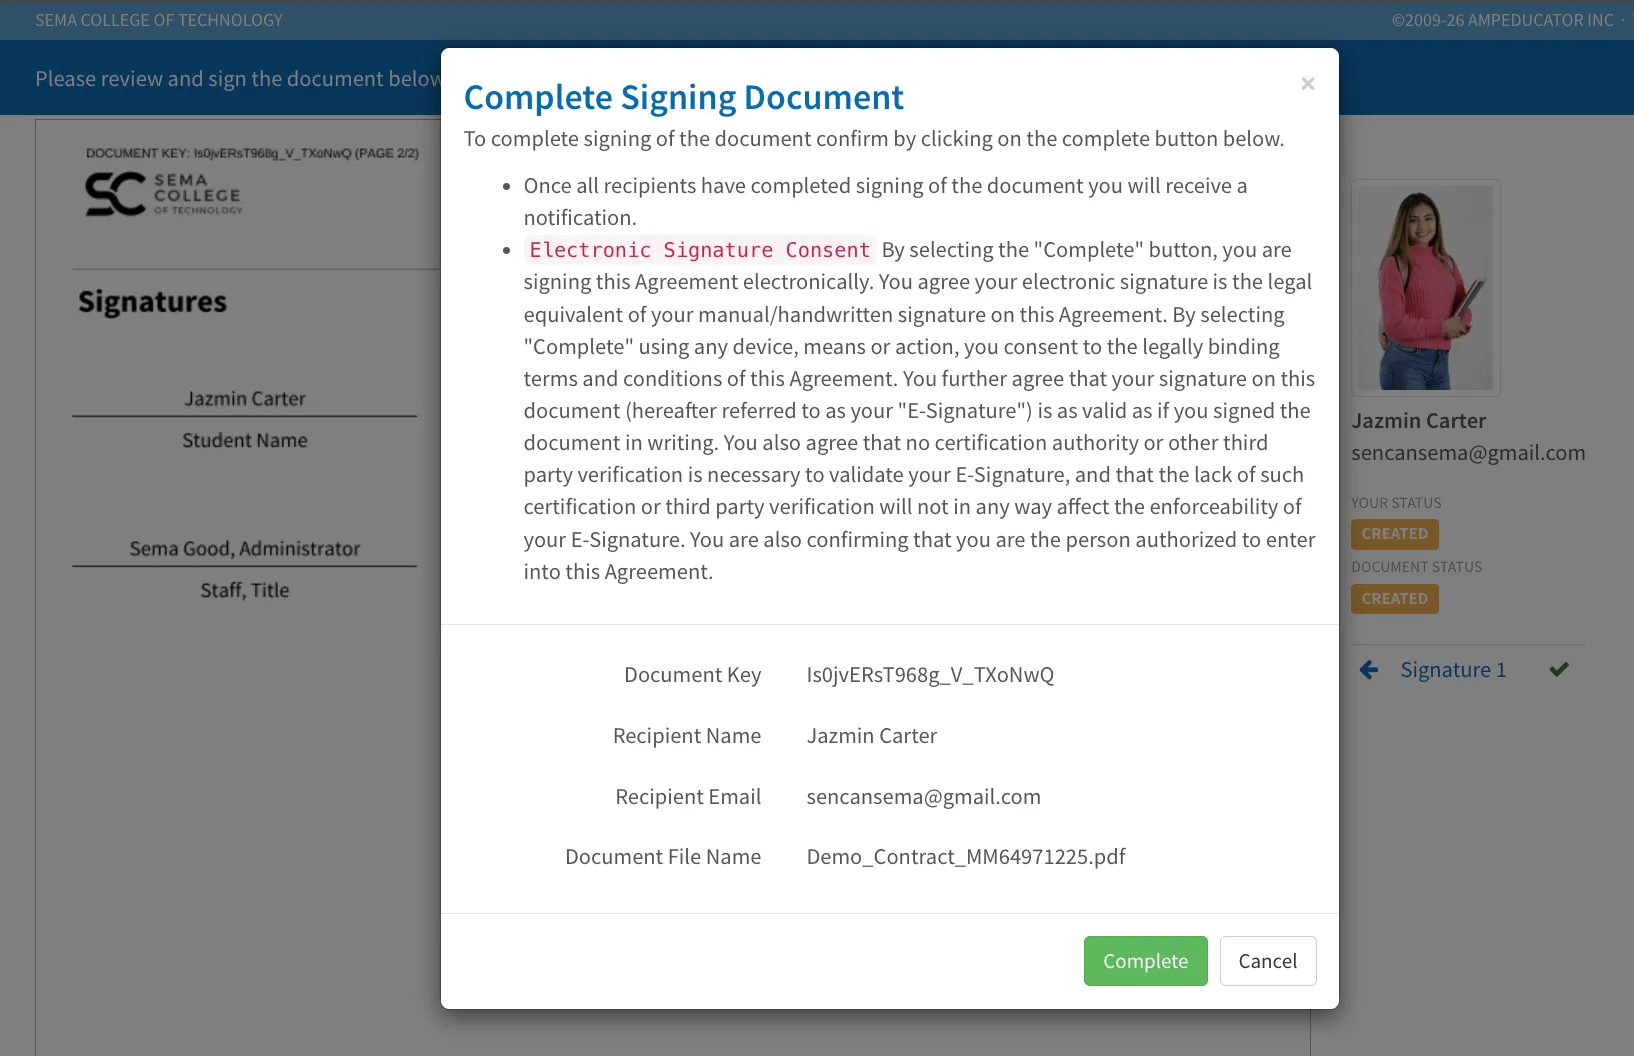
This confirmation:
- Reviews the electronic signature agreement and consent terms.
- Displays the recipient and document details.
- Confirms the identity of the person completing the signature.
- Provides a final opportunity to review the contract before submission.
Students click Complete to finalize the signing process.
After the contract has been successfully submitted, the student can download a copy of the signed contract directly from the signing page for their records.
The student will also receive a confirmation email indicating that the contract has been successfully signed. This confirmation serves as a receipt of the completed signing action and provides assurance that the signed document has been received by the institution.
Additional Signers and Staff Signatures
If the contract includes staff or third-party signatures, the signing process follows the same workflow for each recipient.
In this example, the student signs the contract first. Once their signature is submitted, the staff signer receives an email notification containing a secure link to review and sign the document.
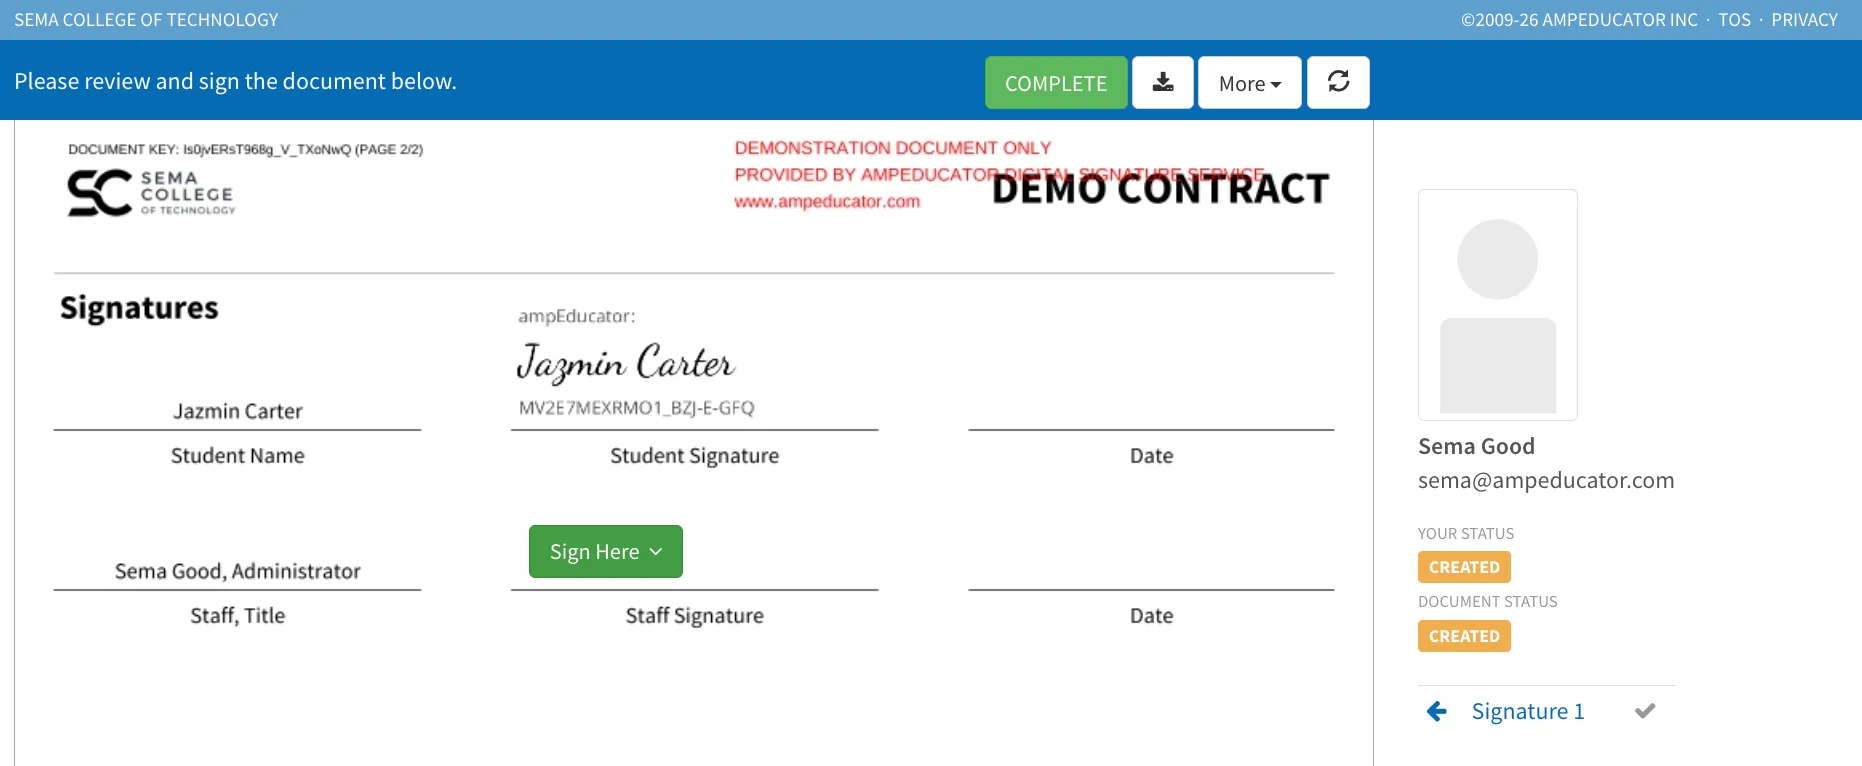
Each signer receives a unique signing link and can only complete the signature fields assigned to them.
Once the final signer has completed the document, the contract status is automatically updated to Signed.
Completed Contracts
Once all required recipients have completed their signatures, the contract status is automatically updated.
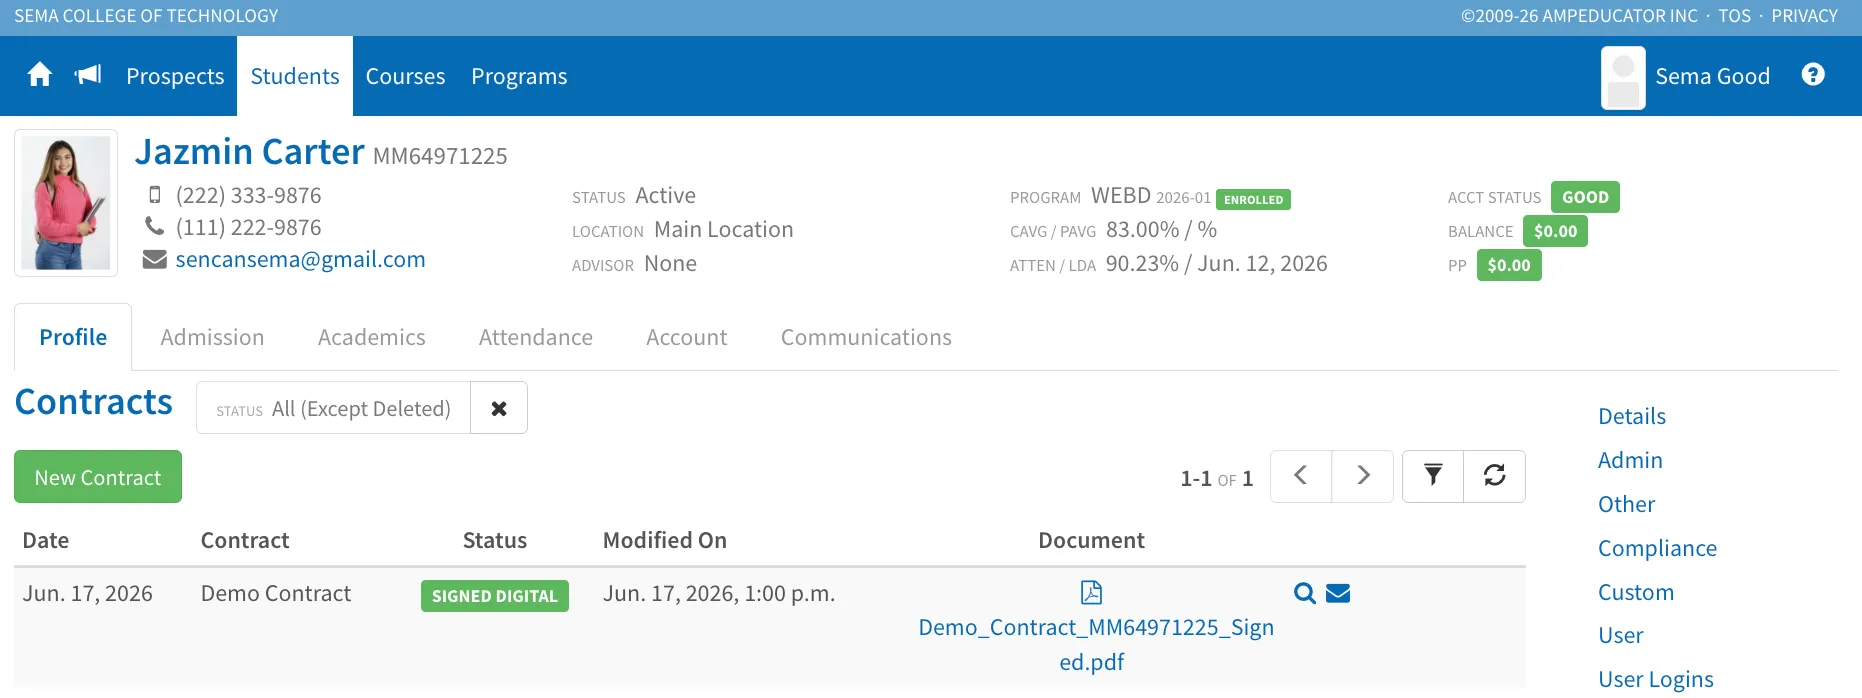
The contract will display a Signed Digital status, indicating that all required signatures have been collected and the signing process is complete.
At this stage:
- The final signed PDF is available for viewing and download.
- All digital signature activity is permanently recorded.
- The contract becomes part of the student's permanent record.
- A signed copy can be emailed to recipients if required.
The contract can be opened at any time to review the completed document and signature history.
Generating & Sending Contracts in Bulk
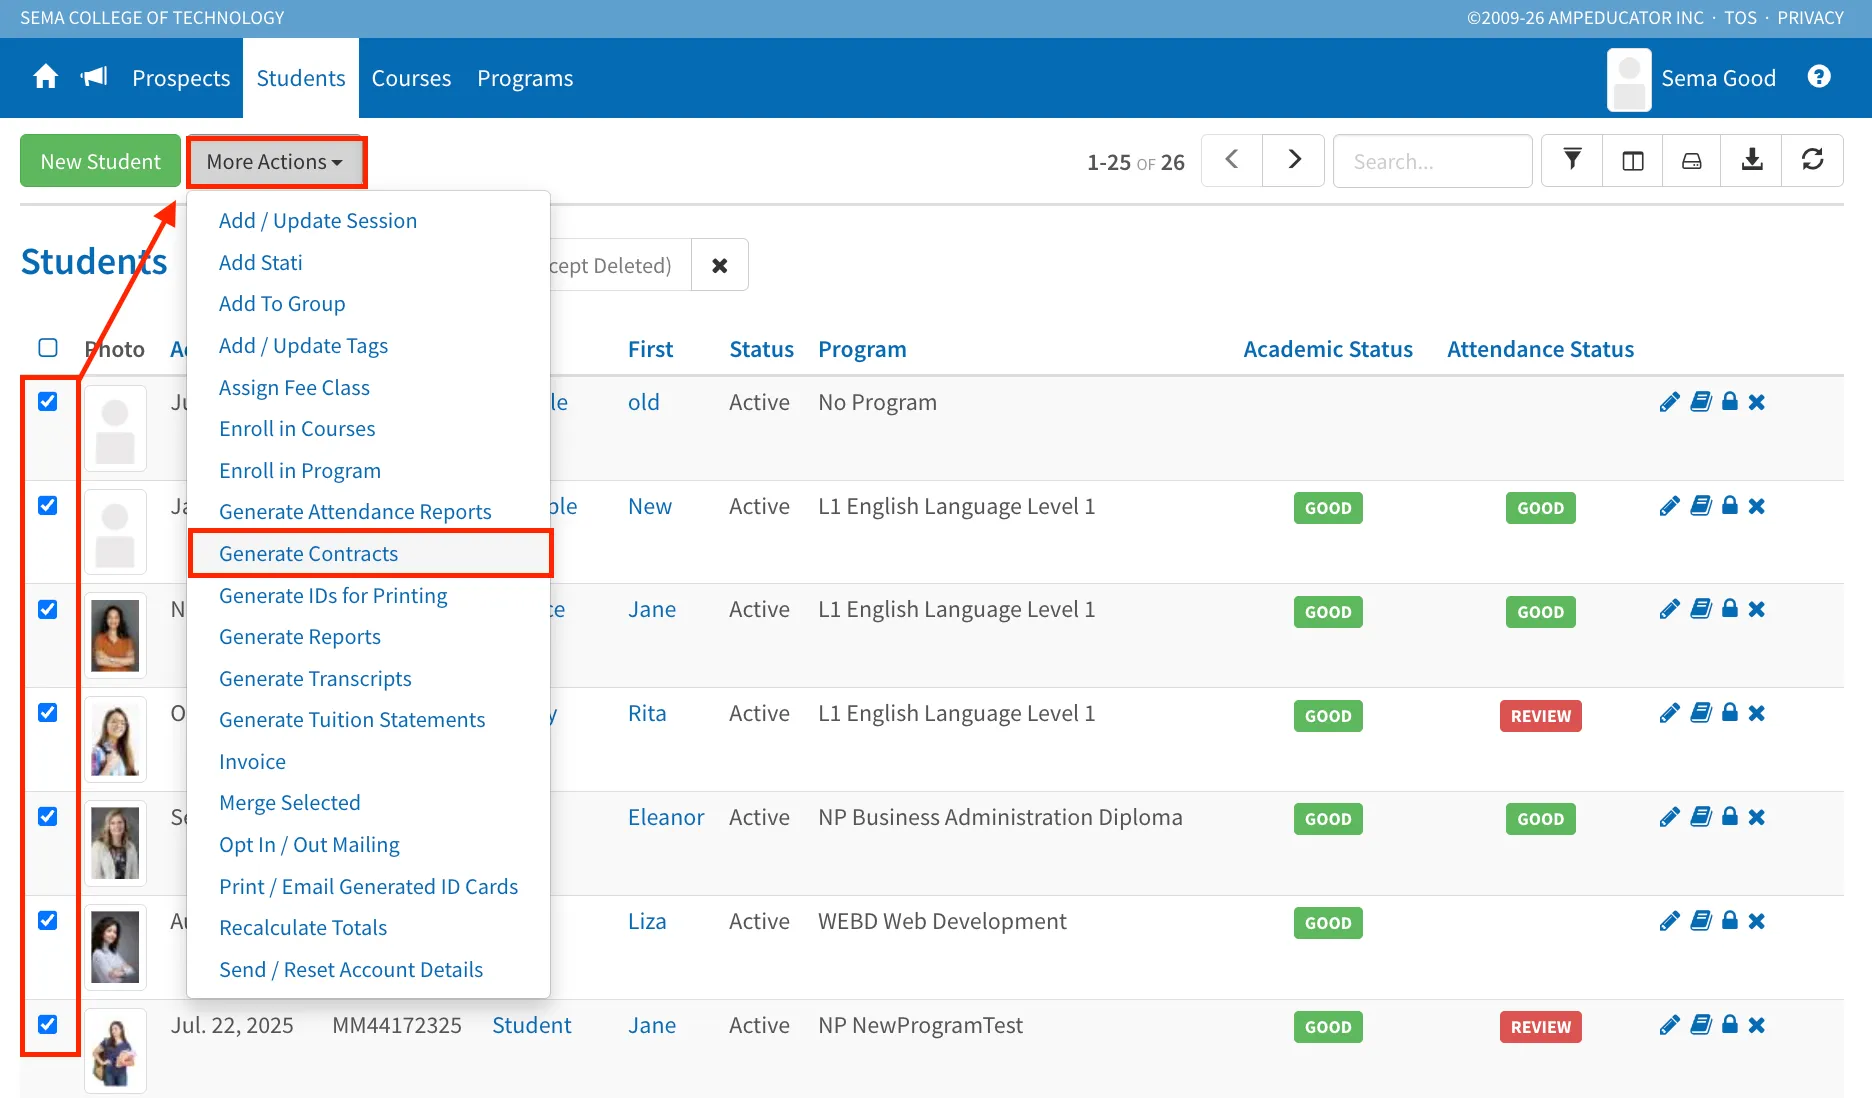
If you need to send the same contract to multiple students, ampEducator allows you to generate and send contracts in bulk directly from the student list.
Navigate to Students. Select the students you want to generate contracts for. Click More Actions → Generate Contracts.
The Generate Student Contracts window will open.
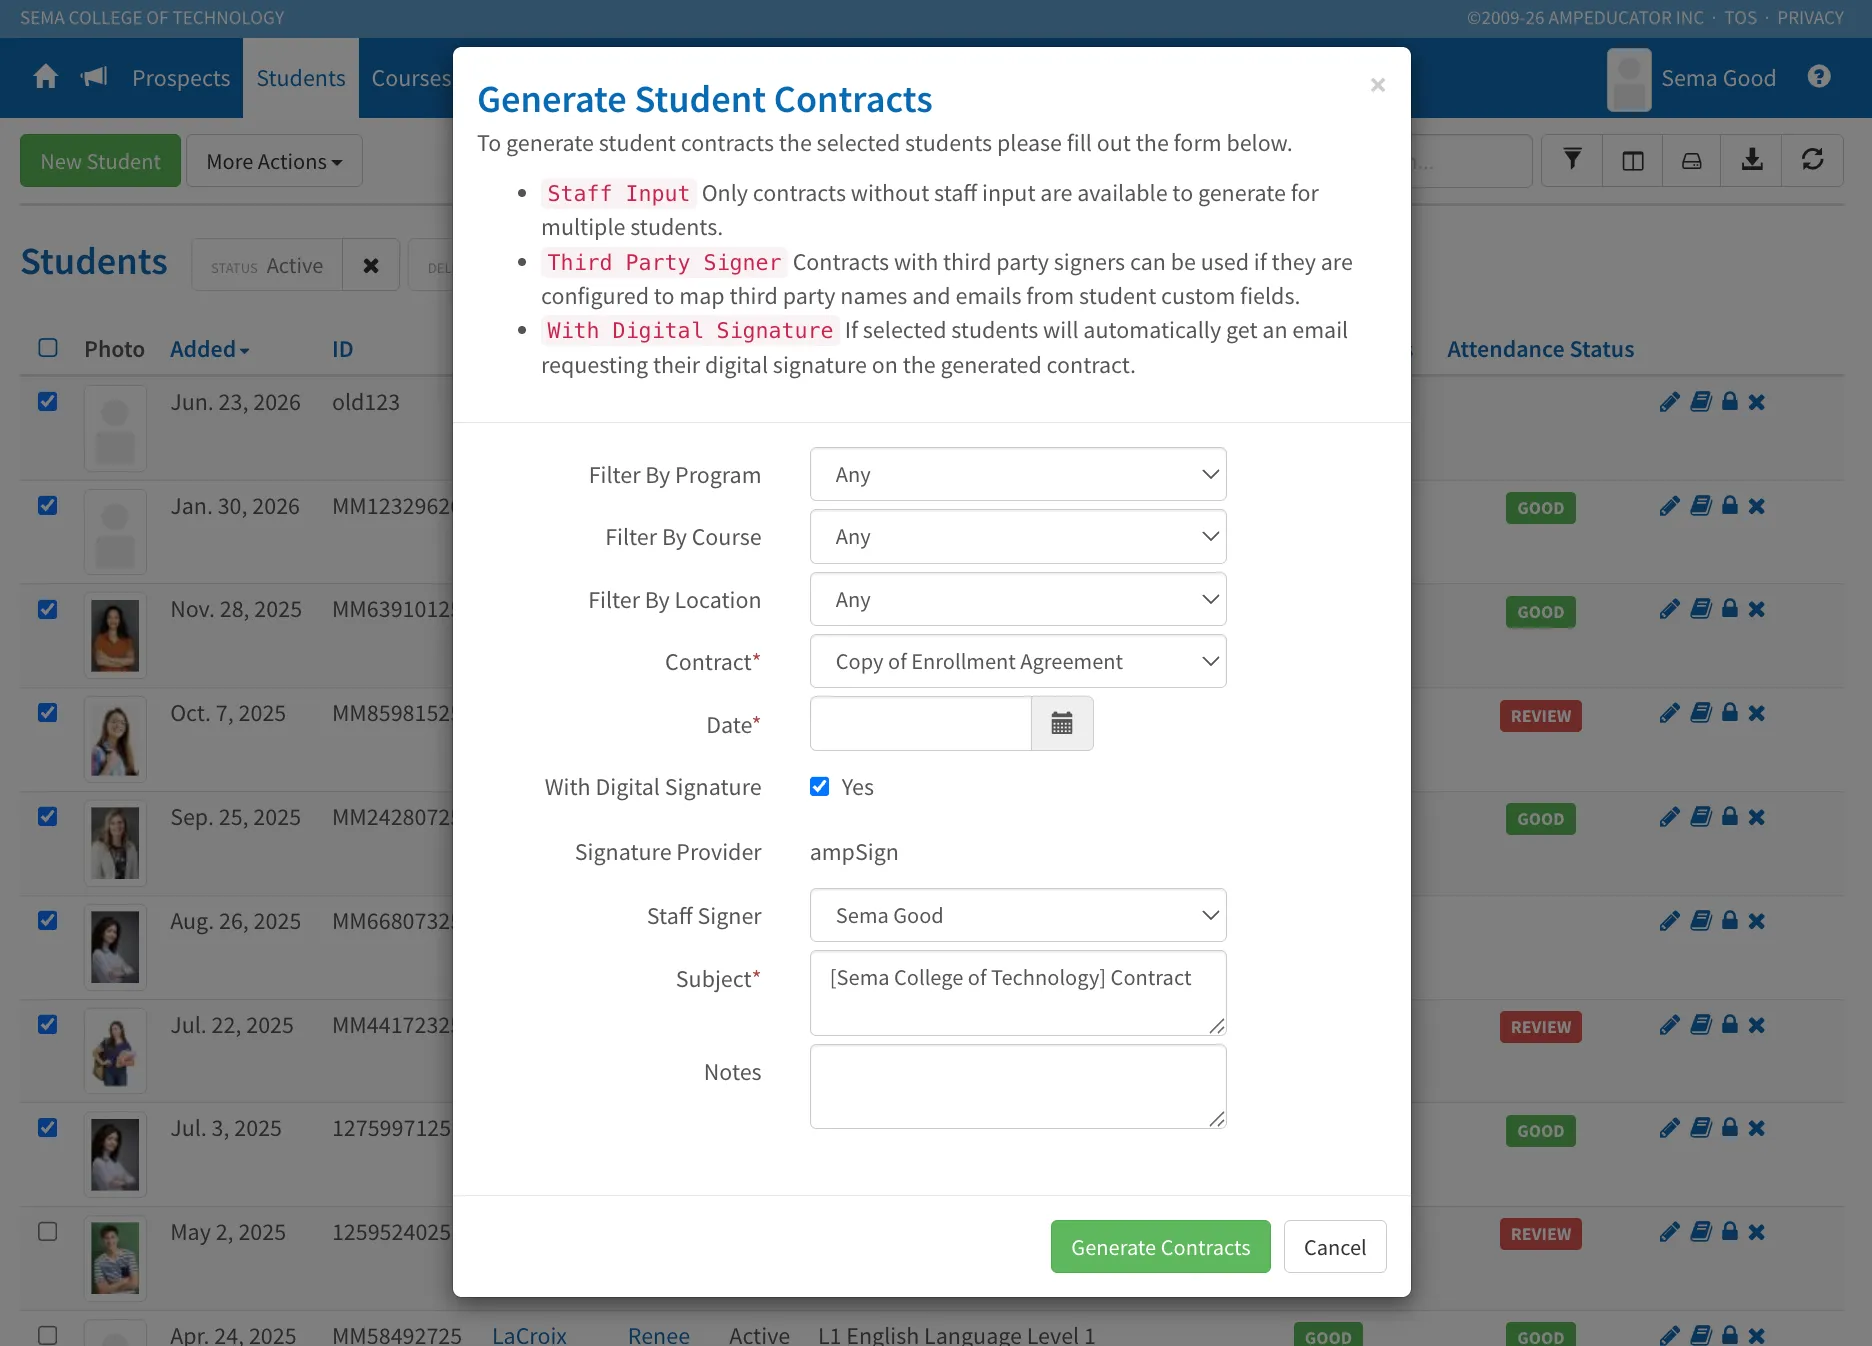
From this window you can:
- Filter students by Program, Course, or Location.
- Select the Contract template to generate.
- Choose the contract Date.
- Enable With Digital Signature if the contracts should be sent for electronic signature.
Without Digital Signatures
If With Digital Signature is not selected, ampEducator generates a personalized PDF for each selected student and emails the completed contract directly to them.
With Digital Signatures
When With Digital Signature is enabled, additional signing options become available, including:
- Signature Provider
- Staff Signer
- Email Subject
- Notes
After clicking Generate Contracts, ampEducator automatically:
- Generates an individual contract for each selected student.
- Populates each contract with the student's information.
- Sends a secure digital signature request to each student by email.
This allows institutions to distribute contracts to an entire cohort in just a few clicks.
Tracking and Viewing Contracts
To view contract details and signing activity, click the View icon beside the contract.
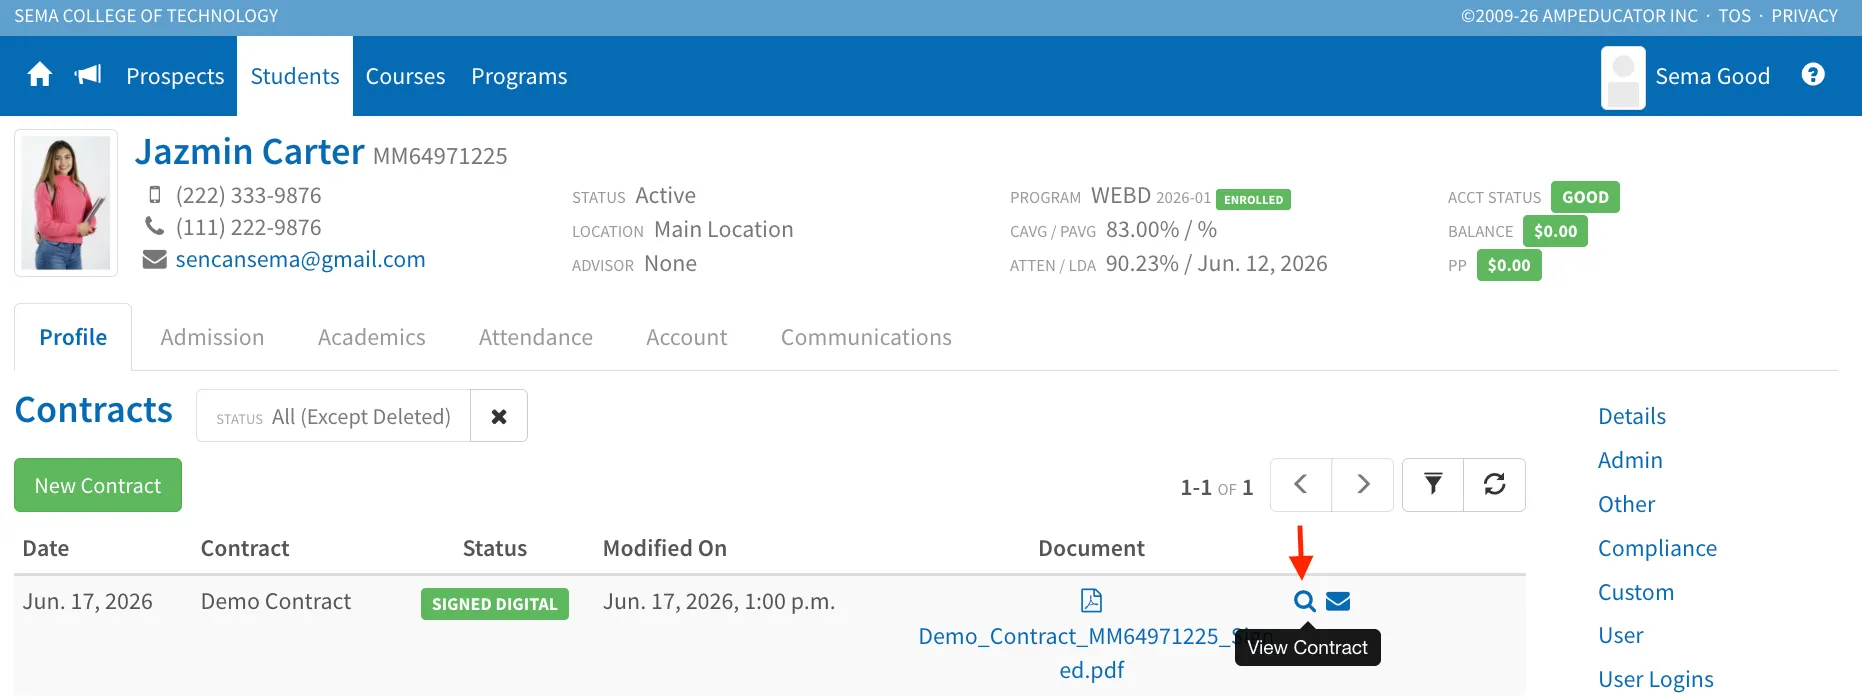
This icon can be accessed at any point during the contract lifecycle. Whether a contract is pending, awaiting signatures, or fully completed, this page provides real-time visibility into the contract's status and signing progress.
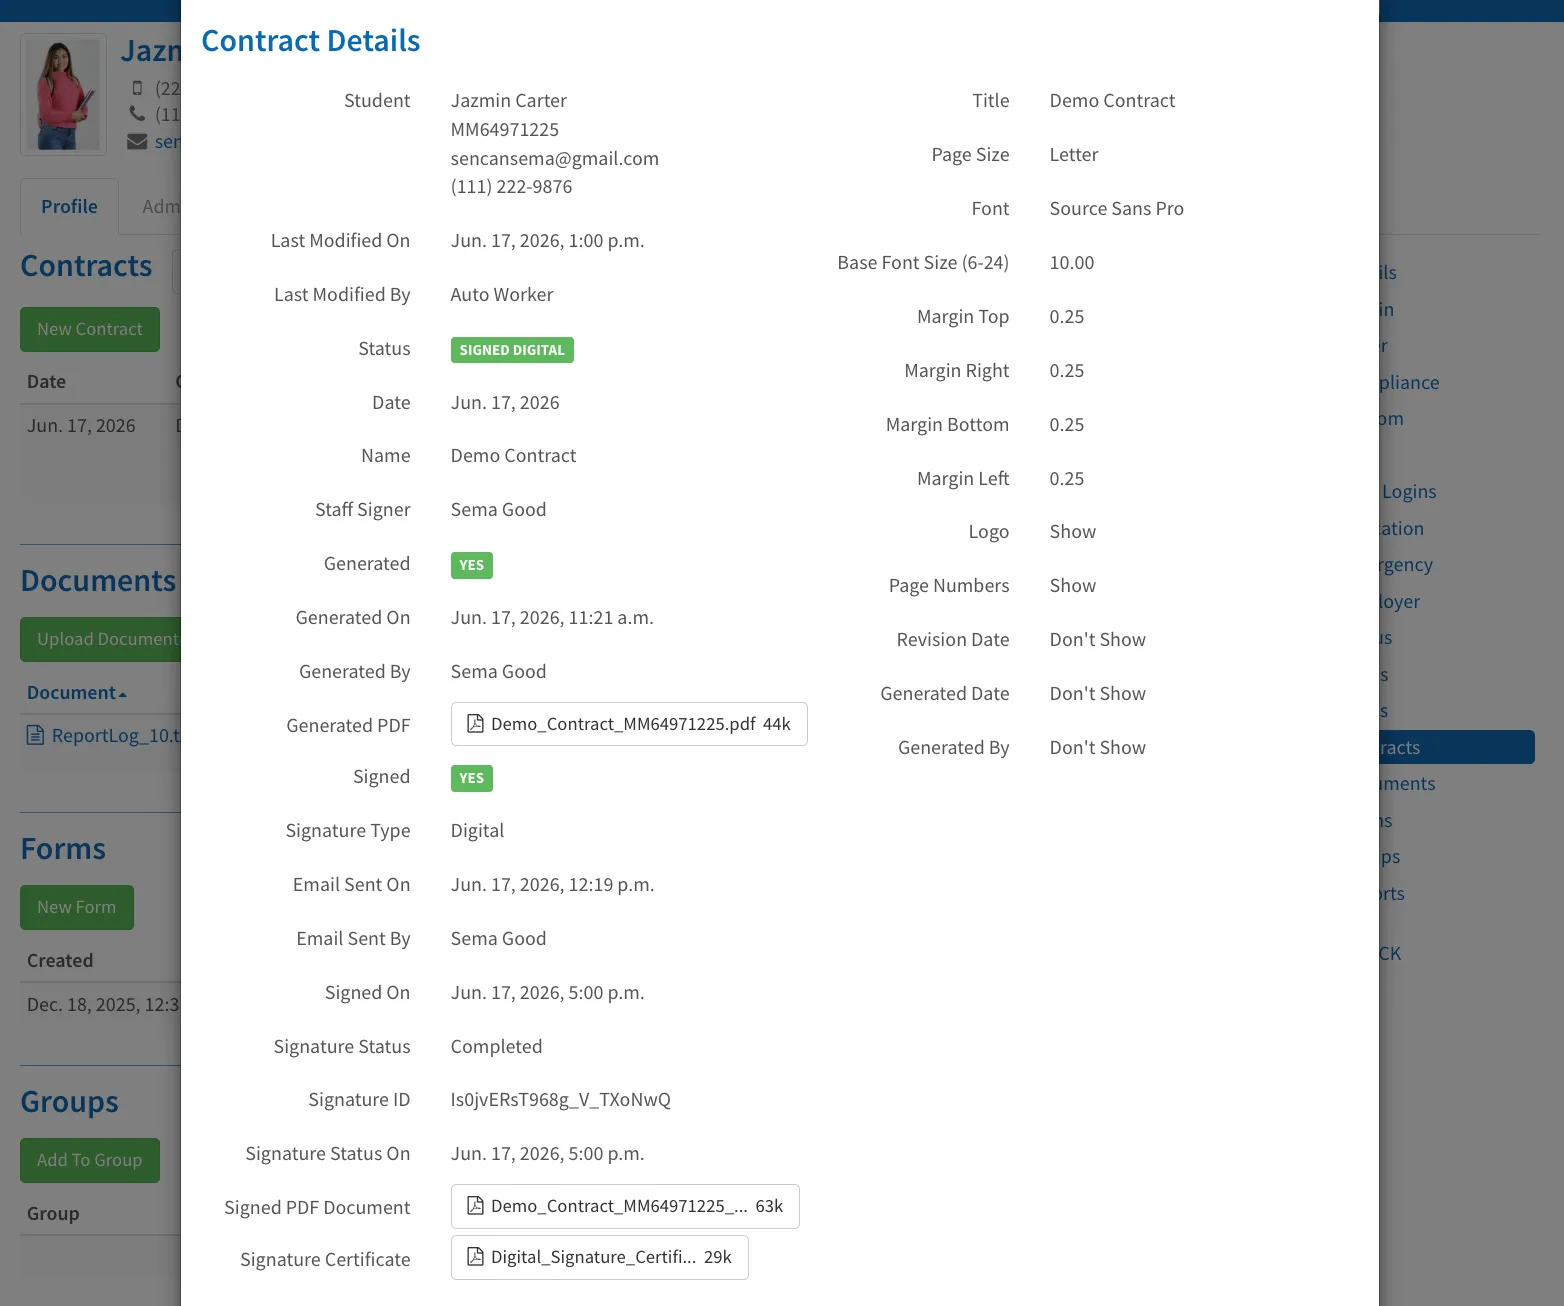
Contract Information
The Contract Information section displays key details about the contract, including its status, dates, owner, generated document, and signature settings.
Digital Signature Recipients
The Digital Signature Recipients section shows everyone involved in the signing process, their signing order, current status, and completion dates. This allows you to quickly identify who has signed and who is still awaiting action.

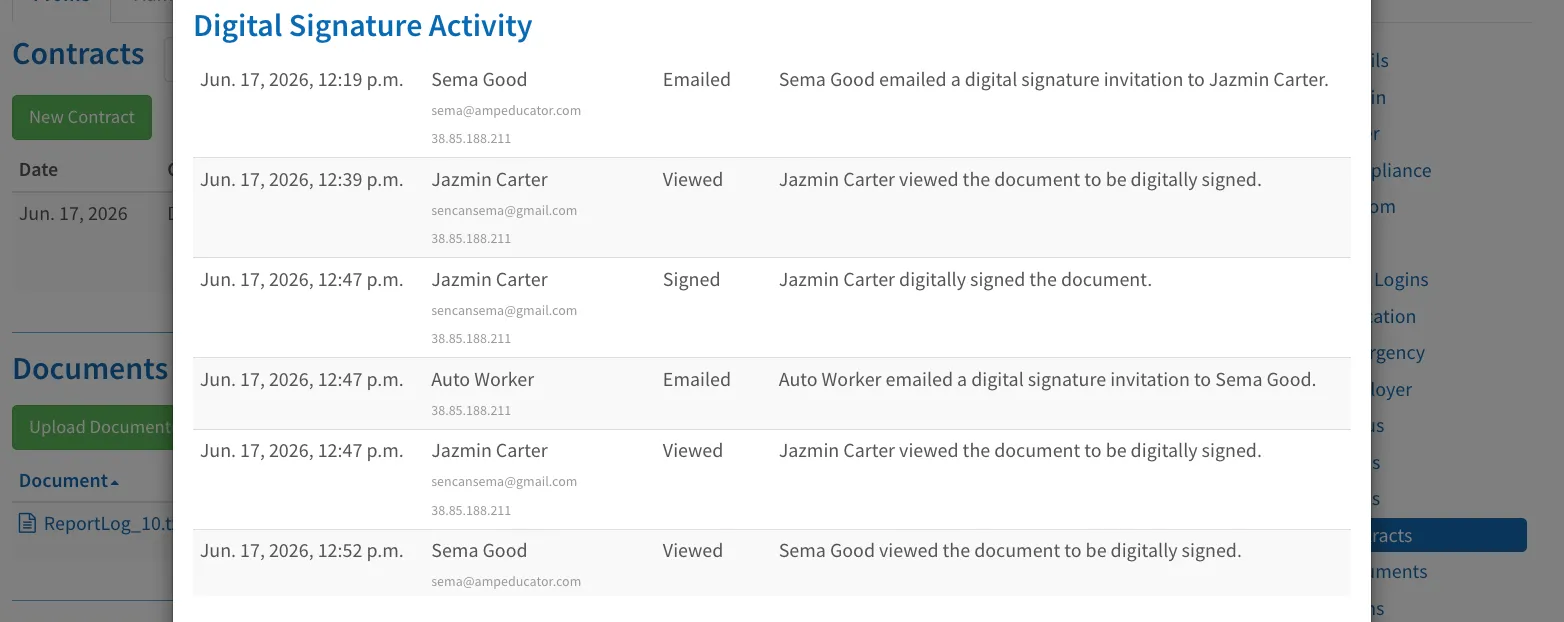
Digital Signature Activity
The Digital Signature Activity section provides a complete audit trail of the signing process. You can review when the signing request was created, when notifications were sent, and when recipients completed their signatures. This information is available throughout the entire signing process and can be used to monitor progress or troubleshoot signing issues.
Contract Preview
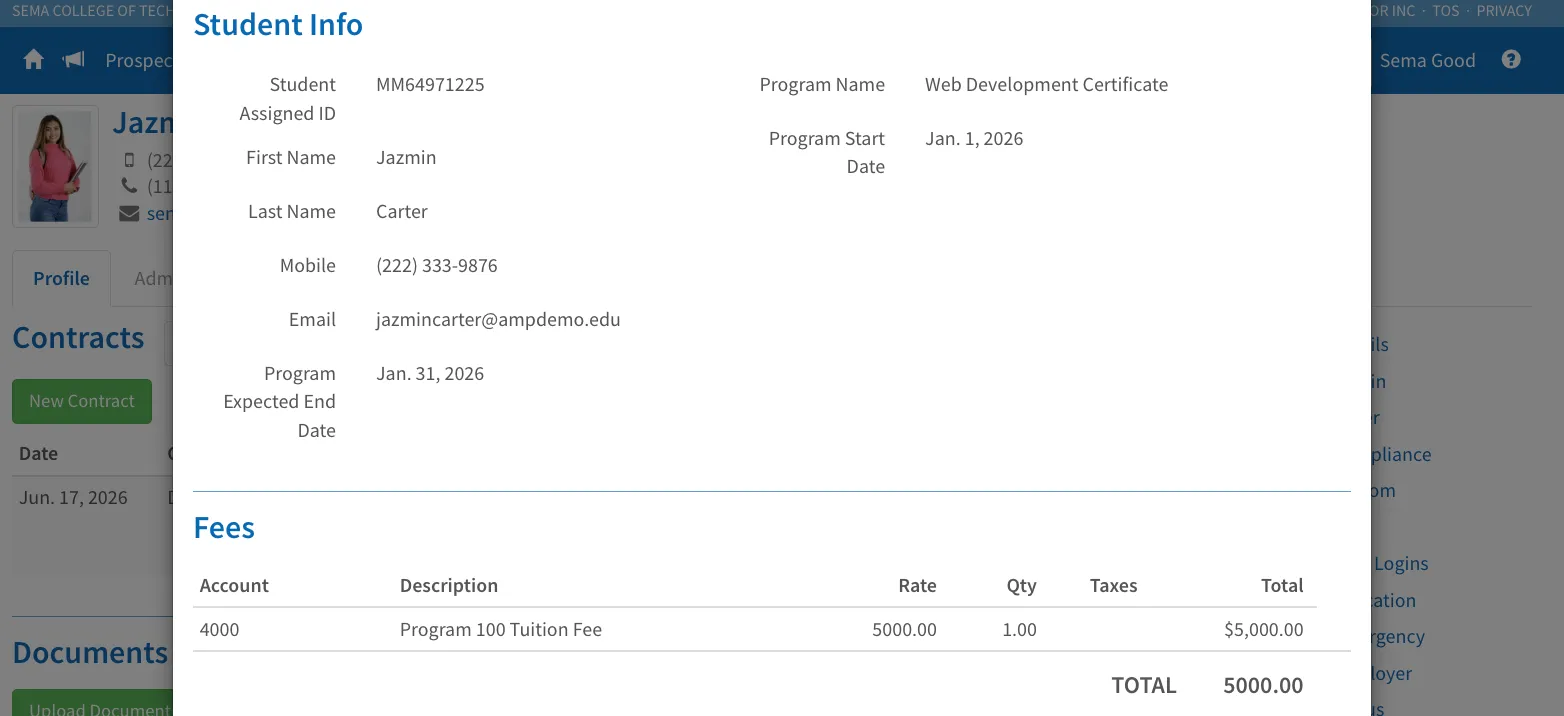
The lower portion of the page displays the generated contract itself, including student information, fees, payment plans, signatures, and any custom content included in the document.
Status Tracking
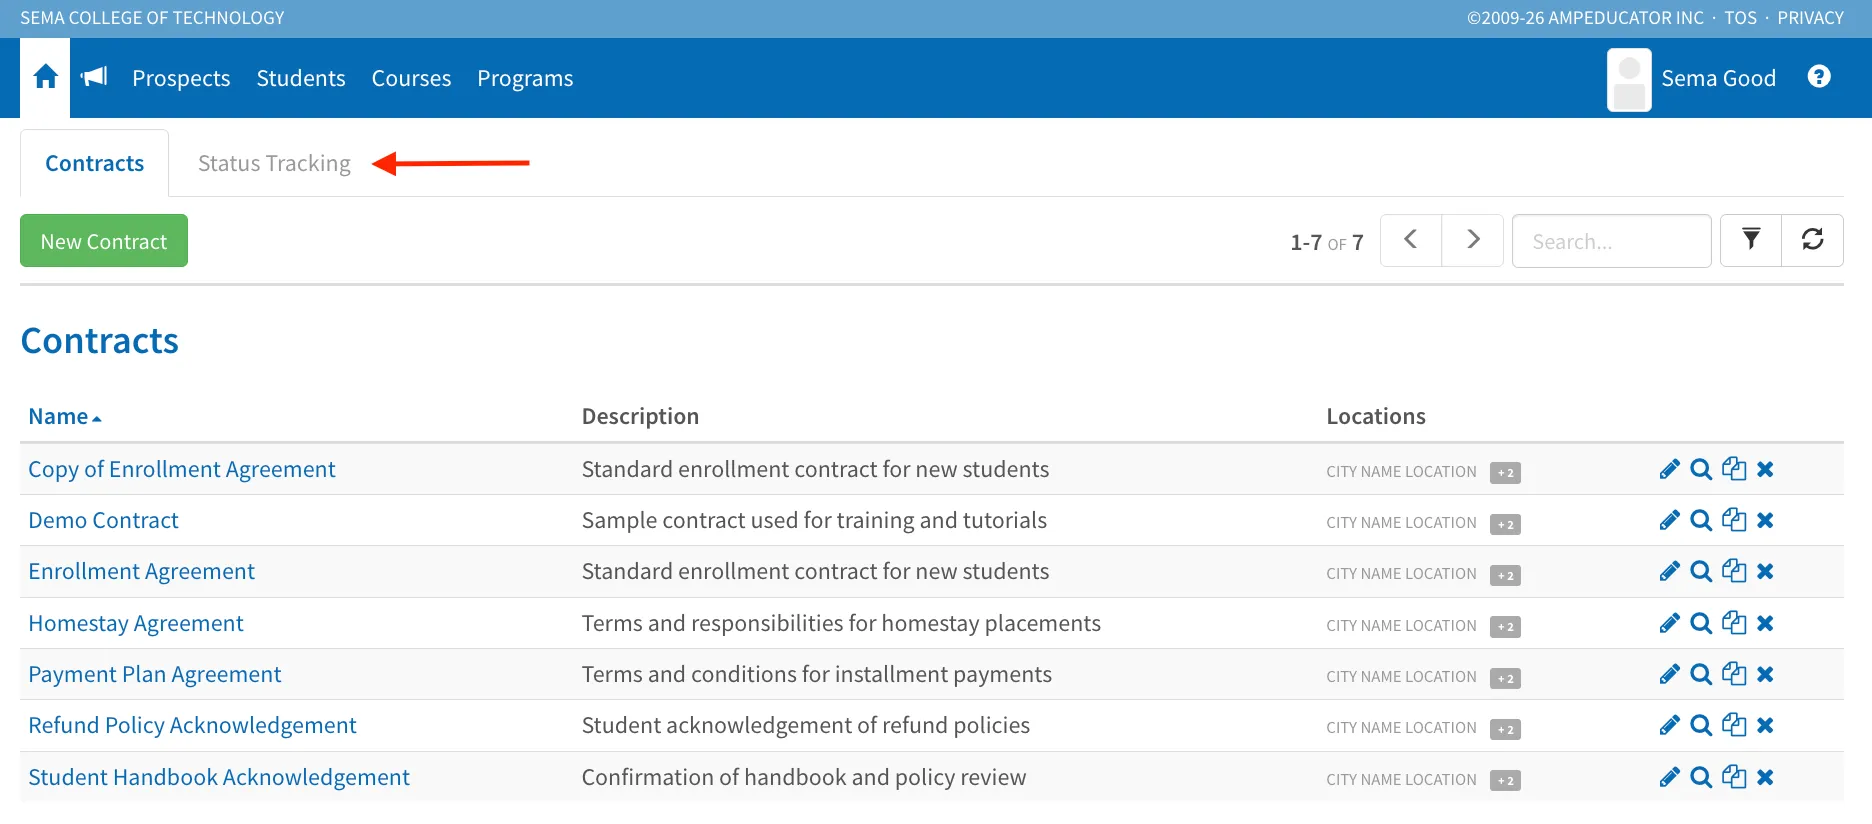
In addition to viewing contracts from an individual student's profile, ampEducator provides a centralized Status Tracking page where you can monitor every generated contract across your institution.
Navigate to Home → Contracts and select the Status Tracking tab.
The Status Tracking page displays all generated contracts in one place, making it easy to monitor progress, identify outstanding signature requests, and access generated documents whenever needed.
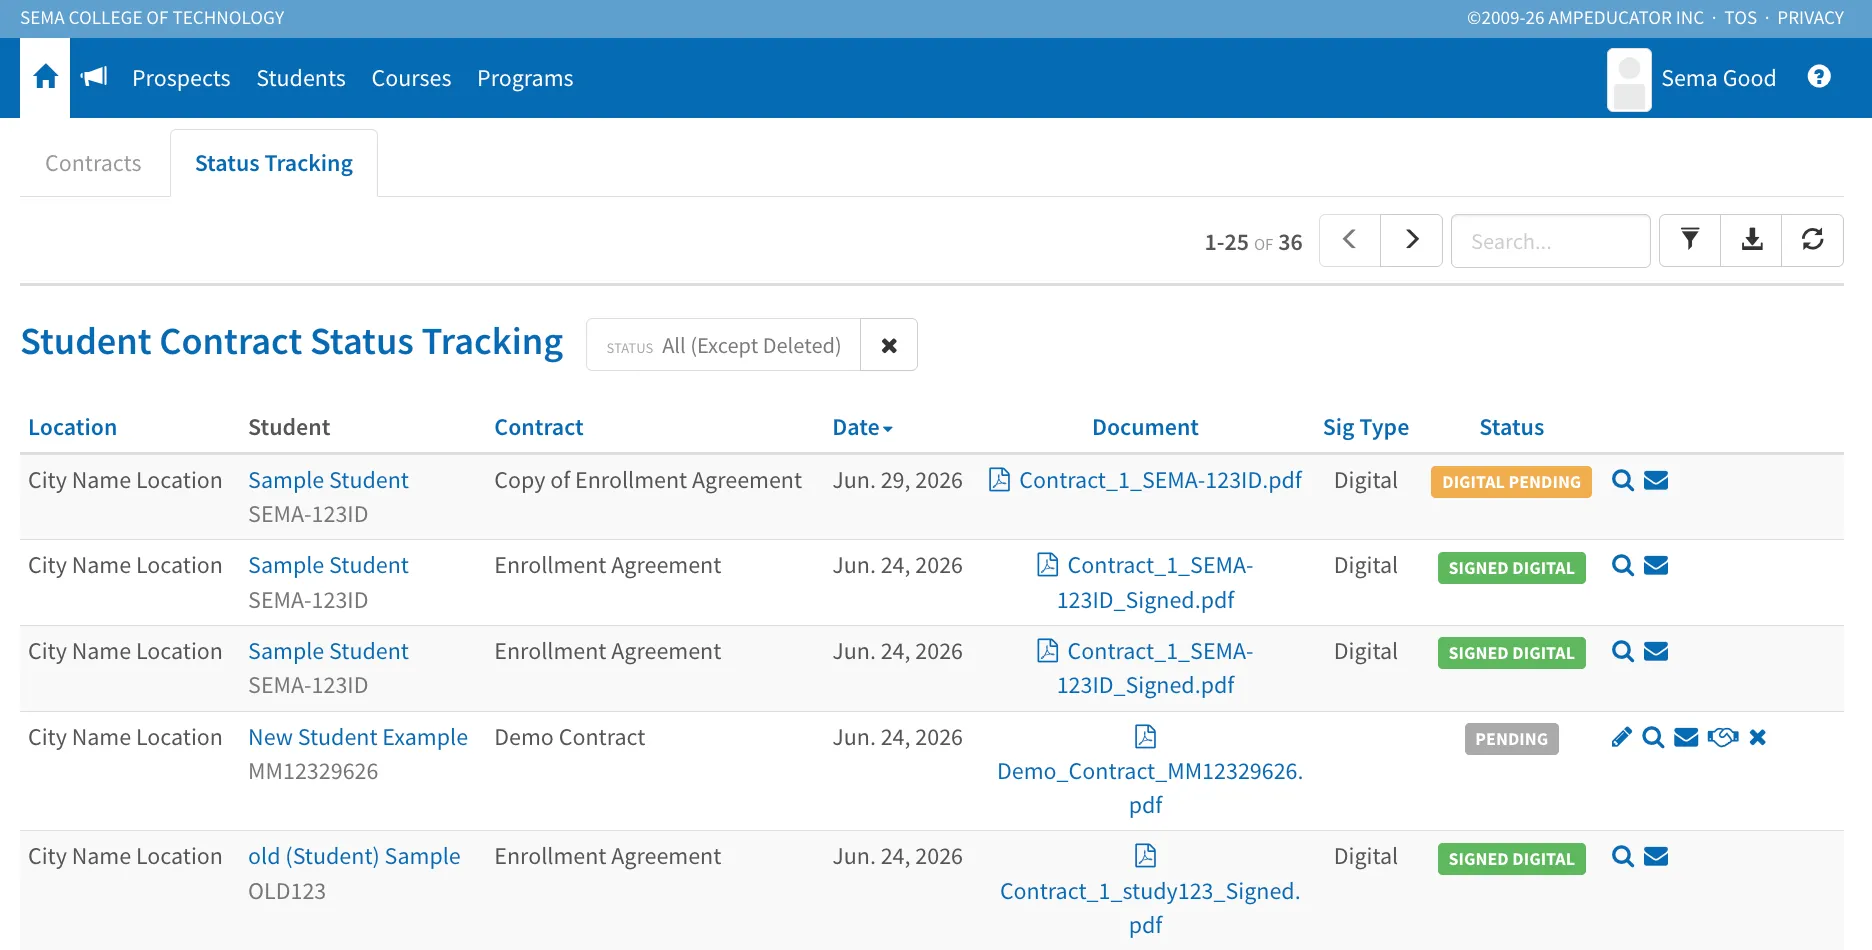
From this page, you can:
- View the generated contract.
- Review the current contract status, including Pending, Digital Pending, and Signed Digital.
- Open the signature activity and signing history.
- Resend contract emails or digital signature requests.
- Filter contracts by status to quickly locate contracts requiring attention.
The Status Tracking page provides a convenient, institution-wide view of your contract signing process, allowing staff to monitor contract completion without needing to open each student's profile.
Validating Completed Contracts (ampSign)
Every contract signed through ampSign includes a Digital Signature Certificate that provides a complete audit trail of the signing process.
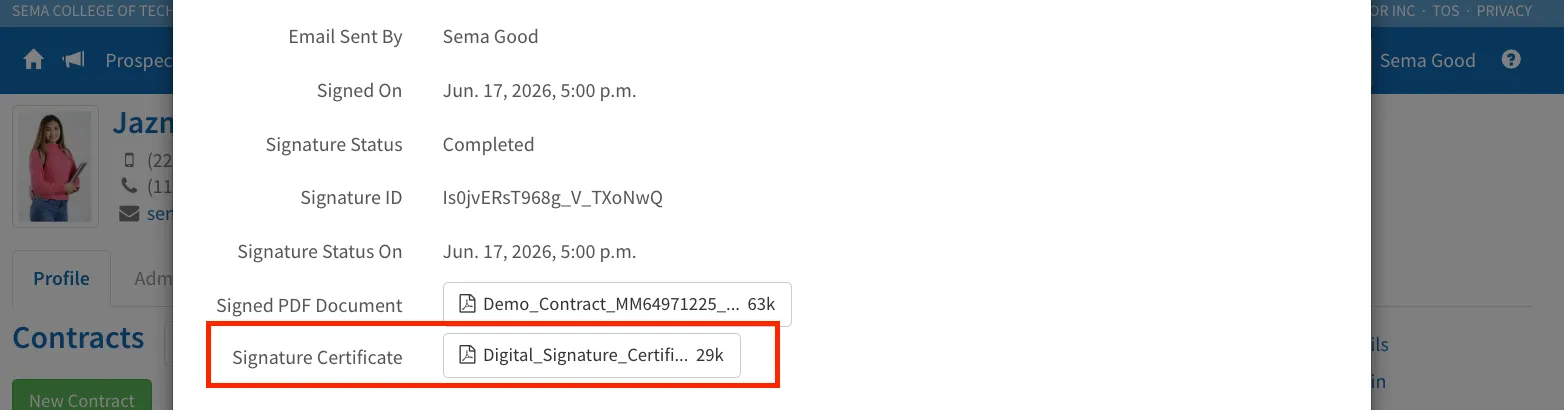
The certificate records all activity associated with the signing process, including recipient information, document views, signature completion dates, electronic signature consent, IP addresses, and a complete event history. This information can be used to verify the authenticity of a completed signature request and support institutional compliance requirements.
In addition to the audit trail, ampSign applies a digital signature directly to the completed PDF document. This protects the document from being modified after it has been signed.
When a completed contract is opened in a compatible PDF reader, such as Adobe Acrobat, the document's digital signature can be validated.
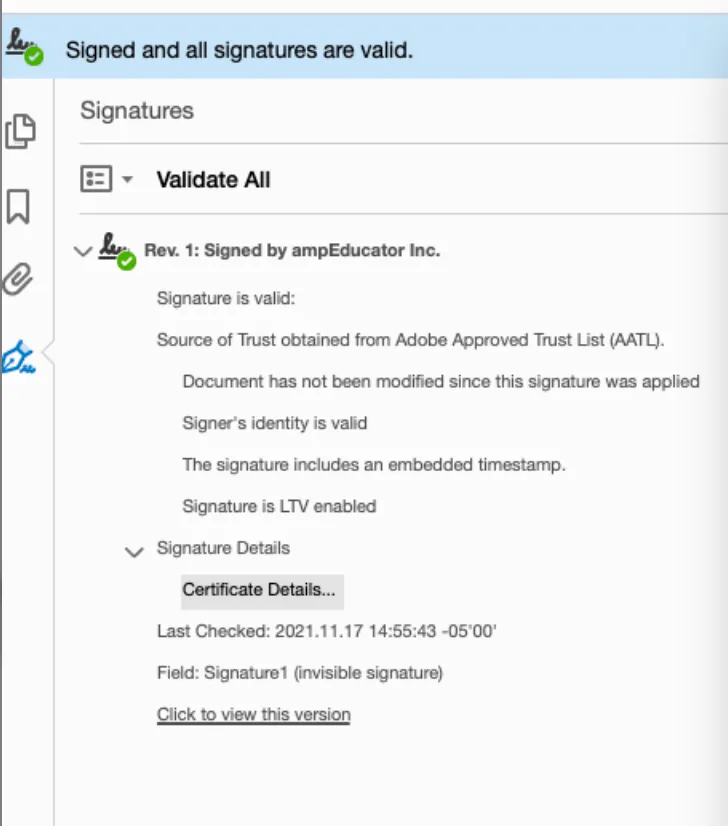
A valid document will display a confirmation indicator, such as a green checkmark, confirming that the document has not been altered since it was signed.
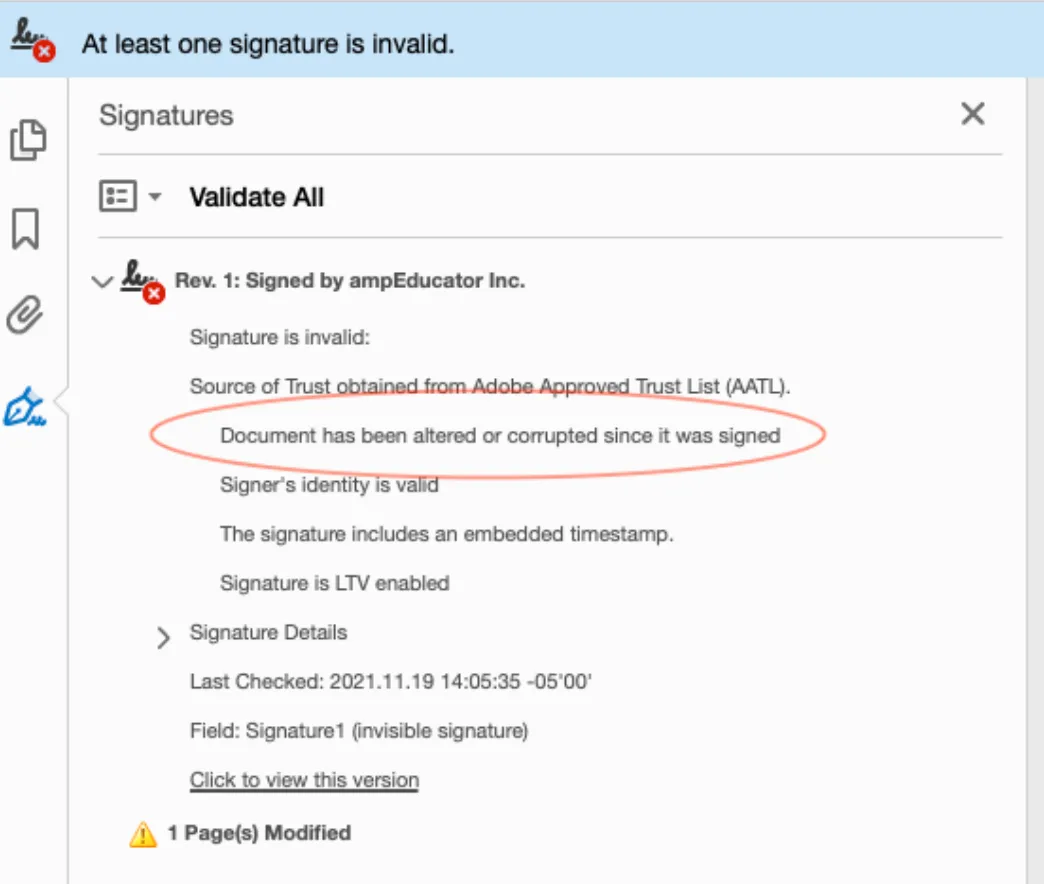
If changes are made to the document after signing, the digital signature becomes invalid and the PDF reader will display a warning indicating that the document's integrity can no longer be verified.
Summary
ampEducator's Contracts and Digital Signatures tools allow institutions to generate contracts, collect electronic signatures, track signing activity, and verify completed documents from a single workflow. All contracts remain attached to the student record, providing a secure and auditable history of the signing process.