Tests
Once you’ve created tests in ampEducator, you can easily integrate them into your courses through the LMS. This section allows you to customize settings such as enabling proctoring, determining student access, and defining grading options. By managing these configurations, you ensure that tests align with course requirements and maintain integrity throughout the assessment process.
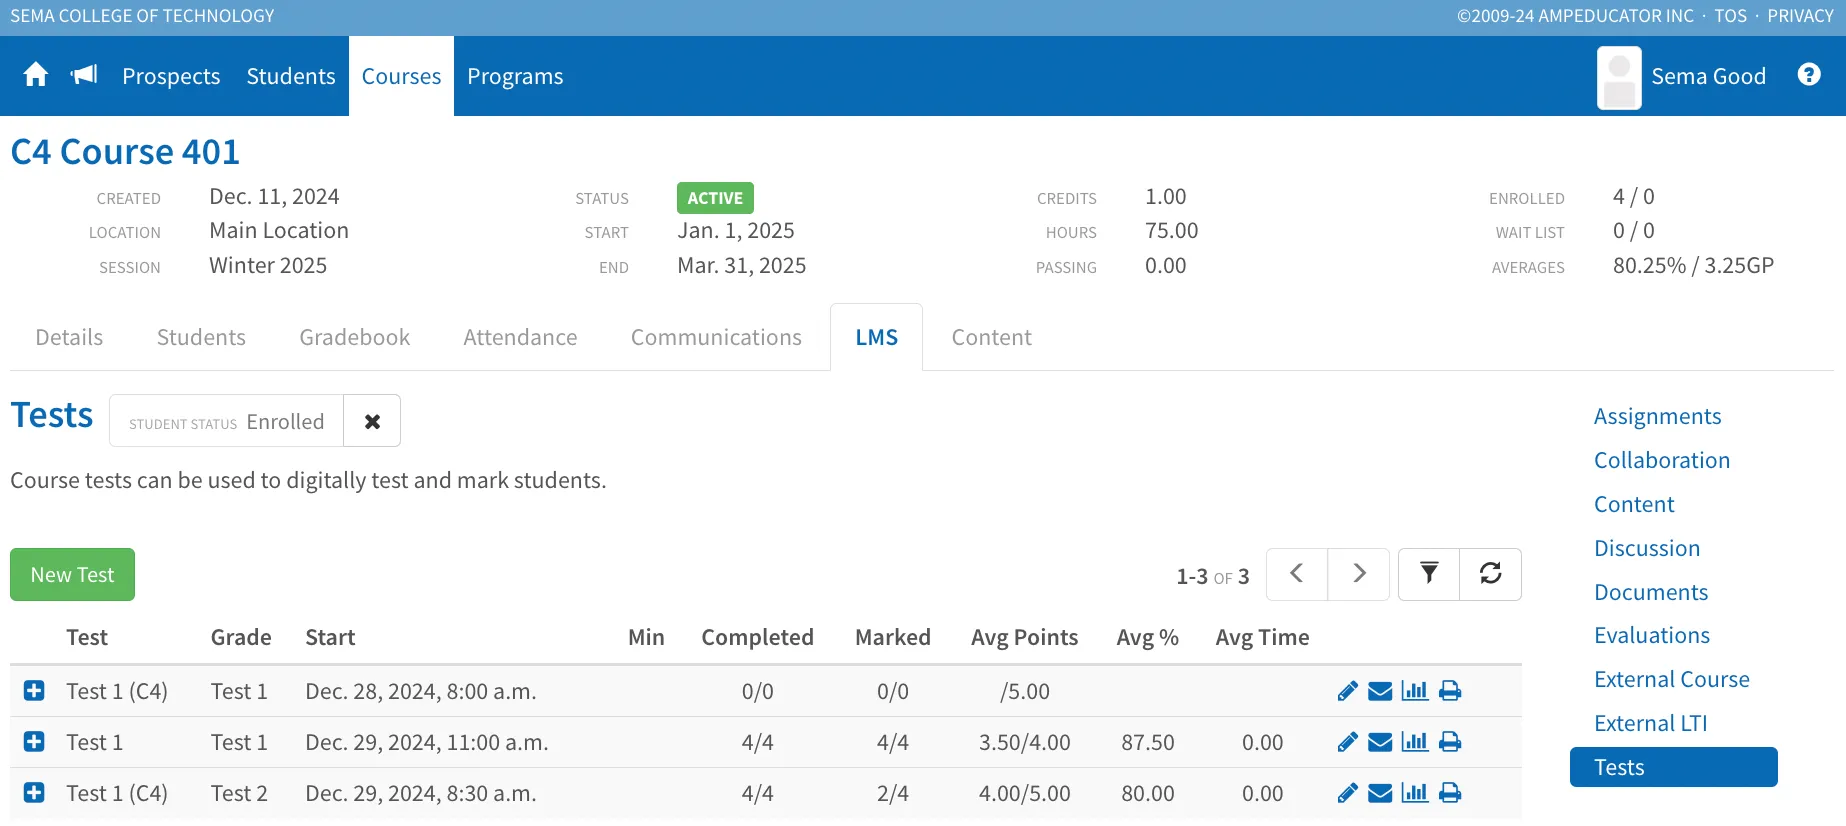
Creating New Tests
Tests in the LMS are assessments that can be added to courses to evaluate student knowledge and track progress. Before adding a test to a course, you must first create by navigating to Home / Tests where you can access the test bank. Once created, you can choose from various test settings, options, and configurations when integrating it into a course.
For detailed instructions on creating tests, please refer to Tests in the Home section of the guide.
Adding Tests to Courses
To add a test to a course, go to the Grading Schema of the course and select New Course Grade. From there, you can link a previously created test and configure it based on your preferences.
- Customizable Test Settings: Once added, you can adjust several key settings, including the grade type (percentage, letter grade, pass/fail, etc.), weight, and passing mark. These settings ensure the test integrates seamlessly with the course’s grading structure.
- Advanced Test Options: You can also configure options such as start and end times, time limits, and question randomization to customize the student experience. Additionally, enable auto-marking to streamline grading and determine the student view options to control how and when students access their results.
- Proctering and Security: For added security, you can enable student verification and apply screen/video capture proctoring to ensure test integrity and prevent cheating.
- Finalizing the Test: Once you have configured all the necessary settings, click Add to add the test to the course. The test will now be listed in the Grading Schema and available to students in the Student Portal when assigned.
Video Walkthrough: Adding Tests to Courses
Test Proctoring and Security
ampEducator offers test proctoring features to help ensure the integrity of online exams.
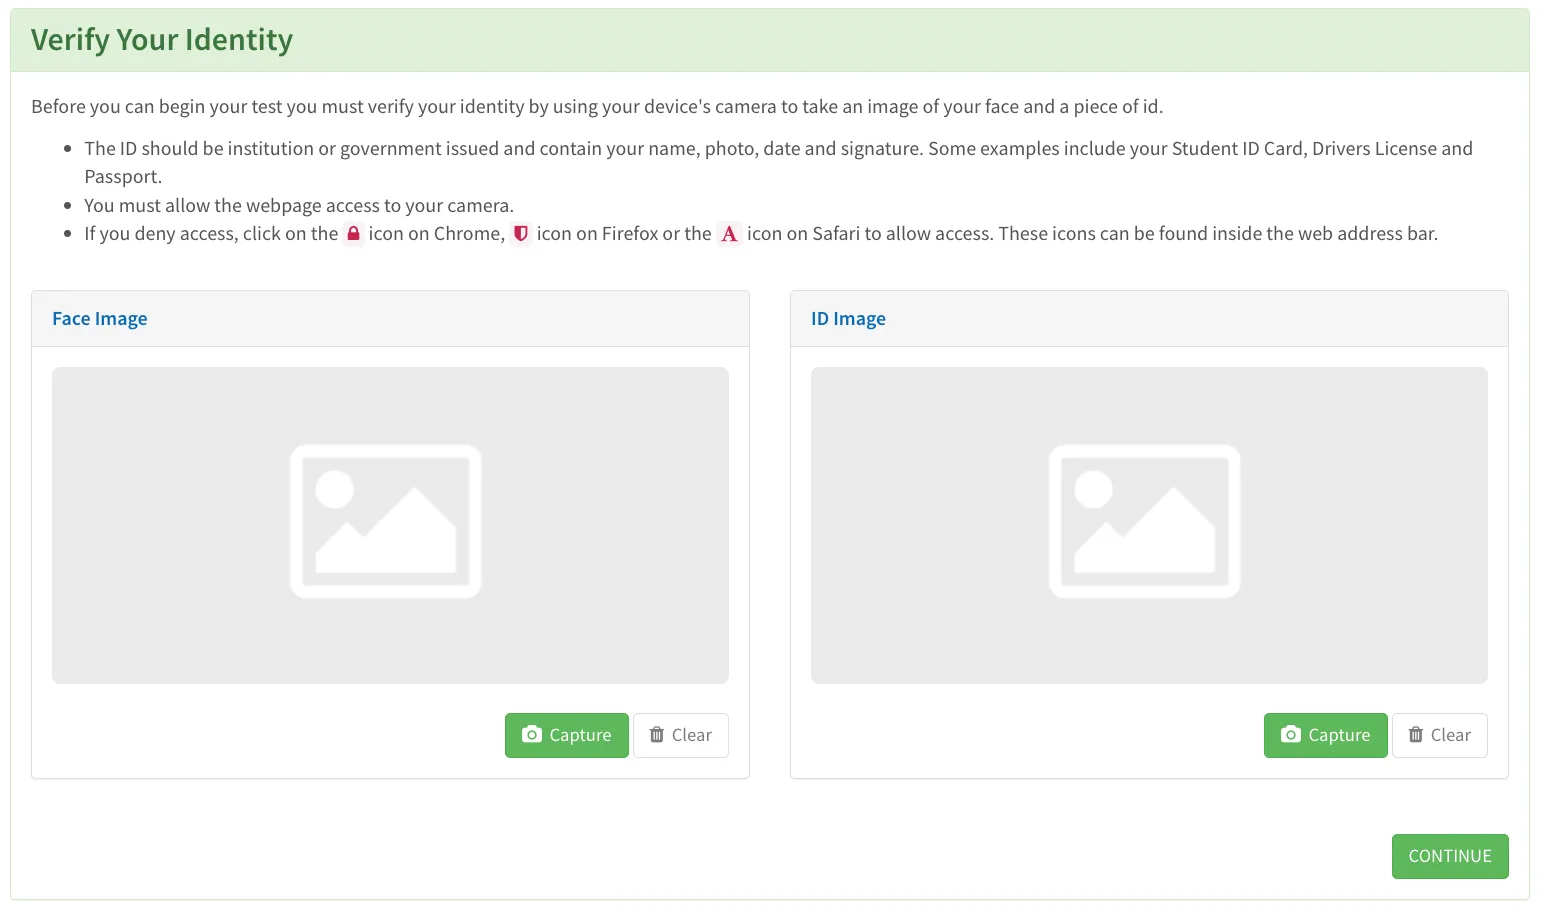
Built-In Proctoring System
The built-in system is easy to use and only requires enabling it when assigning a test to a course. It offers several security features:
- Verify Student: When enabled, students are required to use their webcam to capture a photo of themselves and their ID, ensuring their identity.
- Security Level: This feature tracks and logs when a student navigates away from the test, such as opening another tab or application. You can configure it to either warn the student with a message or end the test automatically if they leave the browser.
- Screen Capture: You can set up the system to capture the student's screen either randomly or whenever they move away from the test window.
- Video Capture: Similarly, you can choose to capture the student's webcam either randomly or in response to anomalies such as no face detected or multiple faces appearing.
Reviewing Security Events
Once the test is completed, you can review the proctoring data by clicking on the security icon. This will show a log of all security events, including screen captures, video captures, and any time the student moved away from the test, providing full visibility into the test-taking process.
External Proctoring Systems
For more advanced proctoring, ampEducator integrates with external proctoring services such as Smarter Services and MS Secure Assessment. These third-party services provide additional security for high-stakes testing, recording the entire test session and offering sophisticated analysis to detect any suspicious activity.
For more information on test proctoring and how to set up additional proctoring features, feel free to reach out to our support team at [email protected].
Grading Tests
In ampEducator, instructors can easily manage and grade tests directly from the Gradebook within the course.
- Automatically Graded Tests: For tests that include automatically graded questions, such as multiple-choice, the system will automatically update the grades based on the student's responses once they submit their test. This ensures efficiency and accuracy without needing manual input for these question types.
- Manually Graded Tests: For tests with open-ended questions or other types that require instructor input, instructors can easily enter grades. Simply select the test from the Gradebook and manually enter the student's score for each section or question.
- Override and Adjust Grades: If needed, instructors can override grades or make adjustments for individual students. Whether it's due to special circumstances, additional feedback, or other considerations, this flexibility allows instructors to ensure fair grading.
By using these features, instructors can effectively manage and grade tests, ensuring accuracy and fairness throughout the grading process.
Video Walkthrough: Grading Tests
Managing Individual Tests
In Courses / LMS / Tests, each test includes a set of quick action icons on the right-hand side. These allow you to manage the test without navigating away from the course.
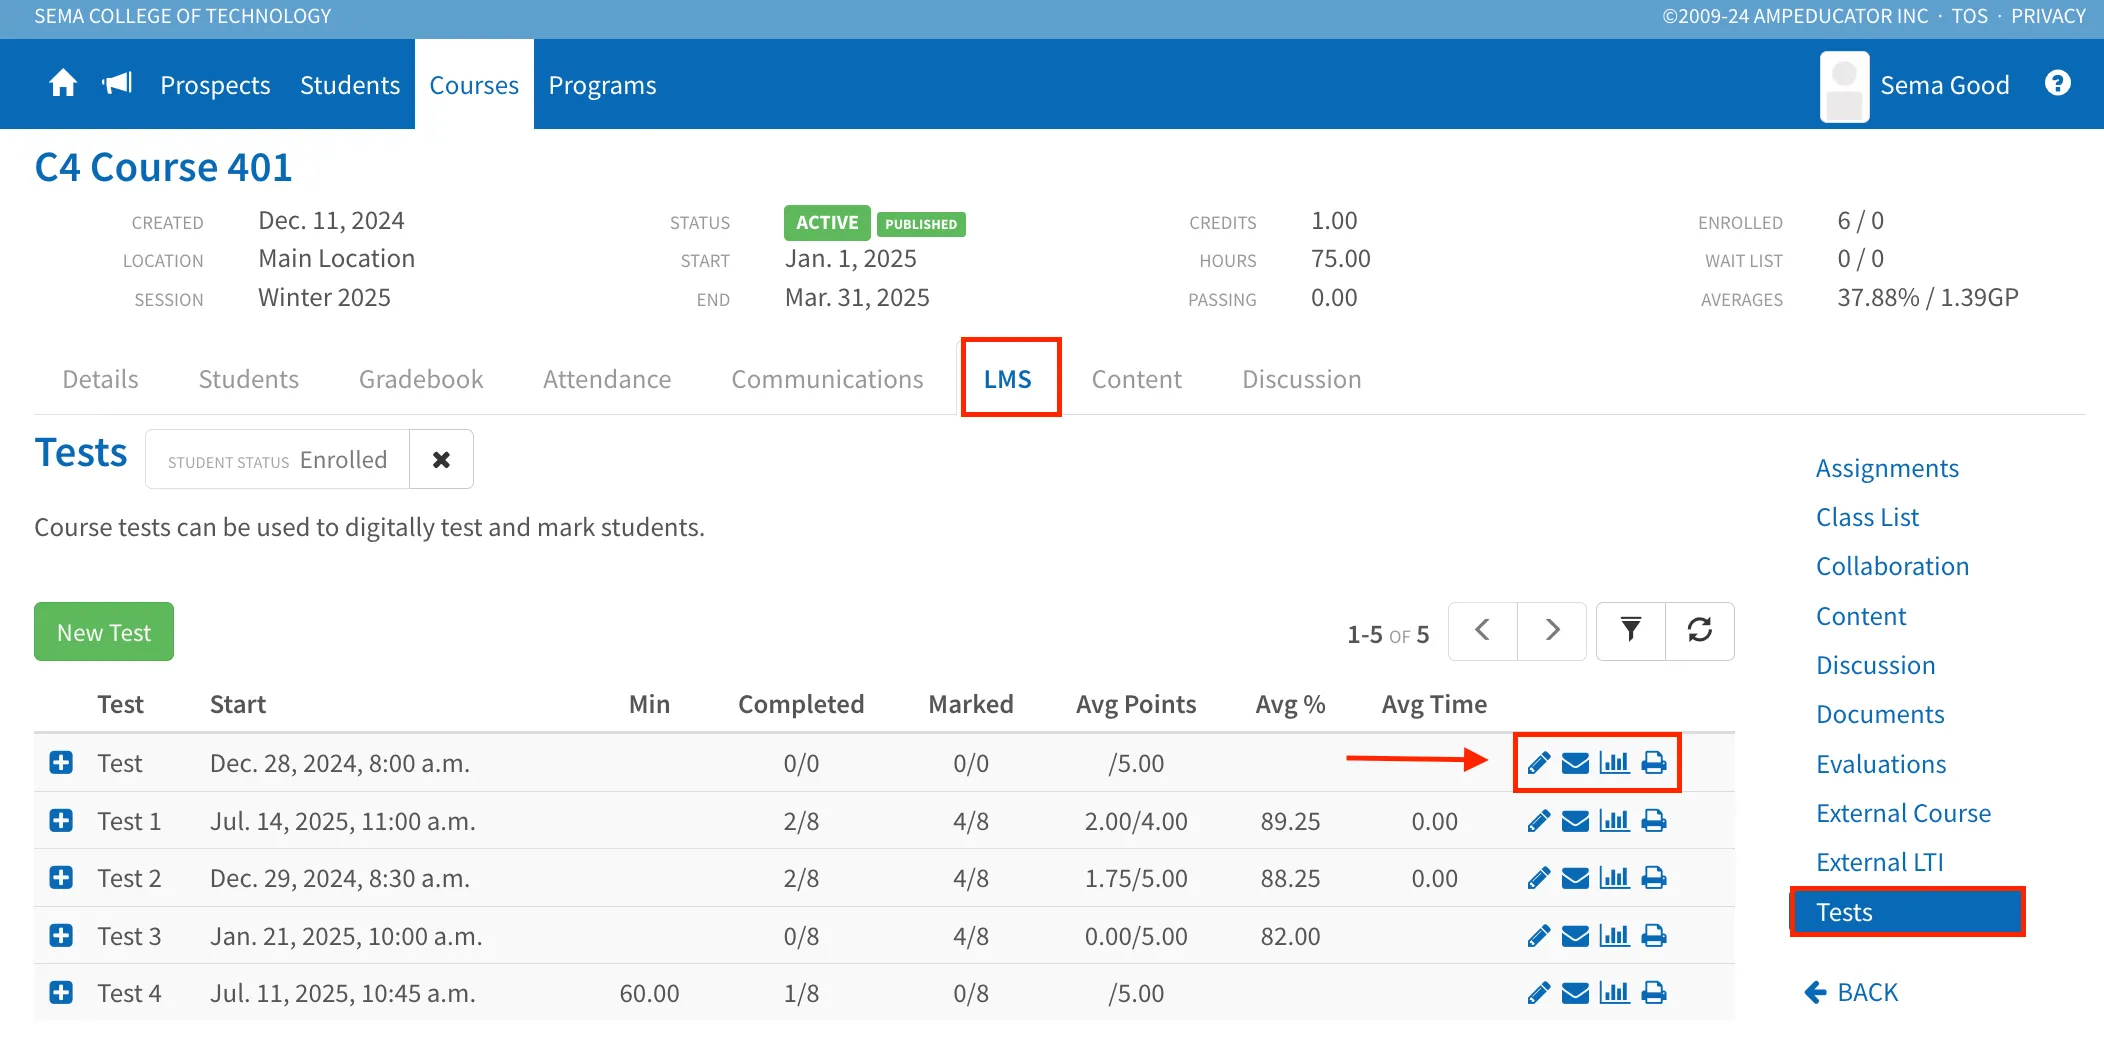
Edit Test
Click the Edit Test icon to update the test settings for the course. You can change scheduling, enable time limits, apply proctoring options, randomize questions, set grading preferences, and choose when students can view results. These settings control how the test behaves within the course environment.
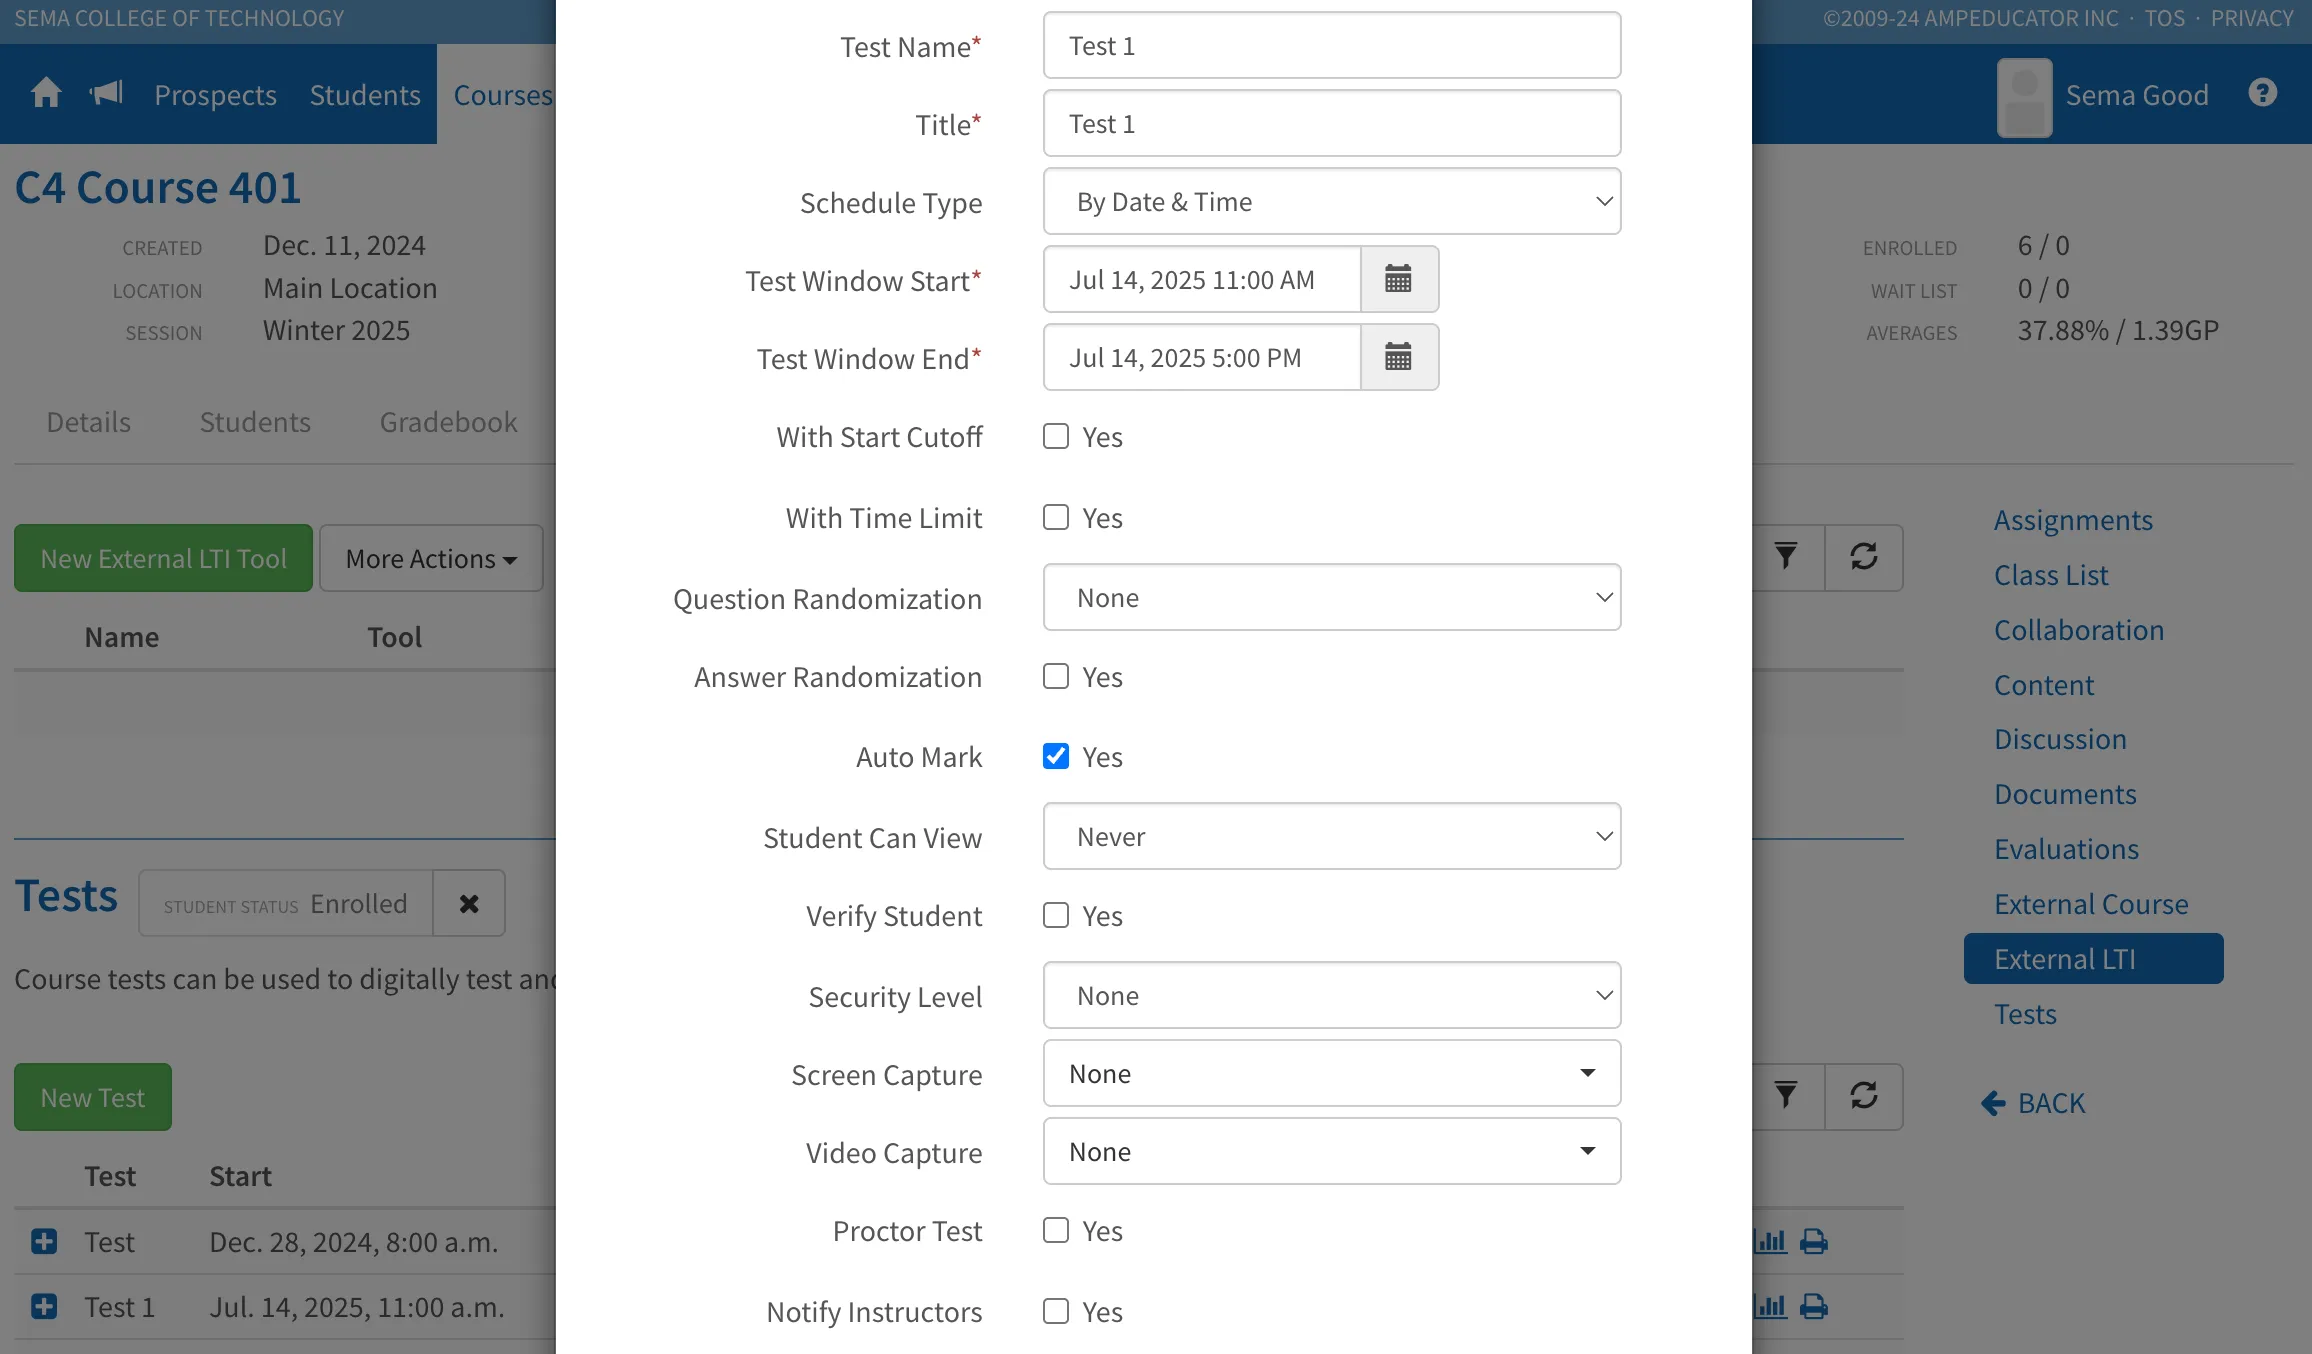
Note: To make changes to the actual test content—such as editing questions—you must go to Home / Tests and edit it from the test bank.
Email Test Links
Click the Email Test Links icon to open a simple form where you can send students a direct link to the test.
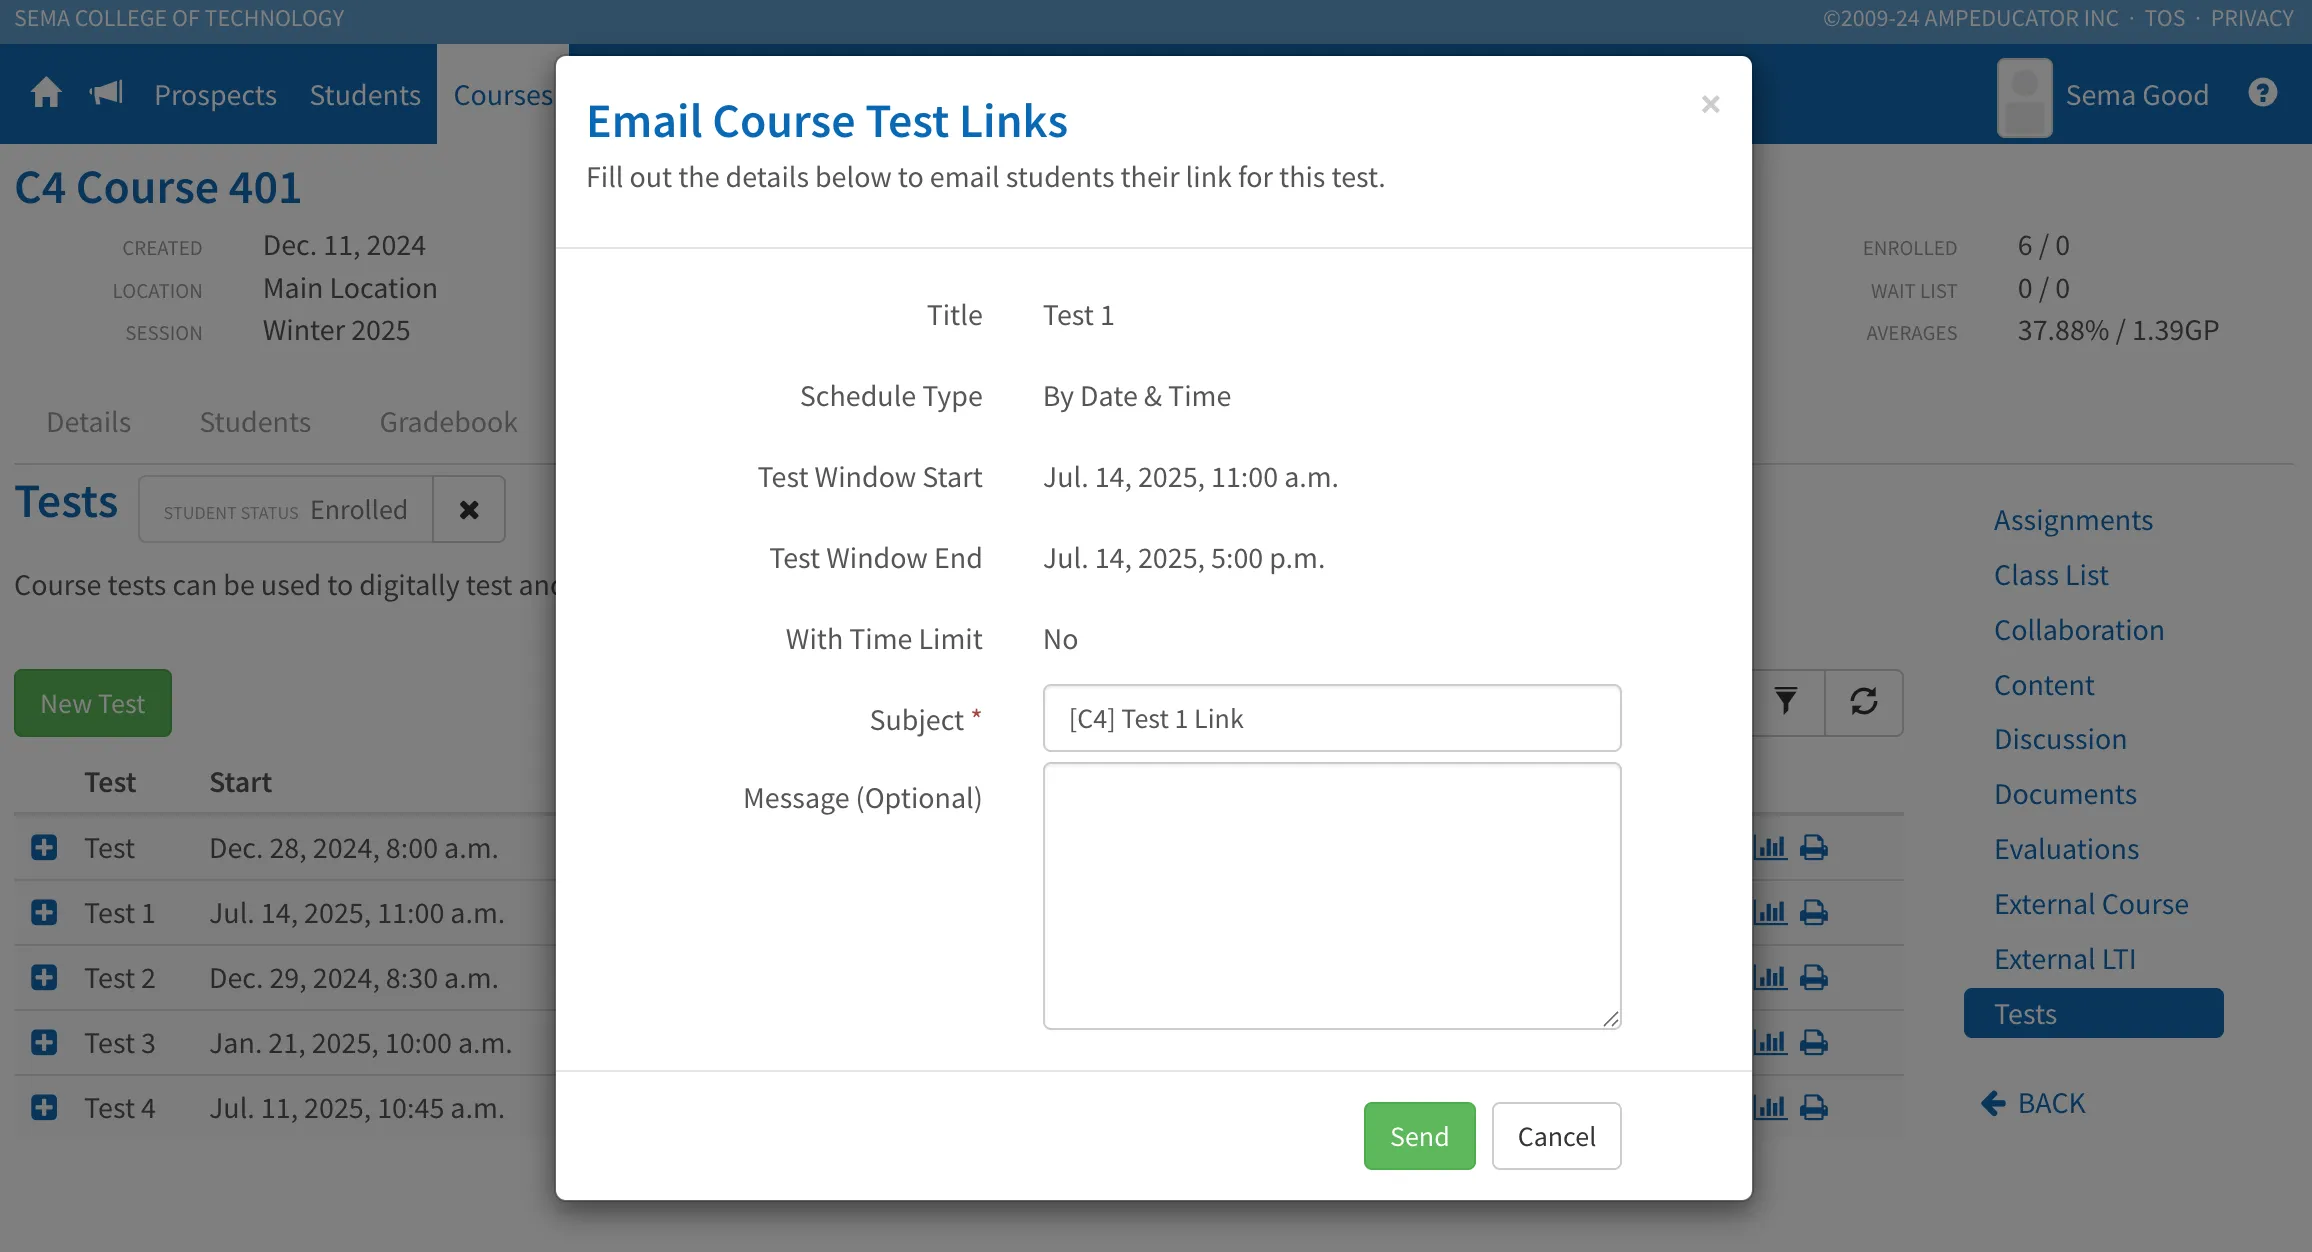
The form will display key details such as the test title, schedule type, and test window. You can customize the email subject and include an optional message before clicking Send. All enrolled students will receive the message along with their personalized test link.
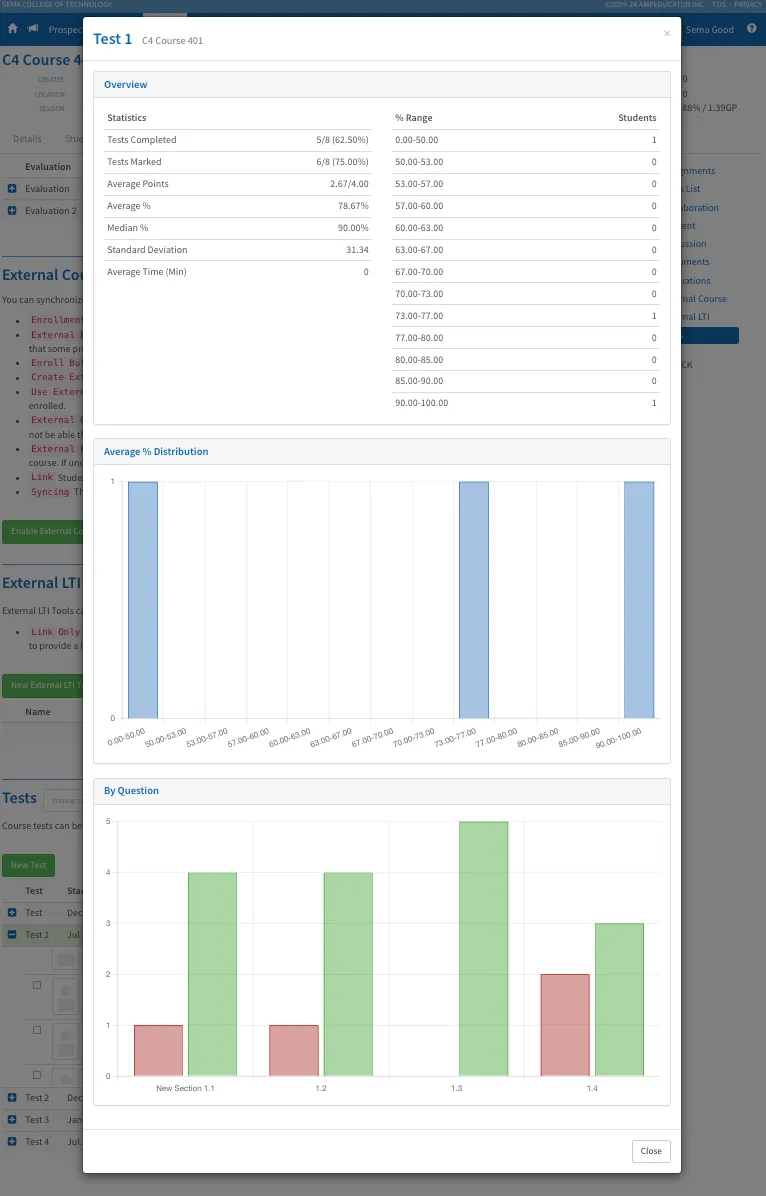
View Statistics
Click the View Statistics icon to open a snapshot of test performance. This view shows you the average score, number of completions, marking status, and distribution of student results.
Print Test
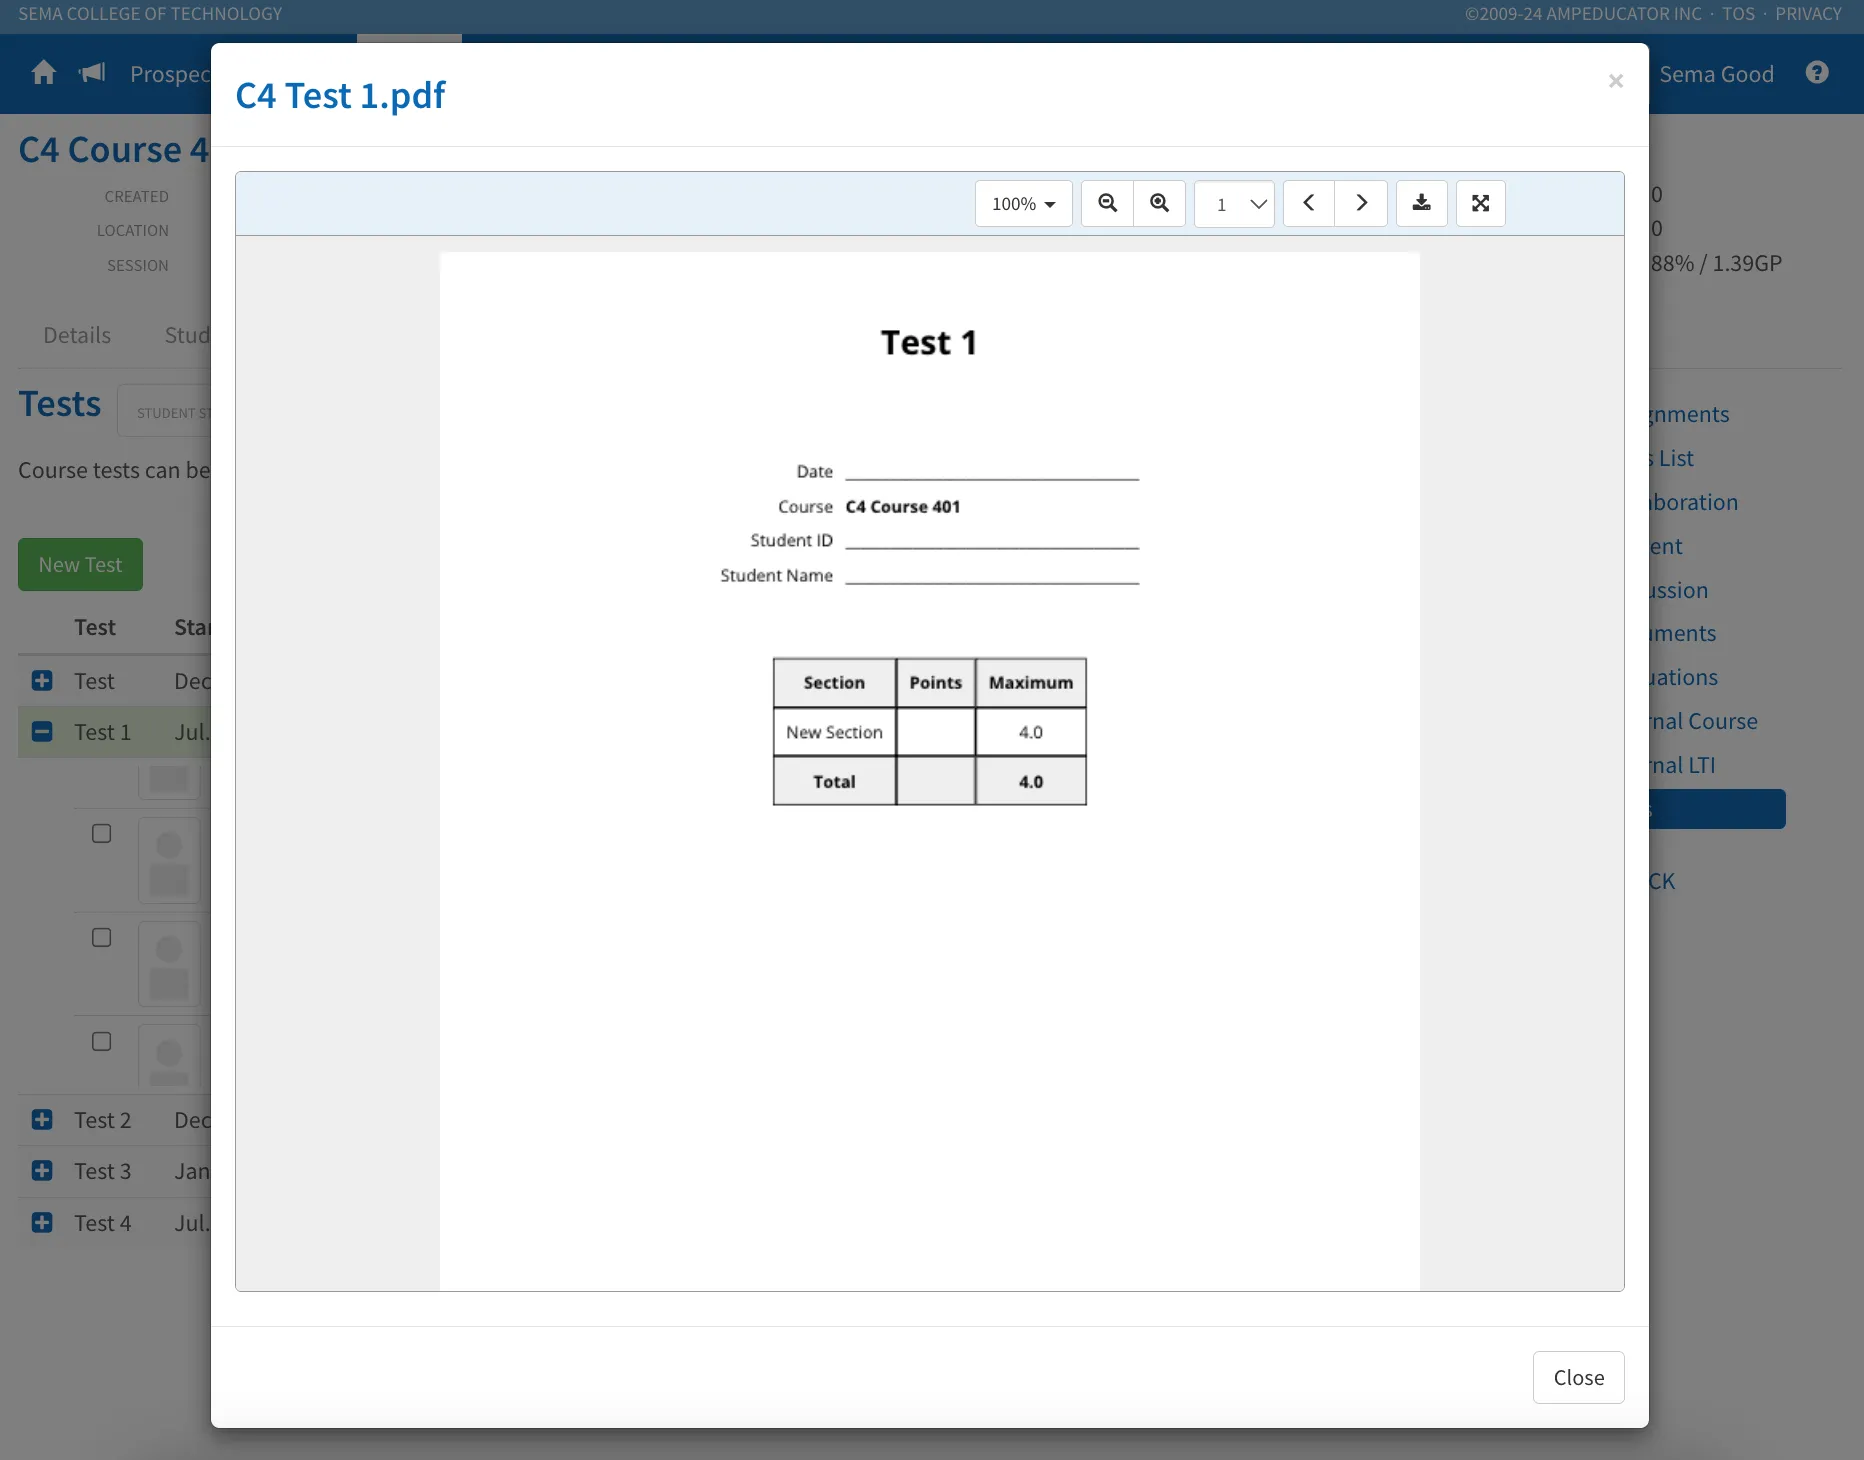
Click the print icon to open a printable version of the test in a modal window. From here, you can review the content and download it as a PDF or send it to your printer. This is helpful if you need a hard copy for records, manual grading, or offline review.
Viewing Student Test Activity
To see how individual students have interacted with a test, click the expansion icon (+) next to a test name in Courses / LMS / Tests.
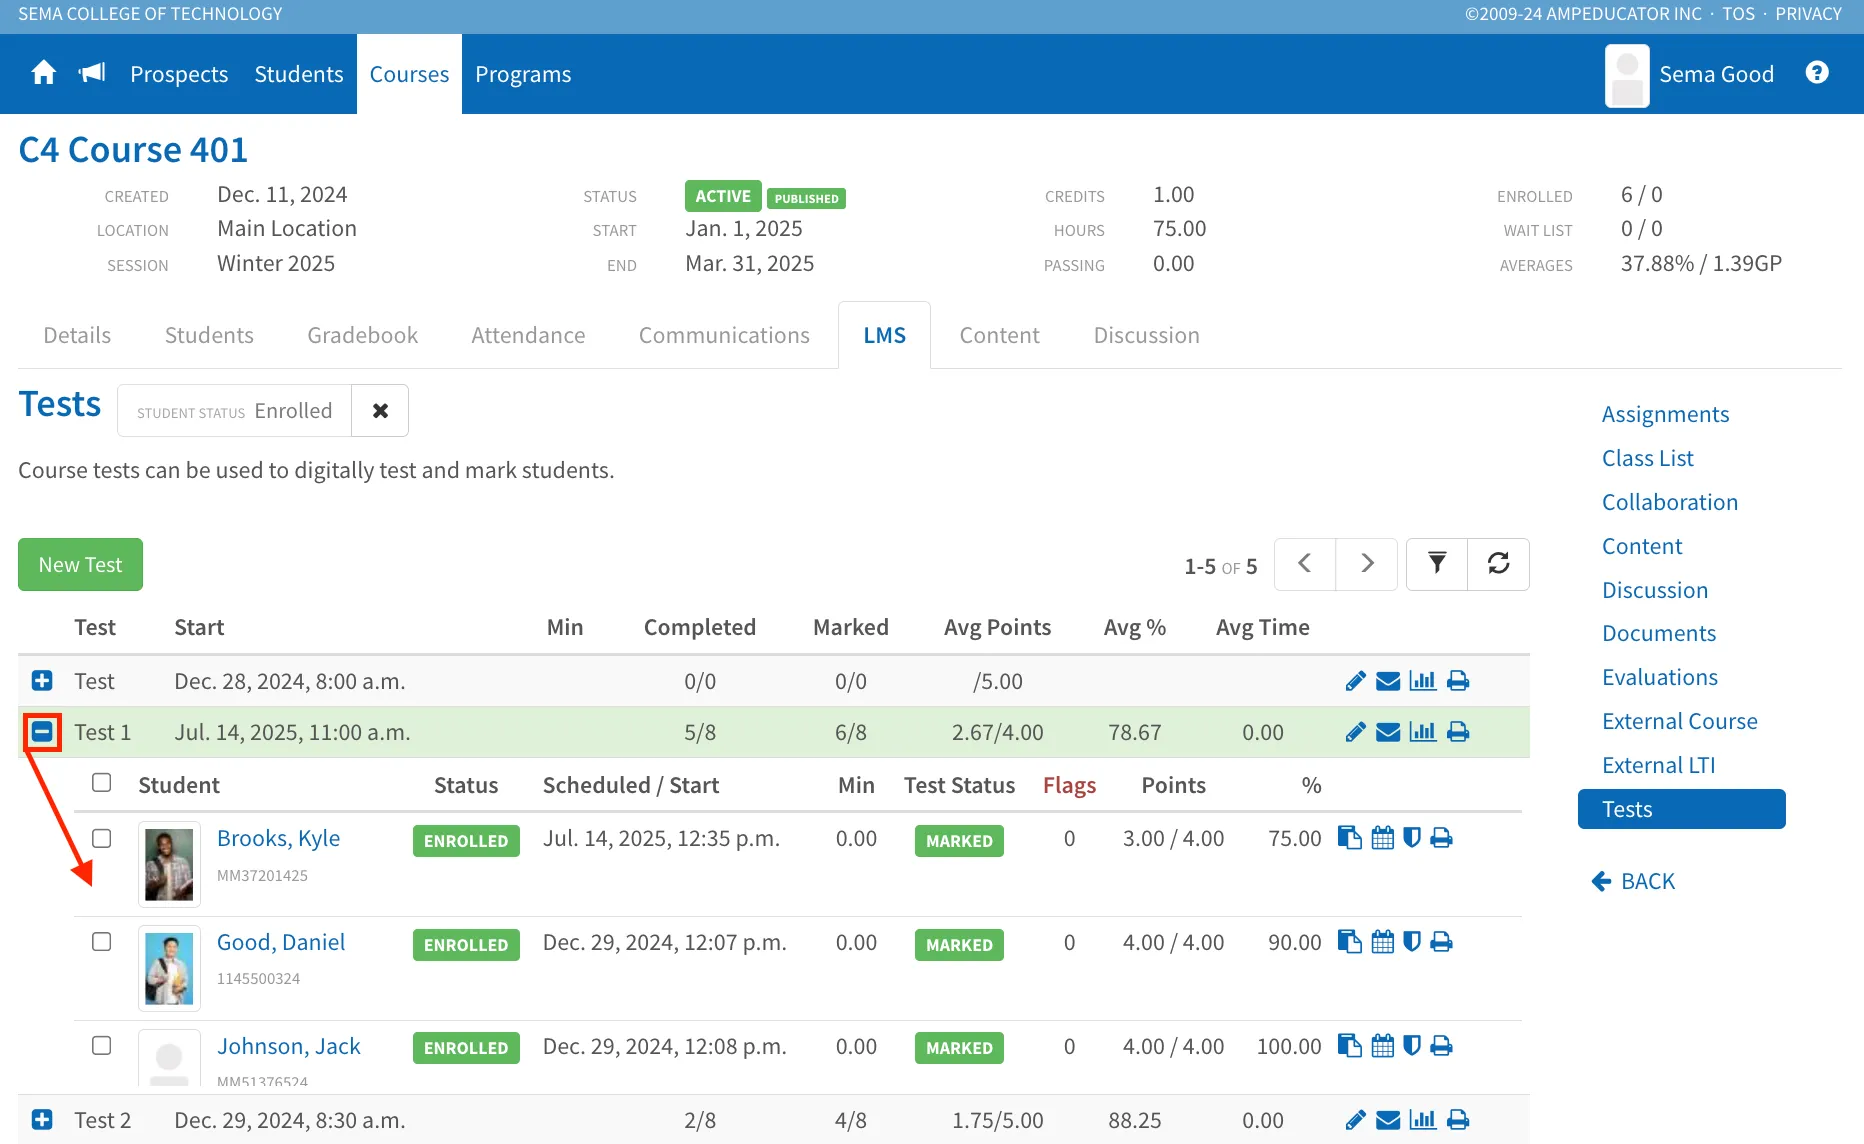
This will expand the view to show each enrolled student’s test status, start time, score, percentage, and any flags if proctoring was enabled. You’ll also see a row of quick action icons beside each student, allowing you to manage test activity on a case-by-case basis.
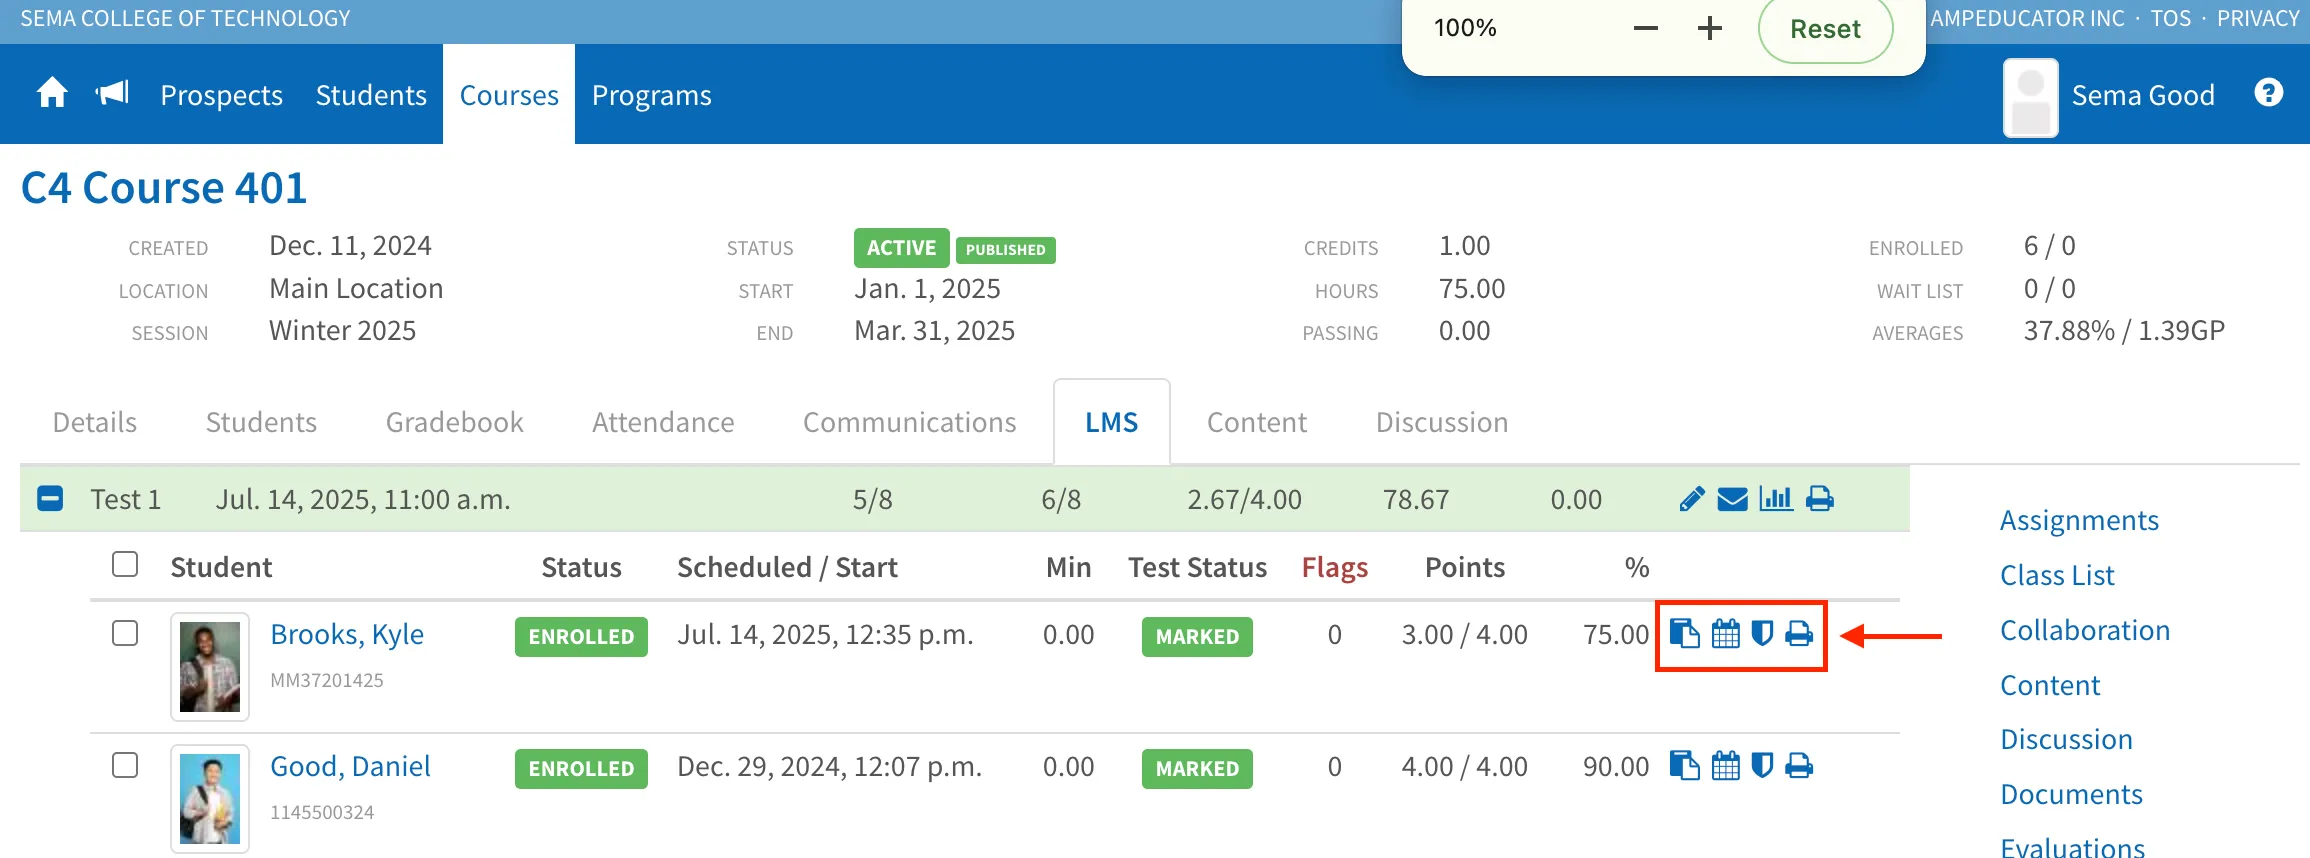
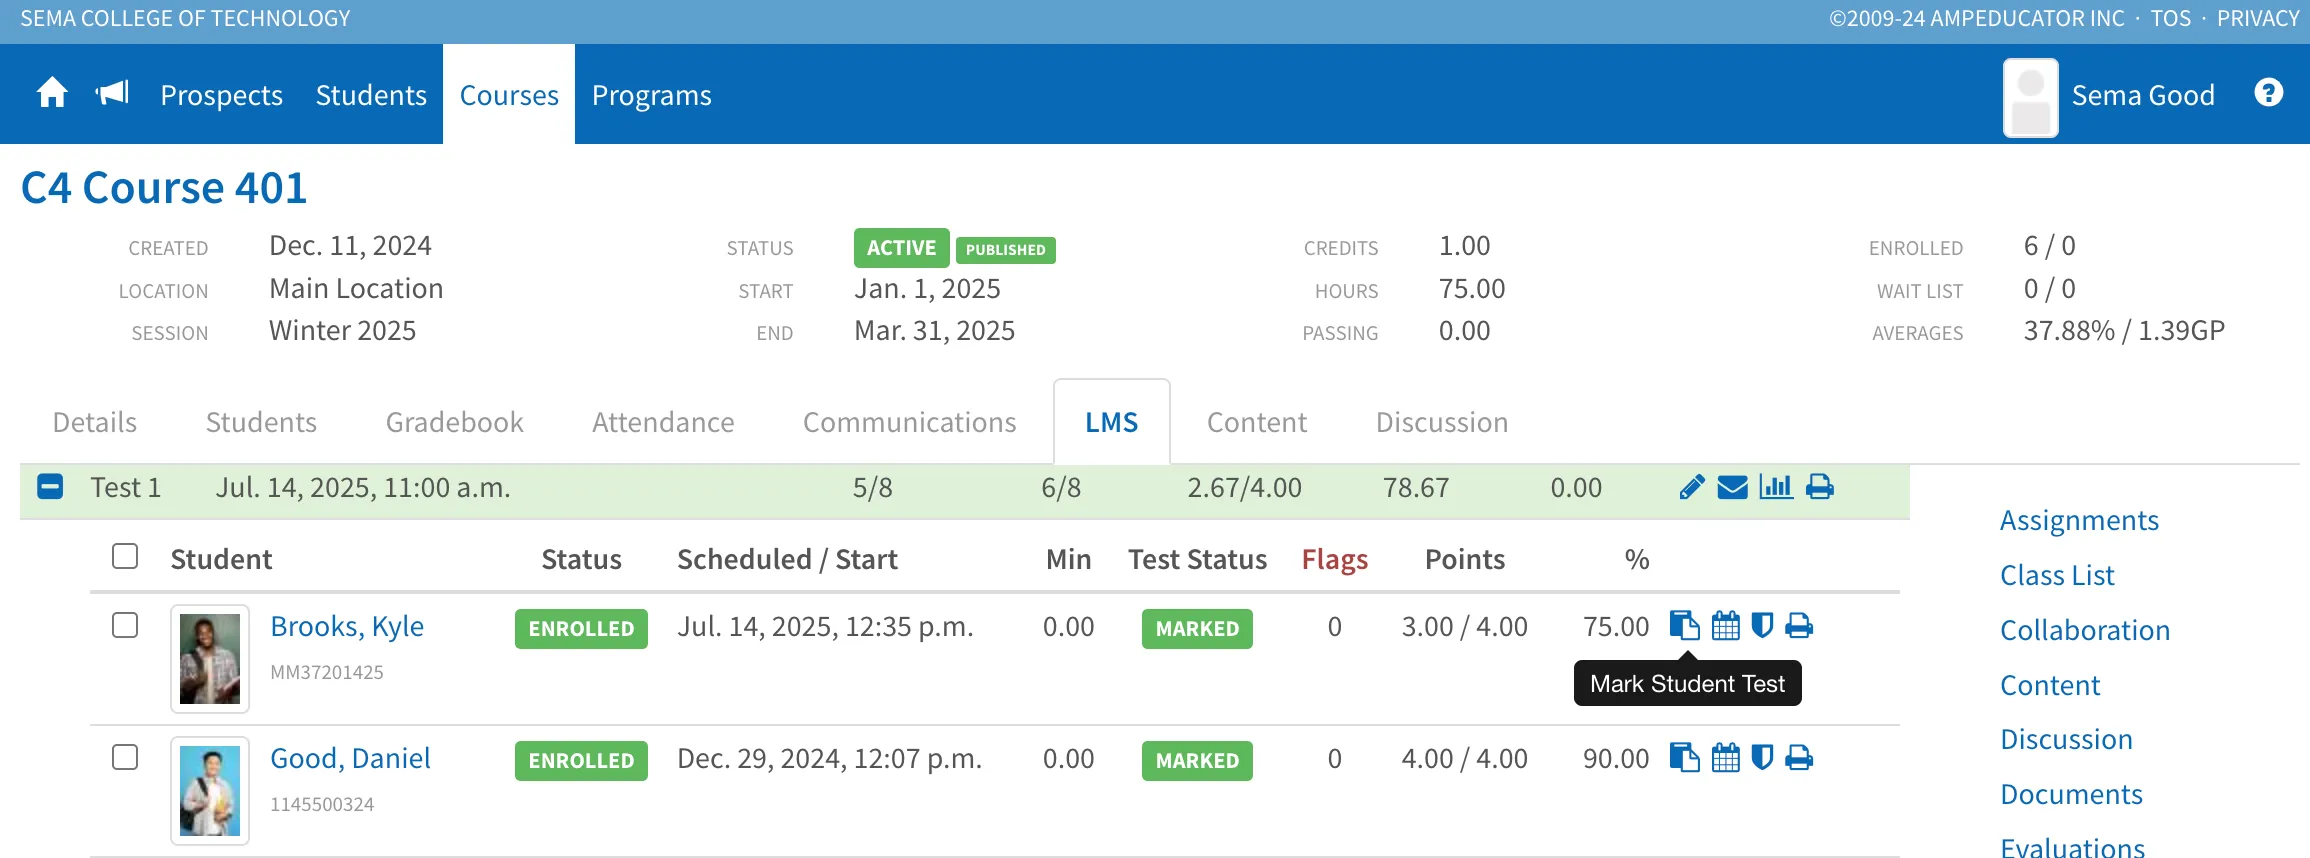
Mark Student Test
Tests can be automatically graded based on question types like multiple choice. However, if the test includes open-ended questions, you’ll need to review each response and assign points manually. The Mark Test icon allows you to verify proctoring settings, override grades, and leave comments for both the test overall and individual questions.
To start, click the mark icon next to a student’s name to open the full test attempt.
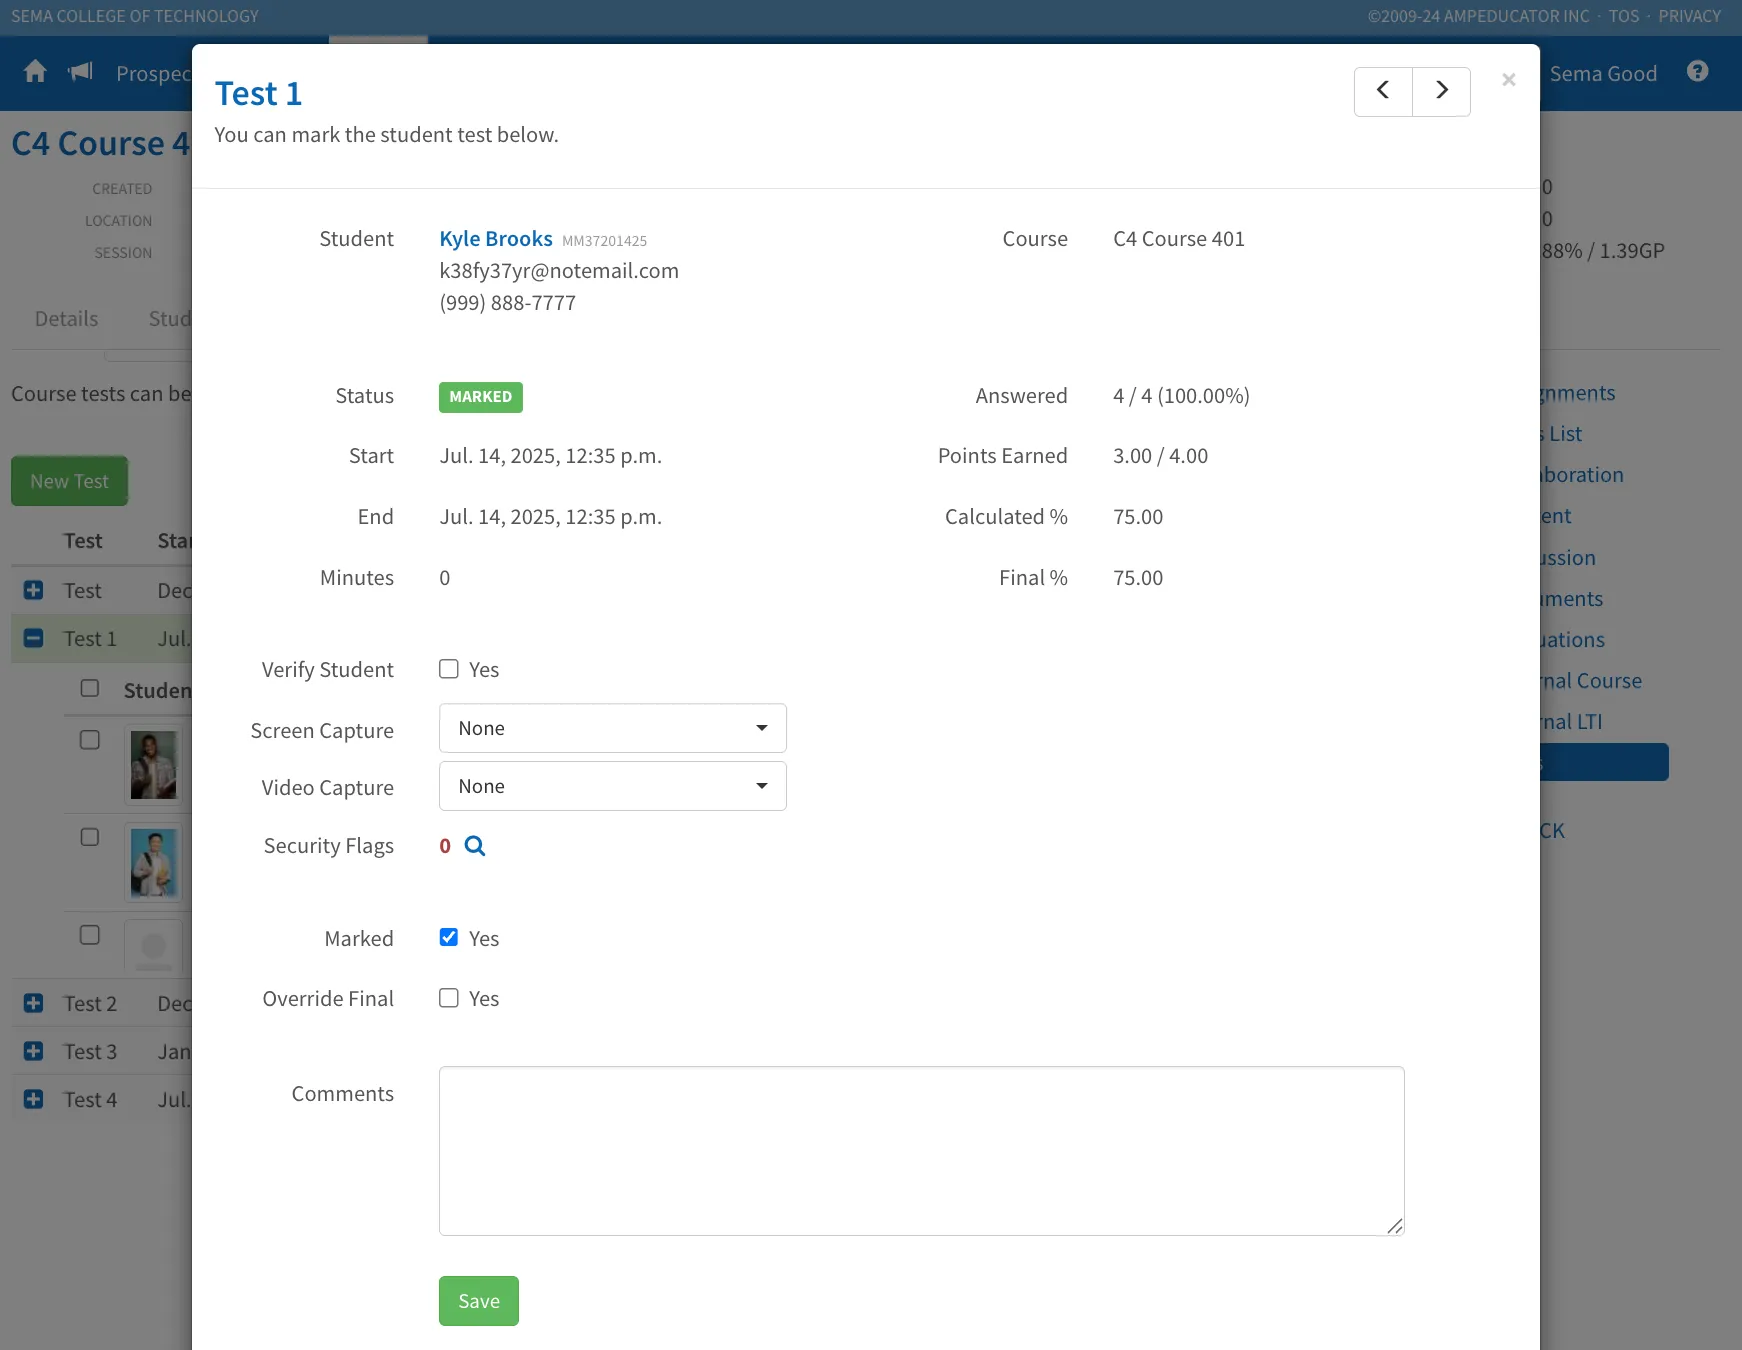
This modal shows the student’s start/end times, score breakdown, security options, and flags if proctoring was enabled. You can review or adjust the student's final score, override the grade if necessary, and add comments.
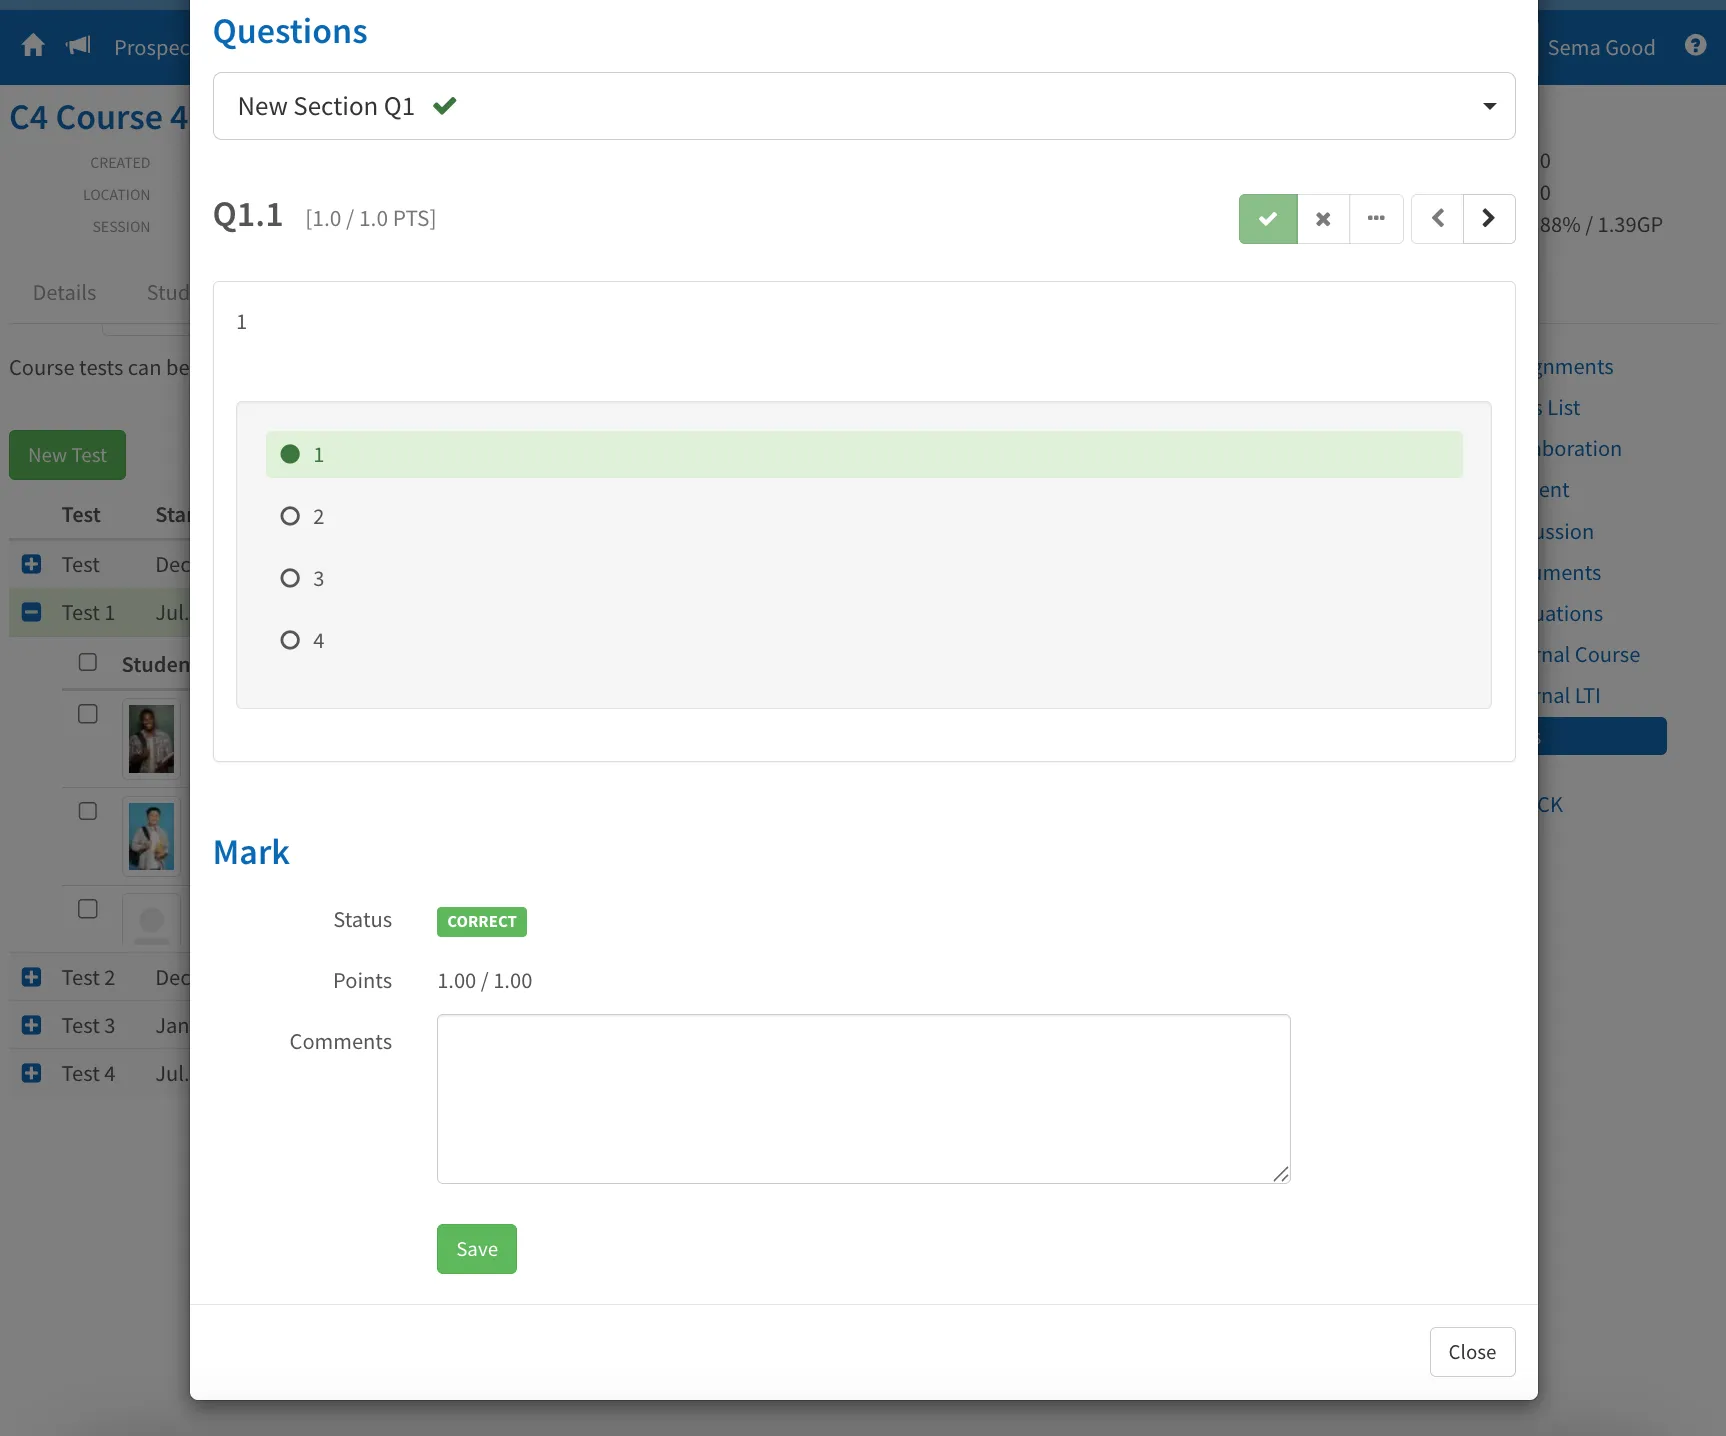
Click into individual questions to review answers, make manual grading adjustments, and leave additional comments where needed. This view is especially useful for open-ended or partially auto-marked tests that require instructor review before finalizing results.
Once grading is complete, click Save to update the student’s score. All changes will reflect immediately in the test record and Gradebook.
Reschedule a Student Test
If a Student needs more time, a new window, or a full reset to retake a test, you can use the Reschedule Student Test icon.
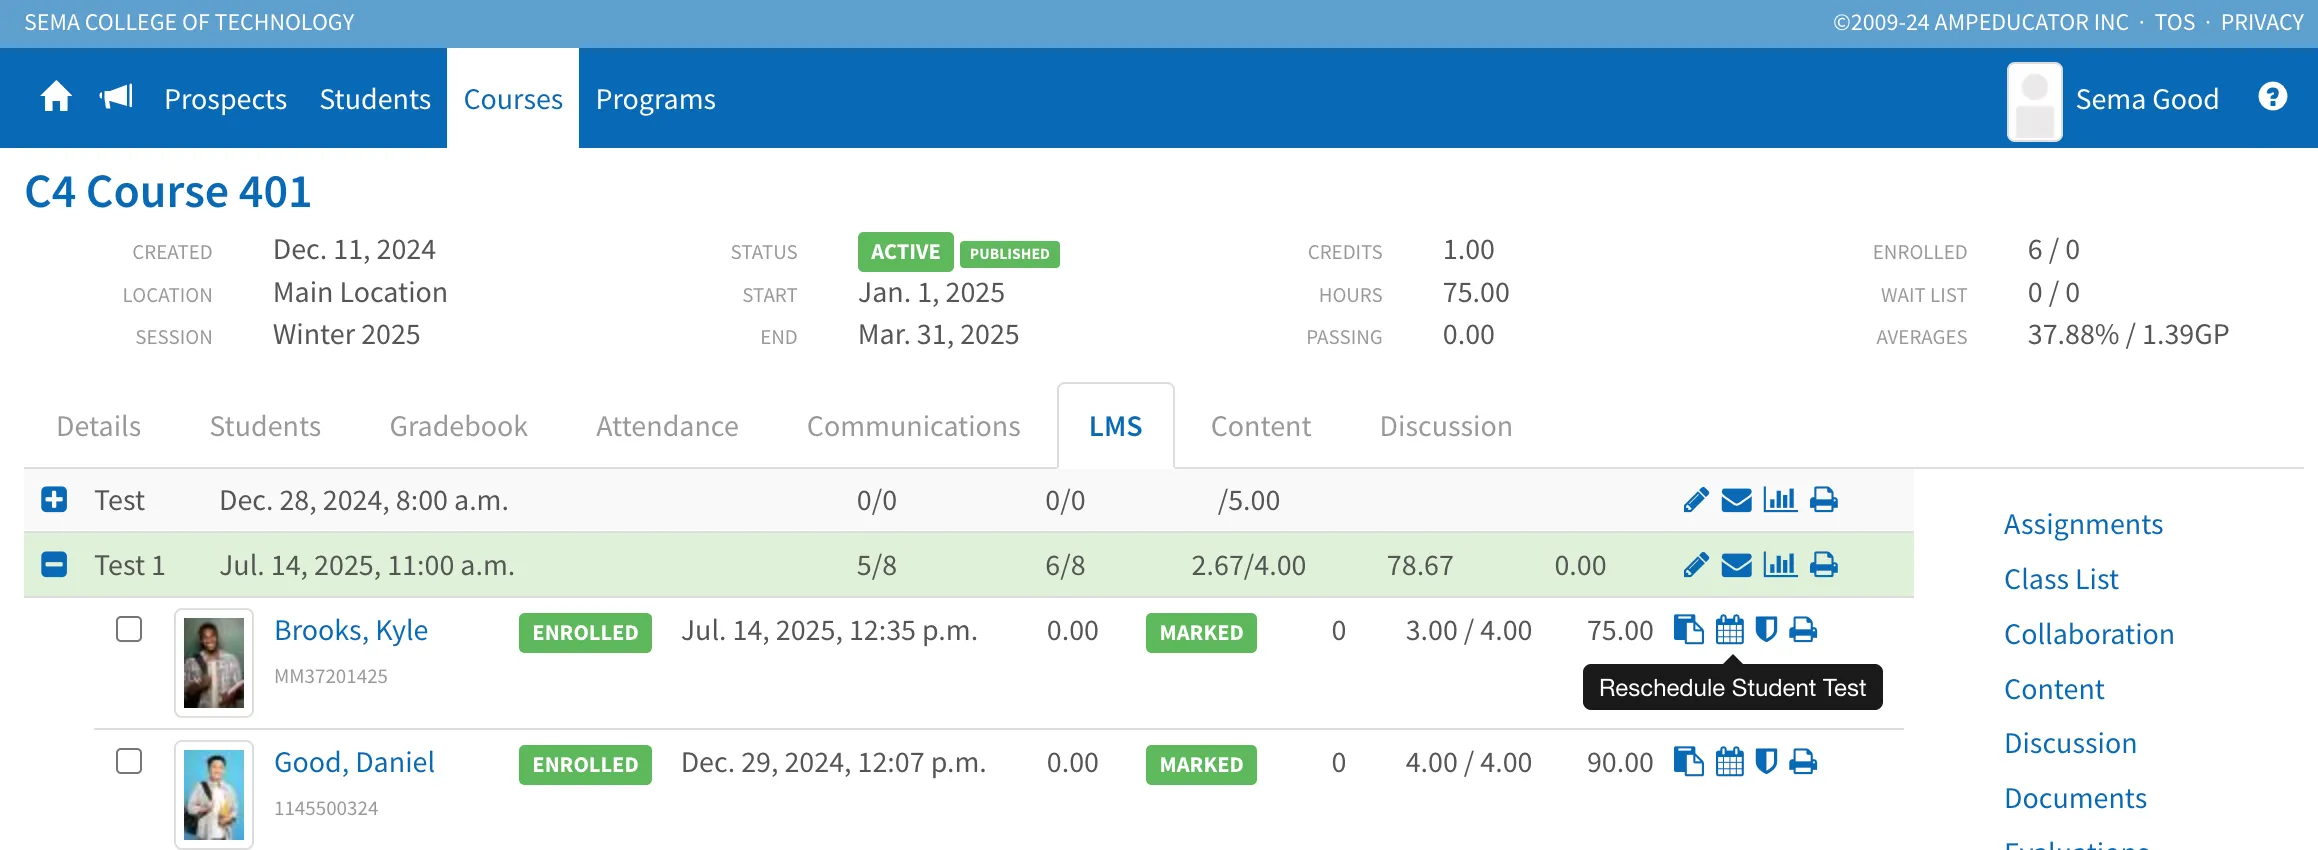
This feature gives you several options depending on the situation, including simply extending the window or fully resetting the attempt.
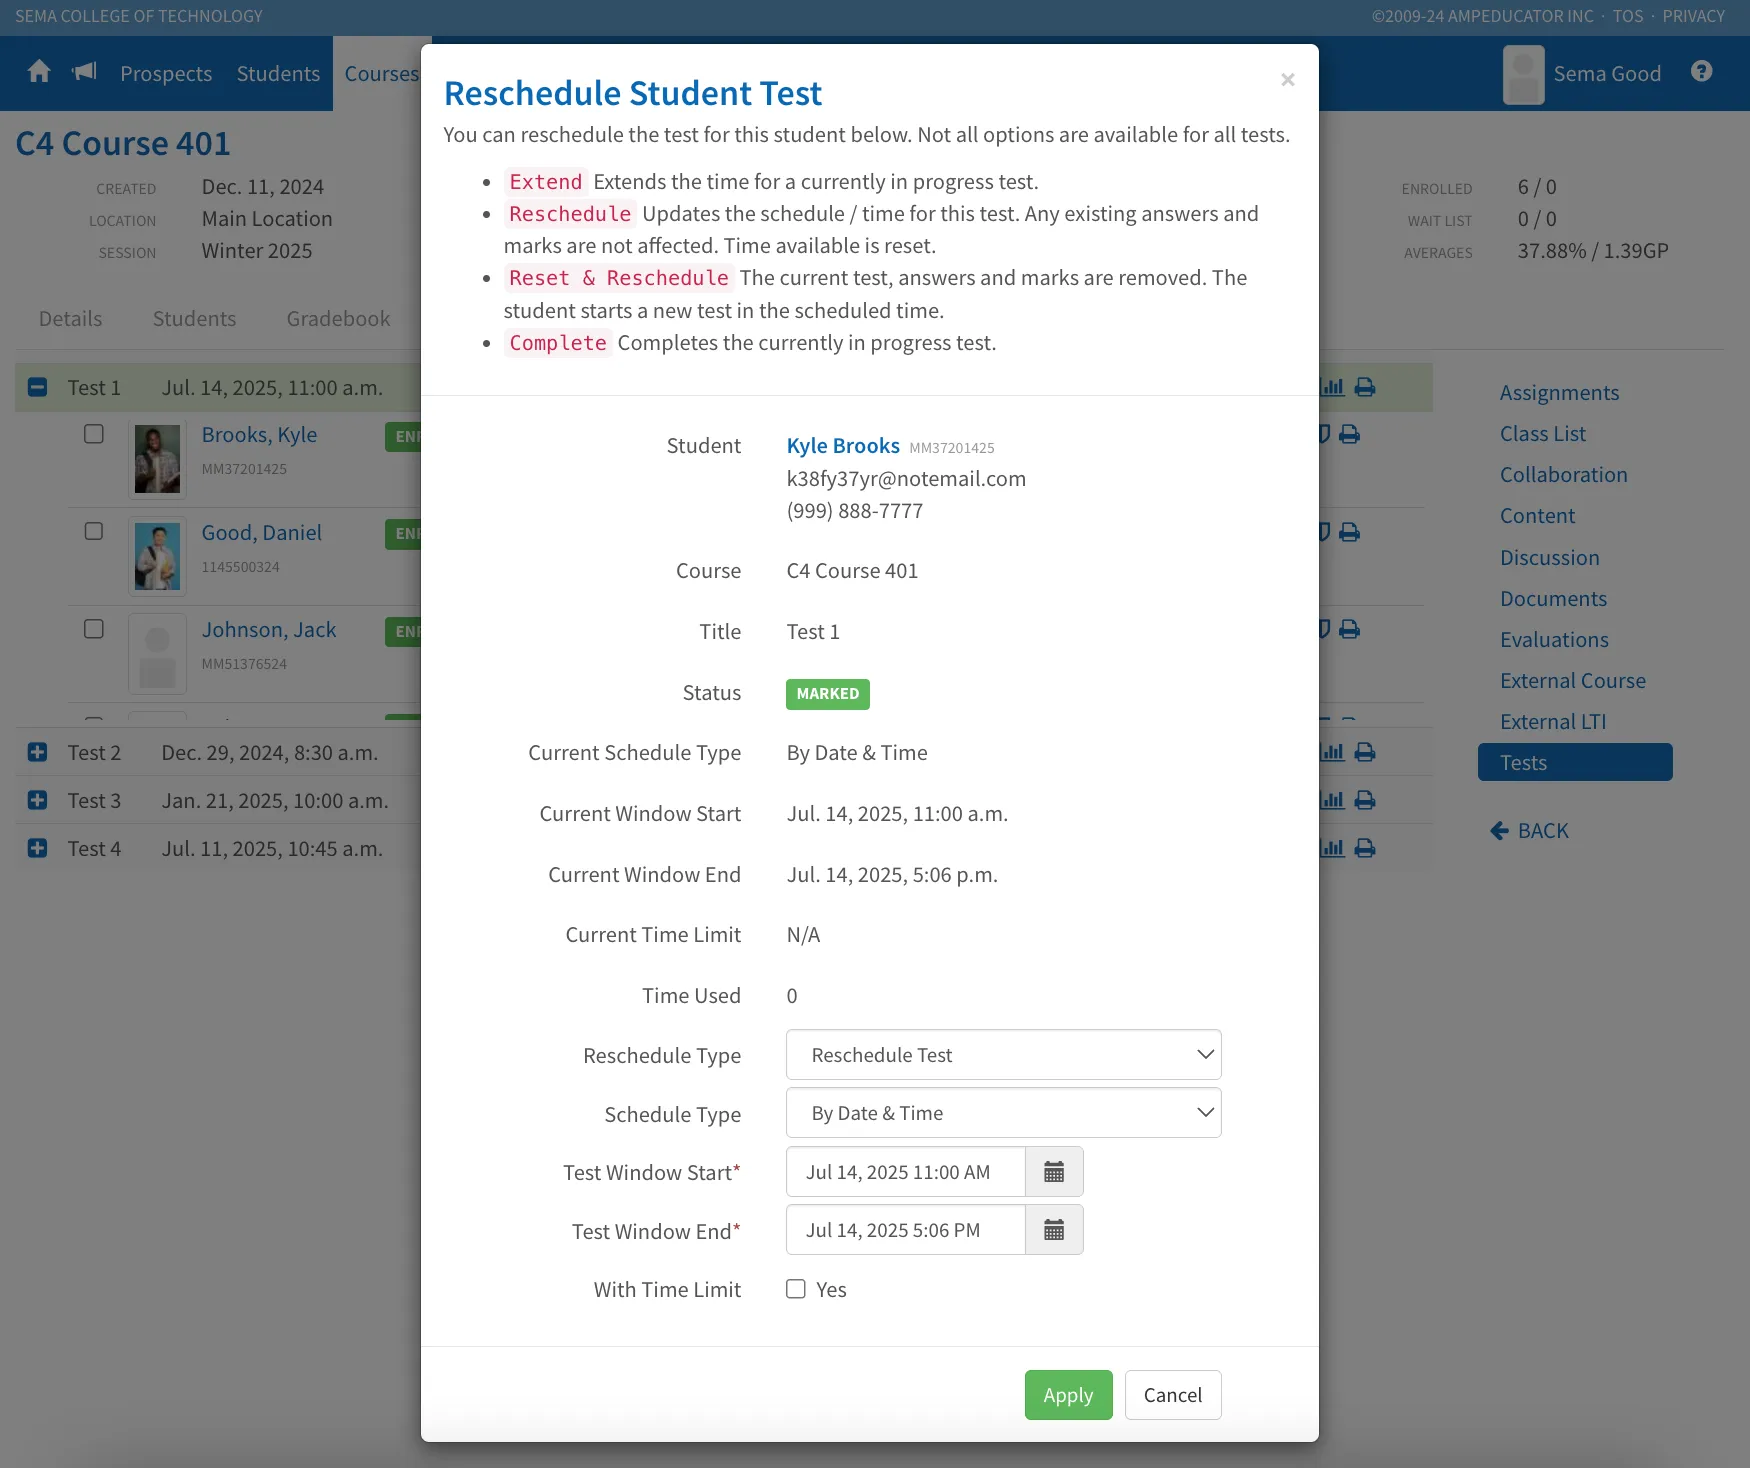
Options include:
- Extend – Allows more time for a test already in progress.
- Reschedule – Changes the schedule for a test. Existing answers and marks stay intact.
- Reset & Reschedule – Clears all answers and marks so the Student can start fresh.
- Complete – Finalizes a test that is still in progress.
You'll also be able to select the test window (start and end), add a time limit if needed, and choose between a fixed schedule or an open window.
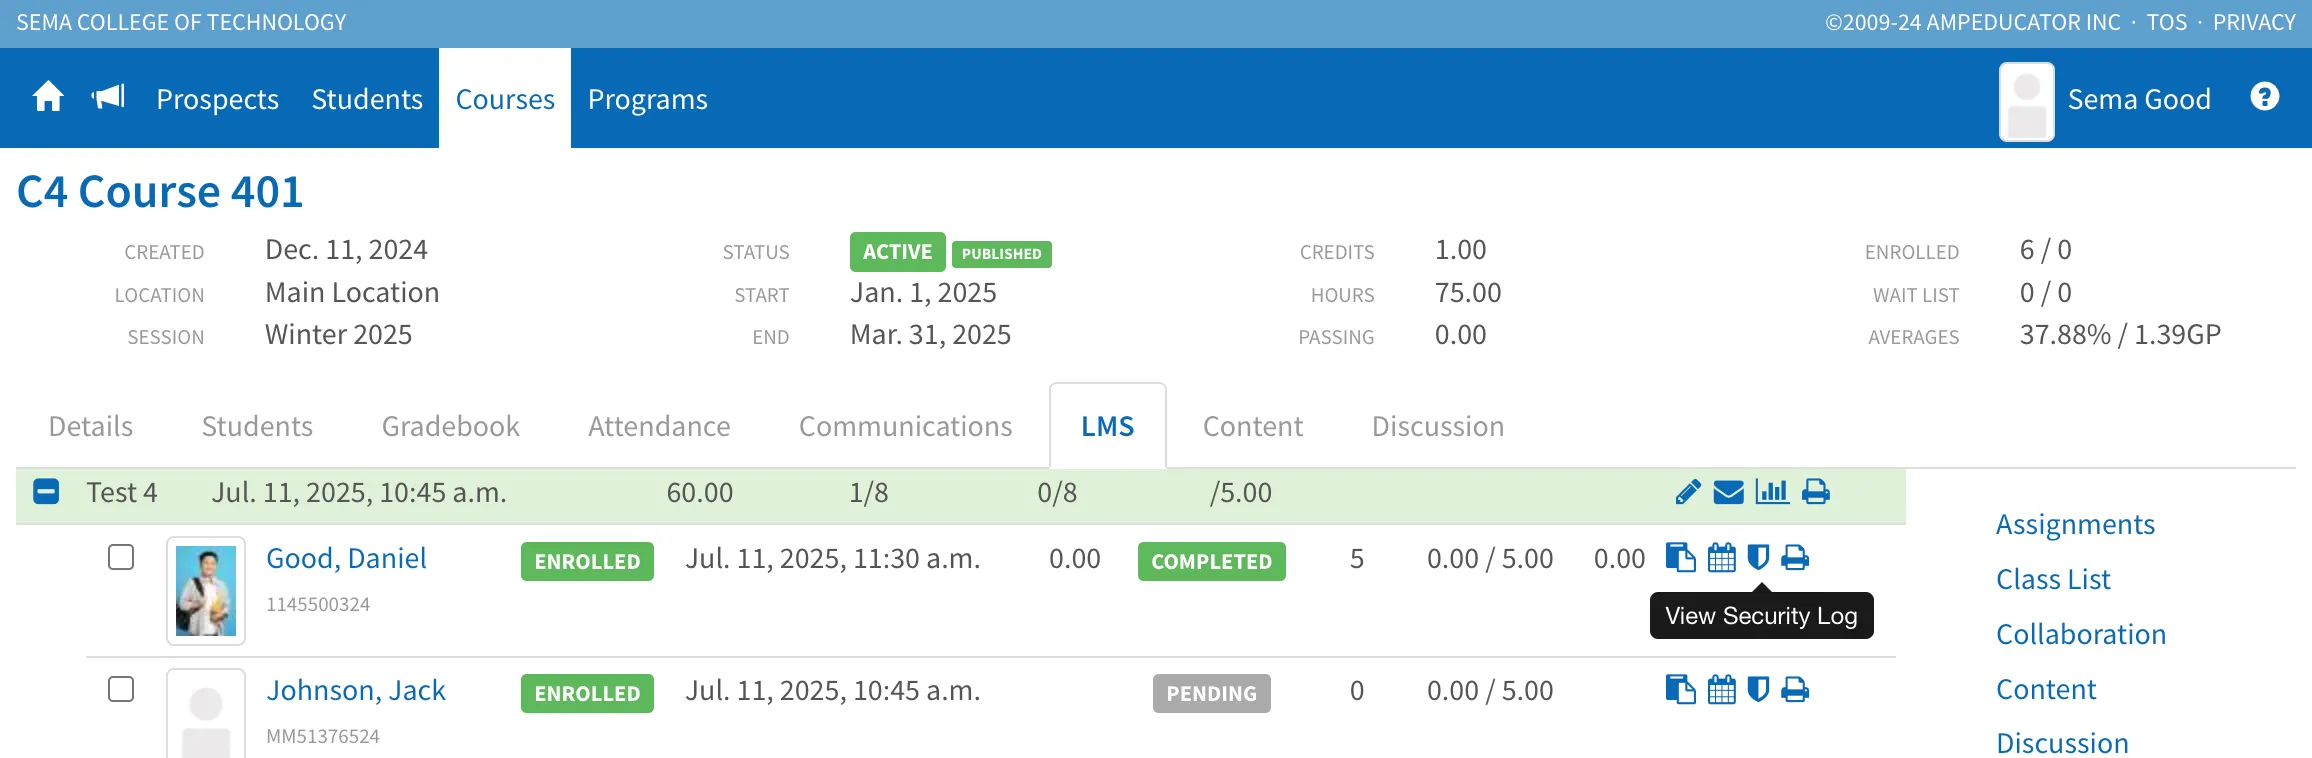
View Security Log
To see the full activity history for a Student's test, click the Security Log icon.
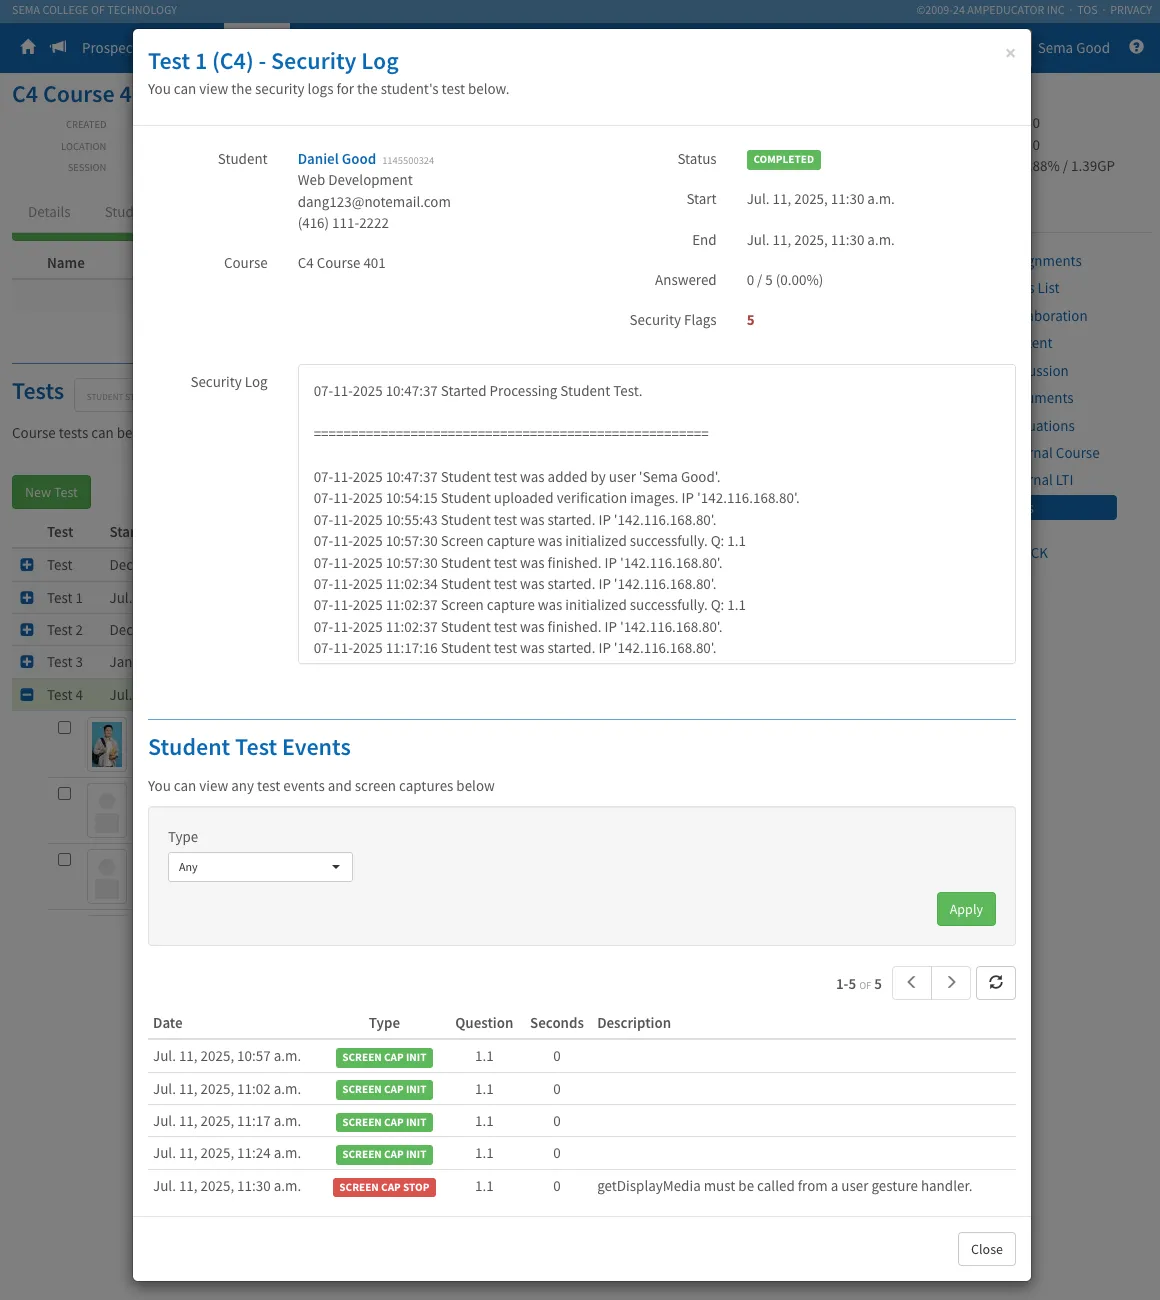
A window will open showing:
- Student Info: Name, contact, course, and test status.
- Security Log: A timestamped list of key actions such as when the test was started, when screen capture was initiated, or if the Student left and re-entered the test.
- Security Flags: The number of potential issues automatically flagged during the test.
- Student Test Events: A breakdown of test-related events like screen capture initiations or errors, with time, type, and brief descriptions.
This tool helps you monitor test integrity and investigate any suspicious behavior if needed.
Print Student Test
To view a printable version of a Student's completed test, click the Print icon next to their name.
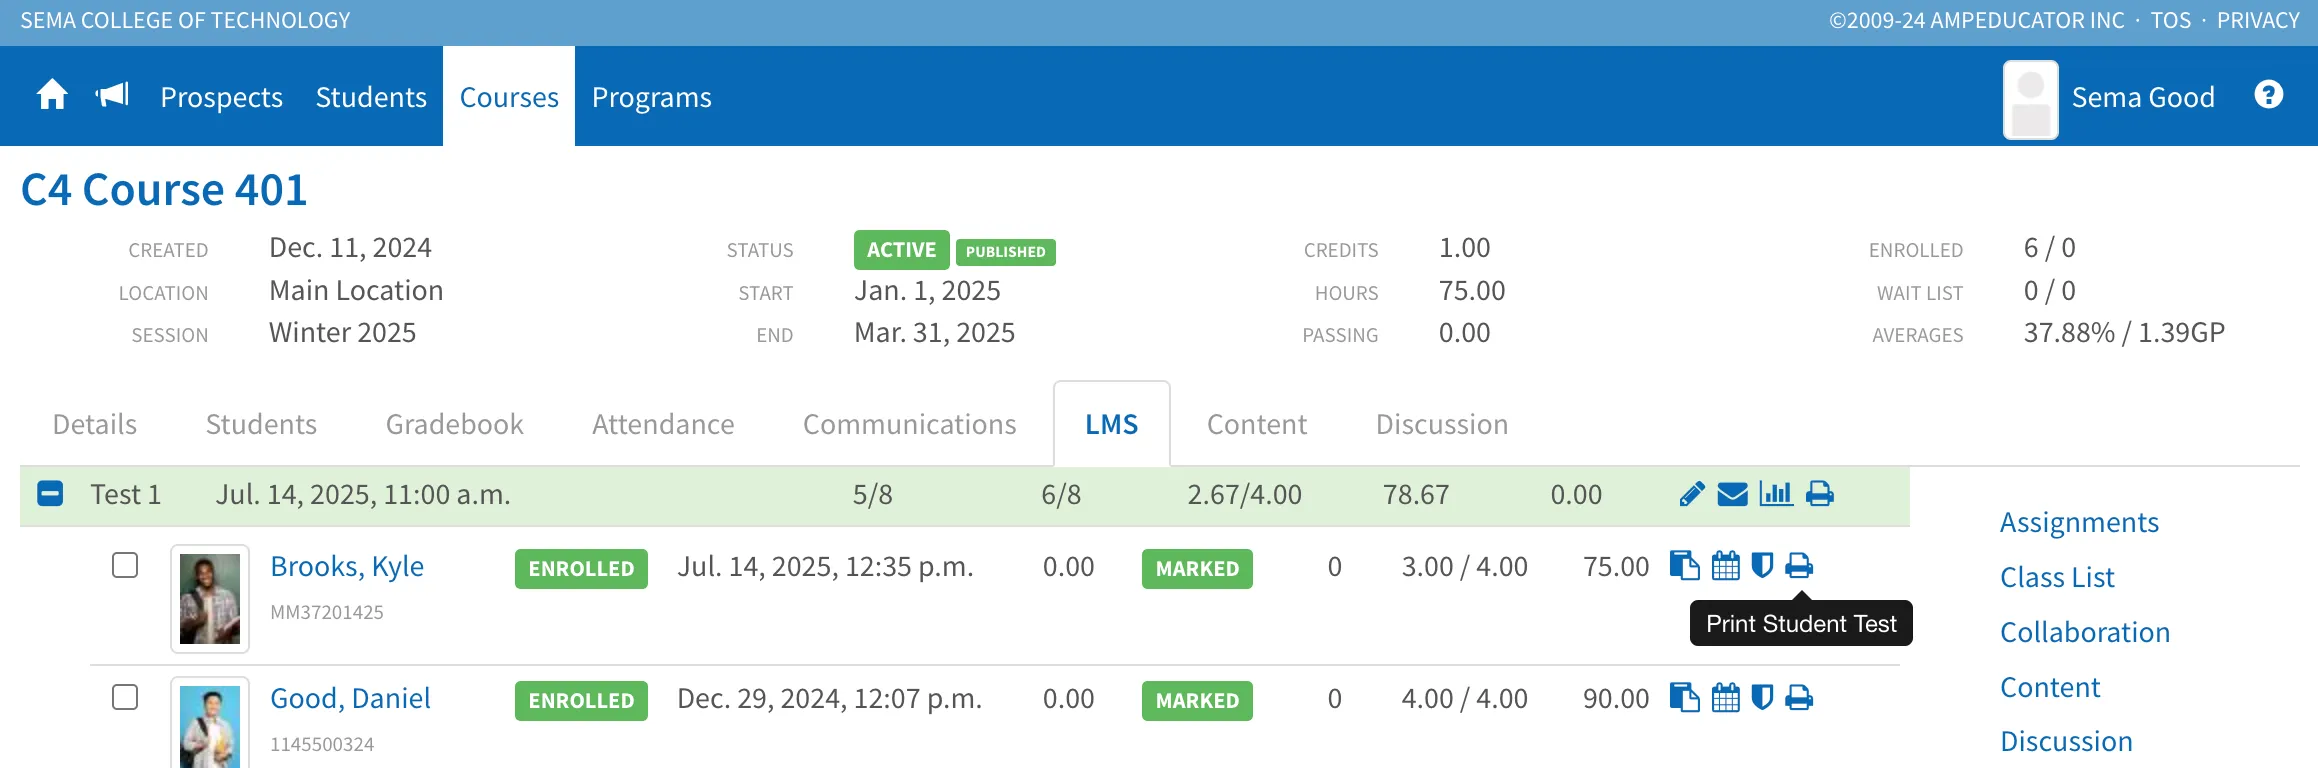
This opens a PDF version of the test in your browser, showing the Student’s selected answers along with any marks awarded.
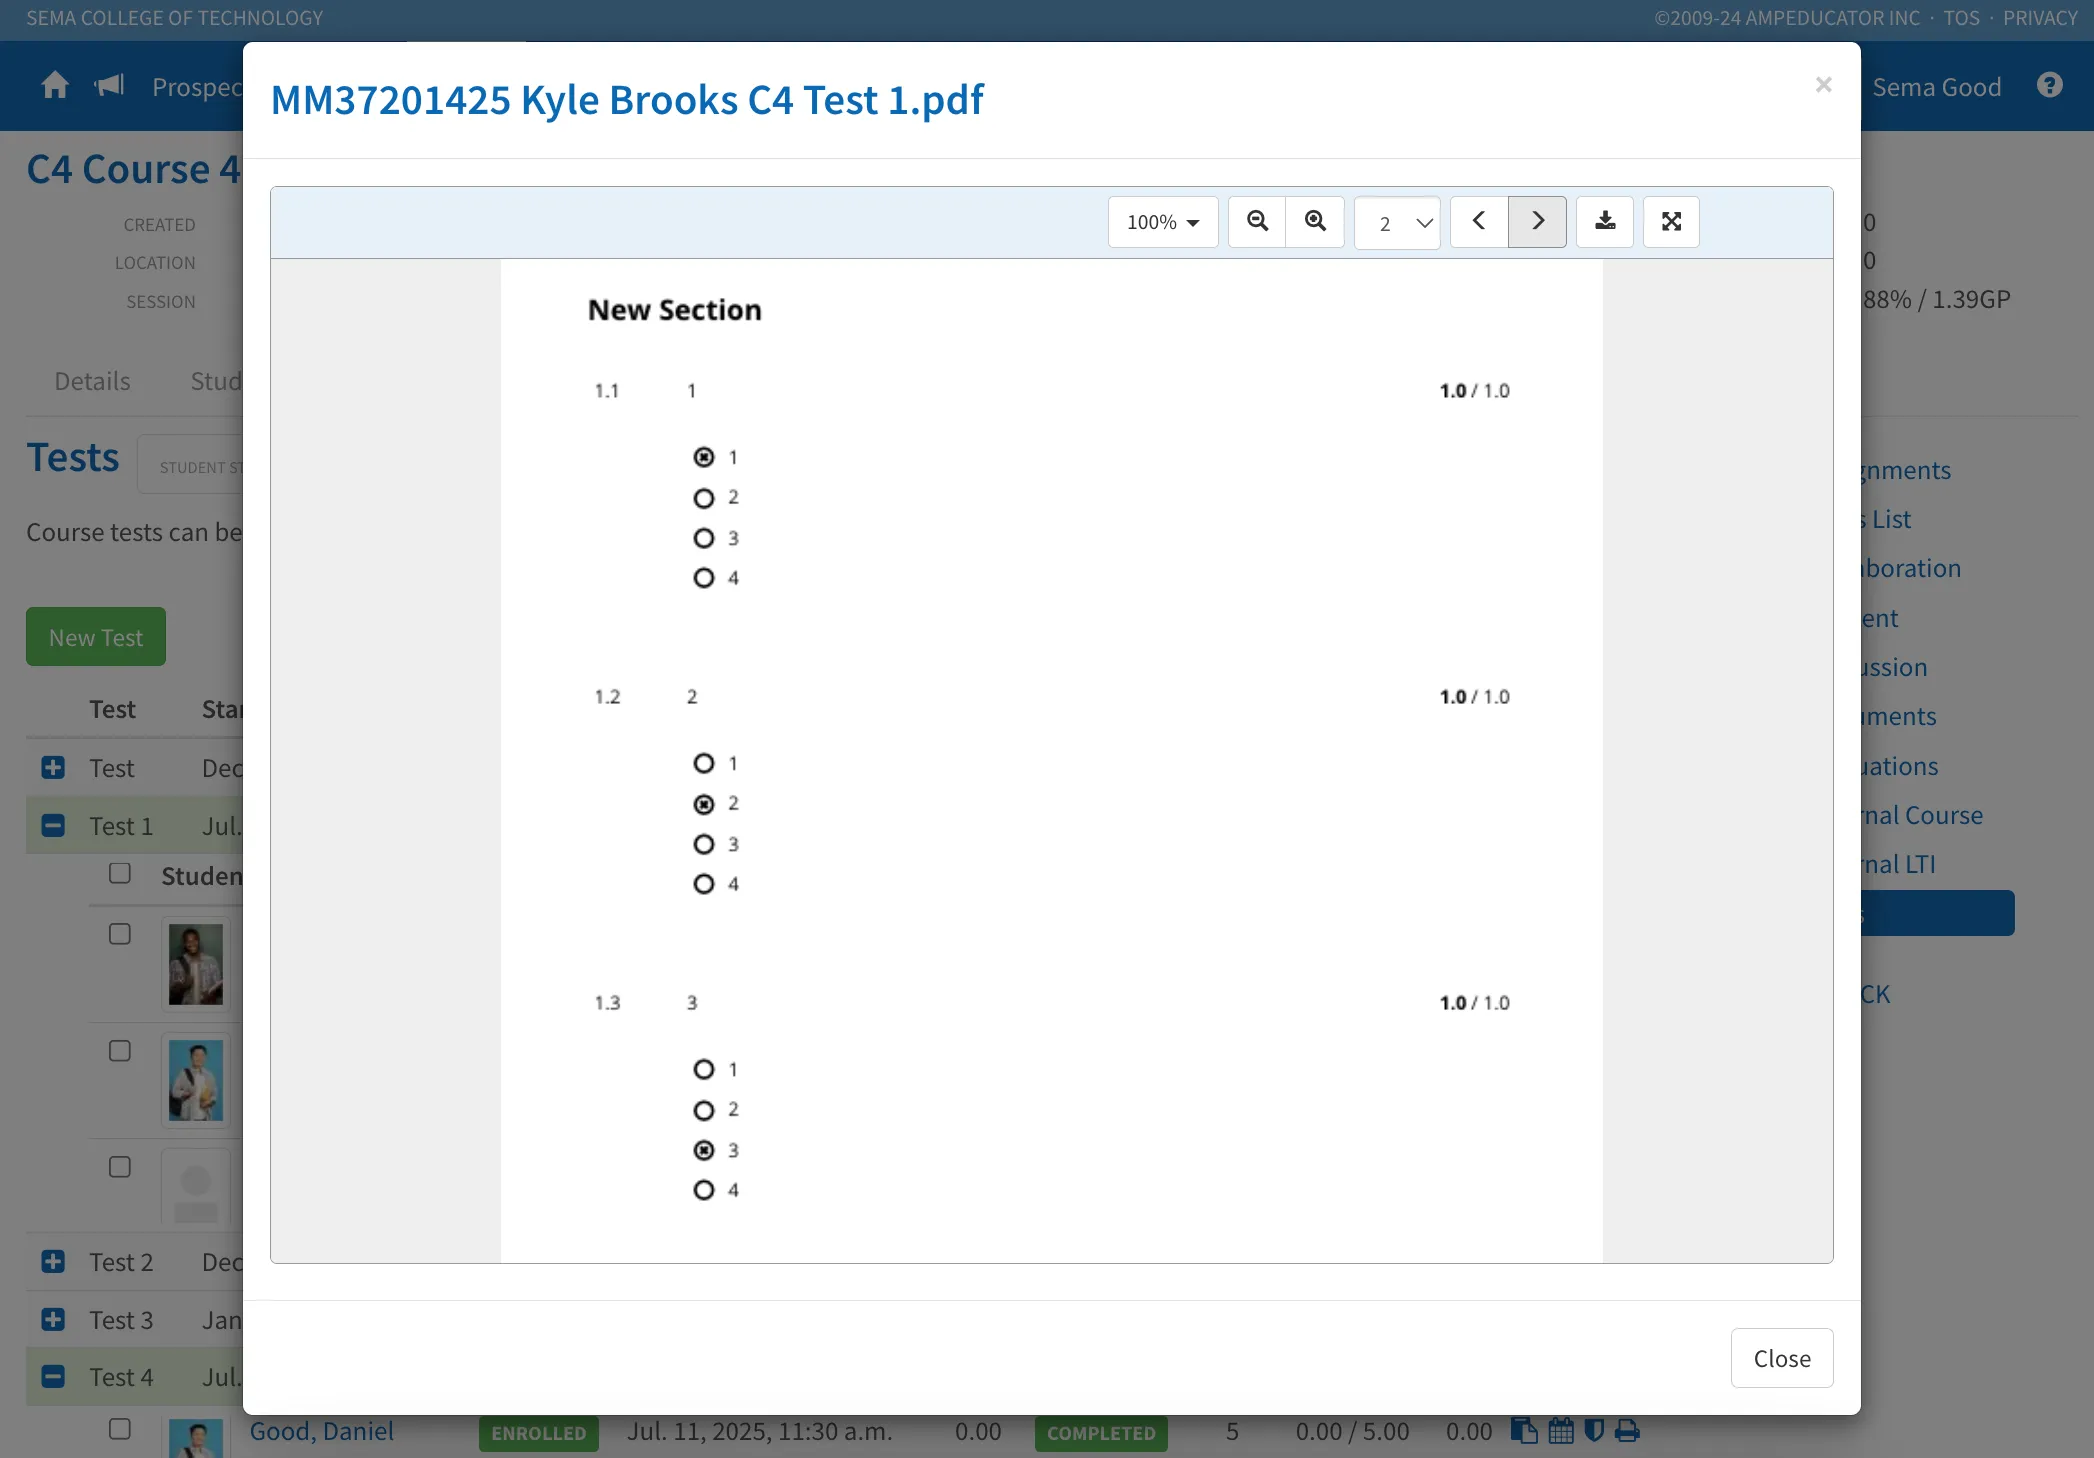
From here, you can:
- Review the test in a clean, easy-to-read layout.
- Download the PDF to keep a copy for your records or print it for offline use.
This option is helpful when you need a formal version of the test for documentation or sharing.
Test Access for Students
Students can access their assigned tests directly from the Student Portal. Once logged in, they can view the test’s details and click on the test link to begin. If proctoring is enabled, students will be required to authenticate their identity and grant permission for screen and video capture before starting the test.
Once the test is completed, the student will receive immediate feedback based on the test settings. If proctoring tools were enabled, a security review may take place before the test results are finalized.